Franchise
Intended for Company Admins - This article is intended for admin users in your company with the appropriate permissions to create and manage Franchise groups and users.
The Franchise module allows your company admins to give local franchisees permission to create and manage campaigns for their locations and only their locations, limiting their access to company-wide functions, among others. Franchisees may utilize templates, segments, and redeemables, but any they create or edit will not be visible to any other franchisee. They may create, run, and manage their own local campaigns during non-blackout dates. They may view feedback and analytics about their locations, but they may not view information about locations outside of their own.
Local campaigns are a great way for your stores to interact with their surrounding communities and can be very effective when used appropriately. Imagine running campaigns based on whether or not the local college sports team wins or loses or scheduling a graduation promotion on the date of the local high school graduation. These types of campaigns can only be created and managed at a local or regional level by your franchisee partners' employees.
Enable Franchisee for your brand - The Franchisee module must be enabled for you by Punchh. Contact your Punchh representative to get you started.
Add and Configure a New Franchise
Once your company has been enabled, you may then set up new Franchisees by navigating to Administration > All Users, Roles and Permissions as detailed below. You'll first create a new franchisee, giving a name to the collection of locations belonging to a particular franchise owner. Then, you'll add the associated locations and/or location groups and add Admin users who may create content for those locations.
As stated above, think of a "Franchise" as a collection of locations and employees that fall under a particular franchise owner. Some franchise owners may run 100 stores, while others may only have one store.
-
Navigate to Administration > All Users, Roles and Permissions > Franchises.
-
Click the New Franchise at the top right.
-
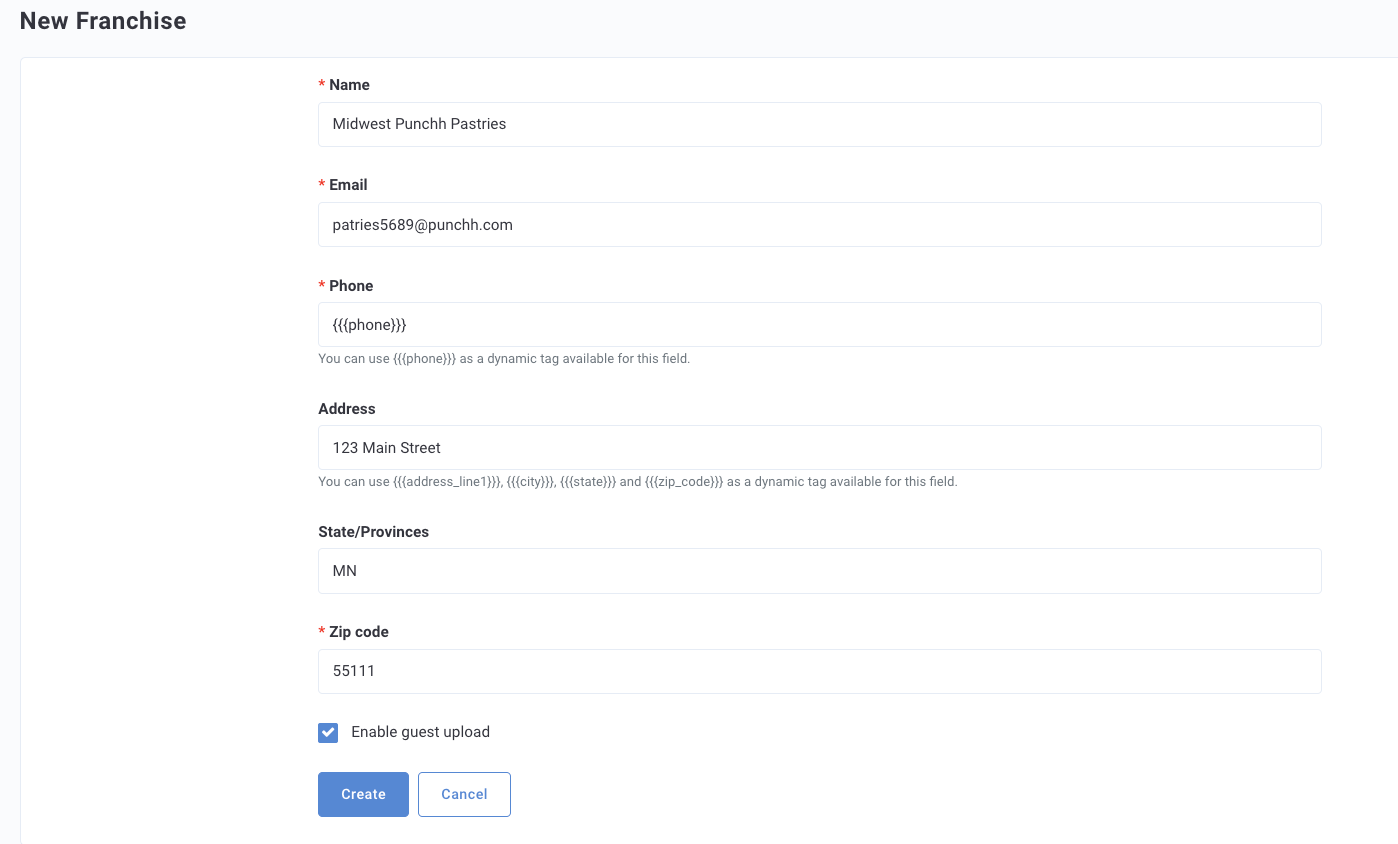
Choose a name for the Franchise and complete the following fields:
Name
You may want to name your new Franchisee based on the name of the franchise owner, such as "John Smith's Stores"; a particular region, such as "Southern California", or by specific store numbers such as "Stores 100, 143, 155, 431".Email
Most likely the email address of the franchise owner. If your franchise owner is already a Punchh user, you should choose a different email for this new Franchisee.Phone
Contact number for this particular franchisee group. This is only visible to users associated with the Franchisee and company admins.Address
Mailing address for this particular franchisee group. This is only visible to users associated with the Franchisee and company admins.State
As part of the address, you may include a state associated with the Franchisee.Zip code
Choose any zip code associated with the Franchisee group.Enable guest upload
Checking this box enables admin users belonging to this Franchisee group to upload eClub lists. -
Click Create when finished.
Once you've created a new Franchisee, you'll need to assign admin users and associated locations. Follow the steps in the sections below:
Designate Admin Users
Admin users associated with a Franchisee group may perform various actions limited to the Franchisee locations. To associate/designate a user to a particular Franchise, you'll need to update their user profile. If creating a new user, the same process applies.
- Navigate to Administration > All Users, Roles and Permissions.
- Click on the name of the user you want to associate.
- Click the Role drop-down and select the appropriate role that allows for Franchisee permissions.
You may have created a user role specifically for Franchisee users, but any user role with the Franchisee permission set turned on may be used. - Click the Franchise drop-down and select the appropriate Franchisee group.
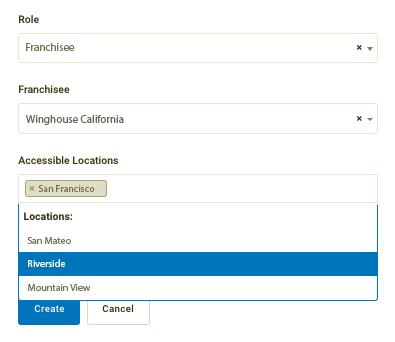
- Leaving the Accessible Locations field blank defaults the user's access to only those locations associated with the Franchisee. You may enter specific locations here to further limit a user's access (such as store managers, for example) to only those locations within the Franchisee group.
Associate Locations
Franchisee users may only run campaigns and view information for locations associated with their Franchisee group. You can add a location to a Franchisee by editing the location's settings. If creating a new location, the same process applies.
Warning: You MUST assign a location to all franchisees to ensure they have restricted campaign access. If no location is associated with a franchisee they will be able to create/edit/delete all campaign templates.
- Navigate to Store Locations > All Store Locations.
- Click the name of the location to associate.
- Click the Franchise drop-down and select the Franchisee group.
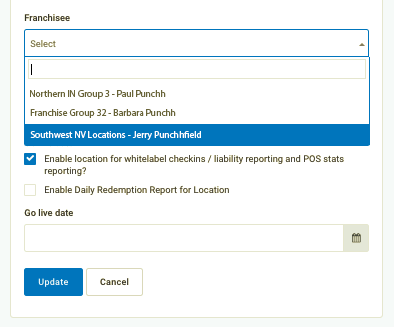
- Click Update when finished.
- Repeat this process for each location belonging to the Franchisee.
Franchise User actions
Franchises are limited to the following actions:
| Franchisees may... | Franchisees may not... |
|---|---|
|
|
Email Templates
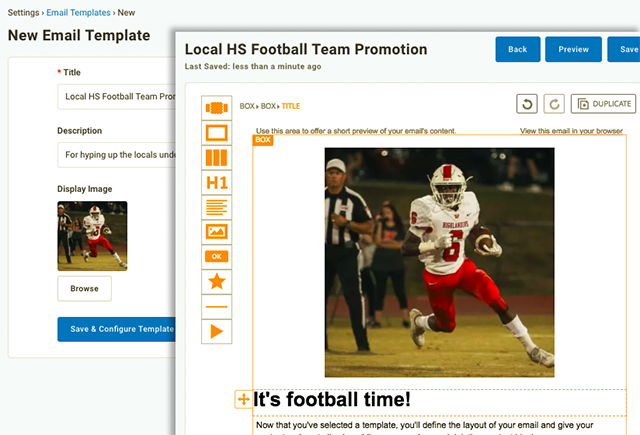
Franchisees can create and use email templates to use for messaging in their campaigns by navigating to Marketing Automation > Email Templates. When creating a new template, they may use any of the default templates to start from. Franchisees can only see templates they've created themselves and will not see any templates created by company admins or other Franchisee users. However, any template created by a franchisee is visible to company admins.
What segment types are available to Franchisees?
The following segment types are available for Franchisees to create and use in campaigns:
Guest Checkin, Guest Profile Based, Top N Spenders, Top N Loyalty Guests at each Location, First N Loyalty Guests at each Location, Total Referrals, Total Redemptions, Total Feedback, Only Visited with Discount, Average X Visits, Referred Guests, and eClub Guests.
Company Admin Actions
In addition to creating, managing, and setting permissions for franchisees and their subordinates, company admins may edit any of their campaigns, control which campaign templates they can access, and set blackout dates during which franchisees (and any other user in the Punchh system who doesn't have the permission) may not run any campaigns.
Edit Campaigns Created by Franchisees
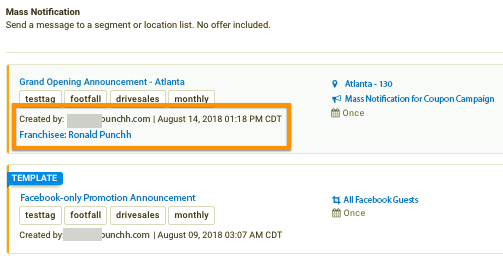
When a franchisee creates a campaign, it can be viewed and edited by the franchisee and by company admins. Franchisee-created campaigns are easily identified by the "Franchisee:" log line, naming the franchisee it belongs to. (See the image below)
To edit a campaign:
- Navigate to Marketing Automation > Campaign Management.
- Click on the name of the campaign you want to modify.
- Click the More Options drop-down at the top right and select Edit
Manage Access to Redeemables
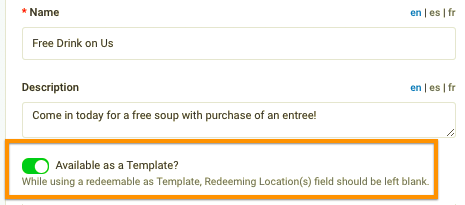
Franchisees may only make use of redeemables that have been set as templates by a company admin. To set a redeemable as a template, navigate to Offers > All Redeemables, click the name of the redeemable to edit its settings, and then click to set the Available as a Template toggle to the green "On" position.
The ability to set a redeemable as a template becomes available only after the first Franchisee has been created for your business.
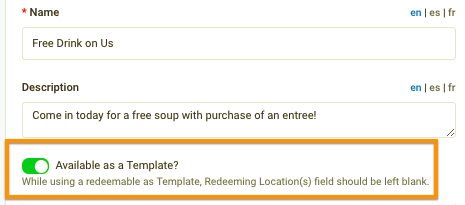
Franchisees may not edit redeemable templates though they may create a duplicate of a template and then edit the copy.
Manage Access to Campaign Templates
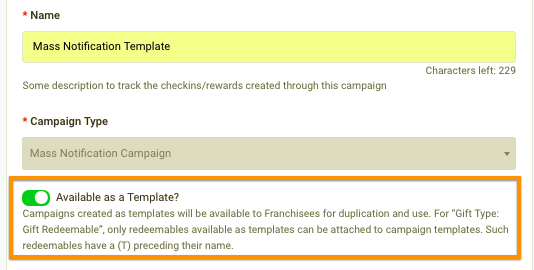
You can control access to which Campaign Templates specific franchisees can see by associating the template with a location group. Templates that include any locations associated with a franchisee will be available to them. Templates that are not associated with any of a franchisee's locations will not be visible. If you set up your campaign template using a Segment instead of a Location that template will be available to all franchisees. The ability to set a redeemable as a template becomes available only after the first Franchisee has been created for your business.
Set a campaign as a template by editing its settings as seen below.
Set Blackout Dates
Blackout Dates are a way for your company to block off certain time periods prohibiting some users from running campaigns during that window. For example, this is useful for when your company is deploying a global campaign targeted to all of your locations and you don't want any local franchisee campaigns to get in the way. Blackout Dates work well in the Franchisee setup but this feature is useful for businesses of all types as a standalone feature. Review Blackout Dates for details on how to set these up.
Add a New eClub Source for Franchisees
Franchisees cannot import their own eClub lists but they may use your company's eClub iFrame Widget on their own page(s). Franchisees may find the iFrame widget useful for local campaigns such as providing an in-store tablet allowing guests to sign up for your eClub. Learn more here: eClub Widget (iFrame)
