Segments
As of July 15, we’ve changed the way we talk about the people who interact with your brand with some updated terminology:
- Guest: Someone who’s placed an online order or signed up for marketing emails, but hasn’t joined your loyalty program.
- Member: Someone who’s officially part of your loyalty program. You will see these changes reflected in the naming and descriptions of some segment types.
Segments are lists organized by guest attributes defined by rules. These segments are based on collections of rich data about guests and members that can help influence and inform your marketing strategies. You can use these curated segments as analytics tools or to target your campaigns and messaging to specific audiences.
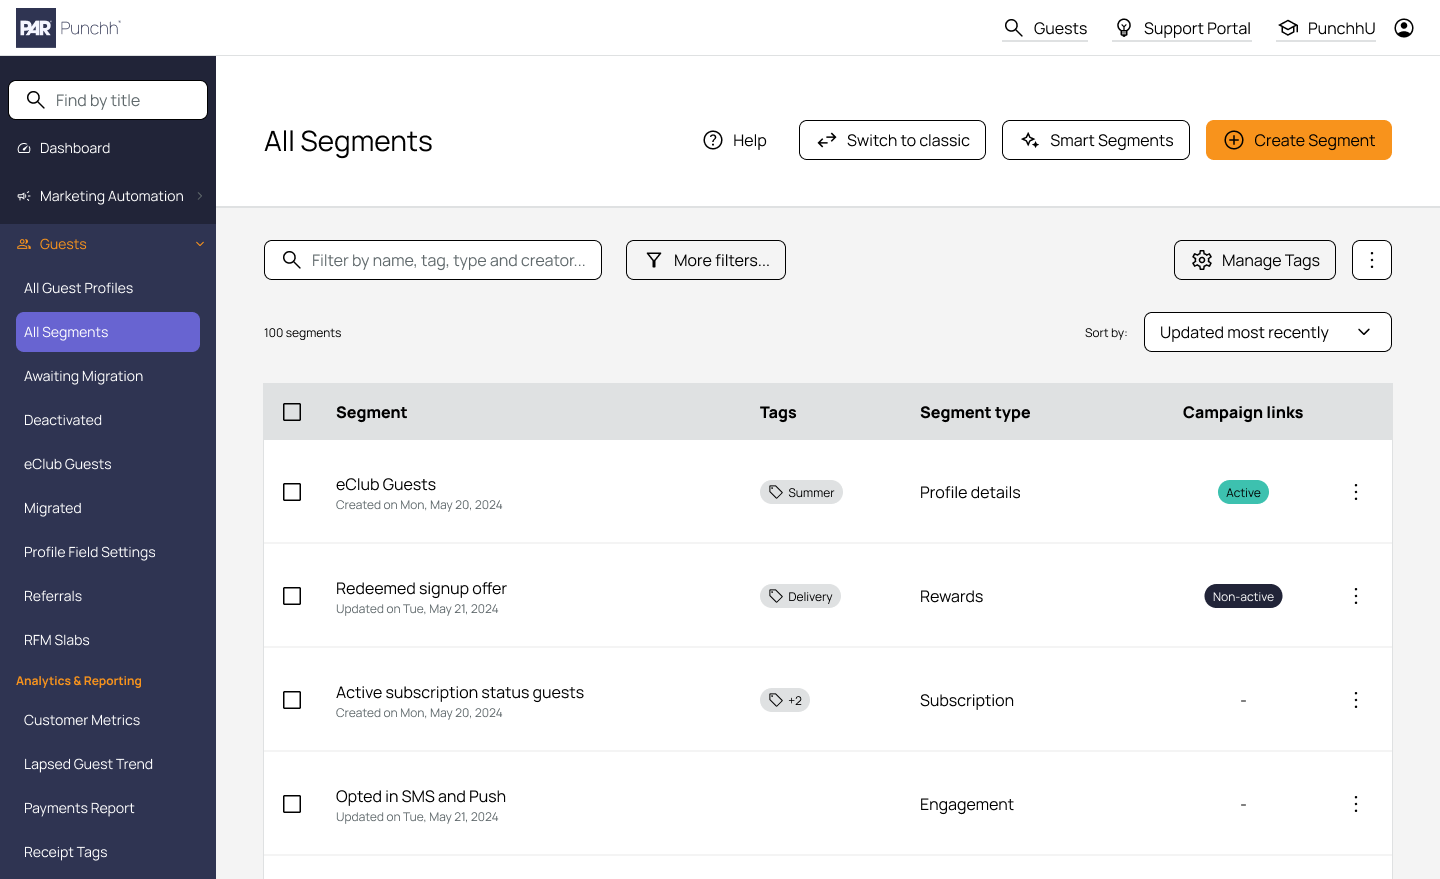
Create a Segment
- Navigate to Guests > All Segments.
- Click on + Create segment.
- The New Segment edit page opens.
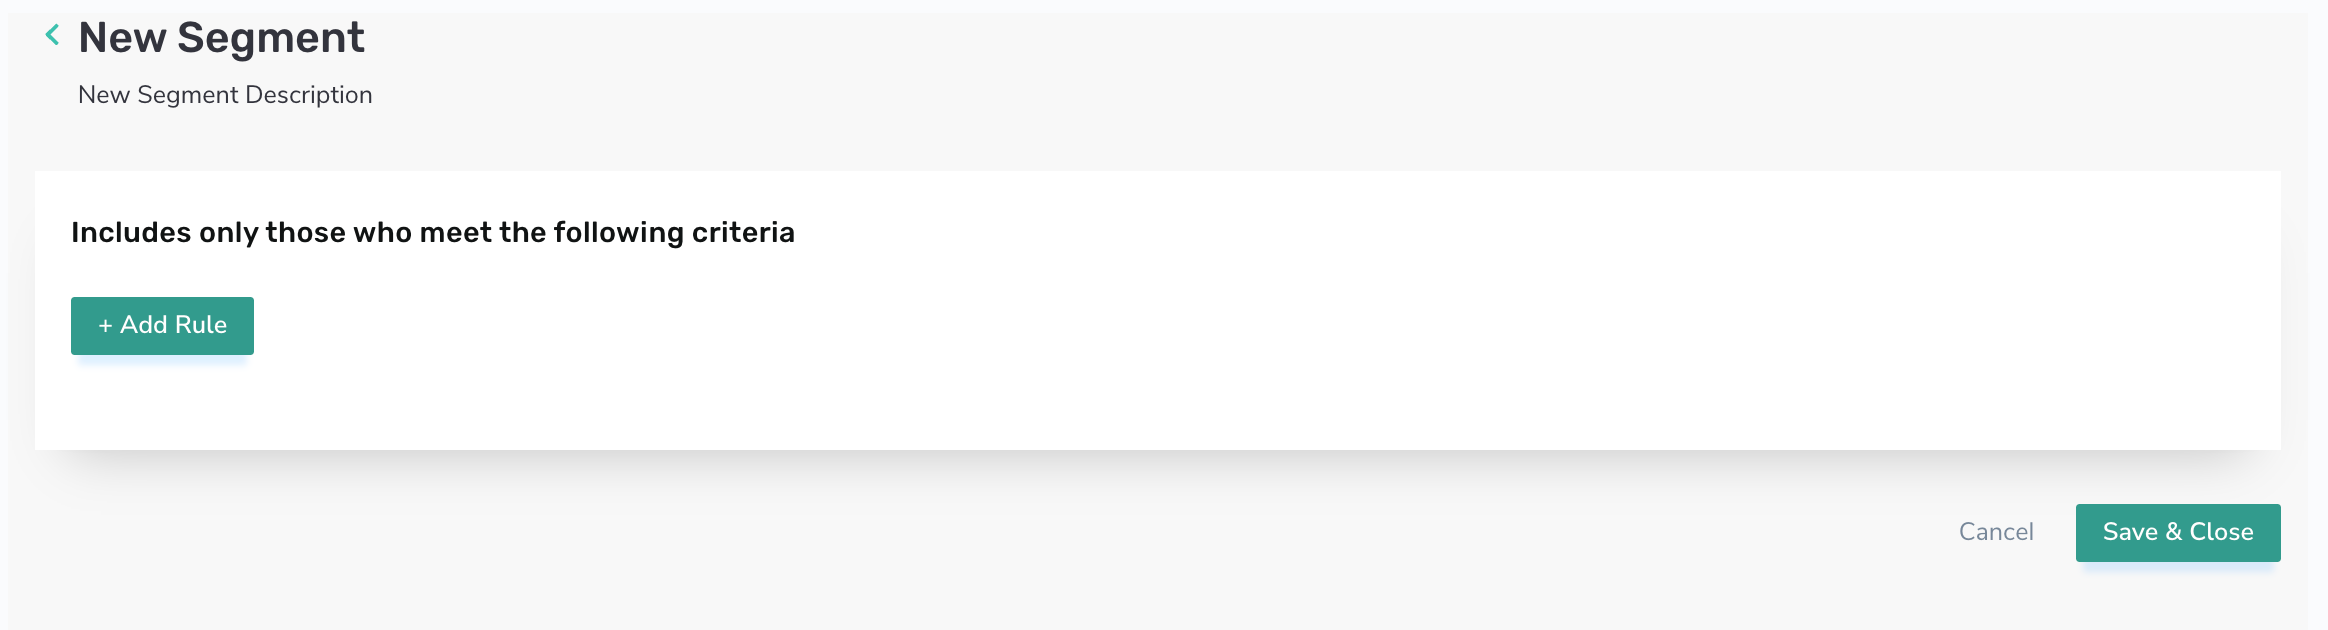
- Enter a name for the segment. Click on the name of the segment to edit. Or click on the pencil icon near the name field to edit it.
- Enter a name for the description. Click on the description to edit. Or click on the pencil near the description field to edit it.
- Click Add Rule.
Note: There is a limit of 40 total rules when creating a single segment.
- Choose a Segment Type. (Refer to Segment Types, Attributes, and Timeframe Definitions for details.)
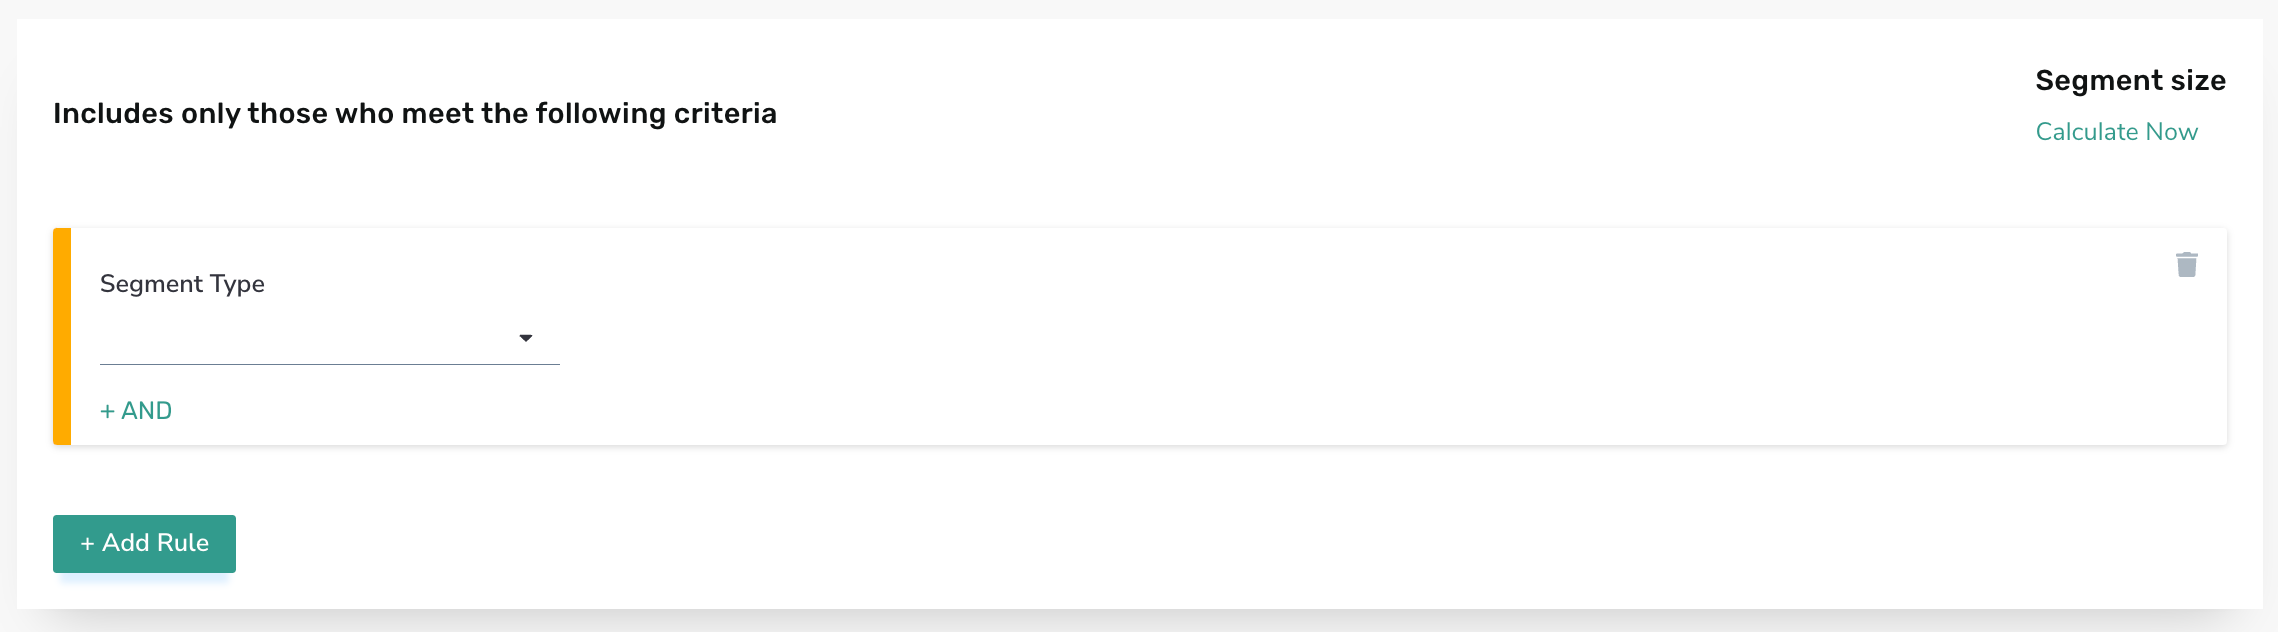
- Use the drop-down menu to scroll through the Segment Type options or use the search bar to search for keywords. You can search for both segment types and attributes. For example, if you want to create a segment with the member's age as a factor, type 'age' into the search bar. All segment types and attributes related to age will appear, such as Profile Details (type) > Age (attribute).
Note: Not all segment types contain attributes; see Segment Types, Attributes, and Timeframe Definitions for details.
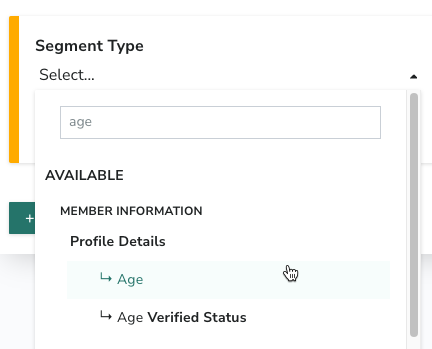
- Use the drop-down menu to scroll through the Segment Type options or use the search bar to search for keywords. You can search for both segment types and attributes. For example, if you want to create a segment with the member's age as a factor, type 'age' into the search bar. All segment types and attributes related to age will appear, such as Profile Details (type) > Age (attribute).
- On choosing a non-category segment, attribute definition fields appear instantly plus any then operator, duration, value, and/or timezone fields.

Membership Tiers: If you have Membership Tiers in your loyalty program, you will see the Membership Tier field, with Current and Lifetime as options, on some segment types.
- Current: Effective membership tier, calculated based on member interaction with the brand within a set timeframe; usually a year, resets on a specific date/anniversary date.
- Lifetime: Operative membership tier, calculated based on total points that contribute to the status. This does not reset every year but updates based on the last achieved tier status.Overall, Punchh recommends using the Lifetime option when creating your segments.
- On choosing a category segment:

- Click on Add Attribute.
- Click on Attribute dropdown to choose a value. Type to search for a value in search field in dropdown
- Once an attribute is selected then operator, duration, value, and/or timezone fields related to the attribute will open subsequently
- Click on Operator dropdown to select a value.
- For operators IN and NOT IN, you can enter multiple values separated by commas.
For example, Zipcode ->In ->10001, 10002, 10003
- For operators IN and NOT IN, you can enter multiple values separated by commas.
- Click the Duration drop-down to choose a time duration for the segment. This is a unit of time (month, day, year, lifetime, etc.). You'll define the amount of time in the next step.
- Enter value for Value fields. For some attributes you may have to enter values for some you may have to choose from preset values via dropdown. Some attributes may have more than one value.
For example, Birthday ->Within ->Last N Days ->N - For Time Zone drop-down select the best corresponding time zone for your business. This is important if you are using day parts. (You may leave the Time Zone as the default time zone. Your choice of time zone will affect the time at which your segments will refresh as a new day.)
- Use the Day Parts drop-down to select from any of your pre-defined day parts (a period of hours during each business day).
- Check the Use Receipt Time instead of Scan Time? box to change how new checkins are counted, time-wise. When this field is not checked, all checkin events, including giftings, referrals, rewards, etc. will be referenced in the segment, based on the time of the event. When the field is checked, only transactional checkins will be considered, based on the receipt time.
What's the difference between Scan Time and Receipt Time? When a customer scans a receipt by using the bare code reader on their mobile app, Scan time would define the input time as the moment the receipt is entered. Receipt Time defines the input time as the time the original transaction occurred (the time included on the receipt). For example, let's say a guest or member buys a burrito on Saturday, March 2nd at 3:00 PM but waits to scan their receipt into their mobile app until Monday, March 4th at 2:00 PM. The Scan Time counts that checkin as Monday, March 4th at 2:00 PM whereas the Receipt Time would count that checkin as Saturday, March 2nd at 3:00 PM. The distinction may make a difference when using set durations of specific days/day parts in a campaign.
- Click on the icon in any block to clear the selected value. The field will reset.
-
Add multiple attributes in a single segment type. Click Add attribute.

- Add multiple Segment Types to a segment. (Limit of 40)
- Click Add Rule.
- You can choose to perform ADD, OR, NOT INCLUDING between different attributes. You can add as many attributes to perform the operations.
- ADD = In order for a guest/member to be in the segment, they must meet all of the segment criteria. The more segments you use with the ADD operator, the smaller your overall segment will become.
The dotted area is the group of users who will fall into the resulting complex segment.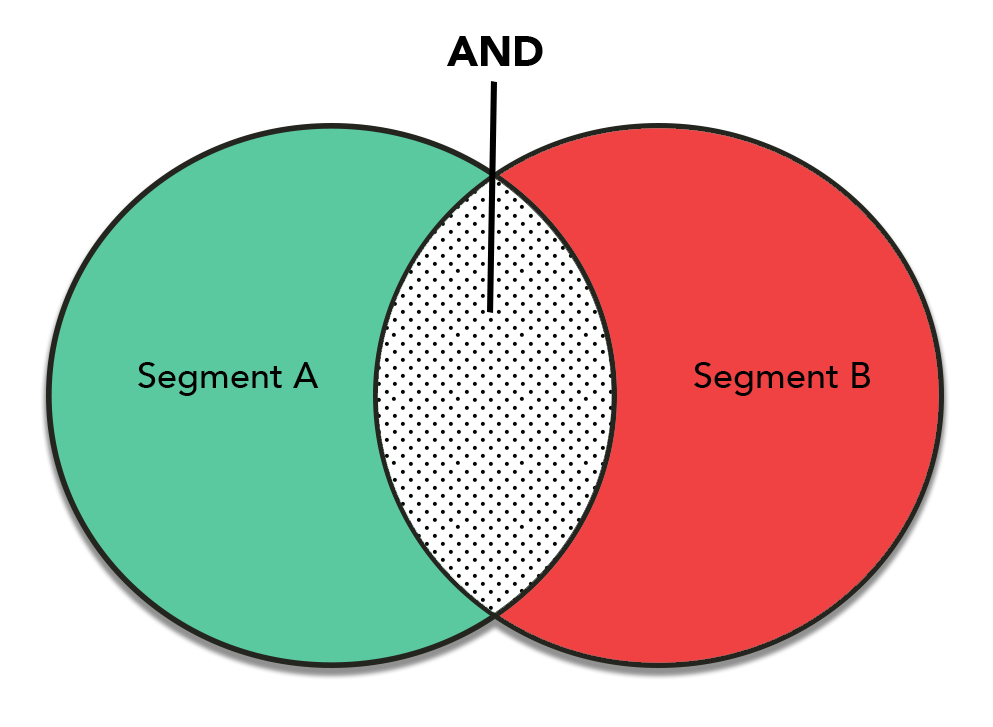
-
OR = In order for a guest/member to be in the segment, they must meet at least one of the segment criteria. The more segments you use with the OR operator, the larger your overall segment will become.
The dotted area is the group of users who will fall into the resulting complex segment.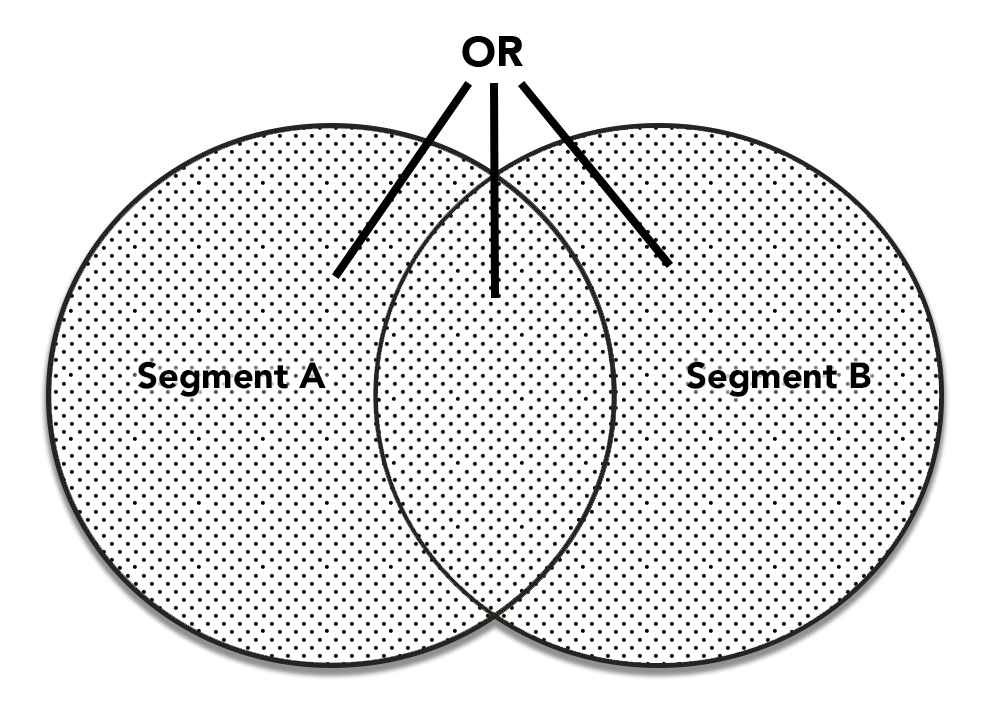
-
NOT INCLUDING = In order for the guest/member to be in the segment, they must meet the first criteria, but not the second criteria. The more segments you use with the NOT INCLUDING operator, the smaller your overall segment will become.
The dotted area is the group of users who will fall into the resulting complex segment.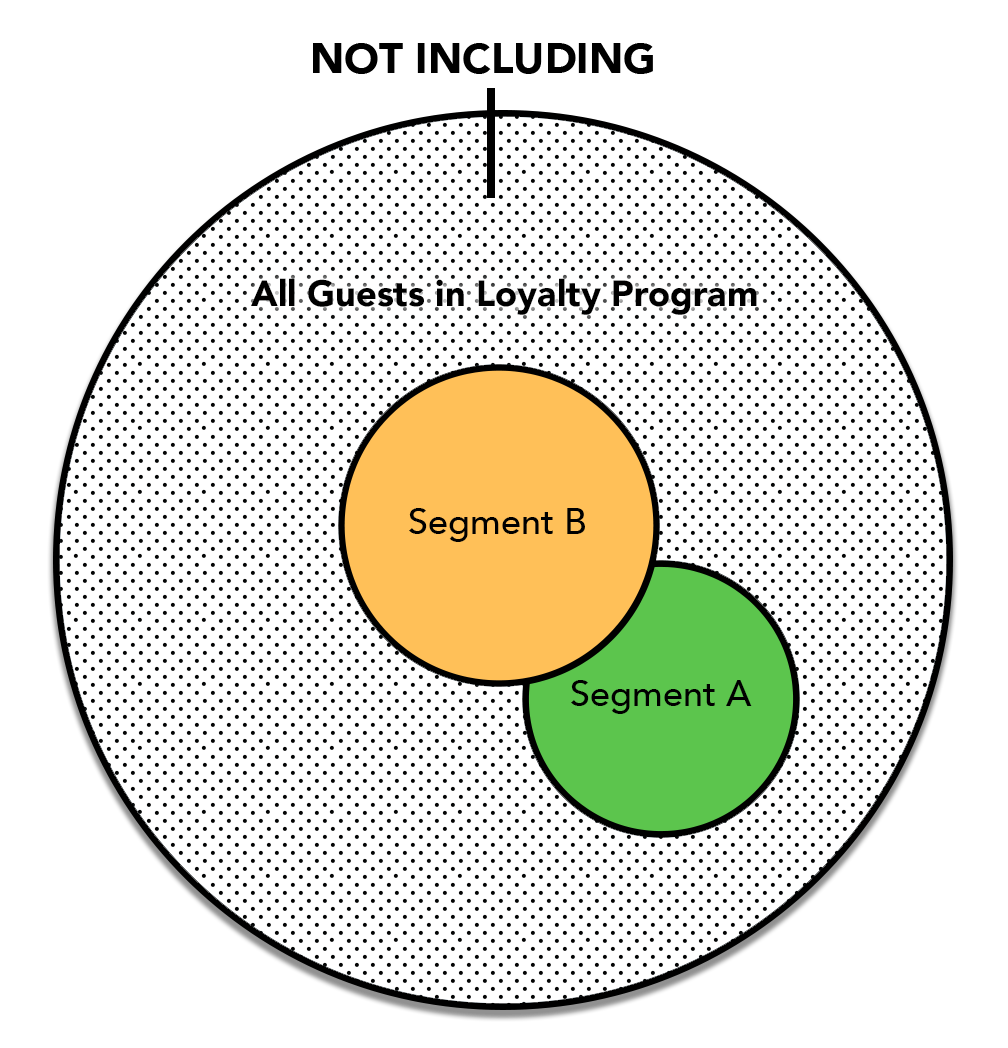
- ADD = In order for a guest/member to be in the segment, they must meet all of the segment criteria. The more segments you use with the ADD operator, the smaller your overall segment will become.
- The operation is performed sequentially for OR and NOT INCLUDING i.e. If 3 attributes are configured, then, the operation will be performed between attribute-1 and attribute-2 first, then between the resulting value and attribute-3.
- Multiple Operators: You may also choose different operators for different attributes. For example, you may perform OR between 2 attributes and AND between 2 attributes in the same segment. The order and grouping of the criteria is also important for determining which guests/member will ultimately fall into the segment.
- Click the delete icon
 to delete a segment type row.
- Once your segment rules are all added, click Save & Show to create the segment. If you experience any issues with segment processing or updating, contact the Punchh Support Team via the Support Portal.
Create a Custom List Segment
Custom List Segments allow you to add guests to a segment based on email addresses or from a frozen segment. See How to Make a Custom List Segment End to End: From Best Practices to Troubleshooting for more details.
Create an External Segment
External Segments allow you to create a segment from predefined segments from external third-party sources such as mParticle.
- Click on Segment Type and search External Segment.
- Choose External Segment. External Segment Type field appears.

- Search for and select which External Segment you would like to use.
Segments Home Page
Segments can be created and managed from the Segments Home Page under Guests > All Segments.
Filter and Sort Your Segment List
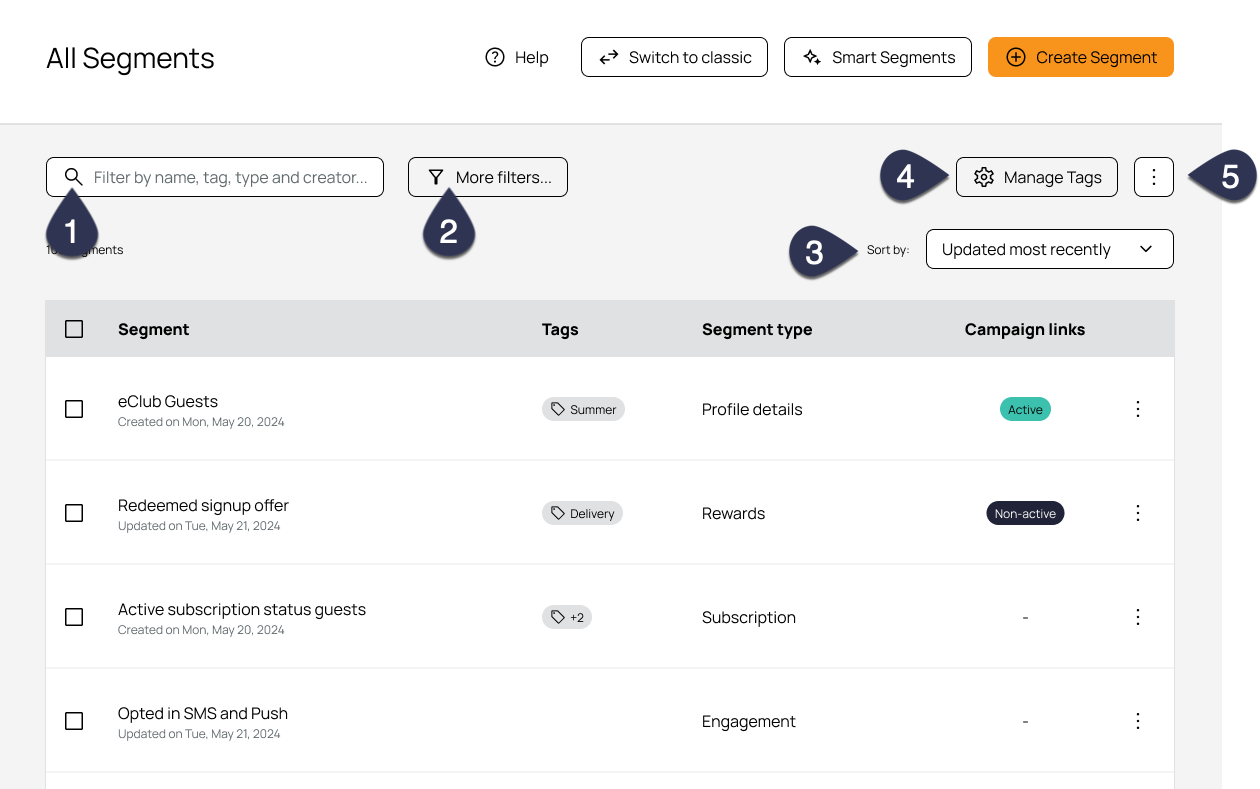
- Segments can be filtered by using the search bar. Enter a segment name, segment type, creator, or tag, to search for a segment(s) containing the search term.
- Click More filters to narrow the segment list further by:
- Segment type
- Campaign link status
Active campaigns are campaigns with a Scheduled, Processing, or Active status. All other statuses are considered non-active campaigns.- Select Linked to active campaignsto filter for segments that are currently linked to active campaigns only.
- Select Linked to non-active campaignsto filter for segments that are currently linked to non-active campaigns only.
- Select No link to any campaignsto filter for segments that are not currently linked to any campaigns.
- Example: If the segment is linked to one active campaign and three non-active campaigns, then segment status would considered active.
- Linked campaigns
- Use the drop-down to filter by the specific campaign(s) the segment is linked to.
- Any: Filter for segments linked to one or more of the selected campaigns.
- All: Filter for segments that are linked to all of the selected campaigns.
- Tag
- Use the drop-down to filter by tags attached to a segment.
- Any: Filter for segments with one or more of the selected tags.
- All: Filter for segments that contain all of the selected tags.
- Creator
- Segment created date
- Enter a date range.
Note: Your search filters will save if you navigate away from your filtered list and then click the back button on your browser to return. Additionally, your filtered list will create a unique link that can be copied/pasted to show the same filters in a new window.
-
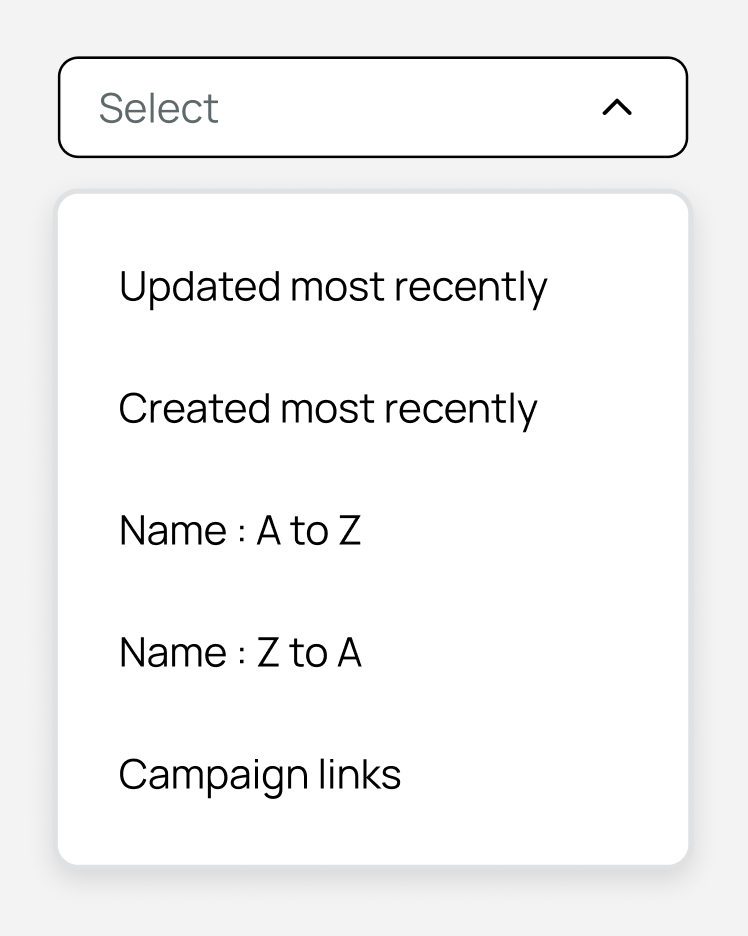
Use the Sort by option on the right to sort your segment list further.
- Click Manage Tags to view, edit, and create segment tags.
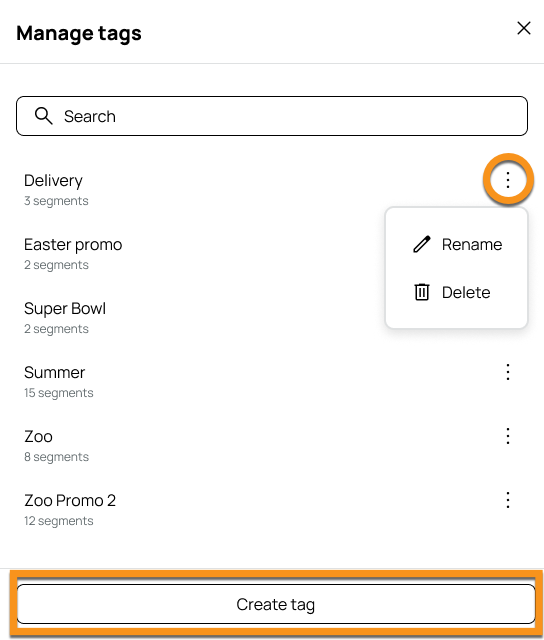
- Click the three dots on the right of each tag to Rename or Delete.
- Click Create Tag to create a new tag. You can have up to 1000 tags for your business.
- Click the three-dot menu for more options:
- Click Audit Log of your brand's segments.
(This option may not be available to you depending on your platform permissions.)
- Click Audit Log of your brand's segments.
Segment List Details
The segment list shows the segment's name, tags, type, any connected segments or gifts, and its status. Click on a segment in the list to view further details.
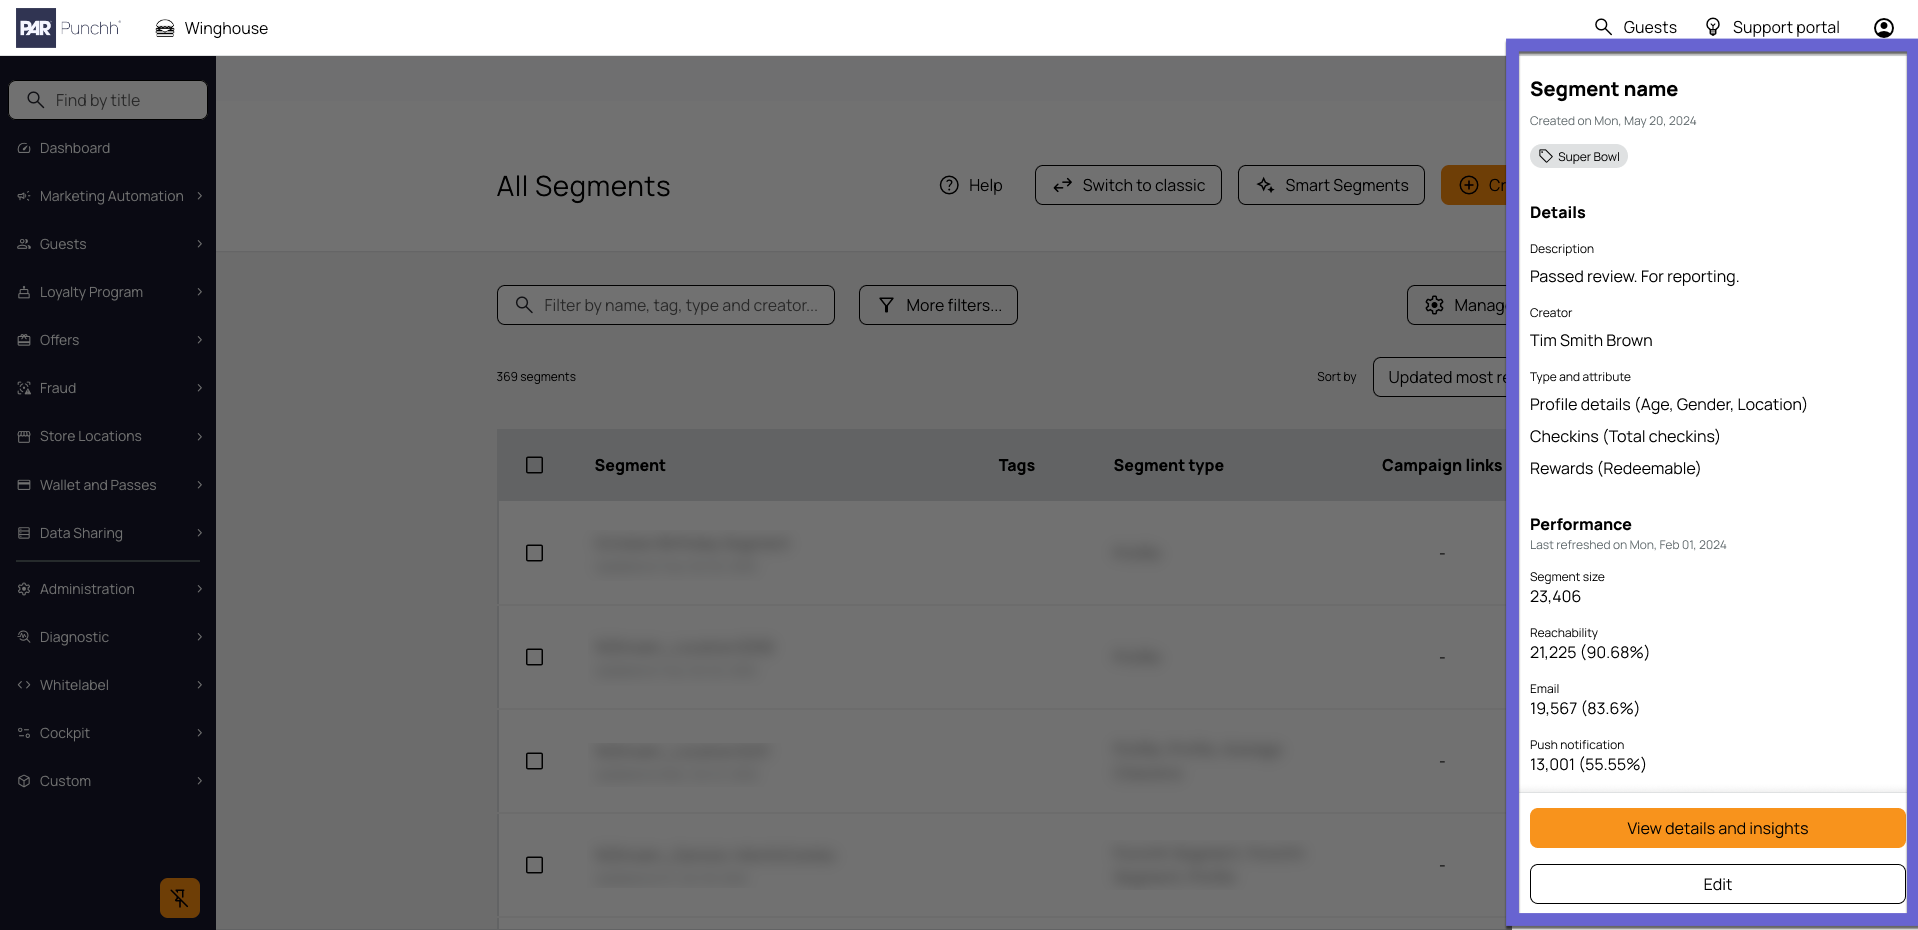
The side panel shows the following details:
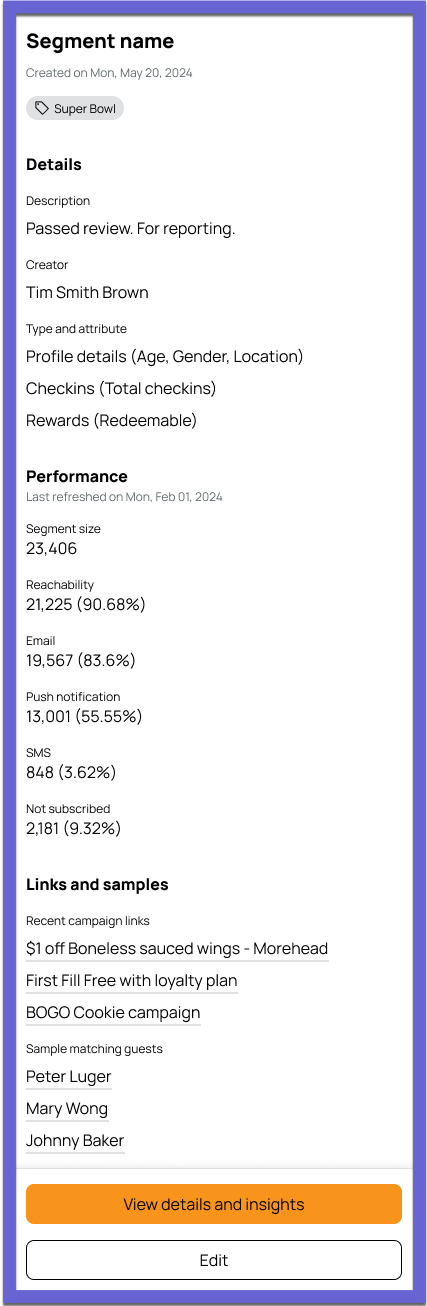
- Segment Name
- Created Date or Date Last Updated
- Tags
- Details
- This section shows the segment description and creator. It also displays the segment type(s) used as well as any relevant attributes.
- Performance
- This section shows the performance metrics such as segment size, reachability, email/push/SMS notifications, and not subscribed (guests or members who are not reachable via any communication channels).
- Links and samples
- This section shows the recent campaign links as well as example guests/member who fit into the segment. Click the links to navigate to the campaign summary or member profile pages.
- View details and insights
- Click to view the full segment overview page. Right-click to open the page in a new tab.
- Edit
- Click to edit the segment.
More Actions
Click the three dots on the right of the segment for further actions:
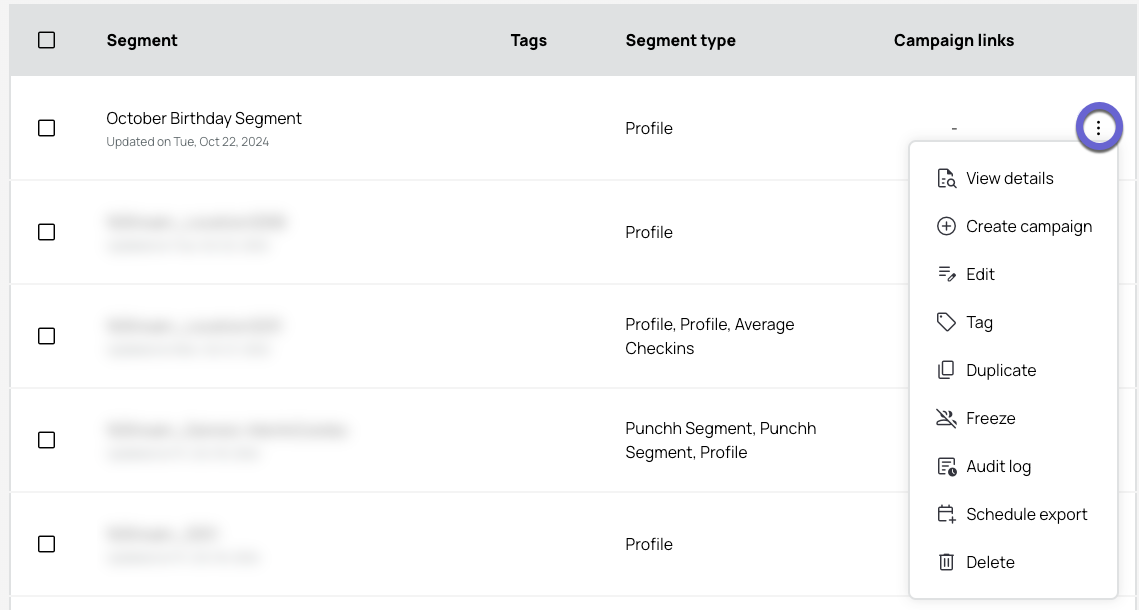
- View details: Click to view the full segment details page.
- Create campaign: A new mass offer campaign creation page will appear with the respective segment attached to it as the selected value in the Segment value field in the 2nd step of the Campaign.
- Edit: Click to edit the segment.
- Tag: Click to add tags to a segment. This can also be done by clicking the check box next to the segment name and then selecting Tag.
- Duplicate: Click to duplicate the segment. The create segment workflow will open with the name field populated as "Segment name - copy" and other fields filled in from the original segment. You can then edit the segment as normal.
- Freeze: Segments based on an ongoing, rolling duration (meaning they refresh daily, monthly, or yearly) are called Dynamic Segments, because the volume/makeup of guests will change as new data is collected. Guests/members may leave the segment (perhaps a lapsed member finally checks in) or new ones may enter. Occasionally, it's beneficial to "freeze" an ongoing segment, either for analytics purposes or if your segment has reached the desired number of guests/members. Freezing takes a snapshot of the current segment and creates a new custom segment populated with the now-static data.
- A new custom segment based on the current segment's static data will be created. The newly created segment's name will default to the format "Custom Segment frozen from Segment 'NAME OF YOUR SEGMENT'"
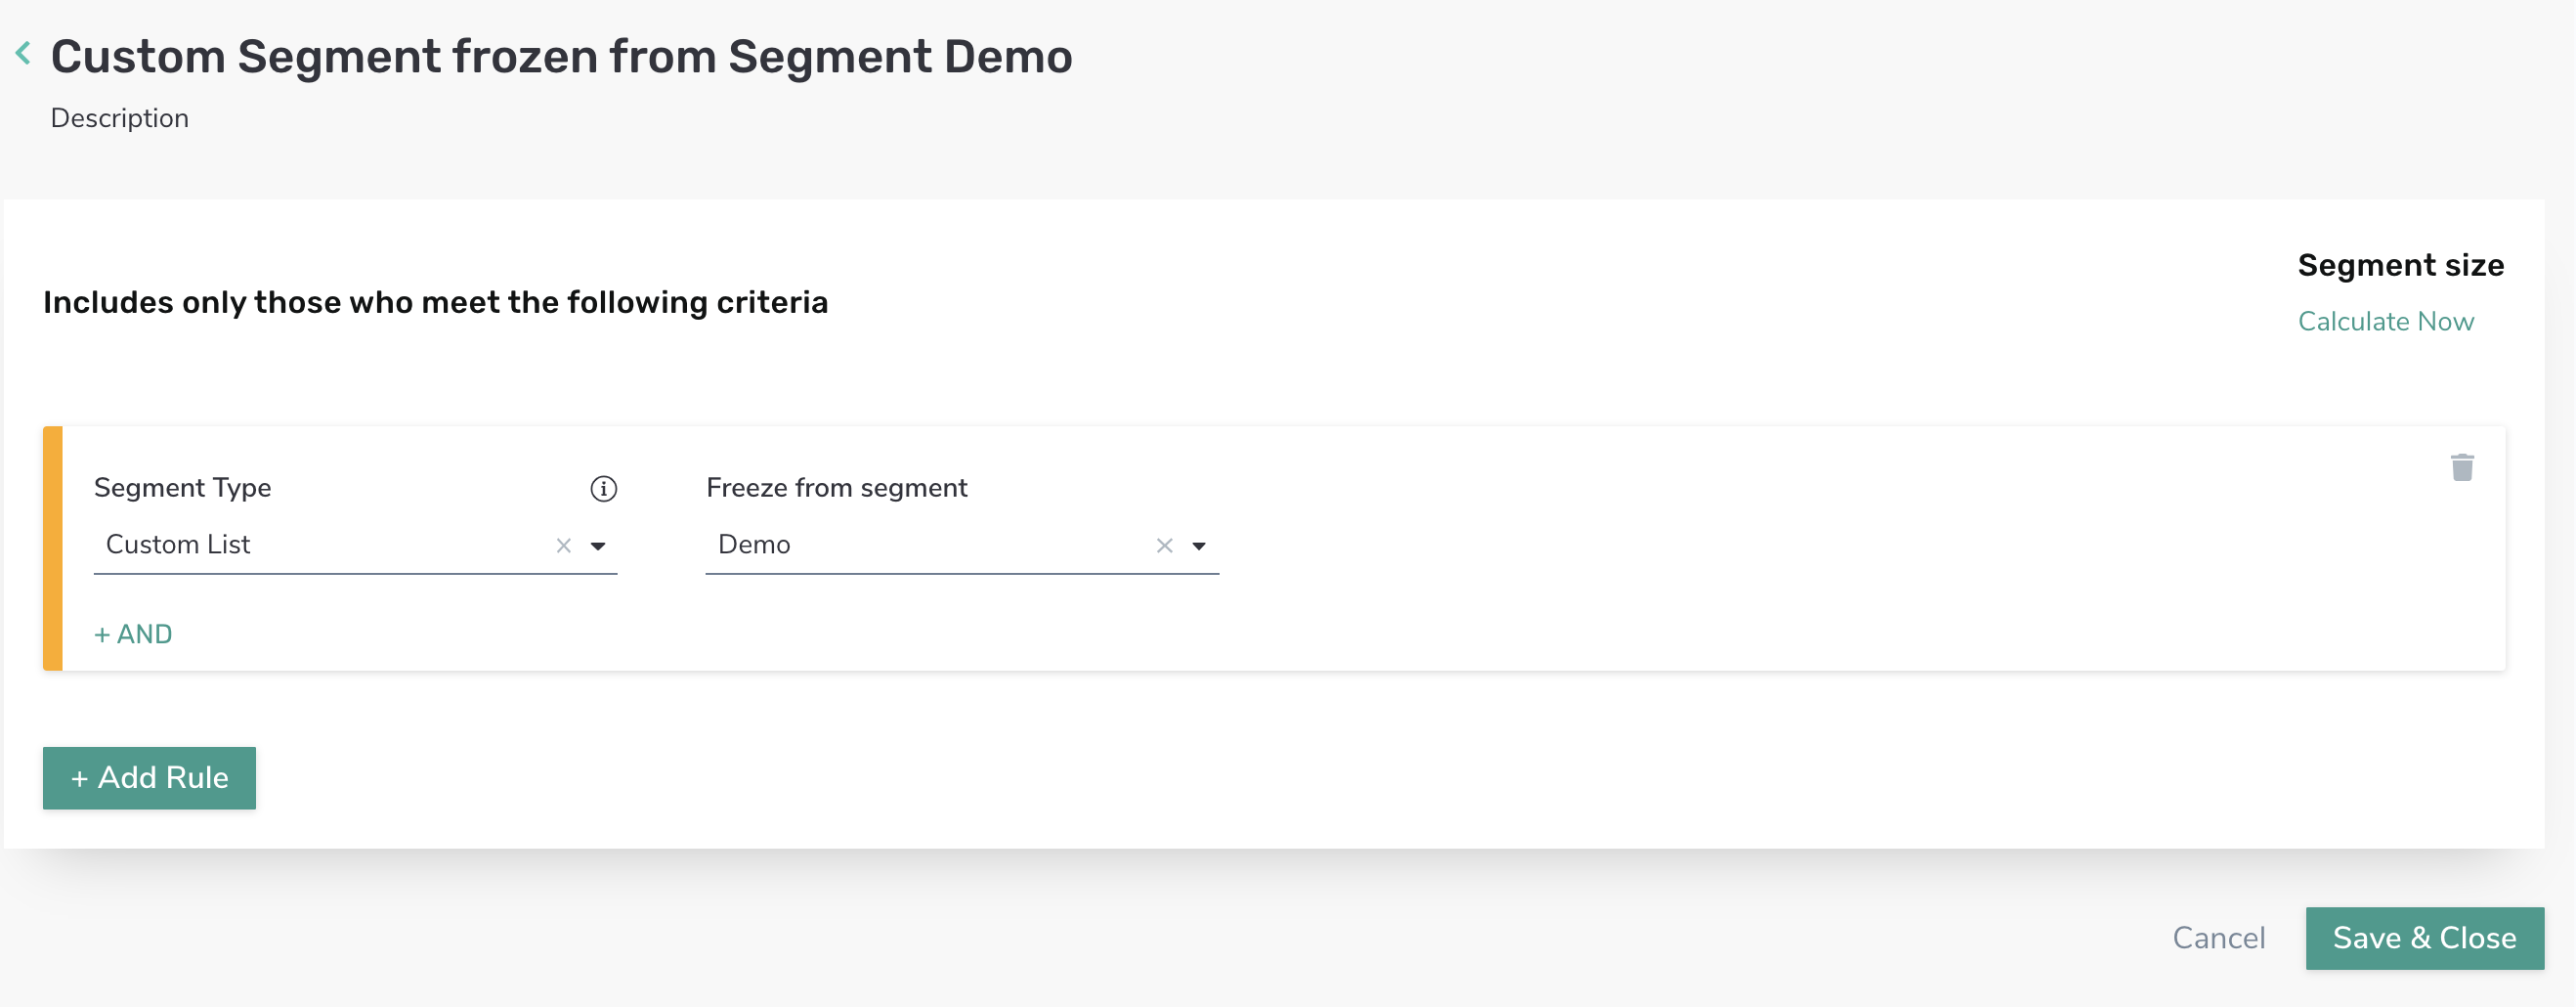
- (Optional) Edit the new segment's Name and Description, if desired.
- Click Save and Close to finalize the frozen segment.
- You'll see a confirmation message stating that the segment has been created.
- Depending on the size of your original segment, this may take a few minutes.
- When the data read has finished and your new segment has been populated with the frozen data, you'll receive an email notification letting you know it's ready.
- A new custom segment based on the current segment's static data will be created. The newly created segment's name will default to the format "Custom Segment frozen from Segment 'NAME OF YOUR SEGMENT'"
- Audit log: Click to view the audit log showing the record of segment events within the platform.
- Schedule export: Click to export the list of guests/members in the segment. This takes you to the scheduling page for that specific segment, where you can specify the frequency, start date/time, recipients, etc.
- Delete: Click to permanently delete a segment.
This can also be done by clicking the check box next to the segment name and then selecting Delete.
Segment Details and Insights
- Click on a segment in the list to open the side panel.
- Click View details and insights.
- The segment's overview page opens.
- Segment Definition
- Displays segment definition in readable (English) format.
- Label for values in segment definition will be available as a tooltip for some non-self-explanatory items. Hover on the value to see the tooltip.
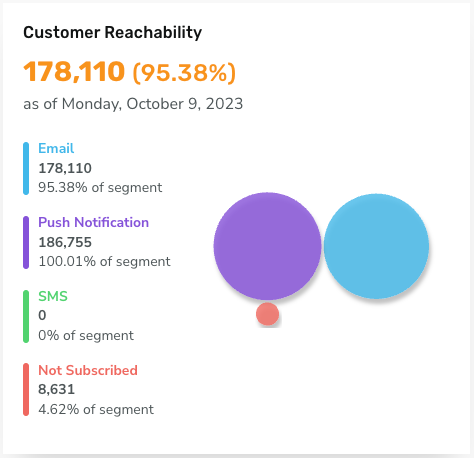
- Customer Reachability
- Displays guest/member reachability as of today.
- Reachability channels include Email, Push Notifications, and SMS.
- 'Not Subscribed' represents guests/members that are not subscribed and not reachable via any communication channels.
- 'Absolute Number'
- Overall- Number of guests/members reachable via all specified channels within that segment.
- Per channel- Number of guests /membersreachable via a specified channel within that segment.
- 0 and N/A- No subscribers in the channel.
- 'Percentage'
- Overall- Total percentage of reachable guests/members compared to overall segment.
- Per channel- Total percentage of reachable guests/members via specific channel compared to overall segment.
- Associations
- Provides information about the places where segment is associated i.e. Campaigns.
- Filter the list based on status of associations by clicking on the dropdown in top right corner in the Associations block
- Click on the status in the dropdown to filter list
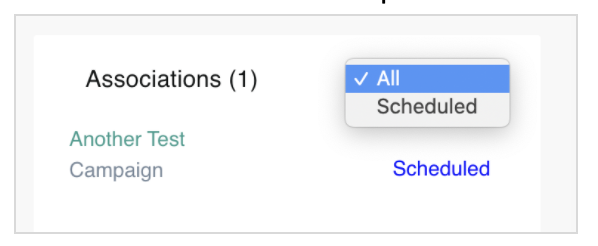
- Click on the association name to navigate to the corresponding association page i.e., Campaigns
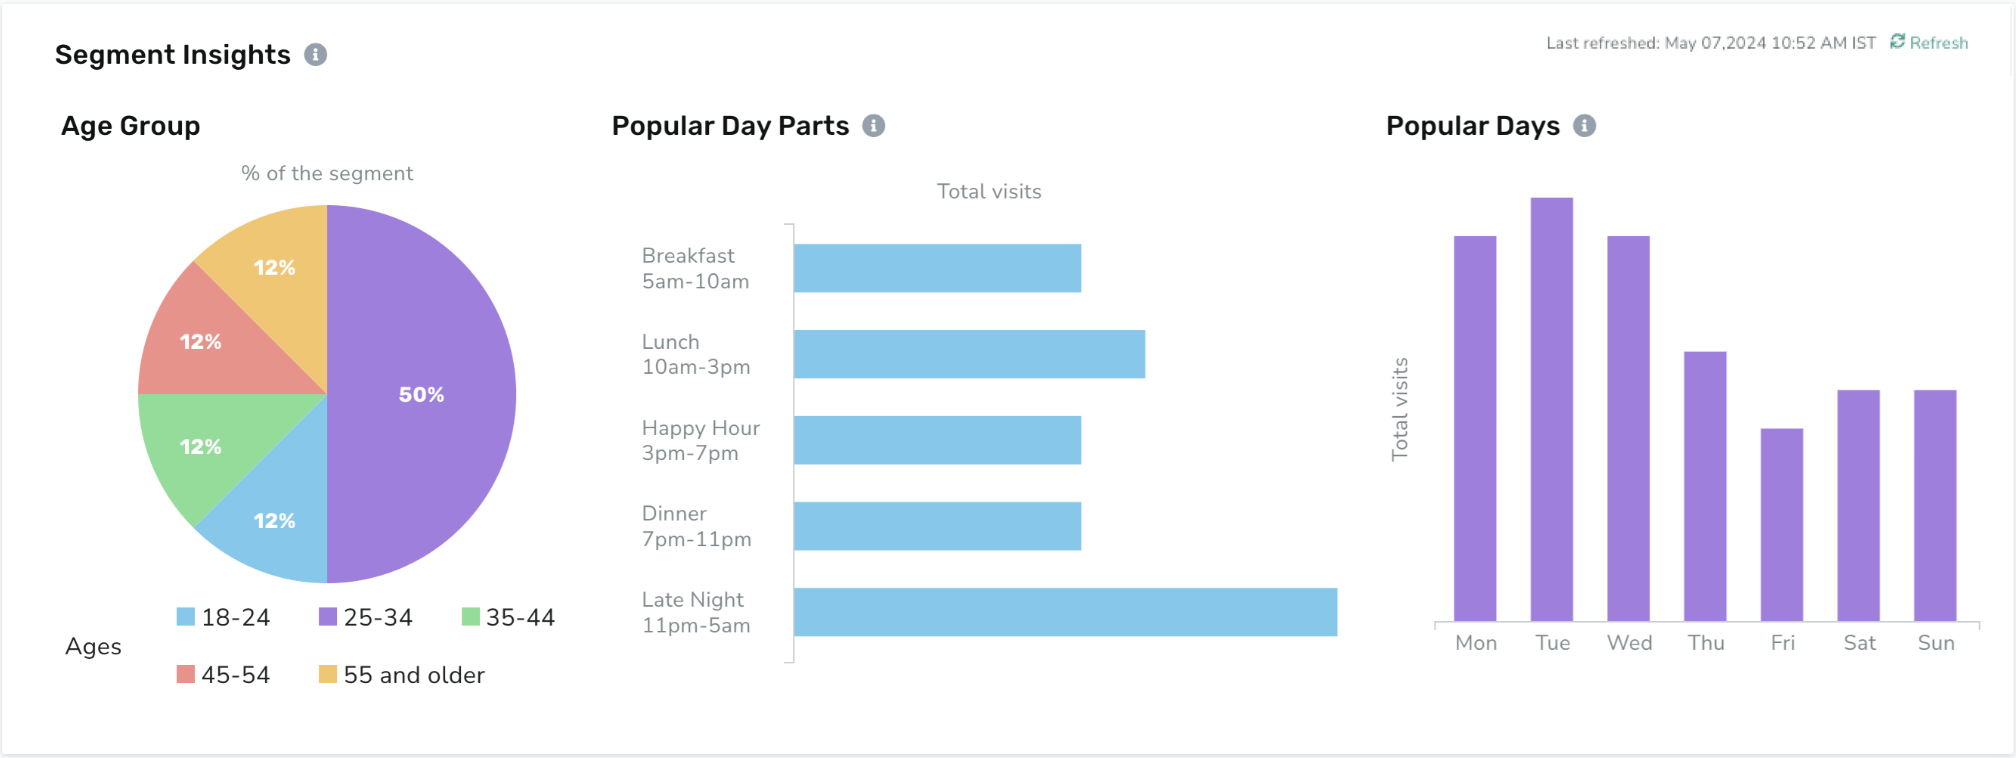
- Segment Insights
- The Segment Insights section displays meaningful insights into the segmented guests'/members' demographics, behaviors, and patterns in the last 30 days.
- Age Distribution: Offers a snapshot of the age distribution within a given segment.
- Popular Day Part: Offers a snapshot of what time of the day the segmented guests/members are most active and engaged with the brand (shown in your business's set timezone).
- Popular Day of the week: Offers a snapshot of what day of the week the segmented guests/members are most active and engaged with your brand.
- The Segment Insights day refreshes every three days, as indicated by the "Last refreshed" date in the right corner. Click Refresh to refresh the data at any time automatically.
- The Segment Insights section displays meaningful insights into the segmented guests'/members' demographics, behaviors, and patterns in the last 30 days.
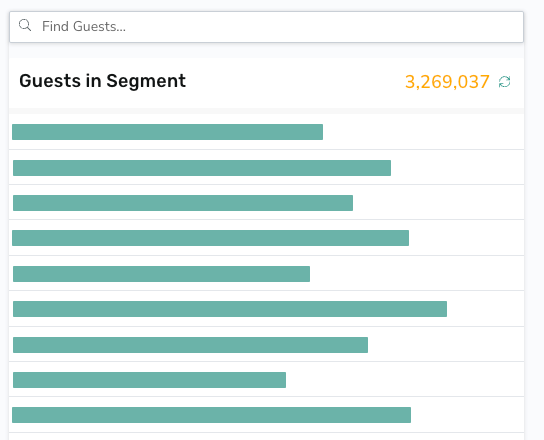
- Guests in Segment
- Click on calculate to view list of guests in Guests in Segment section.
- Type a guest/member name or email address or phone number to find if they are in the segment or not.
- The guest/member name will be highlighted in green if they are available in the segment
- The guest/member name will be highlighted in red if they are not available in the segment.
Other Segments Documentation:
