Aloha POS Punchh Integration (Fresh Install)
PAR Punchh on Aloha - Supported and Recommended Requirements
While it is possible that PAR Punchh will run on systems with other system specifications or Aloha versions than indicated below, it is not recommended or directly supported by PAR.
Software Requirements
- Windows version: Windows 10 or higher
- .NET Framework version: 4.6.2
- Aloha version: 15.1 to 19.6
- Other Aloha requirement: Aloha Connect with 1 available External Interface Terminal (EIT)
Hardware Requirements
- Disk space: 20 GB
- Processor: 1 GHz+
- RAM front of house: 4 GB
- RAM back of house: 8 GB
- HID-Compliant Scanner that is configured in the OS to accept at least 200 characters per scan. Punchh does not require a specific brand or type of scanner.
High-Level Punchh Activation Steps
A. Configure POS for Punchh Integration
B. Prepare the POS Environment
C. Provide Installation Details to Punchh
D. Punchh Application Installation
A. Configure POS for Punchh Integration
- Create a comp for use by Punchh.
- Create a Punchh menu item used for check-ins.
- Create Punchh menu item used for redemptions.
- Create or identify a void reason in case the POS operator removes a check-in or redemption item from a check.
A.1 Comp Setup for Punchh
Create a comp In Aloha that will be used by the Punchh application for redemptions.
Redemptions 1.0 vs. Redemptions 2.0
With a Redemptions 1.0 implementation (legacy Punchh redemptions framework), the comp configuration in Aloha must be configured to support a single redemption. Set the maximum number of discounts Per check and Per table to a value of 1.
With a Redemptions 2.0 implementation (new Punchh redemptions framework), the comp configuration in Aloha can be configured to support multiple redemptions depending on the discount basket limit specified in the Punchh platform configuration.
- If a discount basket limit is specified in the Punchh platform, set the maximum number of discounts Per check and Per table to the value of the discount basket limit.
- If a discount basket limit is NOT specified in the Punchh platform, set the maximum number of discounts Per check and Per table to a value of 10.
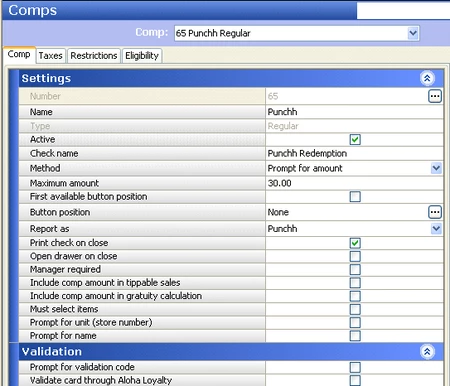
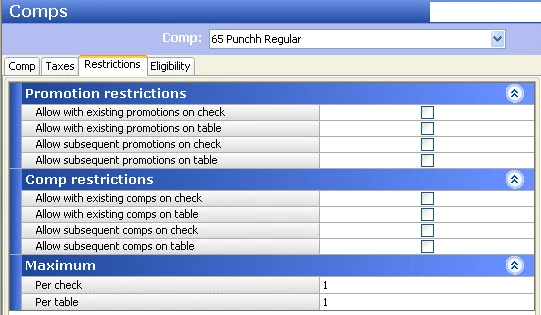
Comp setup notes:
- Set the Maximum amount (dollar value) desired for your operation.
- Set restrictions for your desired operations. Any POS job code (e.g., manager, server, cashier, etc.) that will be able to perform Punchh transactions on the POS will need permission to use this comp.
- Set the Eligibility for your desired operation.
- Note the numeric ID, as that is what the Punchh program uses to reference the comp you have defined.
- When the Must Select Items flag is enabled, child items in a combo will be discounted even if they are excluded from the promotion. Make sure that you assign only valid combos to relevant promotions.
IMPORTANT: Any restrictions set on the POS comp must be mirrored in the Punchh portal rules. Otherwise guest redemptions may fail to be able to be applied.
A.2 Create Punchh Menu Item Used for Check-ins
When a guest checks in on the POS, this item will be used to show the check-in:
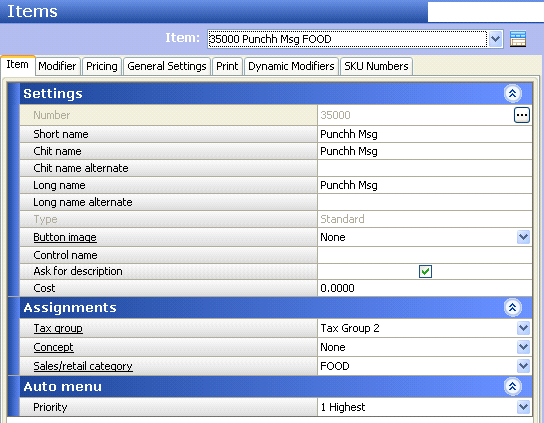
Check-in Menu Item
- Create a new Open Item menu item for Punchh to use for check-in transactions.
- Check the Ask for Description option to allow for the user's identification information to be inserted onto the check.
- Note the numeric ID, as that is what the Punchh program configuration will need to utilize this menu item to denote the user check-in.
A.3 Create Punchh Menu Item Used for Redemptions
When a Punchh redemption is applied to a check, Punchh will use this menu item to show the redemption code on the check.
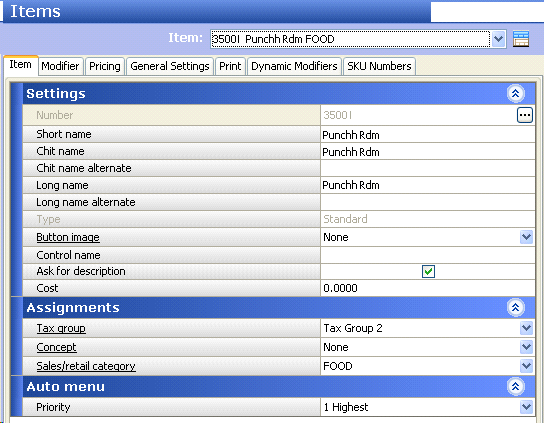
Redemption Menu Item
- Create a newOpen Item menu item for Punchh to use for redemptions.
- Check the Ask for description option to allow for the user's identification information to be inserted onto the check.
- Note the numeric ID, as that is what the Punchh program configuration will need to utilize this menu item to denote the redemption on the check.
A.4 Create a Void Reason for When a POS Operator Removes a Check-in or Redemption Item From a Check
When a POS operator needs to reverse a check-in or redemption, the operator will remove the Punchh redemption or check-in menu item from the check. When this occurs, this void reason will be assigned to the removal action of that menu item from the check.
B. Prepare the POS Environment
Follow the directions in Aloha Firewall Site Setup.
Be sure to run the firewall validation steps.
C. Provide Installation Details to Punchh
For new locations for an existing, live brand, follow the steps in Aloha POS New Site Activation Process to allow installation of Punchh on a new location.
For a new Punchh customer that is just being onboarded, provide the following to your Punchh representative:
- Punchh comp created in step A.1
- Punchh check-in menu item created in step A.2
- Punchh redemption menu item created in step A.3
- Punchh void reason assigned or created in step A.4
D. Punchh Application Installation
D.1 Enable FOH Com and Identify Punchh Apps
Run the installation program on the Aloha back of house computer. Either run the manual interactive installation (e.g., in a lab environment) or run the silent installer (e.g., in a production environment or multiple-site deployment).
D.2 Punchh Aloha Proxy Installation
Punchh Proxy Installation - POS Control Center (New)
For brands launching on Punchh POS Control Center (PPCC), Punchh provides an Aloha proxy installer that includes a monitoring service connected to PPCC. When you run the installer, it will install the default or latest version of the Punchh proxy along with the PPCC monitoring service in-store. Following this, you can provision your location within PPCC, which will then download the necessary operational package, including the latest Punchh Aloha front-of-house (FOH) file and/or back-of-house (BOH) file.
IMPORTANT - All of the following installation steps must be performed on the BOH computer at each location.
Step 1: Download the location initialization file from PPCC
-
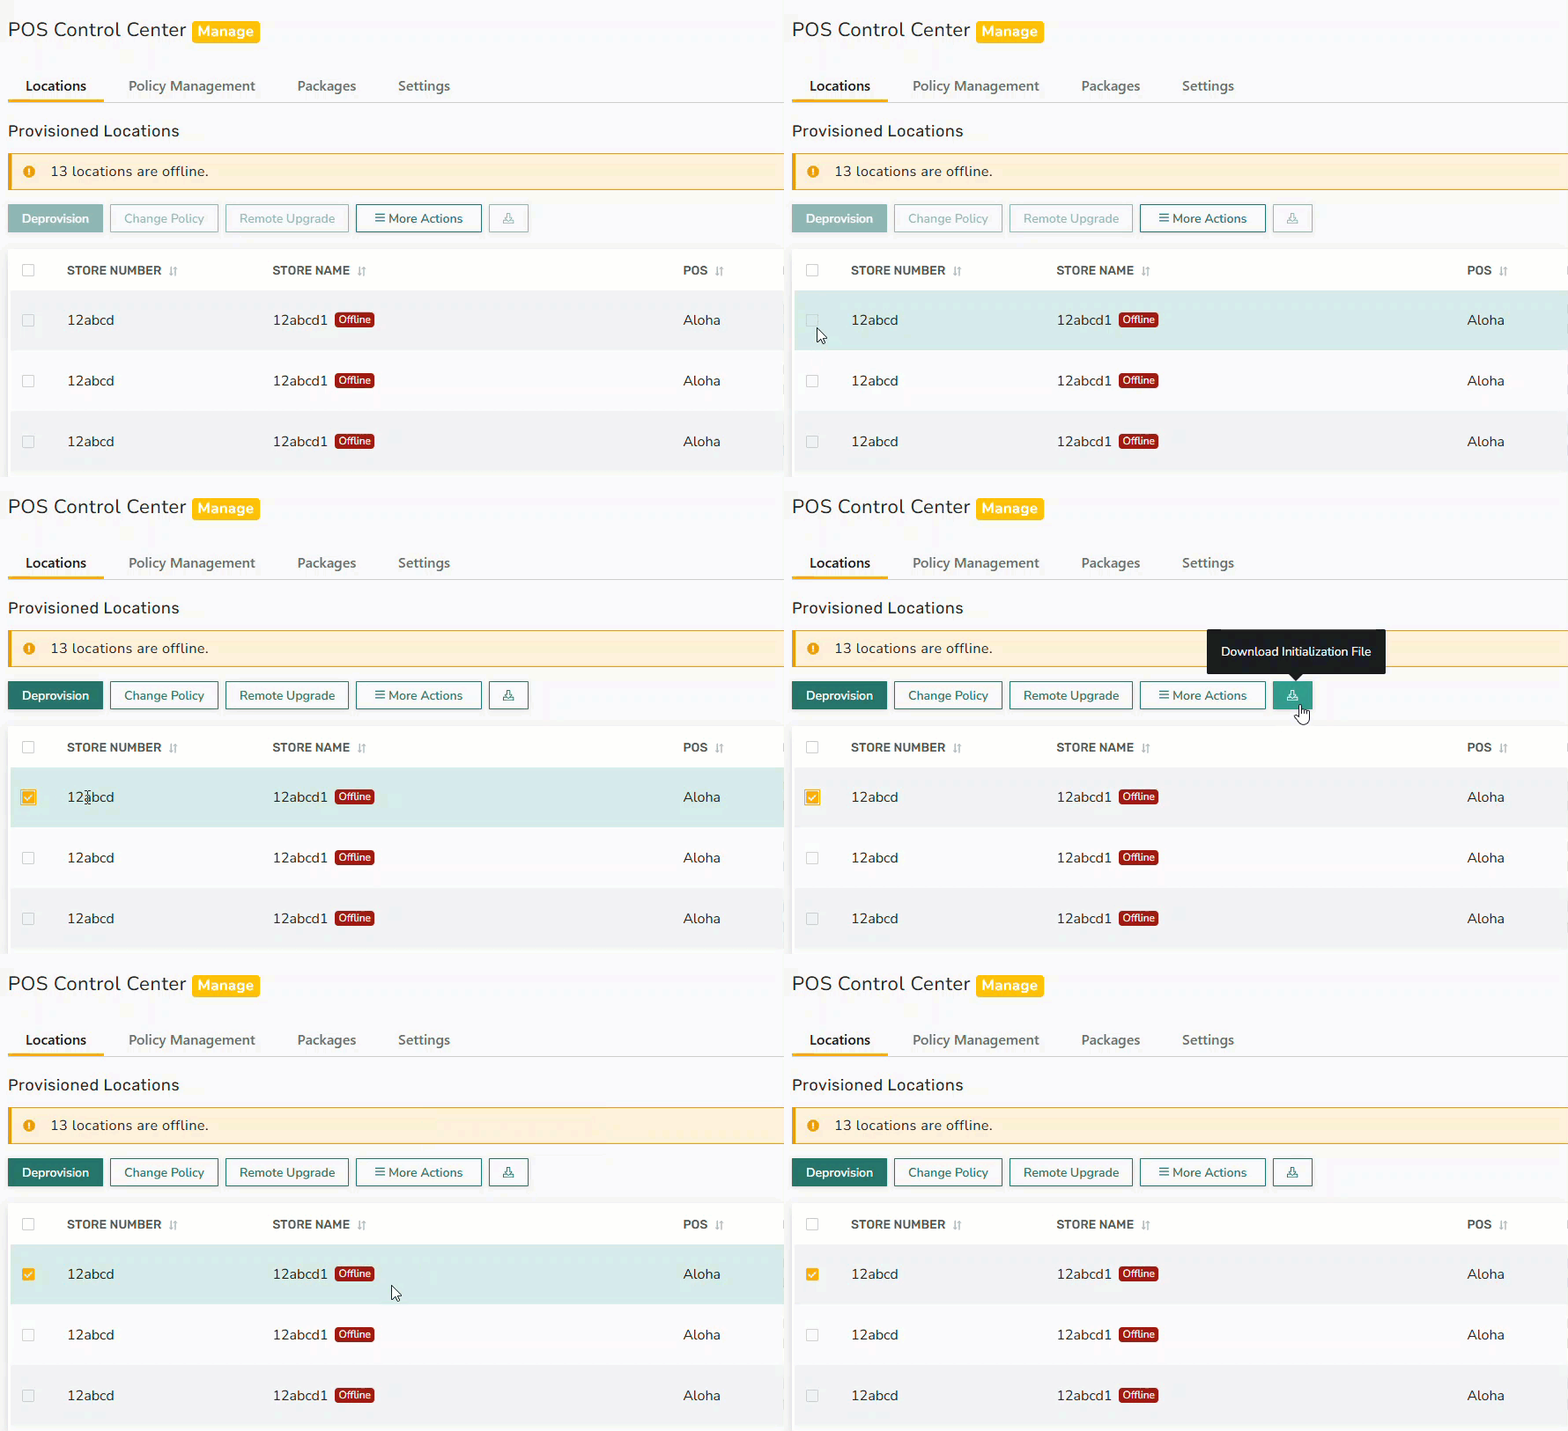
In the Punchh platform, go to Settings > POS Control Center > Locations.
-
Enable the check box for one or more specific locations.
-
Click the Download Initialization File button. The JSON initialization file is downloaded.
Example file name: Punchh-Burger-1111121545.json
Step 2: Download the Punchh proxy service installer file
- Download the Punchh proxy service installer file. This file is provided by Punchh.
File name format: SetupPunchh_v<build-version>.exe
Example file name: SetupPunchh_v10.10.22.0.exe
-
Create a new folder named "Punchh".
-
Move both the downloaded the location initialization (JSON) file and the downloaded proxy service installer (EXE) file into the newly created "Punchh" folder.
Step 3. Run the silent installer for POS Control Center
-
Run a command-line console in administrator mode.
-
When asked "Do you want the <Windows Command Processor> app to make changes to your device?", click Yes. The command prompt window opens.
-
Change the directory to the newly created "Punchh" folder:
cd <path to "Punchh" folder>
- From the "Punchh" folder, run the following command to execute the Punchh proxy service installer file:
<filename> /i /qn /norestart
Example command: SetupPunchh_v10.10.22.0.exe /i /qn /norestart
- Check the console output to confirm that you see the success messages for both PROXY and MONITOR:
PROXY|ExitCode=0 MONITOR|ExitCode=0
Note: The output may vary depending on the command arguments and the POS type/setup. The full output may take up to five minutes to complete.

- Exit the command-line console.
Alternative command-line installation
Alternatively, you can run the following command using the location key and the business key specified in the initialization file.
SetupPunchh_v<build-version>.exe /i /qn /norestart -pos aloha -platform MS1 -locationkey 1111111111 -businesskey 2222222222
/i - (Required) installs the package/qn or /quiet - Quiet mode (there is no user interaction, and there is no console output)/norestart - This option will prevent the computer from being forcefully restarted after installation (useful when running the installer in quiet mode)-platform : MS1, MS2, or TEST-ignoreminorversion - This option ignores the Aloha minor version and allows the installation of Punchh software on unsupported Aloha versions.
Step 4. Verify file versions and check logs
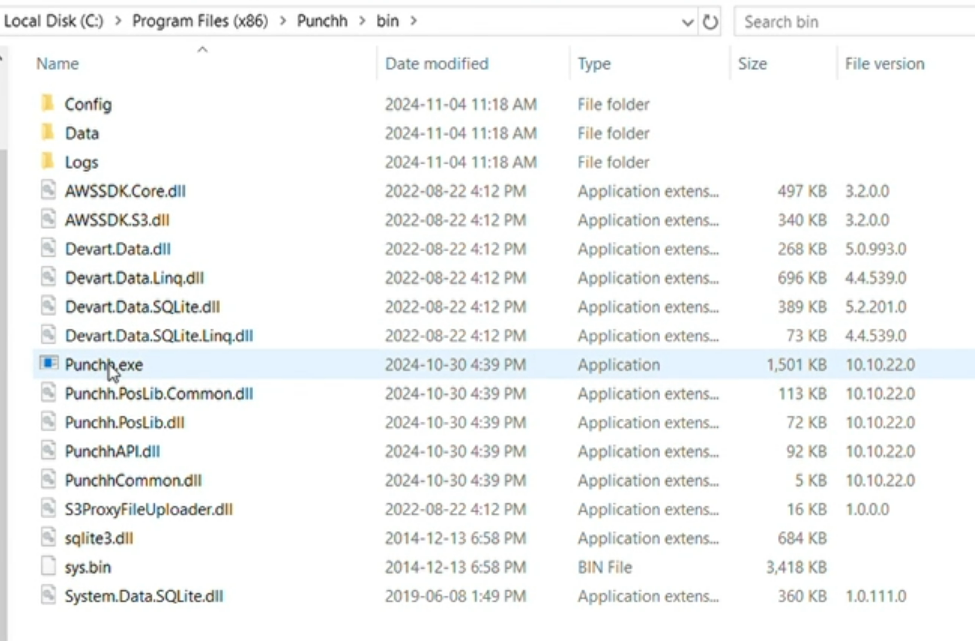
- Navigate to C:\Program Files (x86)\Punchh\bin and make sure that the file version for the Punchh.exe file and all Punchh DLL files matches the version of the proxy service installer (EXE) file.
-
Navigate to C:\Program Files (x86)\Punchh\bin\config
-
Open the Punchh.cfg file and confirm that the values for the API_Key and BusinessKey configuration properties are correct. Also, open the Punchh.cfg file and the Aloha.cfg file to ensure that they match the configuration in PPCC.
-
Navigate to C:\Program Files (x86)\Punchh\bin\Logs and review the proxy logs to verify successful communication between the business location and Punchh.
-
Navigate to C:\Program Files (x86)\Punchh and make sure that the file version for the PunchhMonitor.exe file matches the version of the proxy service installer (EXE) file.
-
Navigate to C:\Program Files (x86)\Punchh\MonitorServiceLogs and review the logs to verify successful communication between the business location and PPCC.
-
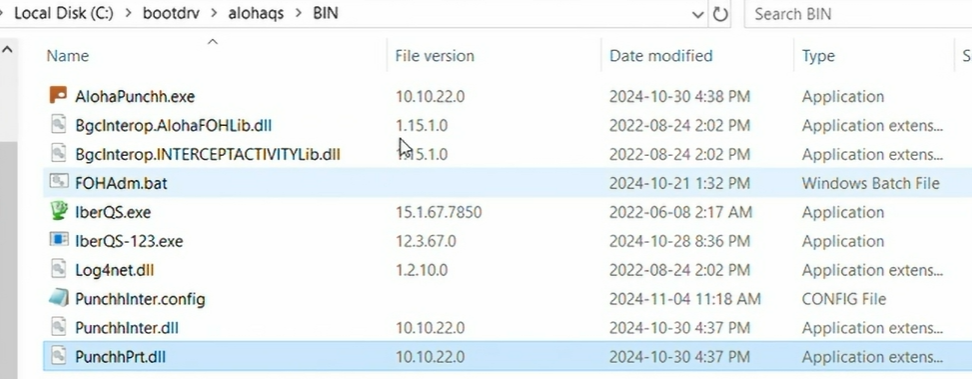
Navigate to the Aloha bin folder and verify the Aloha Punchh FOH file versions. Also, open the PunchhInter.config file to ensure that it matches the configuration in PPCC.
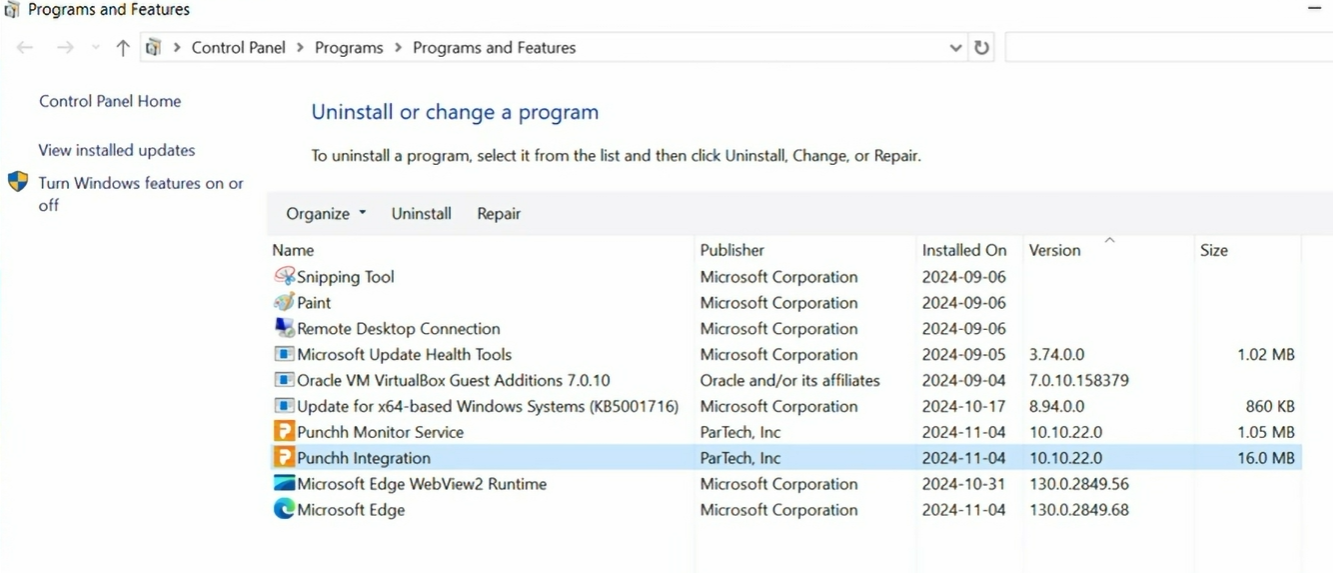
- In the Windows Control Panel, verify that both "Punchh Integration" and "Punchh Monitor Service" are installed.
Step 5. Restart BOH computer and refresh Aloha terminals
-
Restart the BOH computer.
-
Refresh the Aloha POS terminals with the latest data.
Punchh Proxy Installation (Legacy)
PunchhAlohaSetup.exe - Manual Installer (Legacy)
- Install the applications on the back office computer,
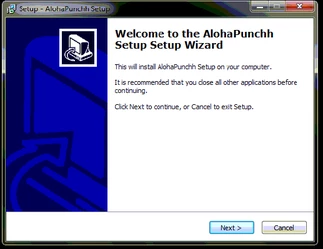
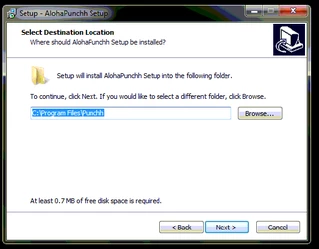
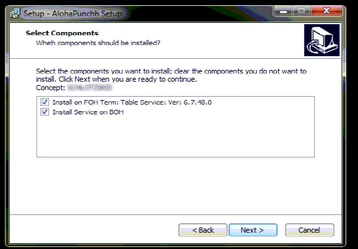
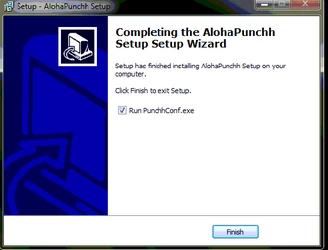
The setup application will install:
- AlohaPunchh service - application that communicates with FOH terminals and external servers
- PunchhMonitor.exe - application that monitors AlohaPunchh service. It also monitors program updates and configuration changes (e.g., receipts messages, comp ID)
- PunchhConf.exe - application that allows user to complete installation and configure settings used by Punchh programs
For more details on the Punch component applications, see Aloha POS Punchh Logging FAQ.
PunchhAlohaSetup.exe - Silent Installer (Legacy)
After receiving the PunchhAlohaSetup.exe file, take note of the location where this is stored.
To run a silent installation, use the following command:
@echo offc:\(FILELOCATION)\PunchhAlohaSetup.exe /SUPPRESSMSGBOXES /VERYSILENT /LOG=c:\tmp\inst_% computername%.log
You can verify results by reviewing the log file above and verify that these services are running:
- Aloha Punchh Monitor
- AlohaPunchhSvc
- Punchh Proxy
D.3 Launching PunchhConf.exe - Legacy Proxy Installation Only
PunchhConf.exe - Manual Setup - Legacy Proxy Installation Only
Normally, the PunchhConf.exe application will not present the user interface if the following conditions are met:
- Firewall setup - the Punchh Aloha configuration is set up properly
- The information required in step C has been provided and confirmation that the Aloha Punchh configuration server has been set up
The installation of the PunchhAlohaSetup.exe will automatically pull site configuration details from the Aloha configuration server, and the PunchhConf.exe application window will open and close, automatically setting the PunchhConf screen values.
The PunchhConf application sets the following:
- Store ID to the Punchh store identifier
- Enables barcode printing on the guest check
- Identifies the Aloha comp ID used for redemptions
- If needed, identifies the category of items that earn Punchh points
- If needed, identifies the categories of items that are allowed for redemptions
- Aloha Punchh redeem Item ID
- Barcode header: message text appearing above the barcode on the guest check
- Barcode footer: message text appearing below the barcode on the guest check
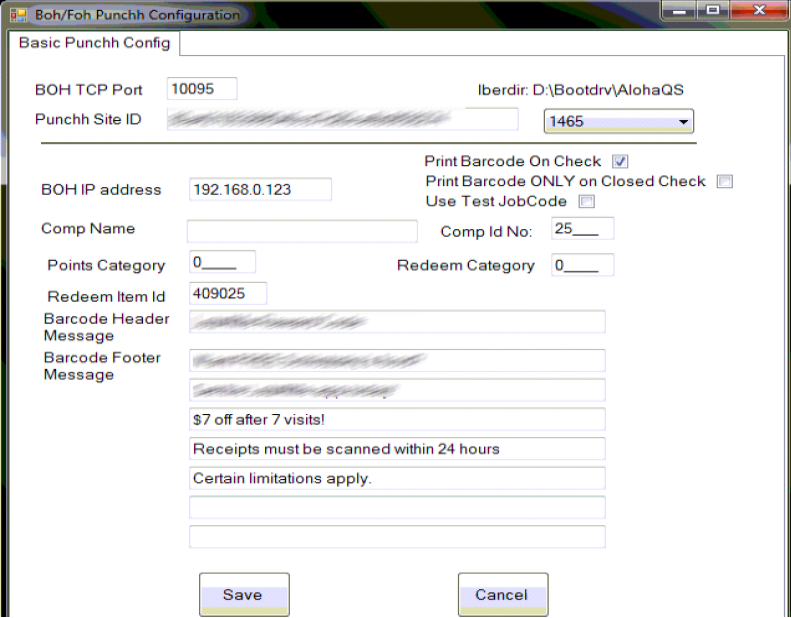
PunchhConf.exe - Silent Setup - Legacy Proxy Installation Only
To run a silent setup, use the following command:
Punchhconf.exe c:\(FILELOCATION)\punchhconf.exe -silent -store=<store-id>
D.4 Redemption button location on Table Service
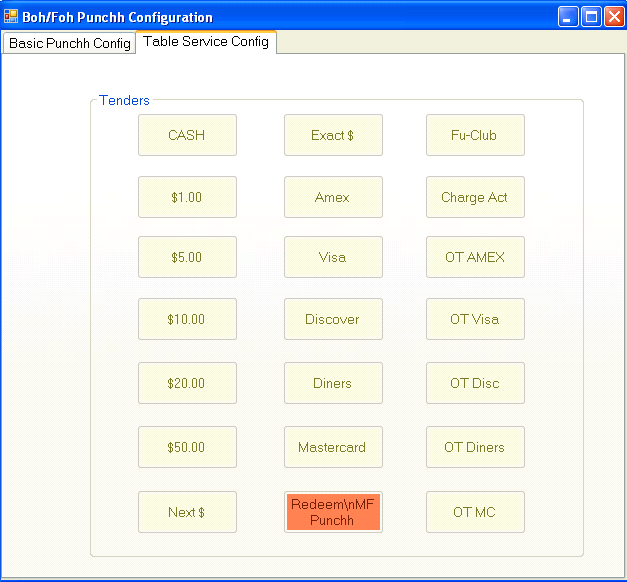
When the configuration program is run on a table service system, it will attempt to find a free location to install the redemption button on your system's tender screen (see below).
Click on an open button location to save the location for the table service system.
D.5 Enable the Punchh Application on FOH Terminal
-
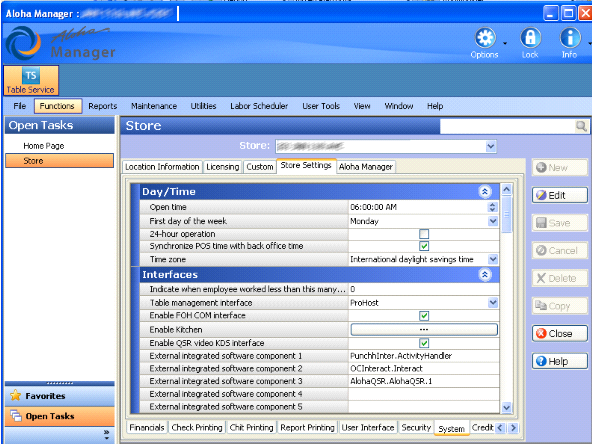
Go to Maintenance > Store > Store Settings.
Enter PunchhInter.ActivityHandler into a free "External integrated software component".
This is how Aloha attempts to load the Punchh DLLs (PunchhPrt.dll and PunchhInter.dll). -
The Punchh application DLL files need to be registered on each terminal.
The setup program will create a file named FOHADM.BAT that will be pushed to terminals. If the site has Command Center installed on terminals, this file will be run automatically upon restarts.
This file can be run to register the DLLs manually if needed by opening Windows File Explorer and double-clicking on it or running from a command window.
-
Set the Punchh Redeem button location on the Table Service Tender screen.
Here's an example of the Punchh Redeem button being located on the Tender screen, which was configured by the PunchhConf.exe program.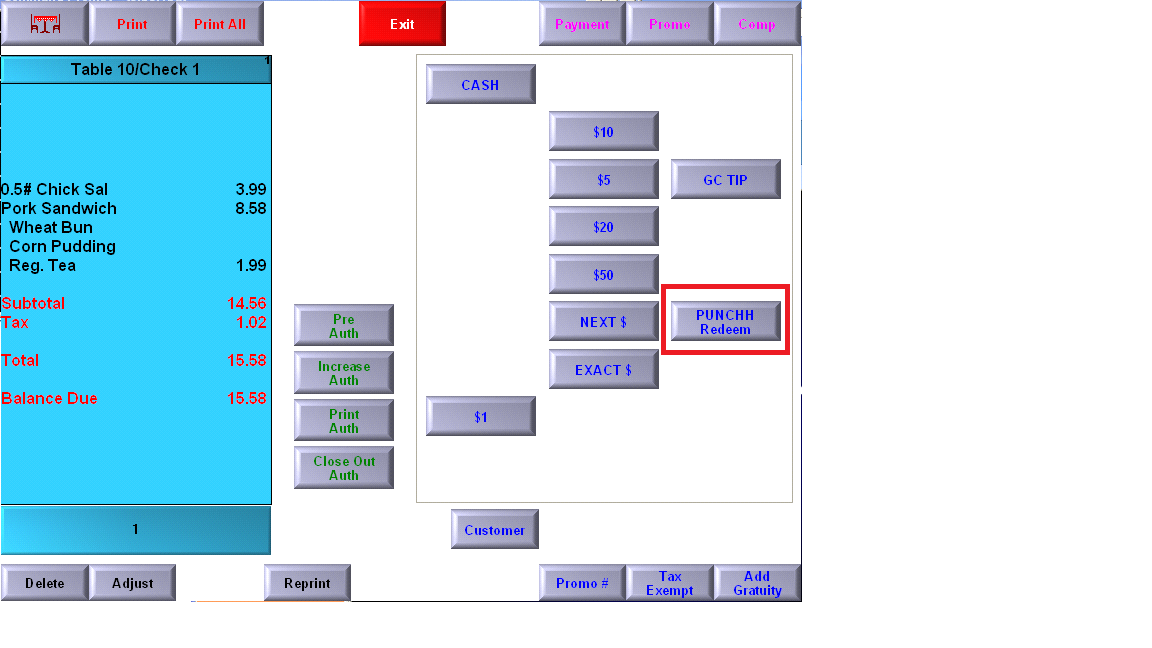
(To enable accessing Punch from the Aloha Comp or Promo screen follow, Aloha POS Table Service Access Punchh from Comp or Promo Screens.) -
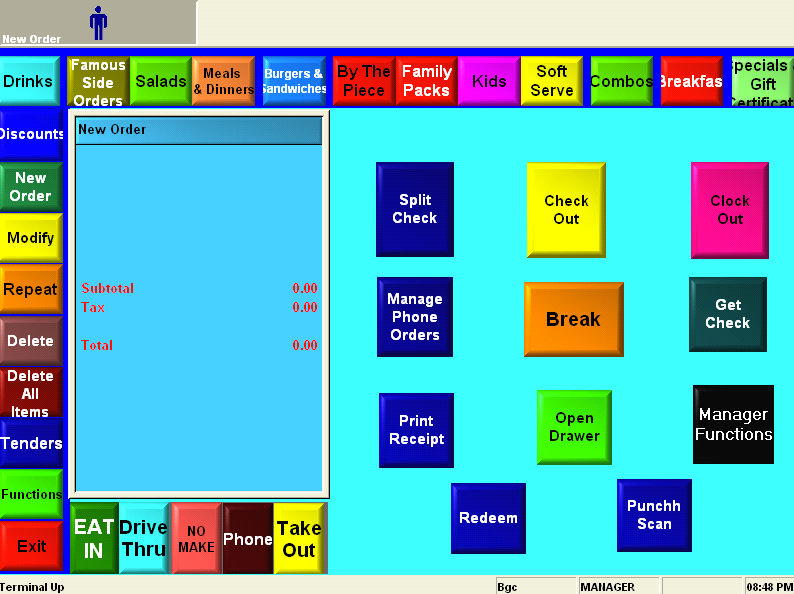
Set Aloha Quick Service buttons.
With Aloha QS, buttons will have to be defined to call the functions used for Punchh. The screen below shows two buttons that are defined:- The Redeem button is called when processing a Punchh redemption.
- The Punchh Scan button is used to process a guest's check-in.
-
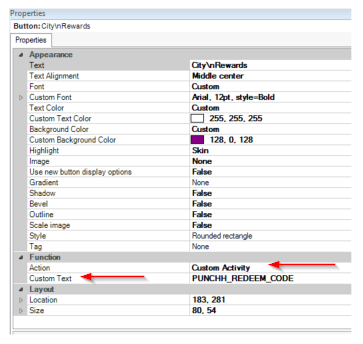
Quick Service - Defining Punchh Redeem button
- Create the desired button.
- Function -> Action = Custom Function
- Function -> Custom Text = PUNCHH_REDEEM_CODE
-
Quick Service - Defining button to call coupon alphanumeric entry
- Coupon entries are entered using the same user interface as the redeem codes entered in the preceding step.
-
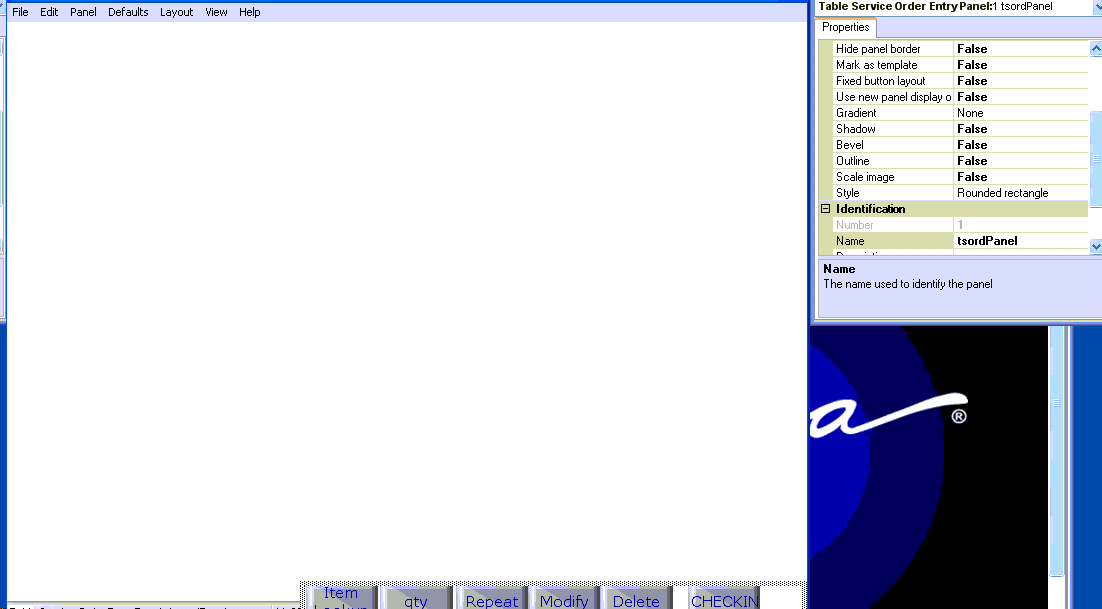
Table Service - Check-in
Create a new order entry panel to allow for the Check In button to be available.-
Create a new order entry panel using the screen editor.
-
Add the existing buttons with desired functions.
-
Add a button titled Check In.
-
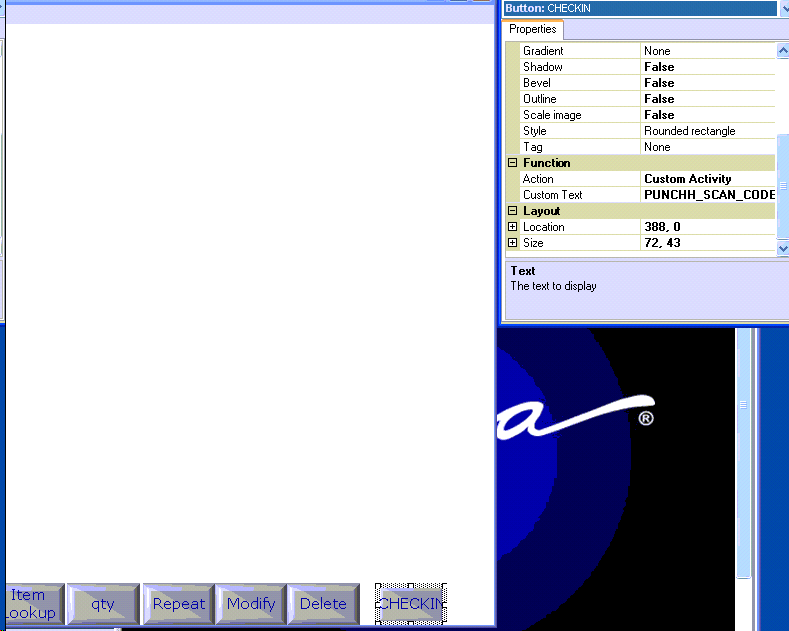
Set the Check In button's function to Custom Activity.
-
Set the customer text to: PUNCHH_REDEEM_CODE
-
Save the panel and exit the screen editor.
-
Add an event to set the newly created order screen for each job code that will need to be able to access Punchh.
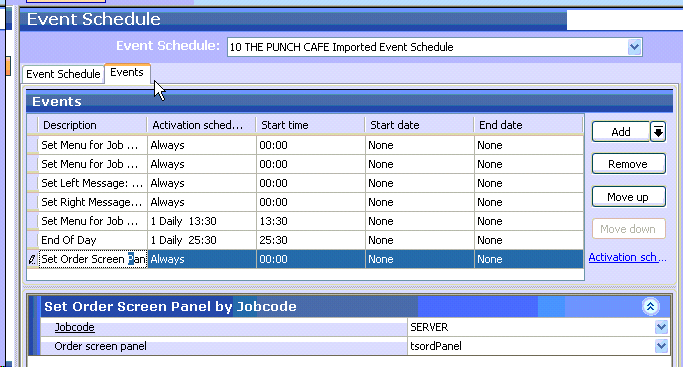
-
FOH User Interface
For more information about the Aloha front-of-house (FOH) user interface, see Aloha FOH User Interface User Guide.
Punchh FOH Application/Files
1. PunchhPrt.dll - This application extension intercepts the guest check messages and appends the desired Punchh Messages and barcode.
2. PunchhInter.dll - This application extension intercepts the check data before printing and transmits check contents to the BOH service program (i.e., AlohaPunchhSvc.exe).
3. AlohaPunchh.exe - This application accepts a redemption code from the POS operator, verifies the redemption code, and applies the comp when punchh.com approves the redemption code.
4. PunchhInter.config - Configuration file that stores variables used by Punchh apps (e.g., receipt header, footer, and comp ID)
5. TounchKbd2.dll, TouchBtn2.dll, BgcInterop.INTERCEPTACTIVITYLib.dll,BgcInterop.AlohaFOHLib.dll - Components used by Punchh apps
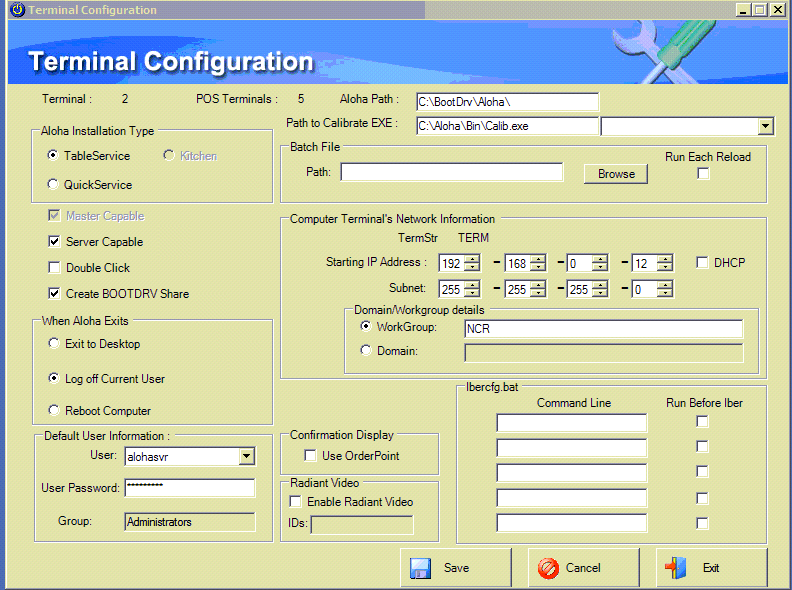
6. Register Punchh DLLs:
PunchhPrt.dll and PunchhInter.dll must be registered on the FOH terminals in order for Aloha to utilize them. If FOHADM.BAT is not present when the setup program is run, the setup program will install it with the following commands:
%windir%\Microsoft.NET\framework\v2.0.50727\regasm.exe %localdir%\bin\PunchhPrt.dll
%windir%\Microsoft.NET\framework\v2.0.50727\regasm.exe %localdir%\bin\PunchhInter.dll
If these commands are not run successfully, then Punchh will not produce a barcode and/or send check data to Punchh.
7. The Punchh programs will create log files in the Aloha tmp folder for debugging and troubleshooting: PunchhInter*.log and AlohaPunchh*.log
Using RAL To Register DLLs
Punchh BOH Applications
- AlohaPunchhSvc.exe - Service that listens to FOH Punchh apps and transmits check data from the store to punchh.com. It also handles redemption processing.
- PunchhMonitor.exe - Service that monitors AlohaPunchhSvc and monitors configuration changes made to the store (e.g., receipt message).
- PunchhConf.exe - Initial configuration program (legacy proxy installation only)NOTE: Firewall settings on BOH and the router must be set up to allow access from BOH to the Punchh service endpoints. For details, see Aloha Firewall Site Setup.
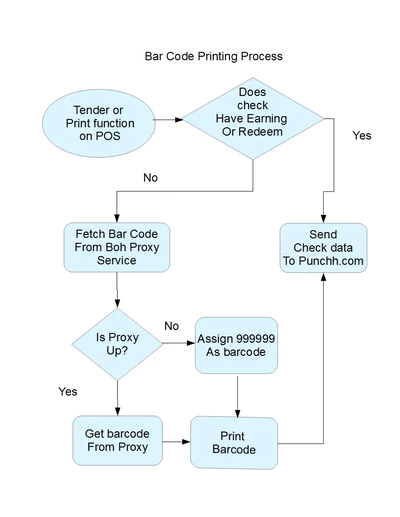
Barcode Printing Process Troubleshooting Barcode Printing
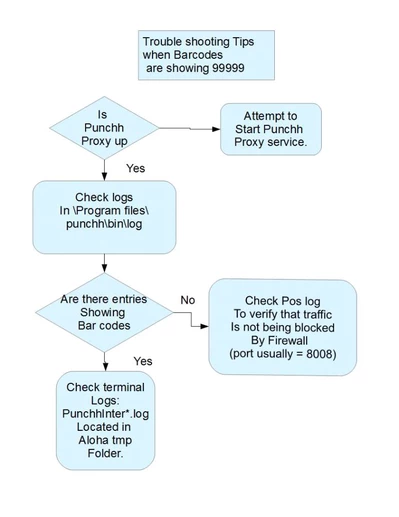
Punchh Troubleshooting Tips
1. Barcode Issues
a. Barcodes are NOT printing on guest check.
i. Verify that the Punchh platform has been set up to print barcodes.
ii. Verify that the Punchh platform does NOT have the diag flag checked.
b. Barcodes are printing all 9999999s.
i. This is an indication that the FOH terminal(s) have a communication issue with the Proxy service on the BOH.
1. Verify that Punchh service is running on the BOH computer.
2. Verify the TCP port Punchh proxy service is running on BOH
a. Check the most recent proxy logs found in C:\program files\punchh\bin\logs. There will be an entry showing the Port number (e.g., 8008) that is being used.
b. If the Punchh Proxy can NOT start on the port, it will log an error indicating that it has an issue.
c. The port being used by Punchh Proxy is stored in this file: c:\program files\punchh\bin\config\Aloha.cfg
3. Verify the TCP port used by the FOH applications. It should match what is used by the proxy found in item 2 above (e.g., 8008 is the most common setting)
a. The PunchhInter.config file located in the Aloha bin folder has a line that identifies the proxy port:
i) <proxyport value="8008" />
4. Verify that the port used for Proxy communications is allowed to pass through any firewall/antivirus programs running on the BOH (e.g., Windows Firewall, Landesk, Norton). Refer to the firewall configuration guide for hardware and software firewall, antivirus, and application whitelisting setup: Aloha Firewall Site Setup
2. Redemption Issues
a. BOH is showing offline in status window.
i. Verify Punchh proxy setting (see notes previously listed for barcodes printing 999999s).
ii. Check the FOH terminal log: AlohaPunchh*.log (e.g., AlohaPunchh_20150915.log), which is found in the Aloha TMP folder. All errors, warnings, and other debug info are logged in this file for troubleshooting use.
b. Redemption discount is NOT applied to the guest check.
i. The program uses an Aloha Comp to apply the redemption to the guest check. Verify that the comp id used is found in PunchhInter.config:
1. <compid value ="17" />
ii. If the comp id is correct in PunchhInter.config, verify that the Comp is defined correctly in aloha. It should be setup to per the Comp Setup in this Documentation.
c. Redemption code is NOT written on the guest check.
i. The program uses an open menu item to write information on the guest check (e.g., part of redemption code). Verify that the menu item used is in the punchhInter.config file:
1. <redeemitemid value="1000" />
ii. Verify that the menu item is set up according to the notes found in Open Menu Item for Punchh Scan and Check-ins.
3. Check-in / Earning Issues
a. Scanning interface form does not appear when button in Aloha is clicked.
i. Verify that the button is set up to call the custom function in aloha named PUNCHH_SCAN_CODE.
b. QR code information is not added to the guest check after scanning the code and earning.
i. Verify that the open menu item defined for use in adding this information to the guest check is set up and defined correctly in the PunchhIner.config file:
1. <punchhitemid vaue ="104" />
4. Large Log Issues****
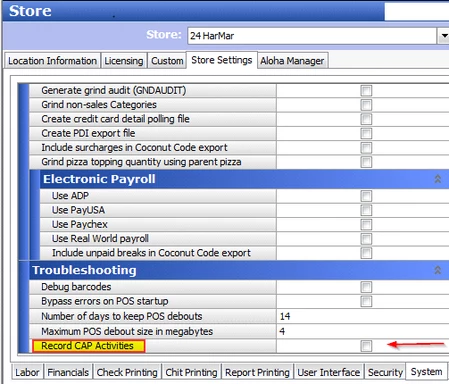
Some customers have found that logs created in the Aloha tmp folder may grow very large (e.g., greater that 500 KB). This is usually because of an enabled a setting in Aloha used for special debugging called Record Capture Activities. The setting to turn off these extra messages can be found below.
Aloha Database Items Needed
-
Comp ID number (see notes regarding comp setup)
-
Punchh menu item (an open menu item used to write check-in information on the guest check)
-
Redemption menu item (an open menu item used to write redemption information on the guest check)
-
Void reason (used in case a cashier voids a check-in or redemption code)
Working With Aloha's Item Categories
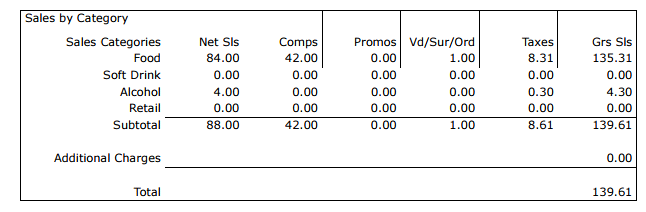
Most stores associate and group their menu items by some simple category identifiers for reporting purposes like the one shown below.
Notes
1. Sales and Retail Categories
Each menu item in Aloha must be assigned to a sales or retail category, and they can be assigned to only one of these categories. For instance, if grape soda is assigned to the Soft Drink sales category above, it cannot be also assigned to the Food sales category.
2. General Categories
Menu items can be assigned to multiple general categories for the store's reporting needs.
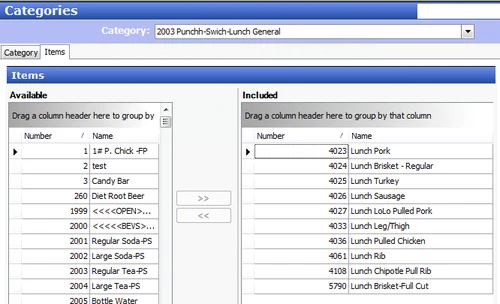
3. To run specific campaigns, the business should use the general categories to earn and reward specific groups of items. A helpful method used in the naming convention for these categories is to use the prefix "Punchh". Also, to prevent confusion, it is recommended that these items are assigned to distinct general categories vs multiple general categories. Here's an example:
Uninstalling Punchh
Uninstalling Punchh - Manual Uninstall - Legacy Proxy Installation Only
-
The Installer on the back office will uninstall the Punchh services when used from the Control Panel -> Programs function. Before running uninstall, please see item 2.
-
NOTE: Uninstalling the FOH apps will depend upon what your business has deployed on the back office computer, as some applications (e.g., Take Out and various online ordering platforms) will cause iber.exe or iberqs.exe to run and may load the punchhInter.dll and punchhPrt.dll. Here's how to remove them:
a. If Iber.exe or iberqs.exe is running on the back office computer, then you can issue a STOP front of house. Warning: if this occurs during business hours, then it will stop the POS terminals, so it's suggested you plan the uninstall after close of business.
b. After the instance of iber or iberqs has been stopped on the back office, you can uninstall Punchh from the control panel and the Punchh apps found in Aloha's bin folder will be removed too.
- Unregistering Punchh on front of house: While not necessary, you can unregister the DLLs used by Punchh with these commands on the terminals:
%windir%\Microsoft.NET\framework\v2.0.50727\regasm.exe /unregister %localdir%\bin\PunchhPrt.dll
%windir%\Microsoft.NET\framework\v2.0.50727\regasm.exe /unregister %localdir%\bin\PunchhInter.dll
- The Punchh apps may still reside on the terminals due to Aloha copying them prior to running the control panel's uninstall. To remove them from the POS terminals, you have a couple of options:
a. If the FOH is still stopped (see item 2), you should be able to delete them manually. Due to network policies, you may not have access to the front of house bin folder where these apps are stored (I.e., Aloha's bin folder). Once removed, you can restart the terminals and "START" the front of house if you have performed a "STOP Foh" operation.
b. If your site uses a SyncInclusionList.cfgfile, then remove or remark out the Punchh files listed in this file and refresh terminals. This will purge the terminal's bin folder and copy just the files listed in this file.
c. If Punchh needs to be removed during business hours, using the Syncinclusionlist.cfg may be the easiest option to employ. Once the Punchh entries are remarked out, just refresh the terminals or wait until end of day to run.
Uninstalling Punchh - Silent Uninstall - Legacy Proxy Installation Only
This command file shows how to run a silent uninstall:
@echo offEcho stopping svcsc stop Punchhping localhost -n 10 >nulsc stop PunchhMonitorping localhost -n 10 >nulsc stop AlohaPunchhSvcping localhost -n 10 >nulEcho starting uninstall"c:\program files (x86)\punchh\unins000.exe" /VERYSILENT /NOREBOOT /LOG=c:\tmp\unpunchh.log
