Swag Management
Swag Management allows you to offer branded swagandise as loyalty rewards within the Punchh Platform. Guests can browse and redeem their points for physical items — such as apparel, drinkware, or seasonal drops — directly from your brand's app or web experience.
As a brand admin, you can configure swag items, set point values, manage inventory, define fulfillment options, and more.
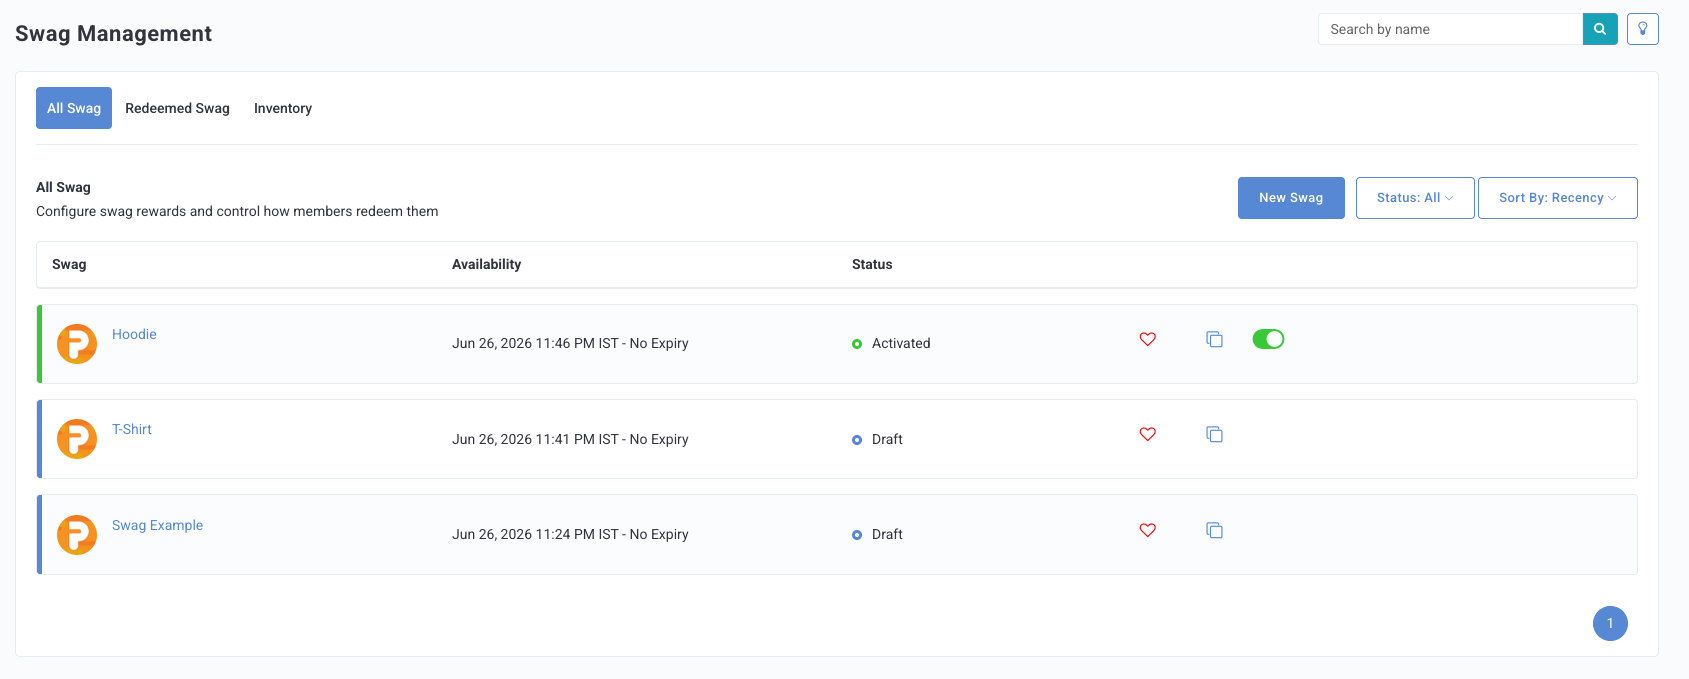
How to Create a Swag Item
Step 1 - Info
- Enter a name for your swag in the Name field.
- Add descriptive text for your swag in the Description field.
- Select a Fulfillment Method for this swag:
- Store Pickup: Guests redeem the item using points and pick it up at a physical store location.
- Home Delivery: Guests provide their shipping details at redemption, and your team fulfills the order.
- Both: Guests choose their preferred fulfillment method at the time of redemption.
- (Optional) To add an image to your swag, click the Browse button and select an image from your computer. The ideal image size is h:600px by w:800px with a max file size of 500kB.
- Toggle Available as a Template? if your brand has a franchisee model and you want franchisees to see your swag as an option.
- When finished, click Next to move on to Step 2.
Step 2 - Eligibility
The Eligibility step is where you add qualification criteria (discount rules) for this swag. This step is always present regardless of your chosen Fulfillment Method.
Note: The Receipt Rule (Qualifier) field is only applicable when the Fulfillment Method is Store Pickup or Both. If you selected Home Delivery, the Receipt Rule field is hidden.
There are two options: if you want to use pre-existing, saved qualification criteria (Existing Qualifier), or if you prefer to create a new discount rule qualifier unique to this swag during this step (New Qualifier).
New Qualifier
Choose New Qualifier in the Eligibility step to choose the category/type of Discount Rule that best applies to your new swag.
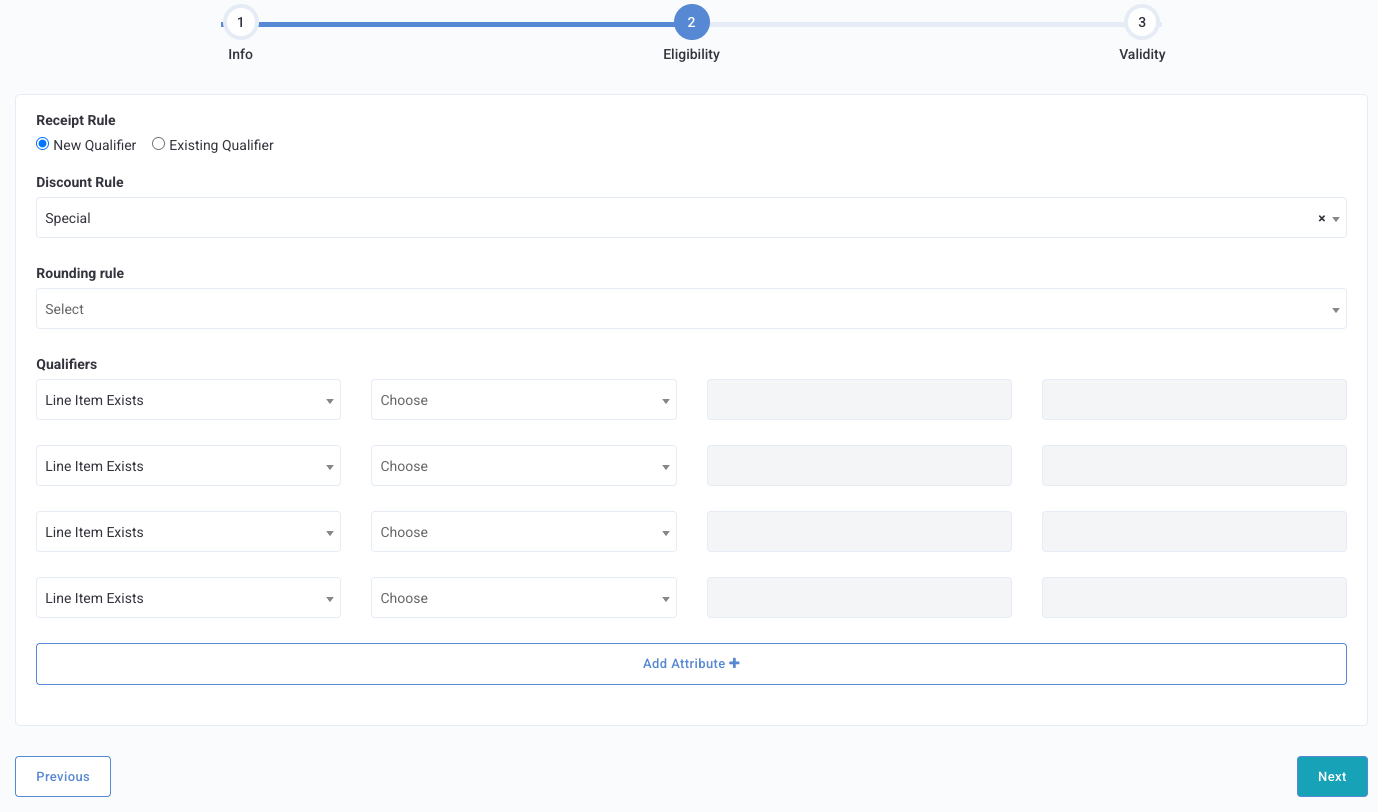
You can set additional receipt and purchase requirements for each type of Discount Rule listed below.
- Free Gift: Create a gift reward a guest can redeem to receive a specific menu item (or off-menu promotional gift) for free.
- $ or % Off: Create a reward a guest can redeem for a specific dollar value or % percent off the receipt.
- BOGO: (Buy One Get One) Create a reward that allows a guest to receive an item (either single or item group type) for free or for a specific discount (dollar value). These can be applied to the same item or different items/item groups.
- Buy X Get Y: Create a reward that allows a guest to receive a specific item "Y" for free if a guest purchases item "X" on the same receipt/transaction. Items X and Y can be the same item or different items/item groups.
- Menu Item Discount: Create a reward that allows a guest to receive a % percent or dollar value off a particular menu item or item group.
- Promotional Price: Create a reward that allows for an item or bundle of items to be purchased at a discounted promotional price.
- Special: These are a choose-your-own-adventure, custom category and occur when a redeemable was/is created in the previous Punchh Dashboard 1.0 iteration. Once the final migration to Dashboard 2.0 occurs, these unclassified redeemables will be re-sorted into their proper types.
Once you select a Discount Rule specific to the type of swag you want to create, you will only be shown qualifier settings relevant to that particular ruleset. Refer to Qualification Criteria and Processing Functions for details on how to set up the details for your chosen discount rule.
Existing Qualifier
If using an Existing Qualifier, click the Choose a Receipt Rule drop-down to choose from any of your previously saved qualification criteria.
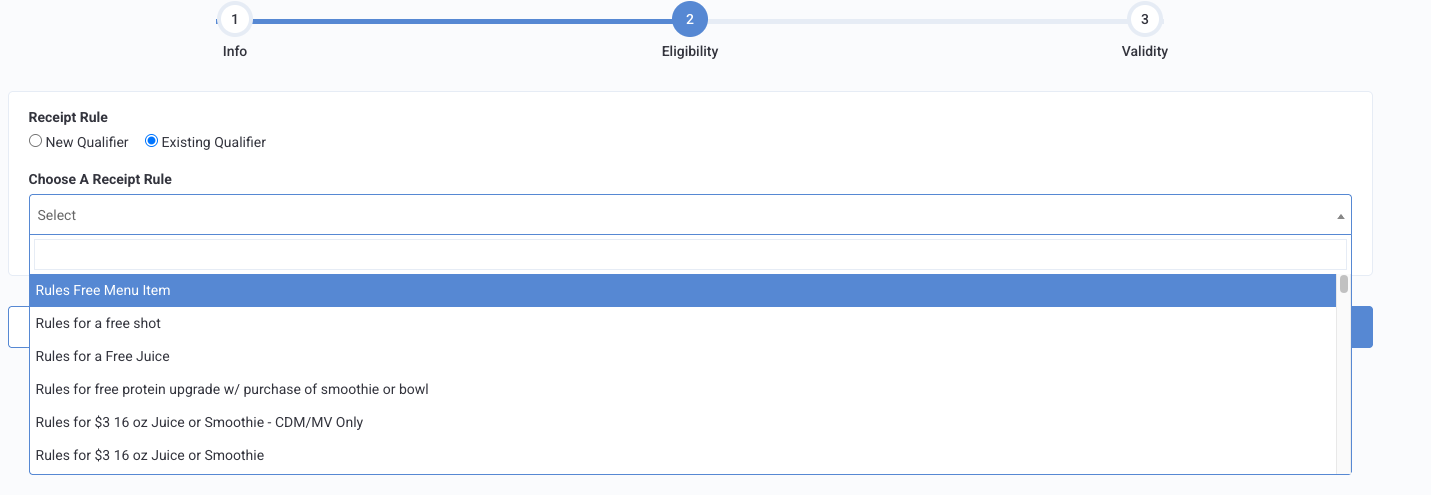
Once finished, click Next to move on to Step 3.
Step 3 - Validity
In the final step, Validity, you set the dates and locations where the swag will be valid, and set recurrence and guest notifications to alert them of the offer's approaching expiration.
-
Toggle Active now to make the swag available upon creation.
-OR-
Enter a Start time for the Swag to become Active and available. -
Enter an amount in the Expiry (In Days) field to end your swag after a set number of days after the reward is credited to a guest's account,
-OR-
To set a hard date for your swag to end, enter an End Time and date in the field and choose the Timezone that will be applied to that time.
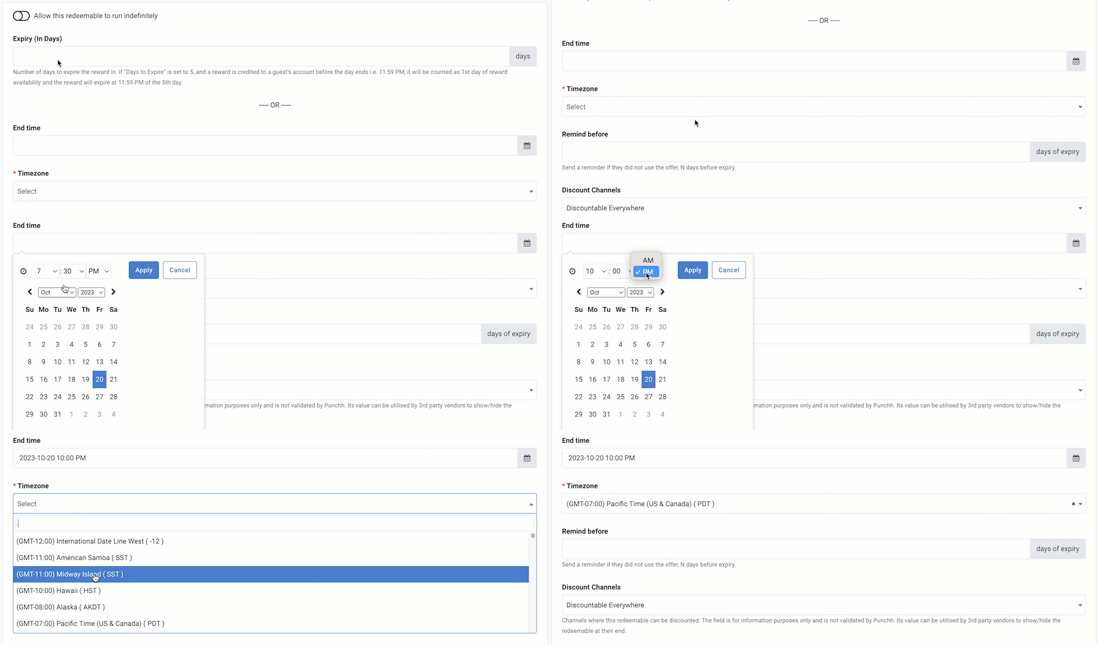
Alternatively, if you don't want your swag to have an expiration date, click the Allow this swag to run indefinitely toggle to enable it
-
(Optional) In the Remind before field, enter a time (in days) to remind a guest in advance that the swag is expiring.
For example, if you enter "3", the guest will receive a notification 3 days before the swag's expiration. While optional, we strongly recommend setting this. -
For points-unlock rewards, enter the number of points required for this swag to be activated into the Points Needed to Redeem field.
When redeemed, this point amount will be deducted from the guest's total. Your program must support that functionality to work. -
Enter the maximum number of times a single guest can redeem this item in the Per Member Redemption Limit field.
-
(Optional) Toggle Additional Options to add more details:
- Countdown Expiry (In Mins): Just as you choose the number of days from launch to end, you can specify a set number of minutes before a redemption code attached to this type of swag expires.
- Allow Redemption Code expiry on Reward's end date? Toggle this option to allow the redemption code generated by a guest to be valid til the end date/time of the reward. If toggled off, the redemption code expiry is set by the Countdown Expiry field above.
Note: This toggle is only shown when the Fulfillment Method is Store Pickup or Both. It is hidden automatically for Home Delivery swags, as it does not apply to that fulfillment type.
- Countdown Message: Set the message shown on the redemption screen on the mobile app when redeeming. You can use {{points_requested}} and {{redeemed_points}} variables to customize this message if it makes sense.
- Meta Data: Enter information as needed for use in your mobile app.
-
Once you've entered your desired validity settings, click the Finish button.
Inventory Management
You can manage inventory for each swag item under Swag Management > Inventory.
Important: All existing swag items will display as Not Configured in the Inventory tab. You must manually set the inventory mode for each swag item before members can see or redeem it.
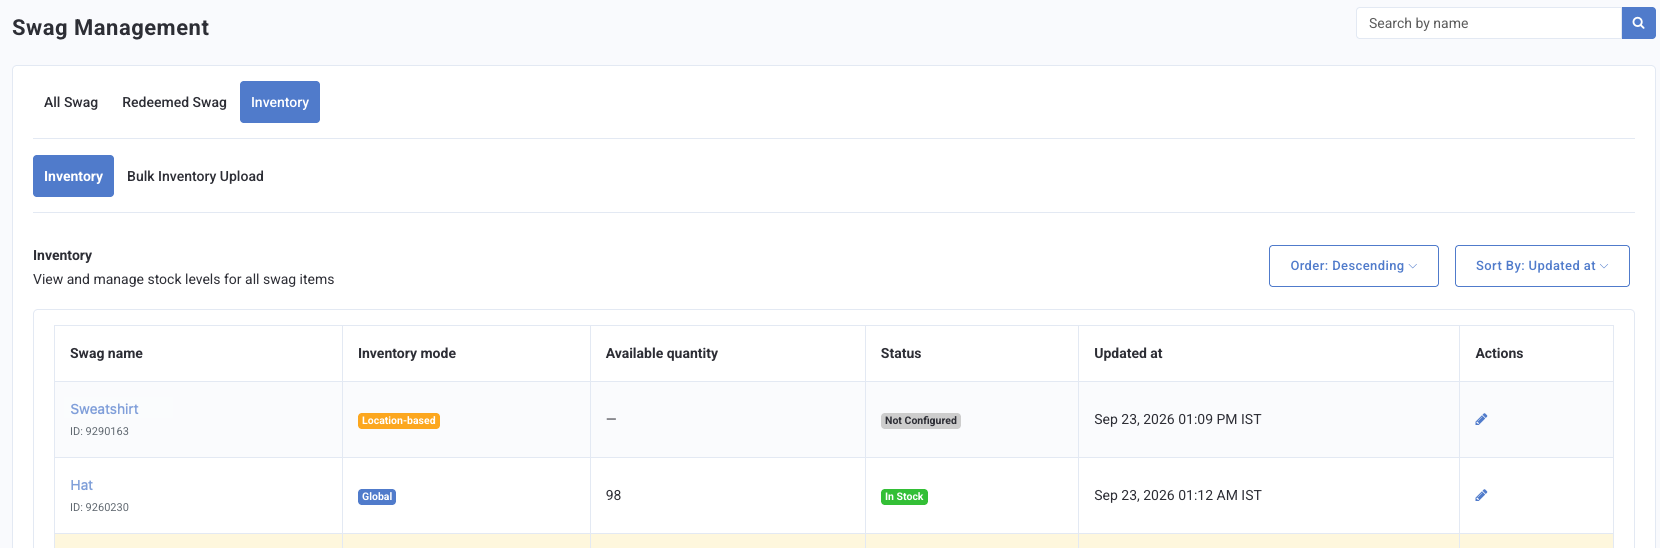
The Inventory tab displays a table of all your swag items with the following columns:
- Swag Name: the swag name (links to the inventory view/edit page) with the swag ID as subtext
- Inventory Mode: a badge showing the configured mode: Not Configured (grey), Global (blue), or Location-based (orange)
- Available Quantity: total quantity; for Location-based swags, shown as "{total} across {x} locations"
- Status: calculated from quantity: In Stock (green), Out of Stock (red), or Not Configured (grey)
- Updated At: timestamp of the last inventory change
Click the edit icon for any swag item to open its inventory view/edit page.
Note: To access the Inventory tab, you need the Redeemables permission plus either the Inventory (Create and Edit) or Inventory (View Only) permission assigned to your admin role. See Inventory Permissions below.
Setting an Inventory Mode
When you open the inventory view/edit page for a swag item for the first time, you choose between two inventory modes:
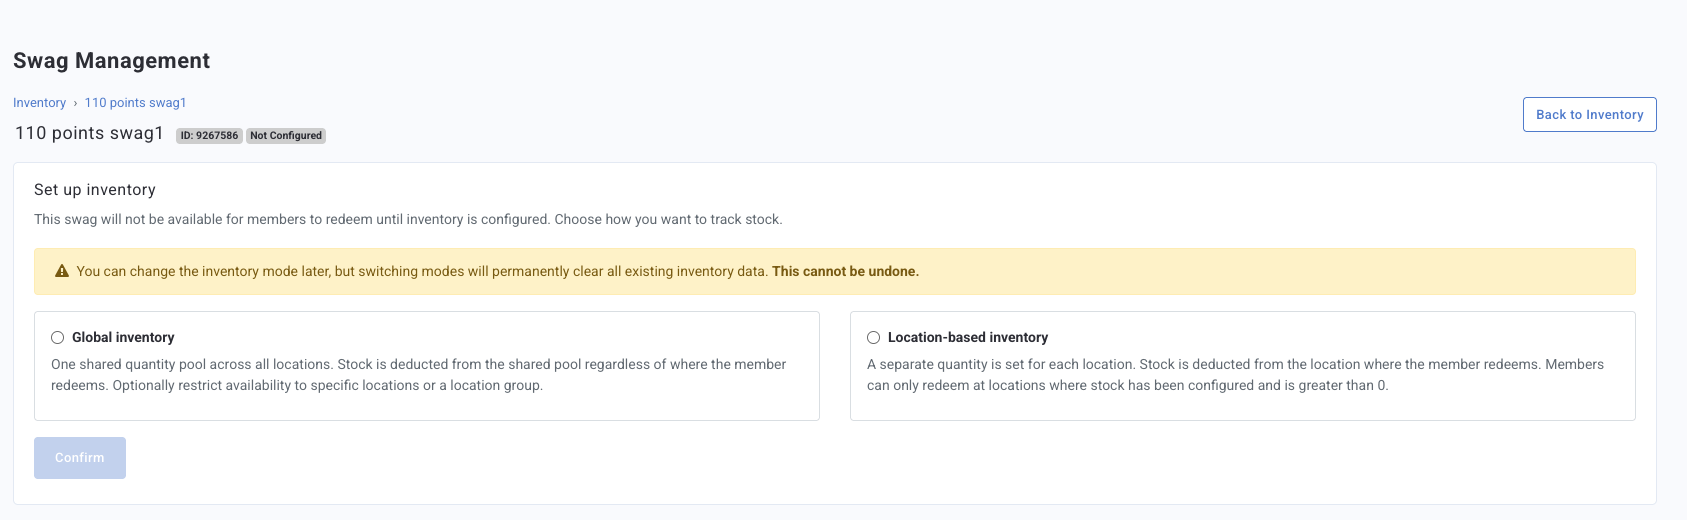
Global
One shared quantity pool across all locations. Stock is deducted from the shared pool regardless of where a member redeems.
- Optionally restrict availability to a specific location or location group using the Participating Locations dropdown. Leave this empty to make the swag available at all locations.
- Setting the quantity to 0 makes the swag unavailable everywhere.
Location-based
A separate quantity is set for each location. Stock is deducted from the location where the member redeems.
- All active locations for your business are pre-listed. Click any quantity value to edit it inline.
- Members can only see and redeem the swag at locations where the quantity is configured and greater than 0.
- Setting a location's quantity to 0 marks it as Out of Stock at that location. The row stays in the table.
Note: Unlimited inventory is not supported. Quantity must be set to 0 or greater. Stock status (In Stock, Out of Stock, Not Configured) is calculated from the quantity value. You cannot set it directly.
Switching Inventory Modes
You can change the inventory mode for a swag item after it has been configured. Click Change mode on the inventory view/edit page.
Caution: Switching modes permanently deletes all existing inventory data for that swag, including all configured quantities and participating locations. This cannot be undone.
Mode switching is blocked if the swag has any redemptions currently in progress (unredeemed rewards that haven't yet been honored or expired). Once all in-progress redemptions are resolved, you can switch modes again.
Bulk Inventory Upload
The Bulk Inventory Upload subtab lets you update location-level inventory for multiple swag items at once by uploading a CSV file or providing an S3 URL.
- The CSV format requires three columns:
swag_id,location_id,quantity. - Bulk upload only applies to Location-based mode. If a row references a swag with no inventory mode set, Location-based mode is applied to that swag.
- File size limit is 15 MB for CSV uploads. For larger files, use an S3 URL.
- Upload history is stored permanently. Downloadable files (including error reports) expire after 7 days.
- You receive an email notification when your upload completes.
- If any rows fail, an error CSV is available for download containing only the failed rows with an added
error_reasoncolumn.
Inventory Permissions
Access to the Inventory tab in Swag Management is controlled by two admin permissions:
| Permission | What It Allows |
|---|---|
| Inventory (Create and Edit) | View the Inventory tab and set or update inventory for new and existing swag items. |
| Inventory (View Only) | View the Inventory tab only. All edit and save controls are disabled. |
Both permissions require the Redeemable, Collectible & Swag Management permission to be active on the admin's role. If the Redeemables permission is removed, the admin loses access to the Inventory tab as well, even if an Inventory permission is still assigned.
Note: Franchise admins can only view the Inventory tab. Edit access is not available regardless of permissions assigned. Superadmins and major admins have full inventory access without needing explicit permission assignment.
To assign these permissions, navigate to Administration > All Users, Roles and Permissions > Roles and update the relevant admin role.
Fulfillment Configuration
When you create a swag item, you select the Fulfillment Method in Step 1 (Info). This determines how guests receive their swagandise and which fields are available during setup.
| Fulfillment Option | How It Works |
|---|---|
| Store Pickup | The guest redeems the item using points and picks it up at a physical store location. |
| Home Delivery | The guest provides shipping details at redemption time. Your team downloads and fulfills orders manually from the Punchh Platform. |
| Both | The guest selects their preferred fulfillment method at the time of redemption. |
Store Pickup Guest Experience
- The guest browses the swag section and selects an item.
- The guest taps Redeem. Points are immediately deducted from their balance.
- If location-level inventory is configured, the guest selects their preferred store location.
- A swag Reward is credited to the guest's Rewards/Wallet section.
- The guest visits the selected store.
- The cashier adds the corresponding item to the receipt. The reward applies a 100% discount at checkout.
- The reward is marked as redeemed, and the physical item is given to the guest.
Home Delivery Guest Experience
- The guest browses the swag section and selects an item.
- The guest taps Redeem. Points are immediately deducted from their balance.
- The guest is prompted to enter their shipping details:
- Full Name
- Phone Number
- Address
- City
- State
- ZIP Code
- Shipping details are saved and associated with the redemption record.
- Your team downloads the shipping information from the Punchh Platform and fulfills the order.
Guest Swag Redemption
Viewing a Guest's Points Saved for Swag Redemption
You can view a guest's current swag redemption balance and threshold directly from their profile in the Punchh Platform. When the swag feature is enabled for a guest, a Swag Redemption card appears on the Guest Profile: Timeline tab, displaying the guest's Current Swag Balance alongside their configured Threshold. Use this to quickly assess whether a guest is eligible for swag redemption without navigating away from their profile.
