Employee Loyalty Metrics
This article was previously titled "Employee Reviews."
When a loyalty user visits one of your stores and leaves feedback, that review is additionally tied to the employee who served them (based on their name on the receipt). The Employee Loyalty Metrics section under Loyalty Program aggregates these reviews for each of your employees, allowing you to see who is getting great ratings and signing up lots of guests for your loyalty program and who might need a little improvement.
Employee Loyalty Metrics are an invaluable tool for maintaining a high level of service and performance among your employees, company-wide.
Employee Loyalty Metrics are not visible to all Punchh users
Because not every POS provides us with an Employee ID, Employee Loyalty Metrics are turned off by default. If your POS supports this, you can ask your Punchh CSM to enable this feature. Once enabled, Employee Loyalty Metrics will only be visible to admin users with Business Manager or Business Owner permissions.
View the Employee Loyalty Metrics
View details such as total loyalty transactions and sign-ups, positive/negative reviews, and even read comments left by guests about their experience. To see review details about specific employees:
-
Navigate to Loyalty Program > Employee Loyalty Metrics.
-
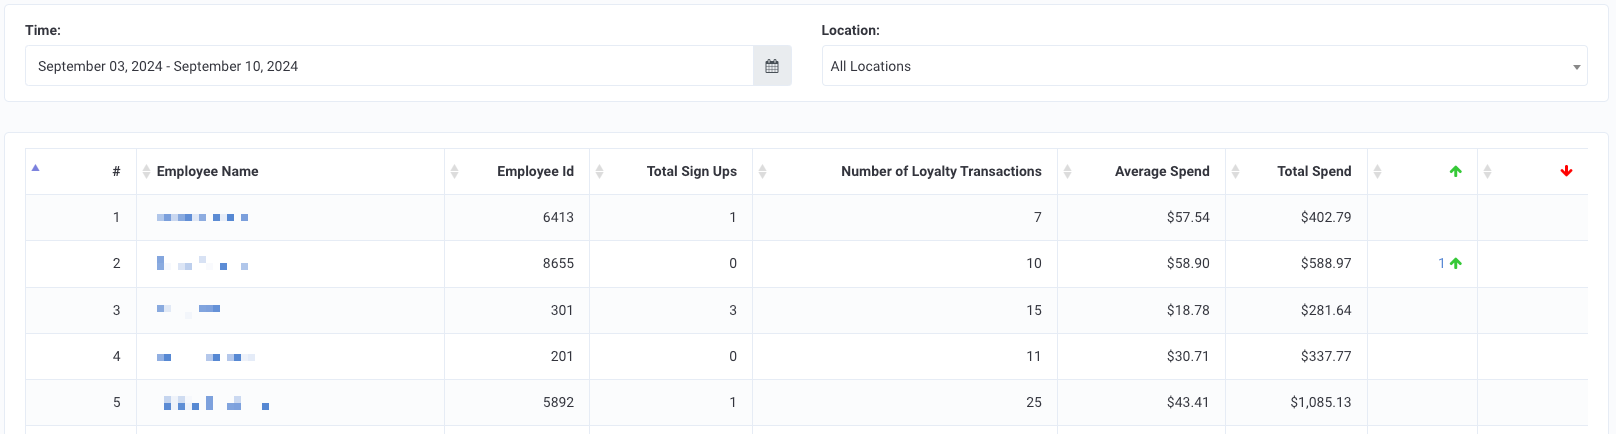
Use the Time and Location drop-downs to find the store of the employee(s) you want to view and the activity time period.
-
You can click the fields at the top of the table to sort employees based on total signups, average spend, positive reviews, etc
- Employee ID: Based on their ID in your POS.
- Total Signups: If your business is set up to allow guest signups at the POS, this value reflects the number of guests signed up by the employee.
- Number of Loyalty Transactions: The amount of checkins, processed redemptions, etc. the employee performed over the time period.
- Average Spend: The average guest receipt total (after discounts) for loyalty transactions performed by the employee. (A higher average check total may indicate an employee who is particularly good about upsells).
- Total Spend: The total amount spent by loyalty guests processed by the employee over the time period.
- Green Upward Arrow: Total number of positive reviews given to the employee over the time period. Click the number to view.
- Red Downward Arrow: Total number of negative reviews given to the employee over the time period. Click the number to view.
-
Click a name to view more details about a particular employee. From here you will see specific guests who have given ratings about their experience at your store while being served by this particular employee. Low ratings may not specifically reflect poor service from one employee, but may be a general review of the store, quality of product, or other factors. You can click the Reply arrow to the right of any of the guests to send them a message about their experience.
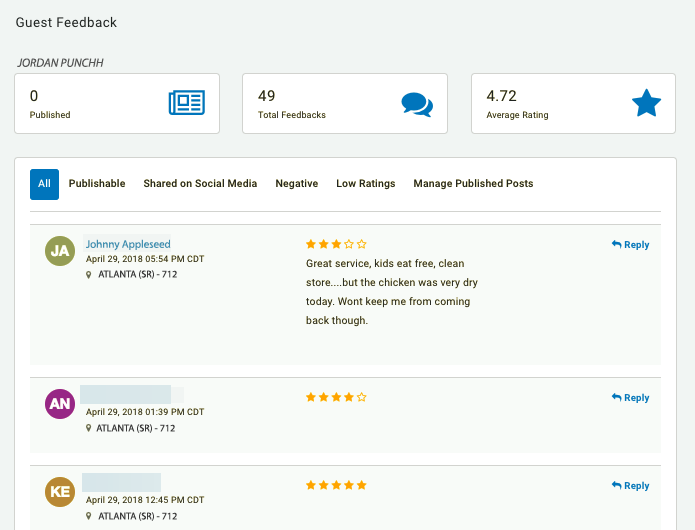
- Use the Feedback Type drop-down to filter your reviews by comments or ratings.
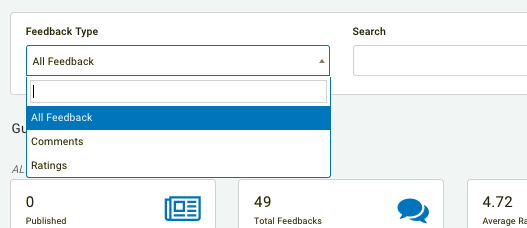
- If you click any of the top tabs above the guest feedback, you'll be taken to the general Feedback section, no longer specific to one employee.

Schedule an Employee Export Report
You can generate a CSV file of your employee review data by scheduling a Employee Export report. To schedule a export report:
- Click the blue Schedule Employee Export button at the top-right of the Employee Feedback page to begin.
- Name your report.
- Choose from which Locations to pull from. Leaving this field blank will include all locations.
- Set the Frequency that your report will be generated; daily, weekly, monthly, or immediately.
If choosing to export immediately, you'll need to enter a date range in the past from which to pull the data. - Select a Start Date and Start Time (this is the time of day that the report will be exported to your email).
- In the Email Recipients field, enter the addresses of all the people who will be sent the report.
To add multiple addresses, hit the Enter key after each one.

- (Optional) Click the FTP Endpoints drop-down to select an outbound FTP site where the report will be automatically uploaded once exported.
- Click Save Schedule to activate your report export.
If you're exporting immediately, the report will be sent out at this time.
