Labor & Guests
Labor
The Labor section contains tools related to employee shifts and schedules.
Scheduler
The labor scheduler application allows for scheduling of shifts for punctuality enforcement or schedule distribution. Start by selecting a location from the drop-down list in the top right corner, then select the pay period and date.
Scheduler page
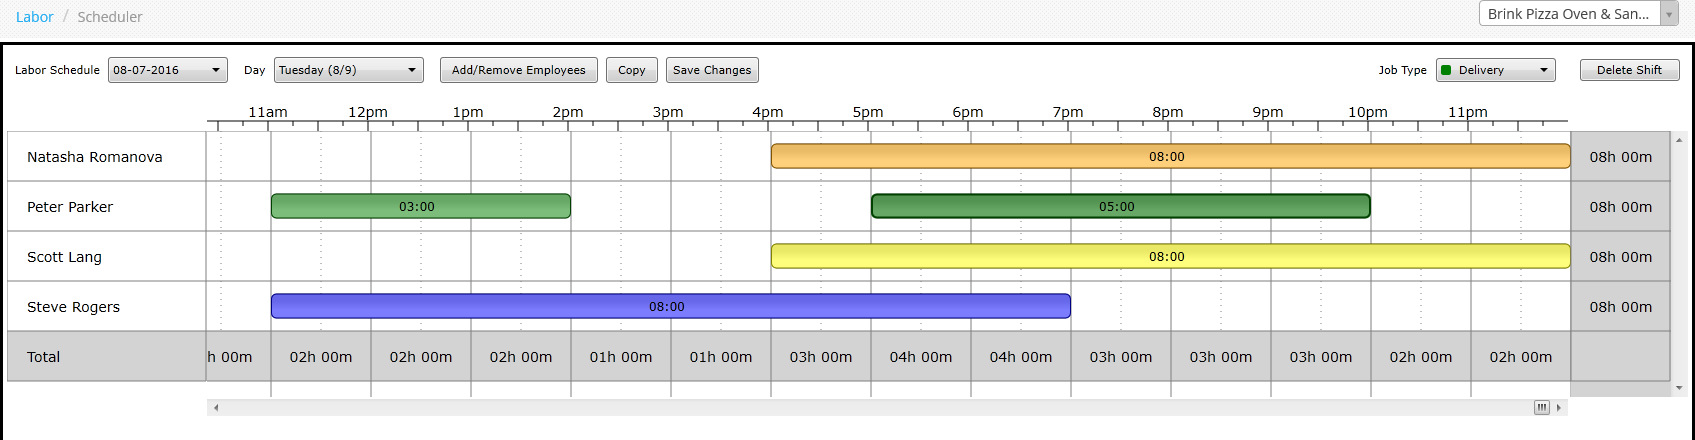
All employees in the selected location are listed on the left. To add a shift, click and drag the shift on the employee's row, starting at the shift's start time column and releasing at the end time. The shift will be created using the first job associated with the employee record, but you can change shift's job by clicking on the shift to highlight it, then use the Job Type dropdown to change the shift's job. To delete a shift, click on the shift to highlight it and then click the Delete Shift button.
Use the Copy button to copy shifts from prior days or weeks when the schedule has little or no change from day to day or week to week.
The shift for a deleted employee can be seen on the schedule by scrolling to the bottom under 'Unknown'. The shift for a deleted employee can be successfully deleted from the schedule while adding new shifts to the schedule.
Prior to navigating away from the scheduler, closing your browser, or selecting another location, be sure to click the Save Changes button to save the schedule.
Edit Pay Periods
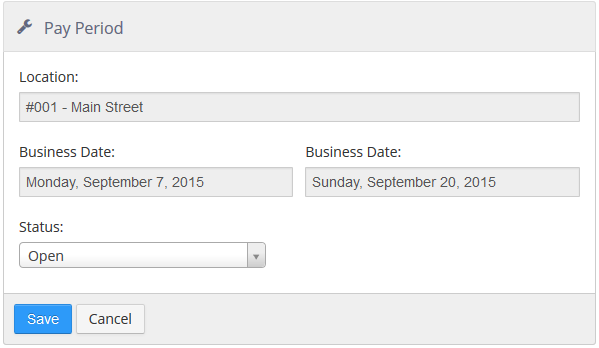
Pay periods are automatically created based on the settings found in the Settings Editor at Options > Labor > General (see Labor in Settings Editor). The Edit Pay Periods page is only used to mark pay periods as either open or closed. When a pay period's status is set to Closed, no further shift edits will be allowed.
Pay Period configuration page
-
Location: Location to which the pay period applies.
-
Business Date (start): First business date of the pay period.
-
Business Date (end): Last date of the pay period.
-
Status:
-
Open: Pay period is open and shift edits are allowed
-
Closed: Pay period is closed and shift edits are not allowed.
-
Edit Shifts
The Edit Shifts page displays employee shifts that can be edited for the selected date range. To display shifts that can be edited, set the date range, location, employees, and jobs using the drop-down lists and click Submit.
NOTE: Only shifts that begin within the date range are shown. For example, if someone works an overnight shift that ends on August 5th, but started on August 4th, then a date range that starts on August 5th will not show that shift.
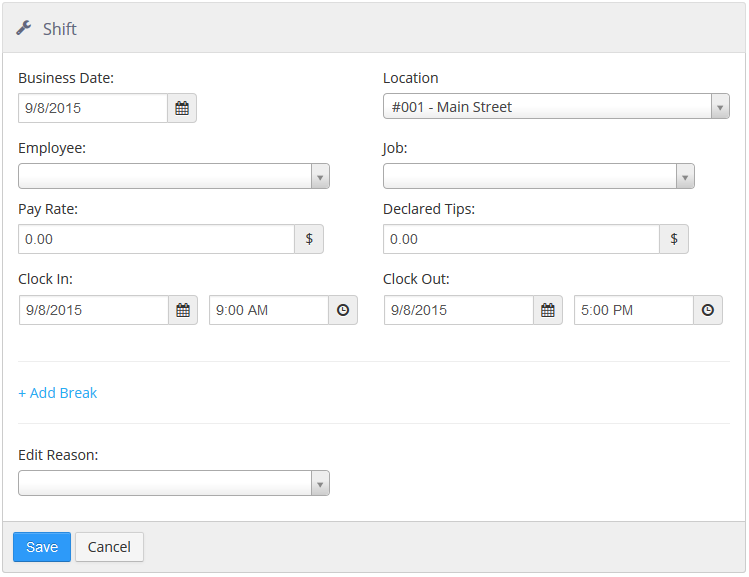
New shifts can be created by clicking the +New Shift button. Existing shifts can be edited by clicking the employee's name.
Shift edit page
-
Business Date: Date on which the shift is to be reported as a labor cost.
-
Location: Location at which the employee worked.
-
Employee: Employee that worked the shift, only employees in the selected location are displayed.
-
Job: Job worked, only jobs associated with the employee are displayed.
-
Pay Rate: Hourly rate of pay for the shift.
-
Declared Tips: Reported tips earned during the shift.
-
Clock In: Date and time that the shift started.
-
Clock Out: Date and time that the shift ended.
-
Edit Reason: Reason for manually editing or creating the shift. Lists Shift Edit reasons defined in Settings Editor for the selected location.
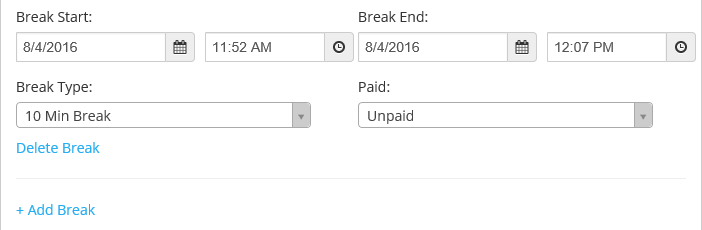
Breaks can be added to shifts by clicking the + Add Break link.
Break section of the Shift edit page
-
Break Start: Date and time the break started.
-
Break End: Date and time the break ended.
-
Break Type: Lists the Break Types defined in Settings Editor at Options > Labor > Breaks.
-
Paid:
-
Paid: Employee is paid for the time on this break.
-
Unpaid: Employee is not paid for the time on this break.
-
Guests
The Guests section contains tools for looking up or adding customers and configuring house accounts.
NOTE: The PAR POS Loyalty program is no longer supported as of March 31st, 2024. In addition, if you use a third-party loyalty provider, these tools do not apply to you.
Customers
The Customers page contains a search form. You can search on a customer name or any other piece of customer data that is stored in the customer database. Enter the search string and click Search.
Customers page after performing a search
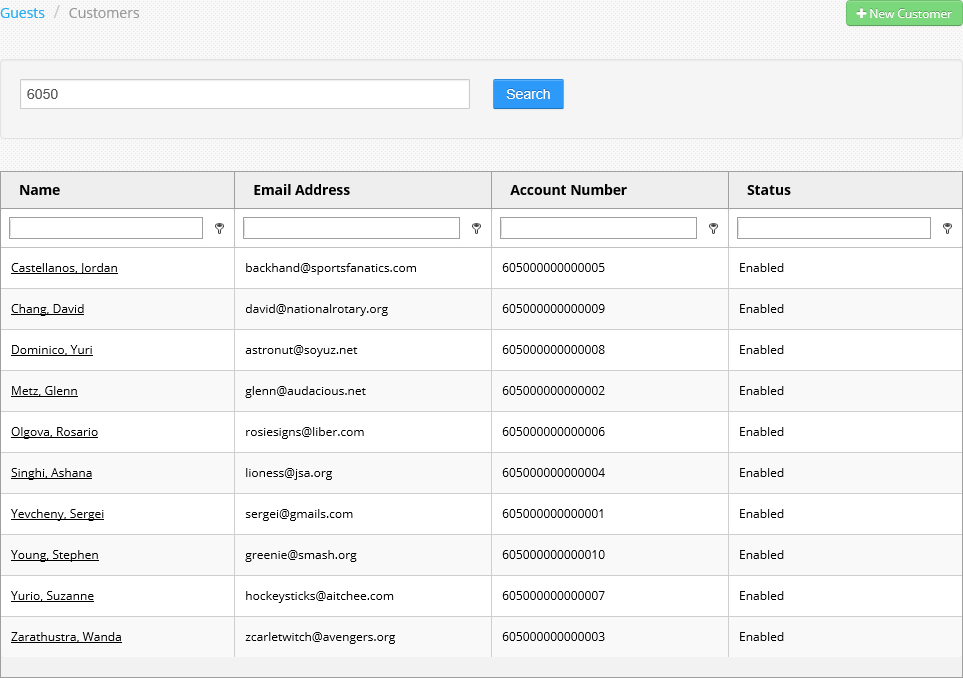
Clicking a name in the customer list displays a customer detail page.
Customer detail page
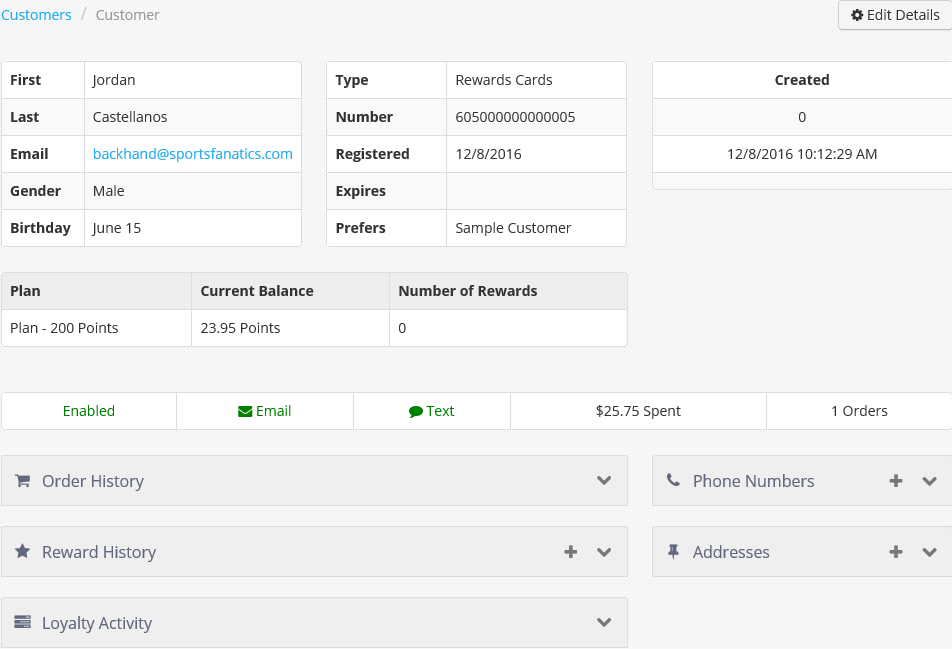
Click the down arrow in any of the title bars to expand the section and see more details. Click the plus sign in any of the title bars to add an entry to that section.
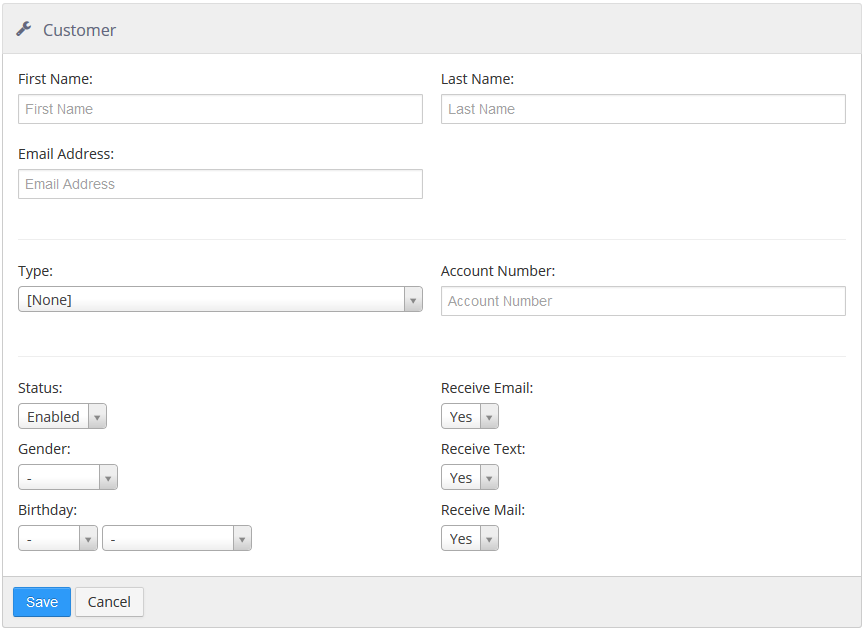
To create a new customer, click the +New Customer button in the upper right of the Customers page. To edit a customer, click the Edit Details button in the upper right of the Customer detail page.
Customer entry/edit page
-
First Name: Customer's first name.
-
Last Name: Customer's last name.
-
Email Address: Customer's email address.
-
Type: No longer supported as of March 31st, 2024.
-
Account Number: No longer supported as of March 31st, 2024.
-
Status: No longer supported as of March 31st, 2024.
-
Gender: Gender of the customer.
-
Birthday: Month and day of the customer's date of birth.
-
Receive Email: Send the customer system generated emails, and used for filtering customer export.
-
Receive Text: Used only for filtering customer export.
-
Receive Mail: Used only for filtering customer export.
House Accounts
The House Accounts page allows you to create new house accounts, edit existing house accounts, and view or edit payment information for house accounts.
House Accounts page
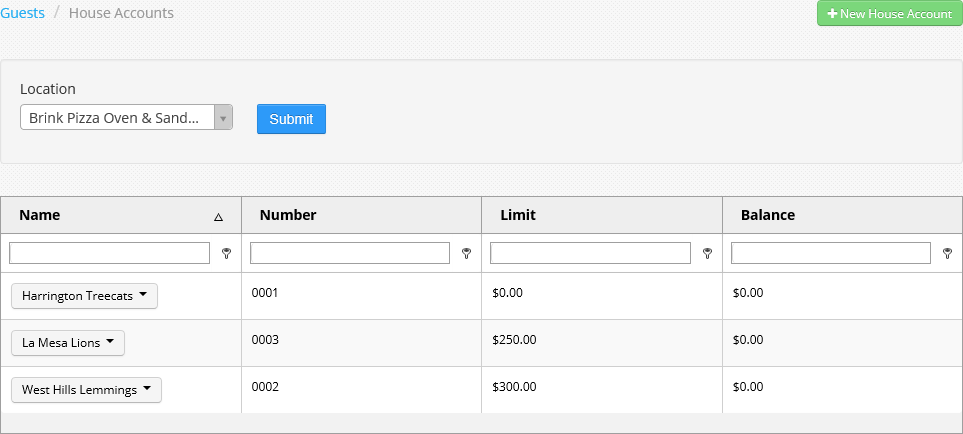
Each house account's name is a drop-down list with three selections.
House account drop-down list
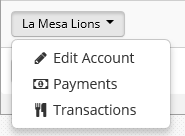
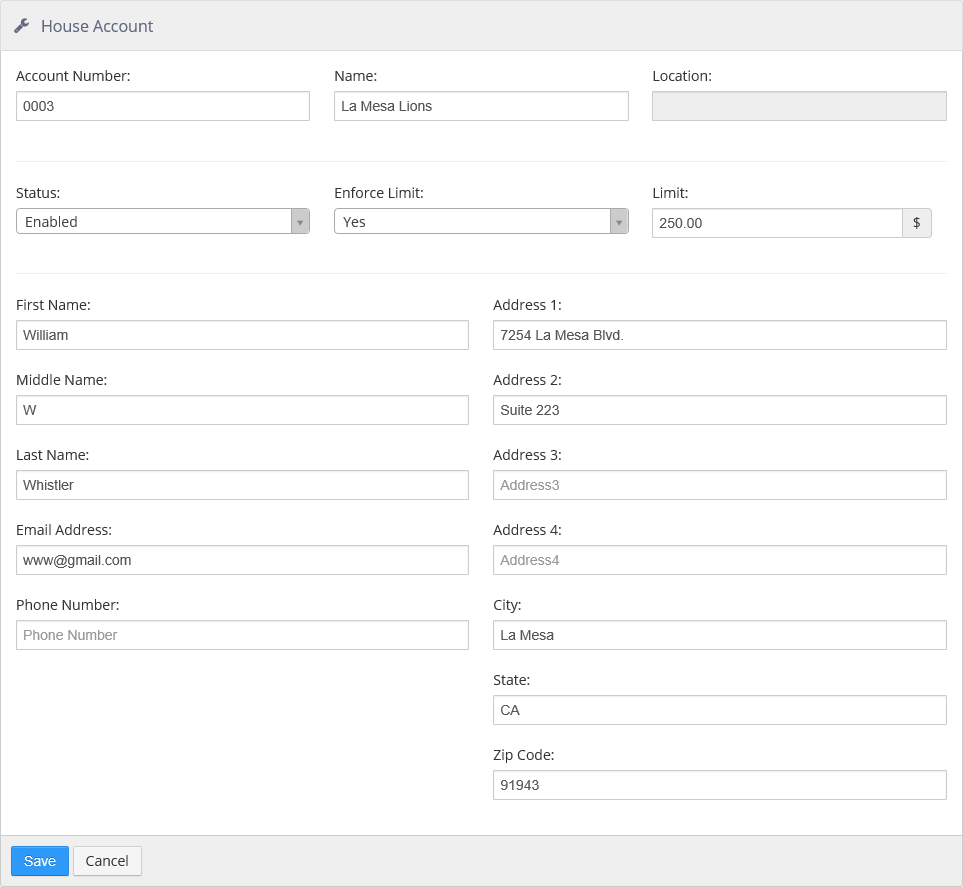
To create a new house account, click the +New House Account button in the upper right of the House Accounts page. To edit an existing house account, select Edit Account from the account's drop-down list.
House Account configuration page
-
Account Number: number used to lookup house account when tendering
-
Name: name displayed on house account related reports and when tendering
-
Location: location at which the house account is valid
-
Status:
-
Enabled: house can be tendered to account
-
Disabled: house account cannot be tendered to account
-
-
Enforce Limit: drop-down to select No or Yes. If Yes, the Limit field can be used
-
Limit: allows entry of a limit amount
-
First Name: allows entry of first name
-
Middle Name: allows entry of middle name
-
Last Name: allows entry of last name
-
Email Address: allows entry of an email address
-
Phone Number: allows entry of a phone number
-
Address 1 to 4: provides four lines to enter an address
-
City: allows entry of a city name
-
State: allows entry of a state
-
Zip Code: allows entry of a zip code
Selecting Payments in a house account's drop-down list opens the Payments page.
Payments page

The Payments section shows payments made to the account recently, plus a balance at the top. The Add Payment section allows you to add a payment to the house account, which is then displayed in the Payments section.
Selecting Transactions in a house account's drop-down list takes you to the configuration page for the House Account Detail report. See Accounting under Reports.
