Control Tower
Control Tower is your brand's central view in the Management Center. It gives you an at-a-glance view of brand health, order performance, and channel status in one place, and lets you pause incoming orders when your kitchen needs a break.
This article covers:
- The Control Tower brand-health dashboard
- The Emergency Closures tab and emergency store closures
- The Store Status tab and emergency store closures
- Pausing and resuming orders from the Management Center
For instructions on pausing orders from the ordering tablet, see How to Pause Online Orders from the Tablet.
Before You Begin
Before you use Control Tower and its order-pausing features, confirm the following:
- For the brand-health dashboard: Your brand must have more than one store. Single-store brands are redirected to the store view and do not land on the brand Control Tower dashboard.
- For order pausing (Management Center): Your brand must have the Order Throttling product enabled. Contact your PAR representative if you do not see the Capacity tab in Control Tower. Your Management Center role must include the appropriate permissions:
- Brand Manager: can pause at both the brand level and store level
- Area Manager and Store Manager: can pause at the store level only
- For emergency store closures: Your Management Center role must have permission to view and manage store closures. By default:
- Brand Manager: can view the Store Status tab and close or reopen any store in the brand.
- Store Manager: can close or reopen stores at the store level only. If you do not see the Emergency Closures tab in Control Tower, contact your PAR representative.
- Note: If your brand has only one store, you will not see Control Tower. Access emergency closure controls from your store's Settings page instead.
- For all Control Tower features: You must be logged in to the Management Center with a role that has access to Control Tower. See the note below.
Navigating to Control Tower
Control Tower is accessible from two places in the Management Center: the brand level and the store level.
- Log in to the Management Center.
- Select your brand from the brand selector.
- In the brand sidebar, click Control Tower (the lighthouse icon, located above Analytics).
Brand-Health Dashboard
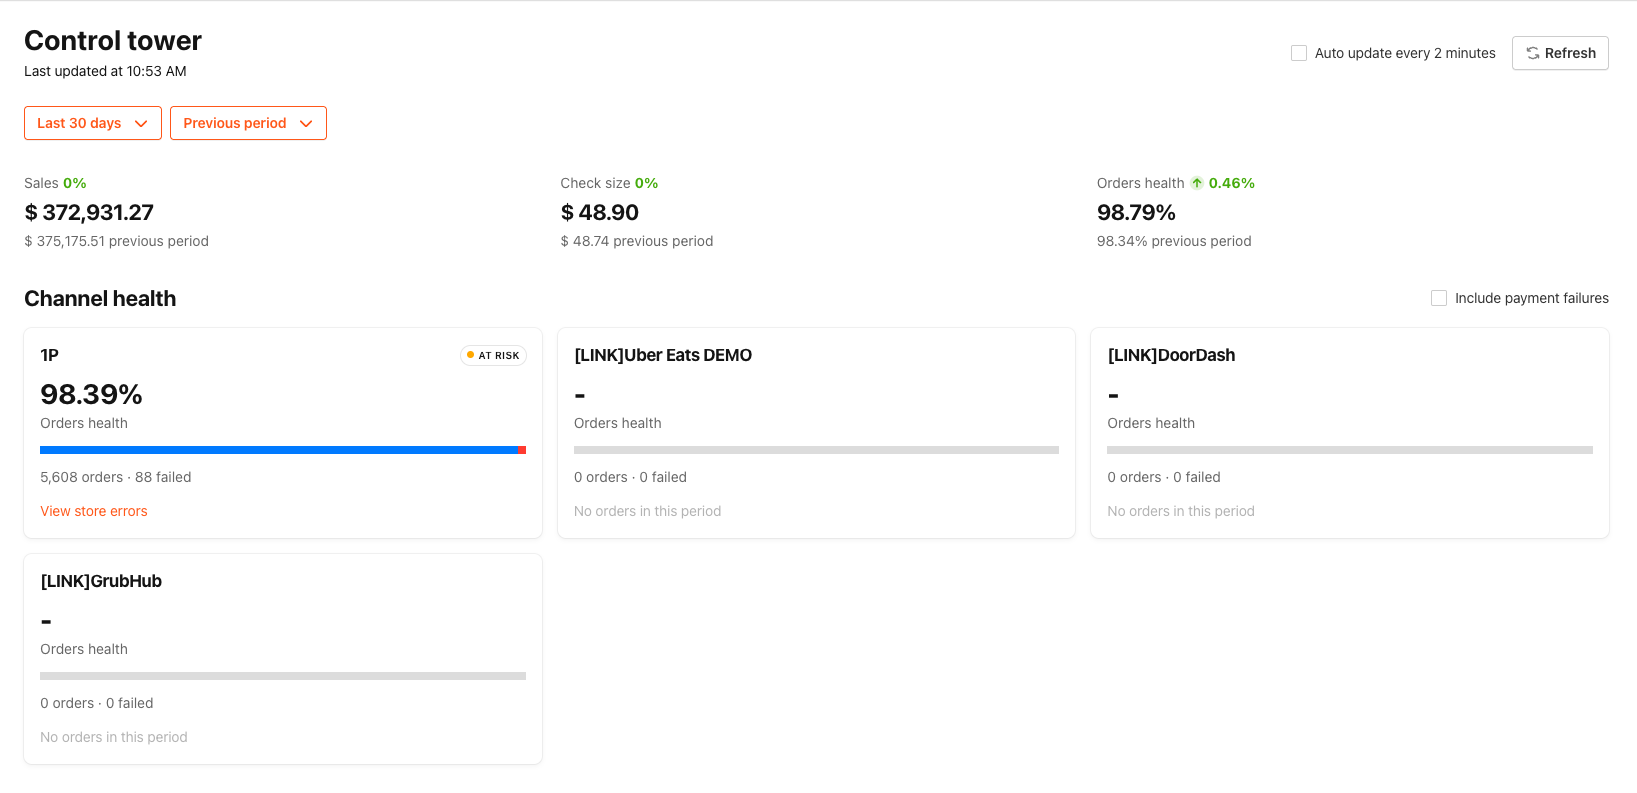
When you open the brand Control Tower, the dashboard loads automatically. The page fetches your brand's current performance data and displays it across the following sections.
Date range and refresh controls
At the top of the dashboard, two menus let you control the reporting window:
- Reporting period: Select from Today, Last 7 days, Last 30 days, Last 4 weeks, and other standard presets. Changing the period refreshes all metrics on the page.
- Comparison period: Select the prior equivalent period to compare against. Trend arrows on each KPI card reflect this comparison.
Next to the date menus, a status bar shows the last time the data was refreshed. You can refresh the data manually at any time by clicking Refresh Now. To keep data current during a live incident, turn on the Auto update every 2 minutes toggle. The dashboard remembers your toggle preference for the duration of your session.
The auto-refresh toggle only re-fetches the KPI strip and channel-health tiles. The Orders, Link, and POS tabs refresh on their own independent schedule.
KPI strip
Four cards summarize brand performance for the selected period:
| KPI | What it shows |
|---|---|
| Sales | Total sales amount |
| Check size | Average order value |
| Order health | Percentage of orders that completed successfully |
Each card displays the current period value, the prior-period comparison value, and a trend arrow.
Channel-health
Below the KPI strip, one tile appears for each ordering channel:
- A combined 1P tile covers mobile app, web, and kiosk orders.
- One tile per connected third-party aggregator (for example, DoorDash, UberEats).
Each tile shows the order count, the failed-order count, and a success-rate indicator for that channel.
To drill into a channel:
- Click View store errors on any channel tile.
- A panel opens on the right. The left side lists every store with its failure count and success rate for that channel. Select All stores for a brand rollup, or select a specific store.
- Once you select a store, the right side of the panel shows:
- Recurring errors: grouped error signatures seen for that channel at that store
- Last errors: a list of individual errors including type, message, store, order number, and time
If there are no errors for the selected store and period, the panel displays "No errors in this period."
The error list is capped at 500 rows per channel per period. If the cap is reached, a "truncated" indicator appears.
Orders, Link, POS, Capacity, and Emergency Closures
Below the channel-health section, three tabs provide access to the operational views you need most:
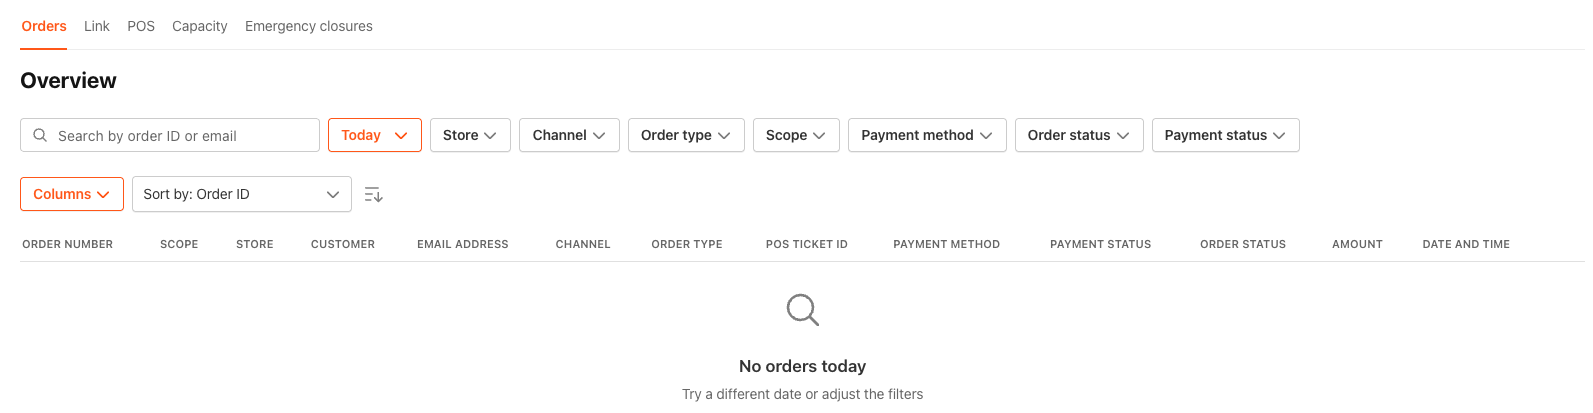
- Orders: the full orders list for your brand
- Link: POS connectivity status
- POS: POS menu-sync status
- Capacity: Allows for pausing stores with order throttling enabled. See Pausing Orders from the Management Center. Note: A tab only appears if your role has permission to view it.
- Emergency Closures: Close or reopen any store in your brand for emergencies. See Store Status Tab and Emergency Store Closures below.
Notes
- Multi-store brands only. Brands with exactly one store are redirected to the store view and do not land on the brand Control Tower dashboard.
- Date range discrepancy near midnight. KPI and channel-health metrics may differ by up to one day's data around midnight due to how each underlying data source handles time zones. This is a known minor discrepancy, not a data error.
- Error log cap. The channel-health drawer displays up to 500 errors per channel per period. If the cap is reached, a "truncated" indicator appears.
Emergency Closures
The Emergency Closures tab lets you temporarily close a store for emergencies, including power outages, severe weather, staffing emergencies, and equipment failures, directly from Control Tower. When you close a store, customers on the web app and kiosk immediately see the store as closed, along with the reason or a custom message you provide.
The Emergency Closures tab is only available to multi-store brands. If your brand has one store, access the emergency closure controls from your store's Settings page instead.
Close a store
-
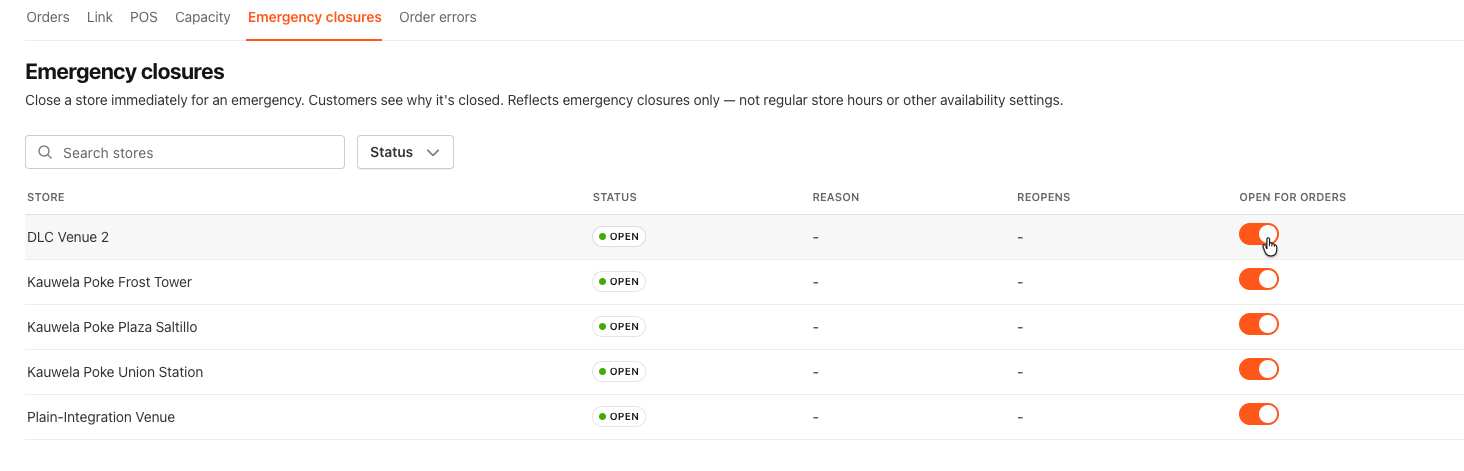
In the Management Center, open Brand Control Tower and click the Emergency Closures tab.
-
Locate the store you want to close. Use the search bar to filter by store name if needed.
-
Flip the Open for Orders toggle from Open to Closed.
-
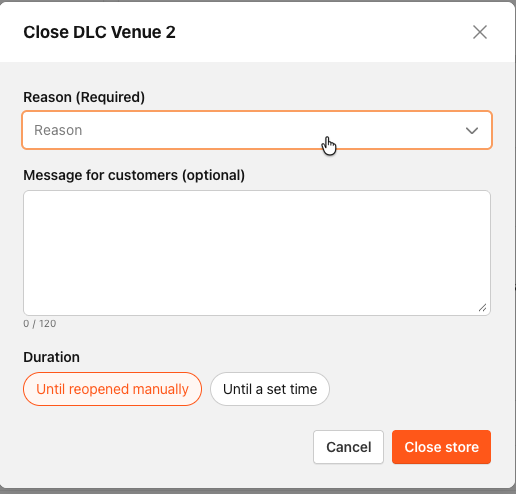
In the confirmation dialog, complete the following:
-
Reason: Select one of the 13 preset reasons (for example: Power Outage, Staffing Emergency, Equipment Failure, Severe Weather, or Refurbishment).
-
Message for customers (optional): Enter a short note to display to customers instead of the default reason text.
-
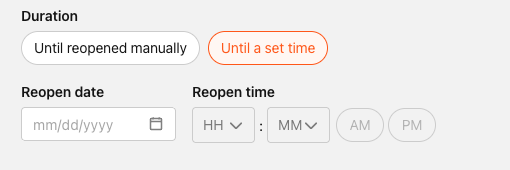
Duration: Select Until I reopen for an indefinite closure, or Until a set time to enter a date and time in the store's local time zone.
- Click Close store.
The store immediately stops accepting new orders on the web app and kiosk. Customers browsing that store see a Closed banner with your reason or custom message.

If you select a scheduled reopen time that falls within the store's advance-ordering window, customers see a Closed: schedule for later option and can place an order for pickup after the store reopens.
Close a store from store settings
If your brand has only one store, you do not have access to Control Tower. Use this workflow instead.
-
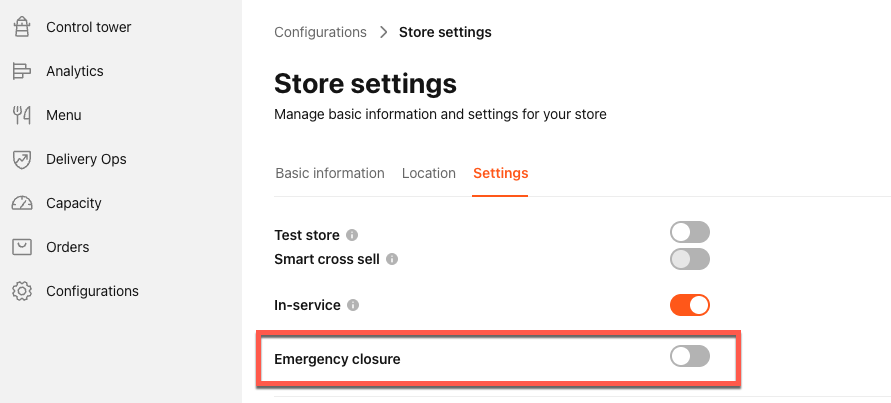
In the Management Center, go to your store's Configuration > Store Settings > Settings page.
-
Toggle on Emergency Closure.
-
Select a reason, optional custom message, and duration, following the same steps as above.
-
Click Close store.
The store immediately stops accepting new orders on the web app and kiosk.
Reopen a store
Flip the store's toggle from Closed to Open. No confirmation is required. Ordering resumes immediately.
Automatic reopen for scheduled closures
If you set a scheduled reopen time, the store reopens automatically within 5 minutes of that time with no action required. If you reopen the store manually before the scheduled time, the automatic reopen is cancelled.
Limitations
- One store at a time. You can only close or reopen one store per action. To close multiple stores, repeat the process for each location from the Emergency Closures table.
- Third-party delivery platforms are not notified. Closing a store stops new orders on the web app and kiosk, and also blocks orders arriving through third-party platforms (such as DoorDash or Uber Eats). However, those platforms do not receive a notification that the store is closed. Customers on those apps may still attempt to place orders before the platform reflects the closure.
- No closure history. The Emergency Closures tab shows only the current open/closed state of each store. There is no in-app view of past closures.
Store Control Tower section
The Store Control Tower provides a focused view for a single location. Open it by selecting a store in the Management Center and clicking Control Tower in the store sidebar.
The Store Control Tower currently includes the order-pausing capability only. If your brand has only one store, you can close your store for emergencies from the Emergency Closure section on your Store's Settings page.

The store capacity card displays one of three states:
- Ready: Order throttling is active and orders are flowing. Duration preset buttons are available for you to start a pause.
- Paused orders: Orders are currently paused. The card shows the end time (in the store's local time zone) or "Until you resume," the pause source (Tablet or Management Center), and controls to extend or resume the pause.
- Pausing is not available for this store: Order throttling is not set up for this store. To enable pausing, set up an order-throttling strategy in your capacity settings. Contact your PAR representative for assistance.
Pausing Orders from the Management Center
You can pause online ordering at the brand level or the store level directly from the Management Center. Use a brand-level pause to stop orders across multiple stores at once. Use a store-level pause for a single location. Orders can only be paused for stores that have order throttling currently set up.
To pause orders directly from the tablet, see: How to Pause Online Orders from the Tablet
Pause orders at the brand level
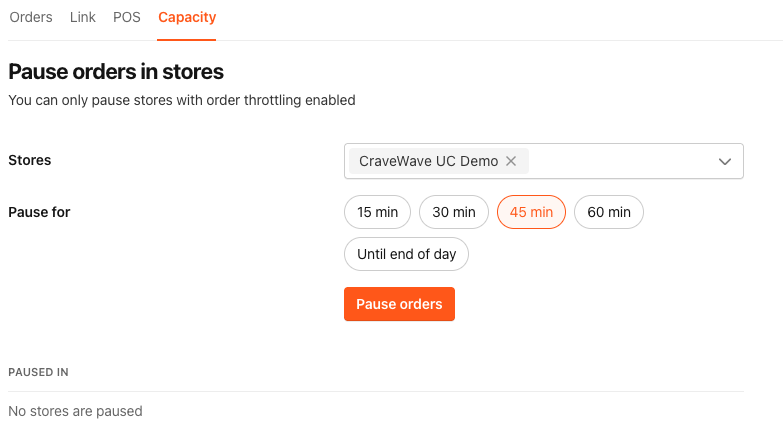
- Navigate to Brand Control Tower.
- Click the Capacity tab.
- Click Pause stores.
- In the store picker, select the stores you want to pause. You can select up to 100 stores at a time. If a selected store does not have an active order-throttling strategy, a warning appears and that store will be skipped when you submit.
- Select a pause duration:
- 15 minutes
- 30 minutes
- 45 minutes
- 60 minutes
- Until end of day
- Click Pause orders.
The Capacity tab updates to show the number of stores currently paused.
Pause orders at the store level
- Navigate to Store Control Tower for the store you want to pause.
- On the capacity card, select a pause duration (15, 30, 45, or 60 minutes, or Until end of day).
- Click Pause orders.
The card updates to show the active pause, its end time or "Until you resume," and the source.
Extend an active pause
You can add 15 minutes to an active timed pause from the brand Capacity tab or the store capacity card. Click Add 15 minutes next to the store or on the capacity card.
You cannot extend an "Until I resume" pause because it has no end time. To change an indefinite pause to a timed one, resume orders and start a new pause with a duration.
Resume orders
To resume orders for a store:
- Brand level: In the Capacity tab, click Resume orders next to the store.
- Store level: On the capacity card, click Resume orders.
If the store was paused from the tablet, a confirmation dialog appears before orders resume.
Resuming orders clears all active pauses at that store, including any pause that was set from a different surface (for example, if both Management Center and the tablet had set a pause).
Notes
- Bulk pauses are limited to 100 stores per action. If your brand has more than 100 stores, submit multiple pause actions to cover all locations.
- Pause errors may show even when the pause applied. If you see an error after extending or resuming a pause, refresh the page and check the current pause state before taking further action.
- Pause history is not available. There is no audit log or history view for past pause activity.
What Guests See
During a Pause
When a store is paused, guests who attempt to place an online order see a message explaining why ordering is temporarily unavailable, rather than the generic "fully booked" message.
- If the pause has an end time, guests see a message indicating high order volume and a temporary delay.
- If the pause is indefinite, guests see a message indicating the store is not accepting orders at this time.
Pause messaging is confirmed for the web ordering experience. Guest-facing messaging on kiosk and native mobile app is not confirmed at this time. Do not indicate support for those channels until confirmed with Product.
During a Closure
This table describes what customers see based on the type of closure.
| Closure type | What customers see |
|---|---|
| Indefinite closure | A Closed banner with the reason or custom message. No ordering option is shown. |
| Scheduled closure (reopen time within advance-ordering window) | Closed: schedule for later. Customers can place an order for pickup after the store reopens. |
| Scheduled closure (reopen time beyond advance-ordering window) | A Closed banner with the reason or custom message. No scheduling option is shown. |
Customers on the web app and kiosk see this messaging immediately after you confirm the closure.
Aggregator platforms (DoorDash, Uber Eats, and others) are not notified of the closure. New orders from those channels are blocked, but the platforms themselves do not reflect the store as closed until they update independently.
