How to Set Up and Manage Upsell
This article covers how to configure upsell in PAR Ordering, including the brand-level display setting that controls how upsell prompts appear to guests and the product-level steps for connecting upsell items to individual products.
Overview
Upsell lets you suggest complementary items to guests as they order. When a guest views or selects a product, a prompt shows the add-on items you have configured, and guests can add them before continuing to their cart.
Upsell in PAR Ordering is managed in two places in Management Center:
- Menu Upsell page: where you configure brand-level display settings that apply to all upsell prompts across your brand
- Product Upsell tab: where you connect specific upsell items to individual products
Brand-Level Upsell Settings
The Menu Upsell page contains brand-level settings that control how upsell prompts appear to guests across your entire brand.
To open the Menu Upsell page, navigate to Brand > Menu > Products > Menu Upsell in Management Center.
Settings on this page are brand-level only and do not appear on store-level pages.
Upsell Placement
The Upsell placement setting controls how the upsell prompt is displayed to guests on your web ordering channel.
| Option | Guest experience |
|---|---|
| As Dialog (default) | The upsell prompt appears as a small pop-up layered on top of the current screen. |
| As Product | The upsell prompt opens as a full-page view. A Back button lets guests return to their previous screen. |
To configure Upsell placement:
- Navigate to Brand > Menu > Products > Menu Upsell.
- Under Upsell placement, select As Dialog or As Product.
- Click Save.
Upsell placement applies to your web ordering channel only. Kiosk and native mobile app experiences are not affected.
What guests see when Upsell placement is set to As Product:
When a guest adds a product that has upsell items configured, the prompt opens as a full-page view instead of a small pop-up. The guest can review the suggested items, make a selection, or continue to their cart without selecting anything. A Back button at the top of the page lets them return to their previous screen.
Adding Upsell Items to a Product
These steps explain how to connect upsell items to a specific product so they appear in the upsell prompt when a guest views or orders that product.
Prerequisites:
- Brand Manager access in Management Center
- The product must belong to a category that is attached to a published menu
- The products you want to offer as upsell items must also be connected to a category on a menu that includes the product you are upselling from
Steps
-
Log in to Management Center with your Brand Manager credentials.
-
Navigate to Menu > Products.
-
Select the product you want to add upsell items to.
-
Select the Upsell tab on the product page.
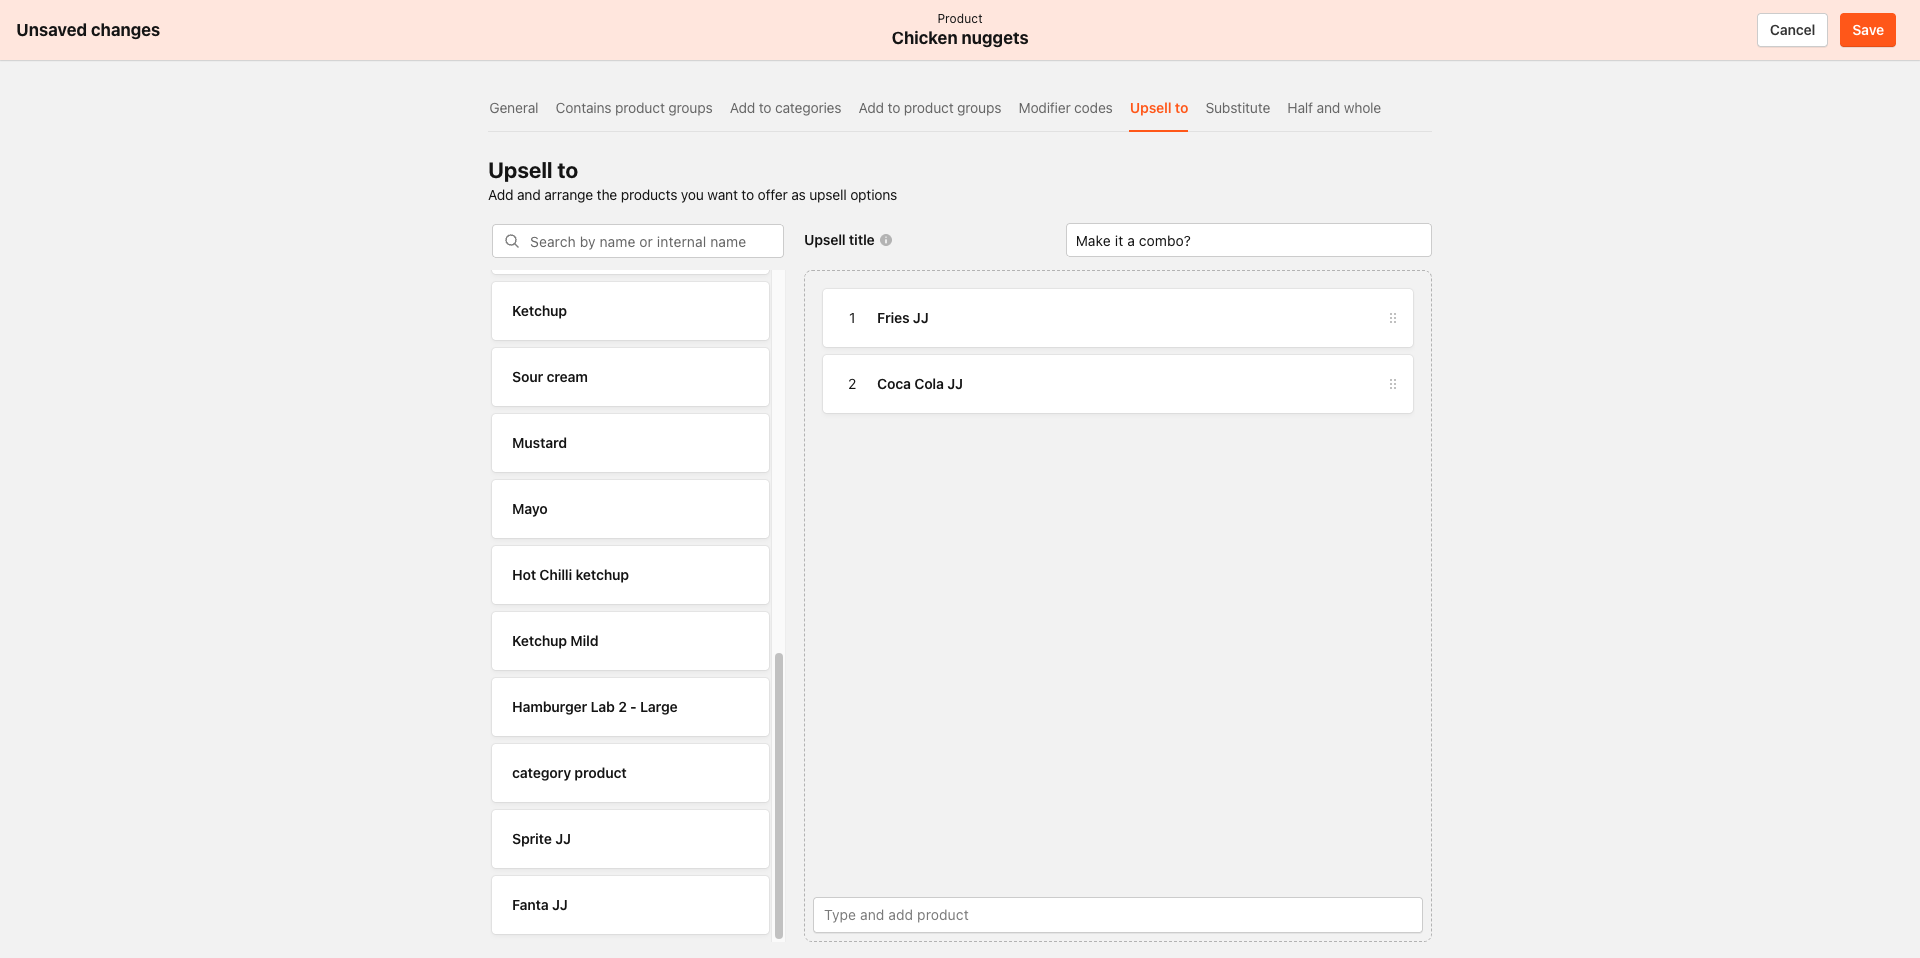
If the product lives inside a virtual container, the tab is still labeled Upsell. The steps below apply the same way.
-
In the left sidebar, locate the upsell items you want to add.
The sidebar shows only products that belong to categories attached to a menu that includes the product you are configuring. If an item is not visible, confirm it is connected to a category that is linked to the correct published menu.
-
Add items to your upsell list using one of the following methods:
- Hover over an item card and click Add.
- Drag an item from the sidebar and drop it directly into your preferred position in the upsell list.
-
Arrange your upsell items in the order you want guests to see them. You can drag and drop to reorder, or type a position number in the input field on each card.
The order you set here is the order guests see in the upsell prompt.
-
When you have finished adding and arranging items, click Save.
Upsell title
After you add at least one upsell item, an Upsell title field becomes available above your upsell list. This is the heading guests see when the upsell prompt appears.
The default upsell title is Make it a combo? You can update this field to any text that fits your brand.
Adding a container product as a upsell item
You can add a virtual container product (such as a combo or build-your-own) as a upsell item. Use the same steps above to add it from the sidebar.
When a guest taps a container in the upsell prompt:
- The prompt opens into the container so the guest can make their selections in place.
- A Back button at the top of the prompt lets the guest return to the upsell list without losing their place.
Container products do not have a fixed price. Their price is determined by what the guest builds inside them. A container appearing without a price in the upsell prompt is expected behavior, not an error.
Upsell on Products Inside a Virtual Container
If the product you are configuring upsell items on lives inside a virtual container (for example, a size variant of a drink grouped under a container product), the upsell prompt works as a second step in the ordering flow.
When a guest selects a product from the container, the upsell prompt appears after they select their core product, before they continue to their cart.
To configure this, follow the same steps as any other product: navigate to the product, open the Upsell tab, add your items, and save.
Troubleshooting
The upsell prompt is not appearing for a guest.
Confirm that upsell items are connected and saved on the product's Upsell tab. If items are configured but the prompt still does not appear, confirm that the product belongs to a category linked to a published menu.
A product is not visible in the upsell sidebar.
The sidebar shows only products from categories attached to a menu that includes the product you are configuring. Confirm the missing product is connected to a category and that the category is attached to the correct published menu.
The upsell prompt is appearing as a small pop-up instead of a full-page view.
Check the Upsell placement setting on the Menu Upsell page (Brand > Menu > Products > Menu Upsell). If it is set to As Dialog, select As Product and save.
