POSitouch Configuration and Install Guide
POS Prerequisites/Requirements
Primary Server (Backoffice)
- Windows 7 (with SP1) and .NET Framework 4.6.1 or higher
- POSitouch v.6.4 or higher
- POSitouch Loyalty Licence
- POSitouch XML Ordering
Terminal(s)
- Windows OS with .NET 4.0-4.5.2
- Check with your POSitouch dealer to ensure that your printers can print QR codes. If you printer cannot print QR codes, then the earning code will be printed in plain text only.
Configure Firewall/AV
Network Firewall and Antivirus Setup
Confirm that the following FQDN (Fully Qualified Domain Names) endpoints are properly whitelisted in the site's firewall/router
(PUNCHH DOES NOT SUPPORT FIREWALL RULES USING IP ADDRESSES)
| NETWORK FIREWALL CONFIGURATION | |
|---|---|
| ALLOW TCP using port 443 FROM: POS BOH SERVER TO: |
|
| ALLOW Web Surfing from: | POS BOH File Server TO: https://*.punchh.com |
| NETWORK FIREWALL VALIDATION | |
|---|---|
| From the POS BOH PC open a web browser and navigate to the following web pages. Each web page should return a plain white page with OK. If any page doesn't return OK, the firewall needs to be reviewed to ensure the correct FW rules are in place. |
POS Setup
Create the Discount That Will Apply to the Check
-
Open Back Office Setup > Menu Editor > Menu Items & Recipes.
-
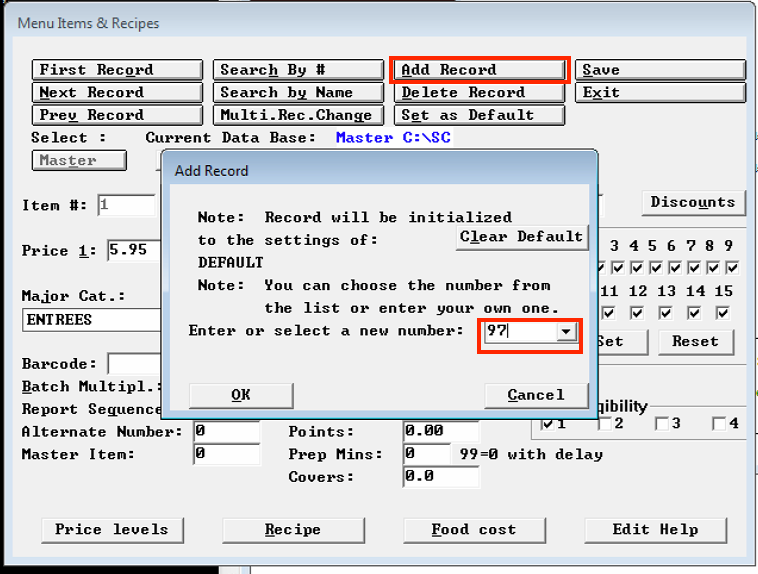
Click "Add Record". Enter an item ID, then click OK:
*Remember the item # you created here for the discount as you will need it later.
-
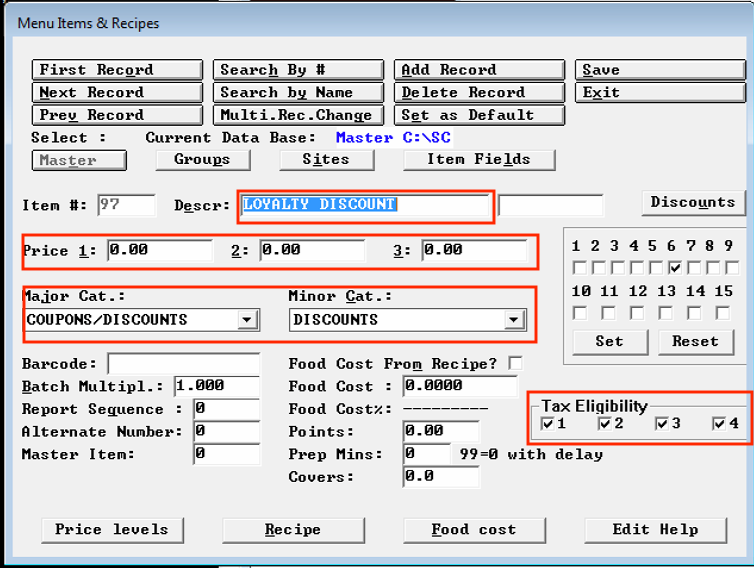
Configure the discount as follows and then Save:
- Descr: Customer choice (The name of the loyalty discount)
- Price level (1-10) = $0.00
- Major Cat: Customer choice (reporting category)
- Minor Cat: Customer choice (reporting category)
- Tax Eligibility: Check all taxes that you want the loyalty discount to apply to
-
Go to Back Office Setup > Menu Editor > Edit An Order Screen
-
Select a screen where you want to assign the loyalty discount to then select an empty cell (this should not be on a screen that accessible to staff).
-
On the new cell form, configure the following and Save:
- Cell name: "AMOUNT"
- Cell type: "3-General mult (xx.xx)"
-
Verify the settings highlighted below, then click Save
(The rest of the settings may be left with their default values)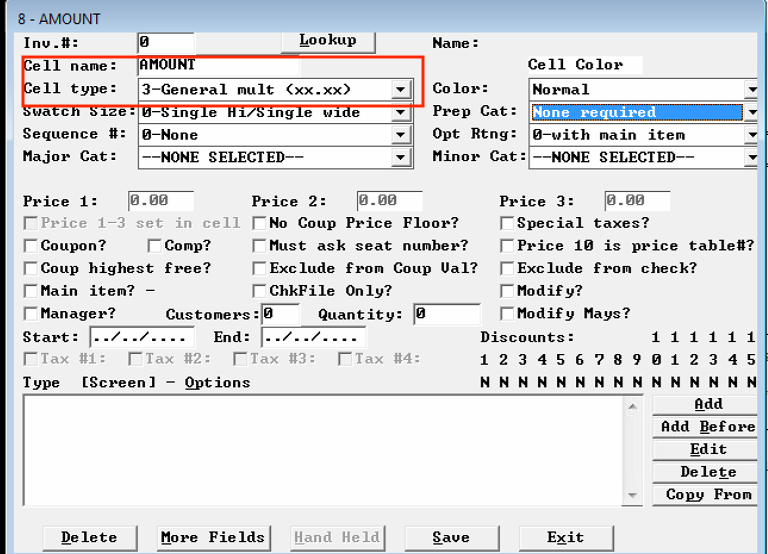
-
Back on the "cell selector" form, select another empty cell.
-
Click the "Lookup" button, then click "Search by #".
-
Enter the item ID of the "Loyalty Discount" item you created in step 1, then click OK.
-
Click "Select".
-
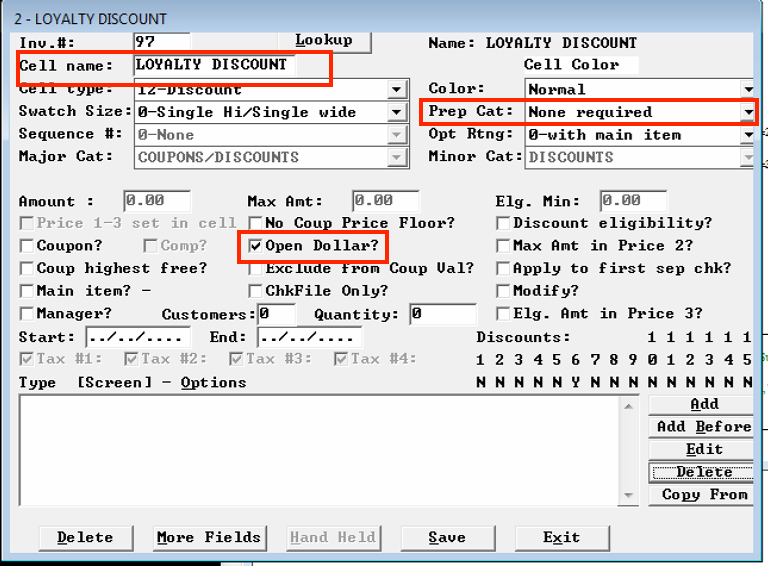
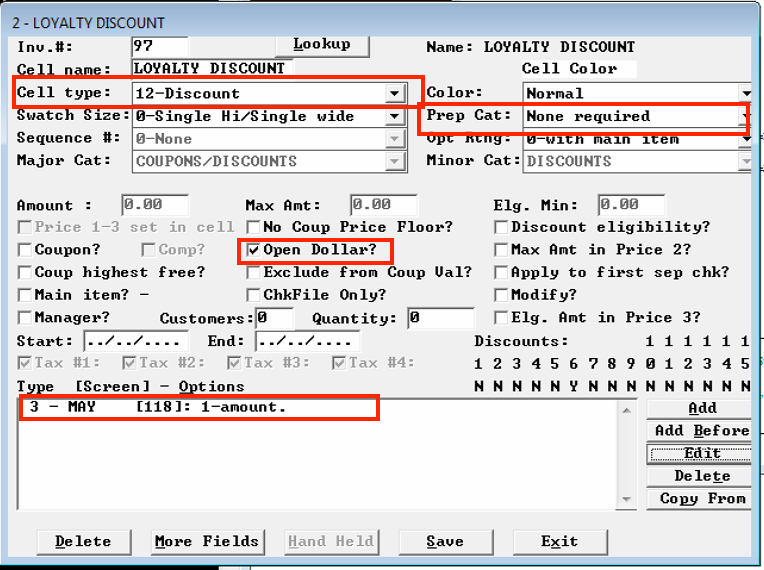
On this form, make the following changes:
- Cell type: "12-Discount"
- Open Dollar?: Checked
- Prep Cat: "None required"
-
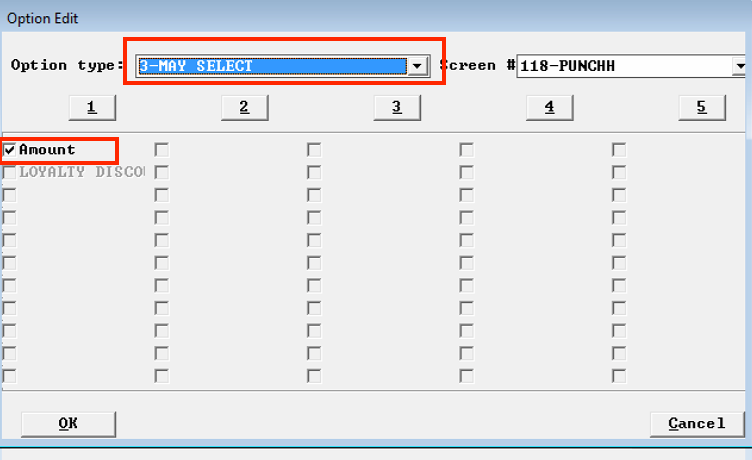
Click the "Add" button near the bottom-right.
- Option type: "3-MAY SELECT"
- Screen #: Select the screen that the "AMOUNT" cell is on.
- Check "AMOUNT"
- Verify with the below image, then click OK.
-
Verify the information with the below image, then click Save.
Step 14- xx are OPTIONAL: If you want to restrict what the loyalty discount can be applied to at the POS level (i.e. preventing alcohol items from getting discounted), then follow these steps:
-
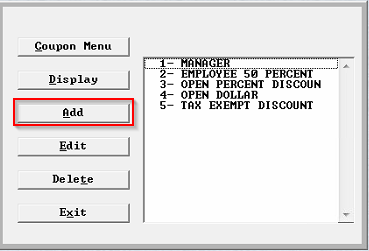
Open Back Office Setup > Discounts & Surcharges and click Add.
-
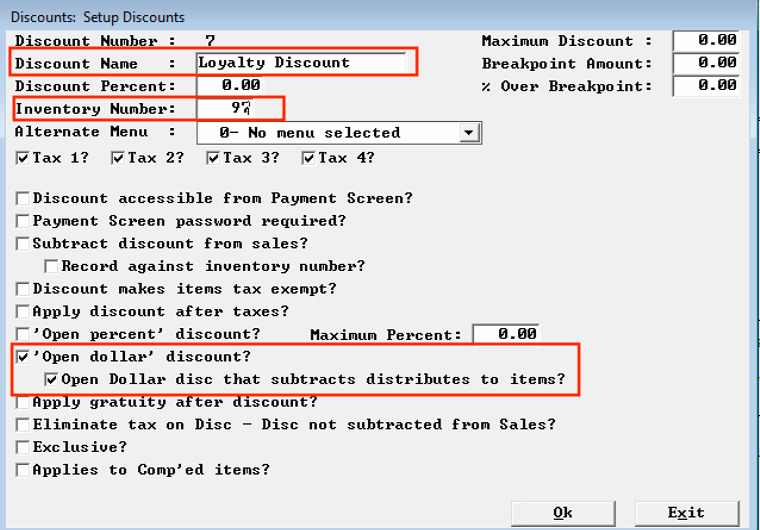
Configure the following and click OK:
- Discount Name: Customer Choice
- Inventory Number: Enter the Item ID of the cell type 12 item that was recently created.
- Tax flags: Select the taxes that you want the loyalty discount to be applicable to.
- 'Open dollar' discount?: Checked
- Open Dollar disc that subtracts distributes to items?: Checked
Make a note of the Discount Number, you will need it later.
-
Open Back Office Setup > Menu Editor > Edit An Order Screen. Re-open the cell type 12 item that was recently created.
-
Check the “Discount eligibility?” checkbox, then click on the Lookup Button.
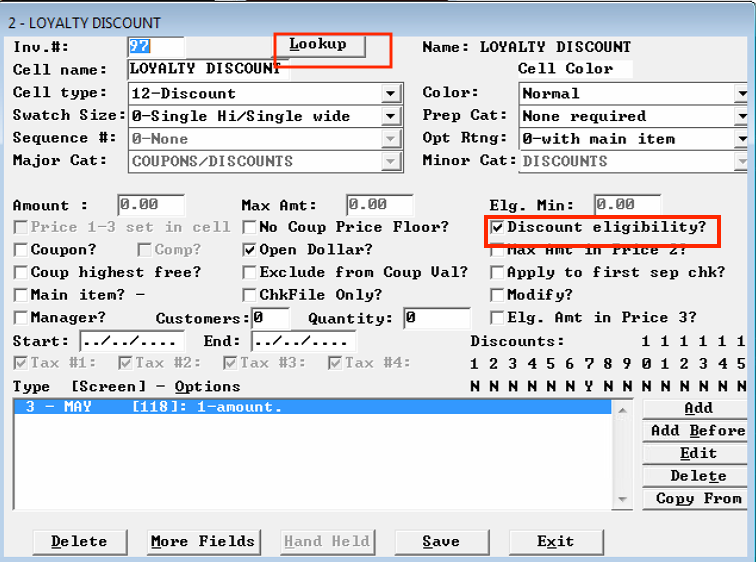
-
Under the “Discounts” button, check the checkbox for the Discount Number (i.e. 7, from the Discounts & Surcharges menu). Then click Save → then Exit → Save again.
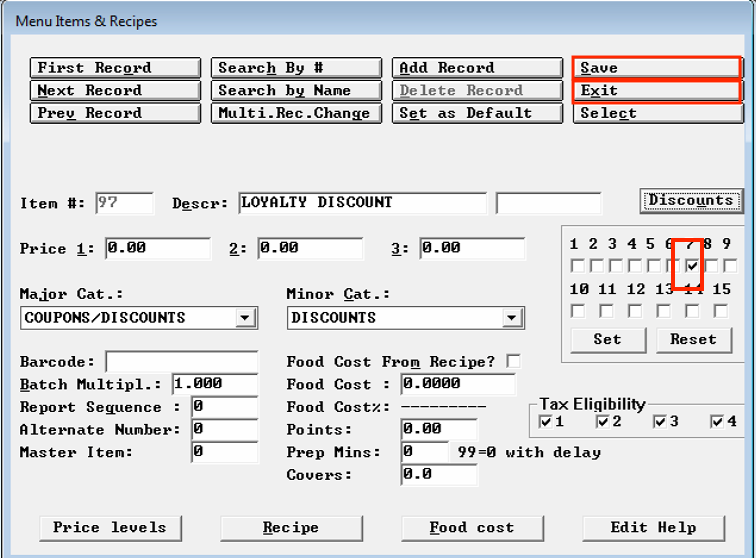
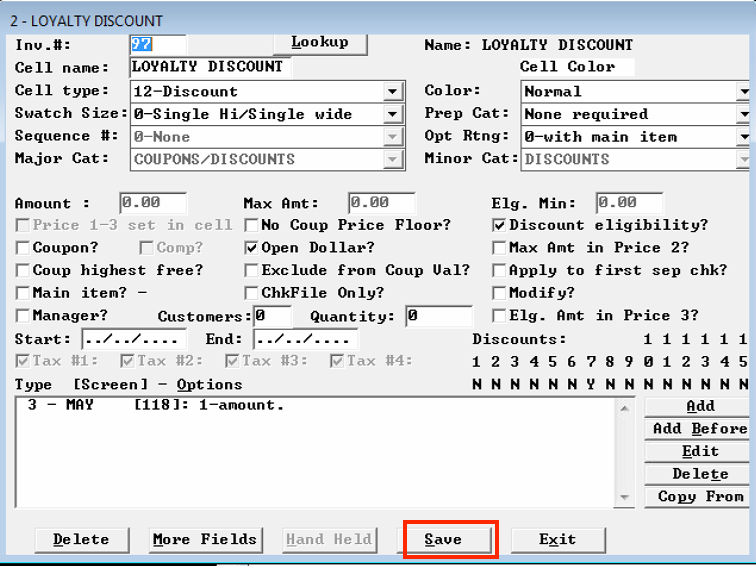
-
For all the items that you:
-
don’t want the loyalty discount to be applied to, edit the items so that the checkbox under the Discount Number is unchecked
-
want the loyalty discount to be applied to, edit the items so that the checkbox under the Discount Number is checked:
Note: You can bulk edit items via the “Multi.Rec.Change” button.
-
Create the Ability To Assign an Earning Barcode to the Check
-
Go to Back Office Setup → Menu Editor → Edit An Order Screen
-
Select a screen, then select an empty cell.
-
Configure the following changes and Save
- Cell name: "MEMO"
- Cell type: 9-Memo
- Prep Cat: None required
- Opt Rtng: 0-with main item
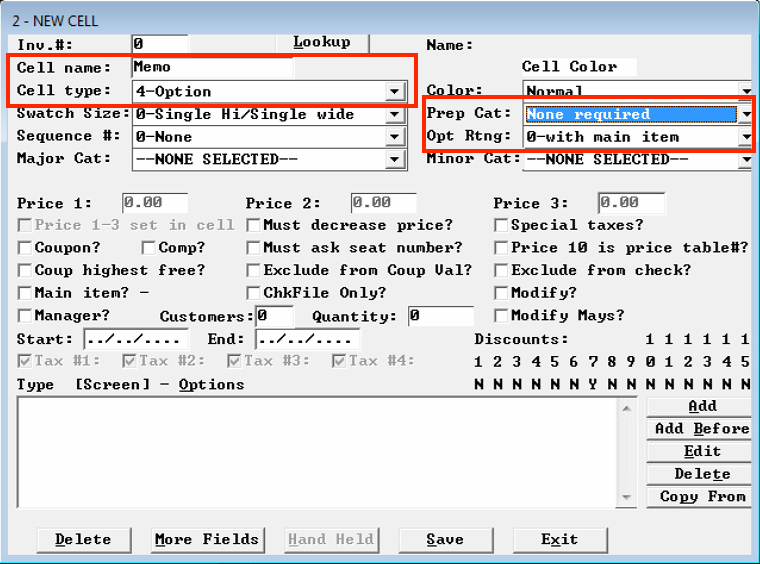
-
Open Back Office Setup > Menu Editor > Edit An Order Screen
-
Select a screen, then select an empty cell.
-
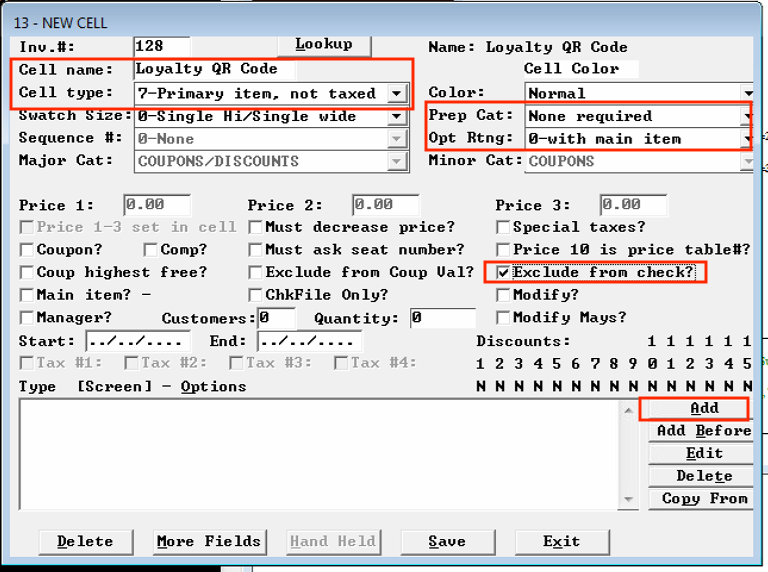
On this form, make the following changes and then click Add to add the memo item:
- Cell name: "Loyalty QR Code"
- Cell type: 7-Primary item, not taxed
- Prep Cat: None required
- Opt Rtng: 0-with main item
- “Exclude from check?”: Checked
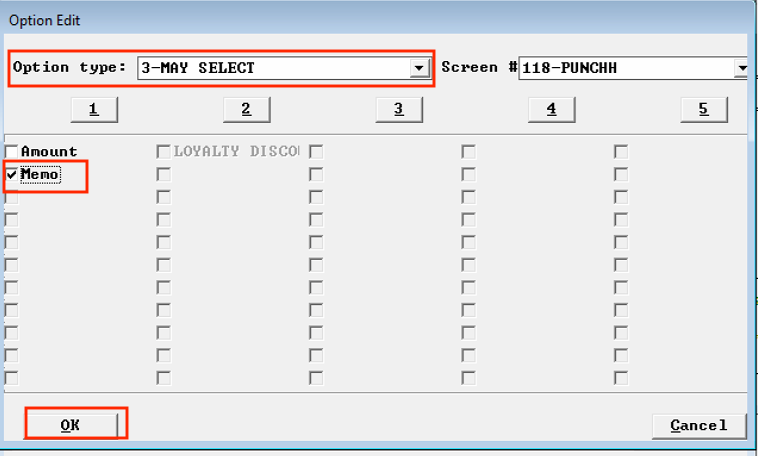
- Screen #: Select the screen where the “MEMO” cell is located.
- Option type: 3-MAY SELECT
- Check the checkbox next to “MEMO”.
- Click Ok
Set up a Virtual Printer
-
Go to Back Office Setup > Hardware > Prep Printers > Locations and Types and click Insert
Enter the following:-
Printer Number: Enter the next sequential number (see image below).
-
Printer Name: XML Printer
-
Click YES to save
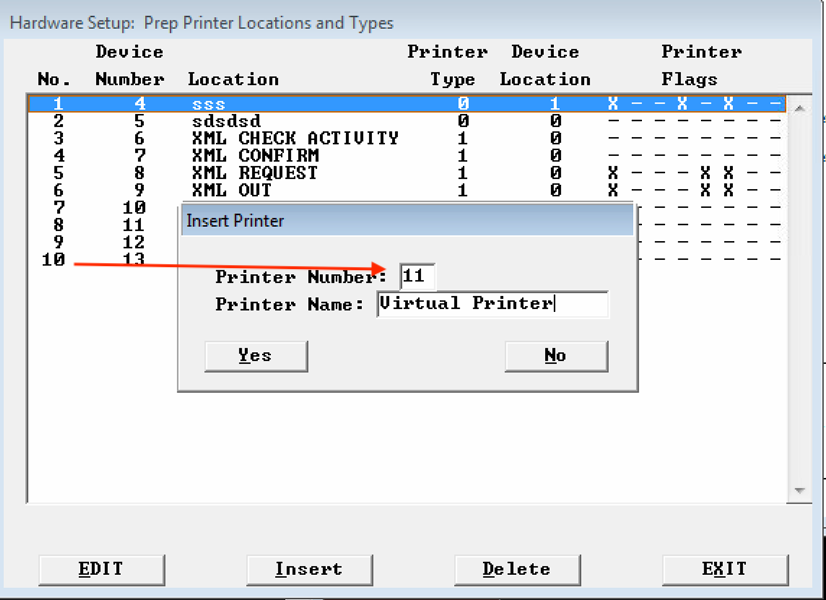
*Make note of the Device Number for the virtual printer as you will need it when you add this to SPCWIN.INI in step 3.
-
-
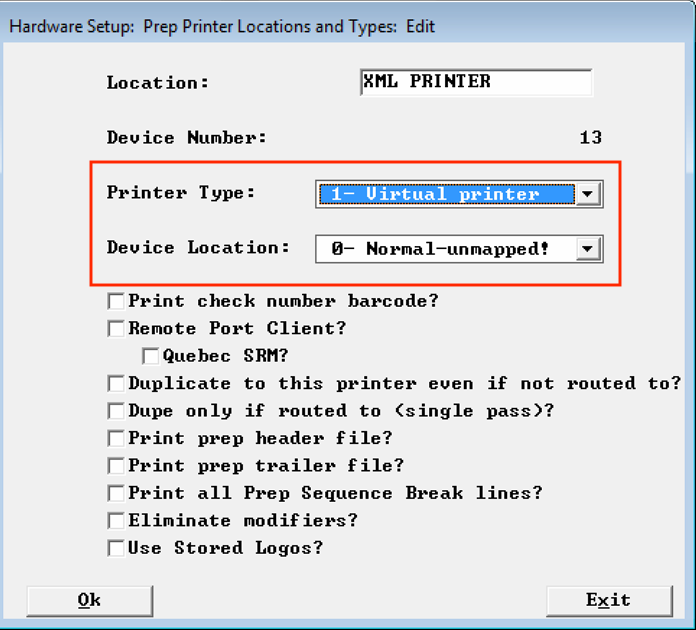
Select the XML Printer and click EDIT.
- Printer Type: 1- Virtual printer
- Device Location: 0- Normal-unmapped!
- Click Ok to save
-
Go to Back Office Setup > Restaurant Misc Data > XML I/O.
- Select the "XML Printer" for the following XML types:
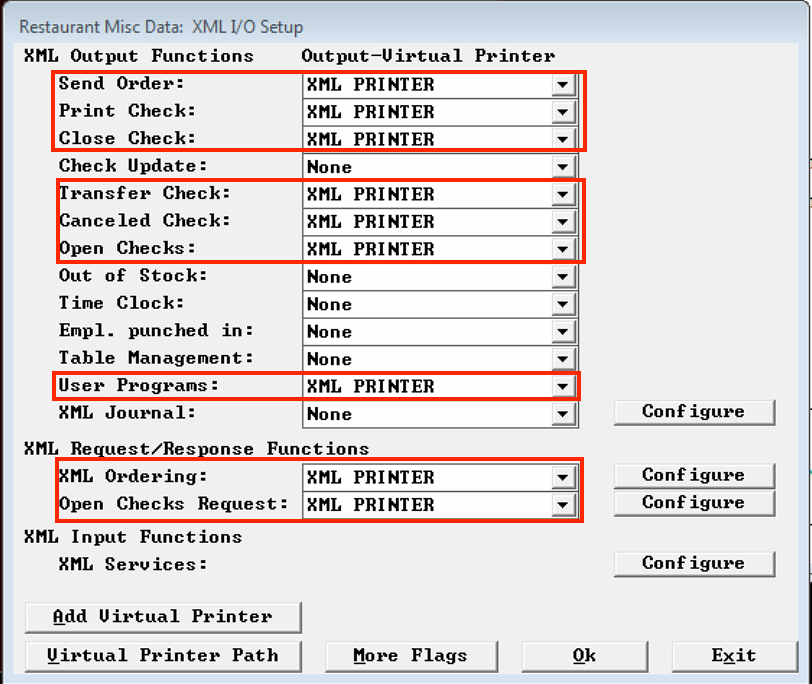
- Select the "XML Printer" for the following XML types:
-
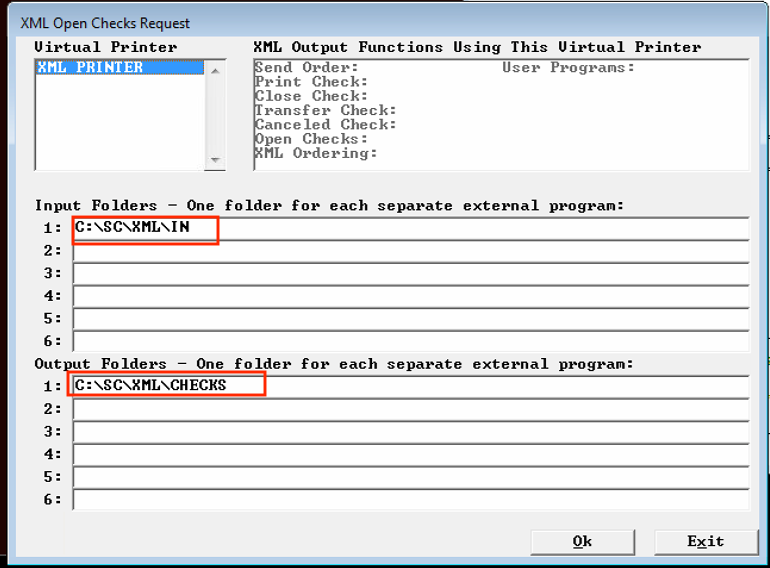
Configure the following:
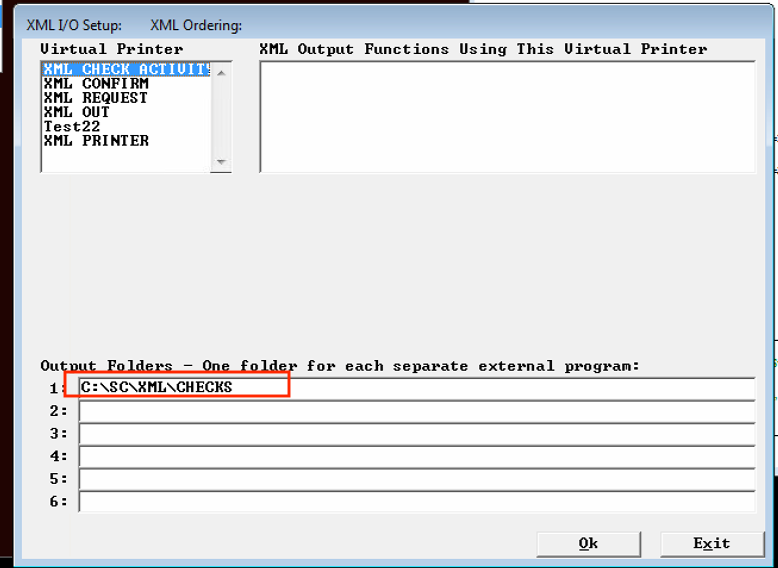
Note: If other third party integrations are currently installed and utilizing XML I/O functionality, then specify folder paths that are unique to Punchh (ex: C:\SC\XML\Punchh\XYZ).-
XML Request/Response Functions
-
XML Ordering
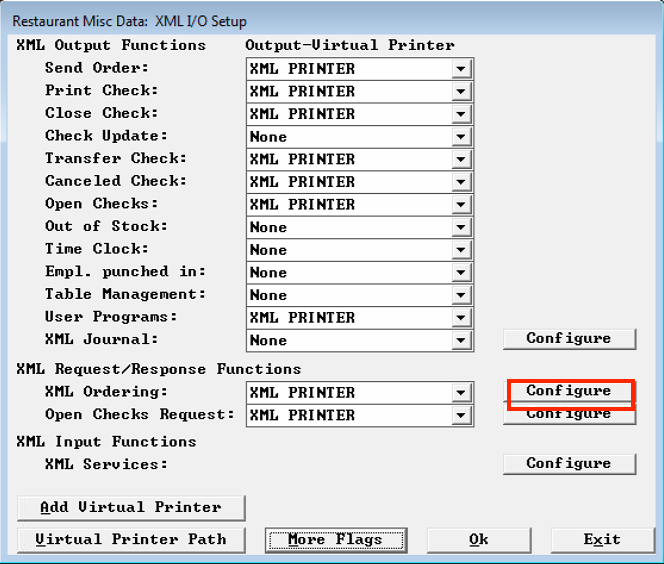
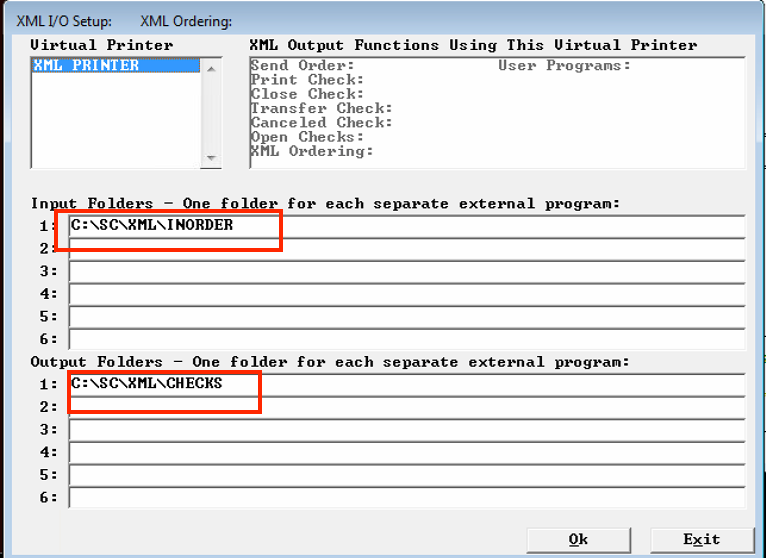
-
Open Check Request XML
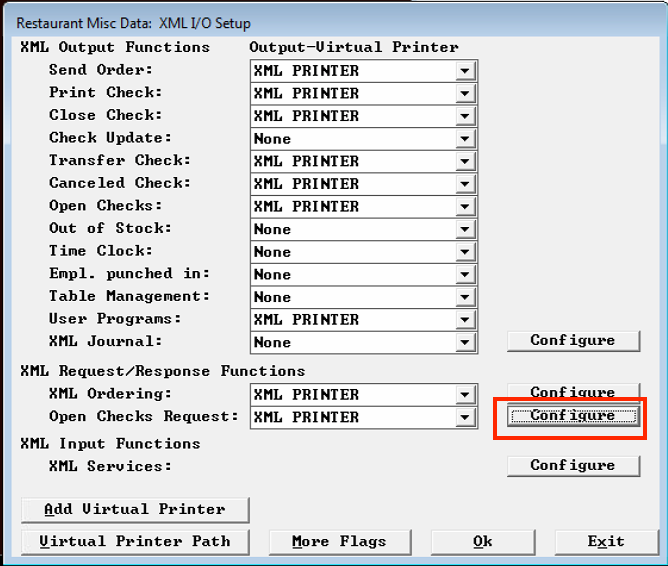
-
-
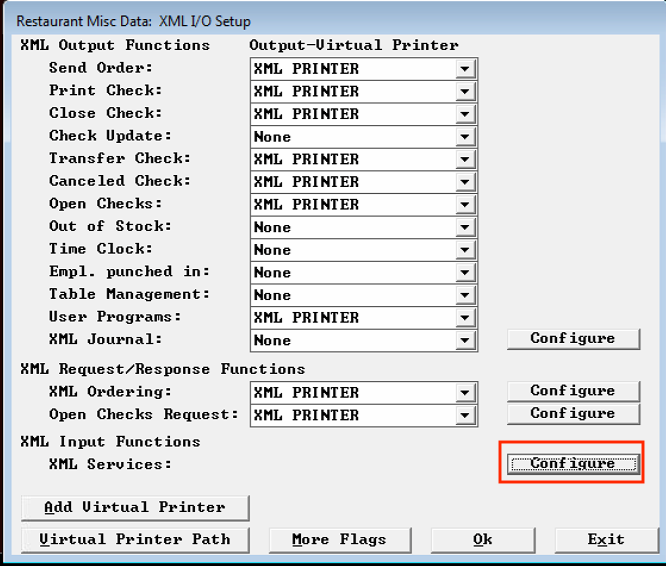
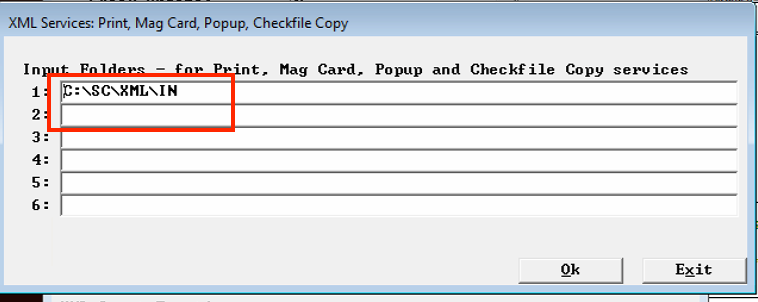
XML Input Functions
-
XML Services
-
-
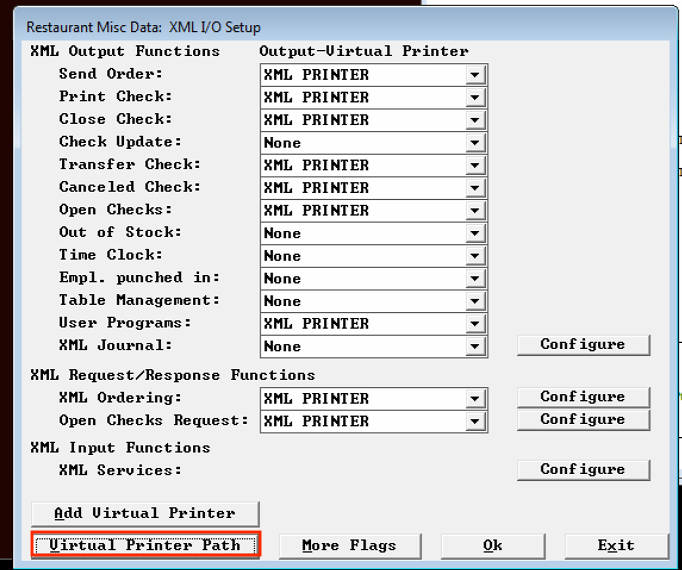
Virtual Printer Path
-
-
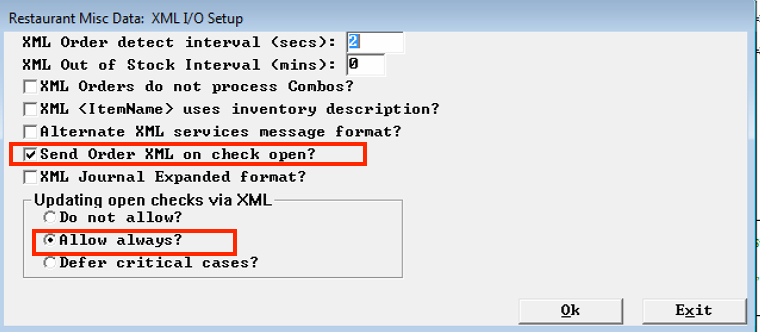
Go to Back Office Setup → Restaurant Misc Data → XML I/O → More Flags. Enable the following flags:
- Send Order XML on check open? Checked
- Updating open checks via XML = Allow Always?
-
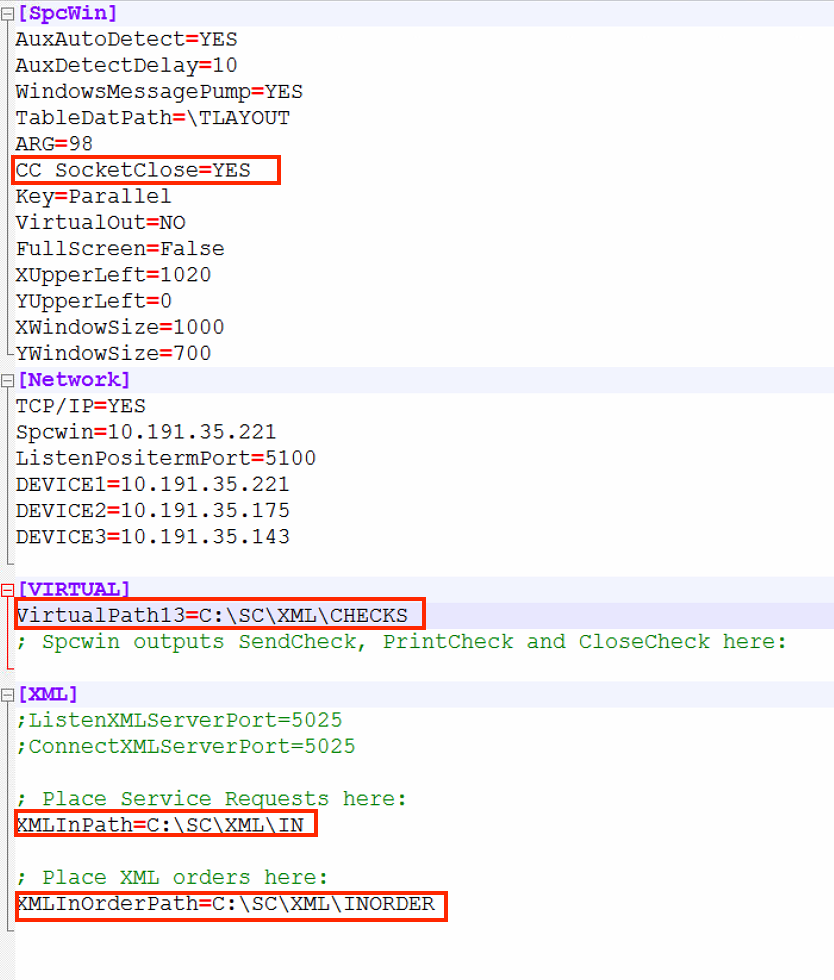
On the Posdriver go to, \SC\SPCWIN.INI edit the file as follows:
-
In the [SpcWin] section, add:
- CC_SocketClose=YES
-
In the [XML] section, add:
- XMLInPath=C:\SC\XML\IN
- XMLInOrderPath=C:\SC\XML\INORDER
-
In the [VIRTUAL] section, add:
-
VirtualPath**[virtual printer device number]**=C:\SC\XML\CHECKS
Eg. VirtualPath13=C:\SC\XML\CHECKS
Note: The number 13 in “VirtualPath13” is taken from the table as shown below (Back Office Setup > Hardware > Prep Printers > Locations and Types):
-
-
Configure To Print Receipt Footer Details
-
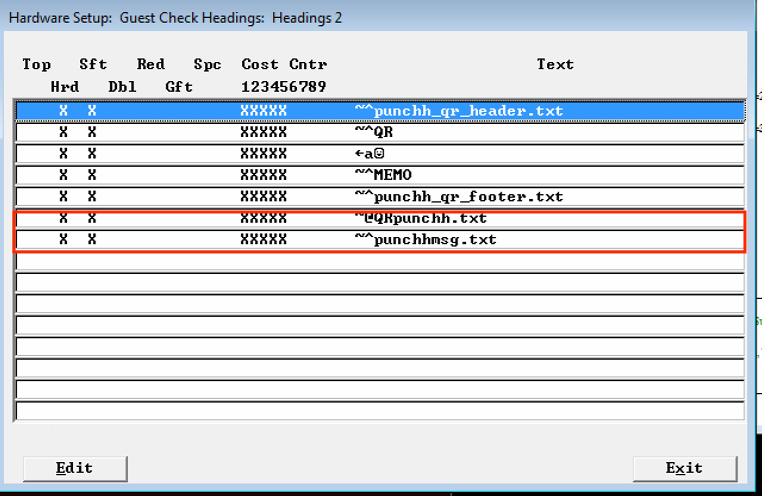
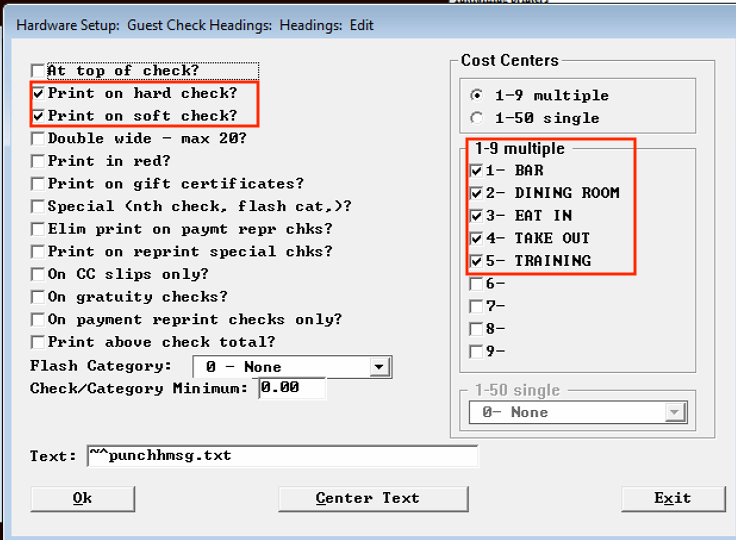
Go to Back Office Setup → Hardware → Guest Check Headings → Headings 2. Add the following:
- ~@QRpunchh.txt
- ~^punchhmsg.txt
-
Edit each line with the same settings:
- Print on hard check? = checked
- Print on soft check? = checked
- Select all cost centers where you want loyalty footer info printed (loyalty earning barcode and receipt messages)
Configure User Program Functionality for the Punchh GUI
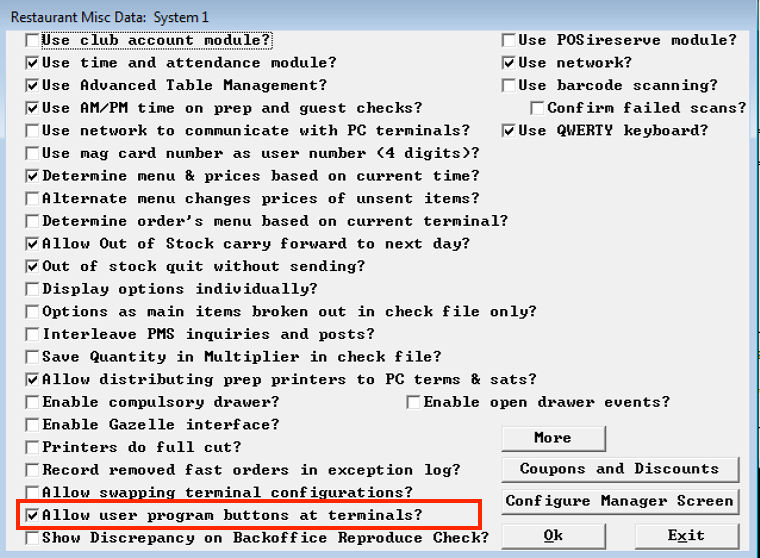
- Go to Back Office Setup > Restaurant Misc Data > System. Enable the flag for “Allow user program button at terminals?”, and click Ok to save.
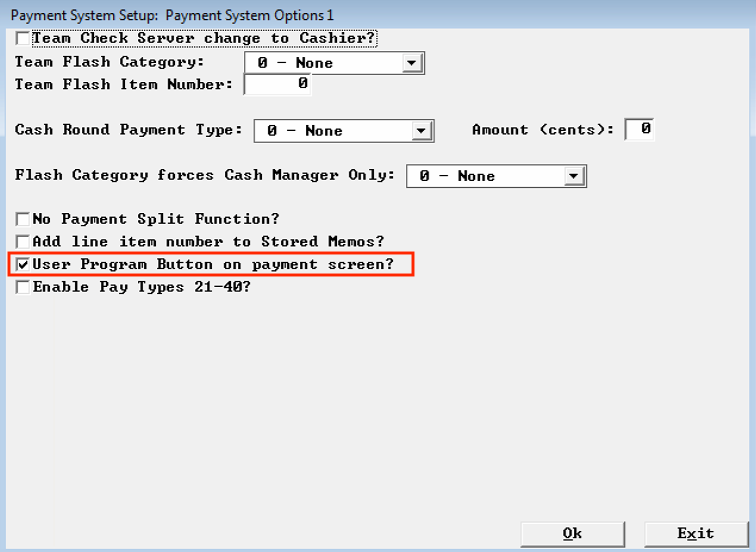
- Go to Back Office Setup → Payment → Payment System Options 1 → More Flags. Enable the flag for “User Program Button on payment screen?”, and click Ok to save.
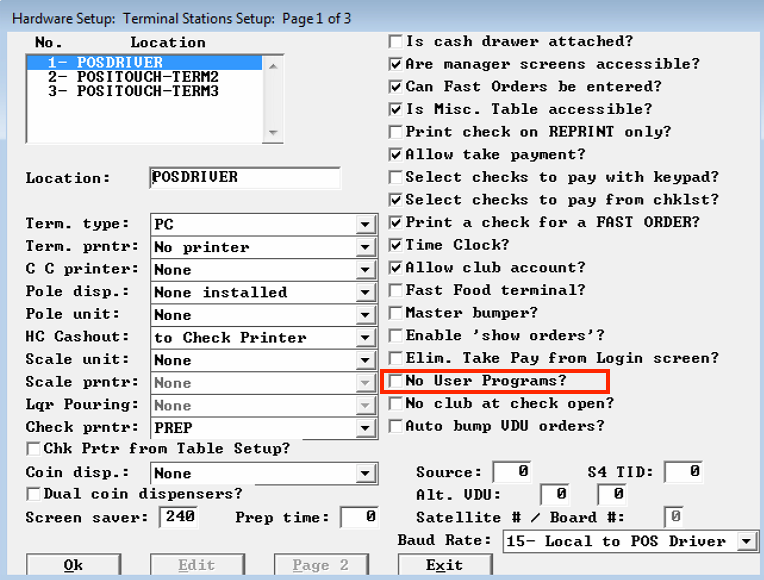
- Go to Back Office Setup → Hardware → Terminal Stations. On each terminal, that you want punchh to operate on, ensure the flag for “No User Programs?” is unchecked. Click Ok to save.
-
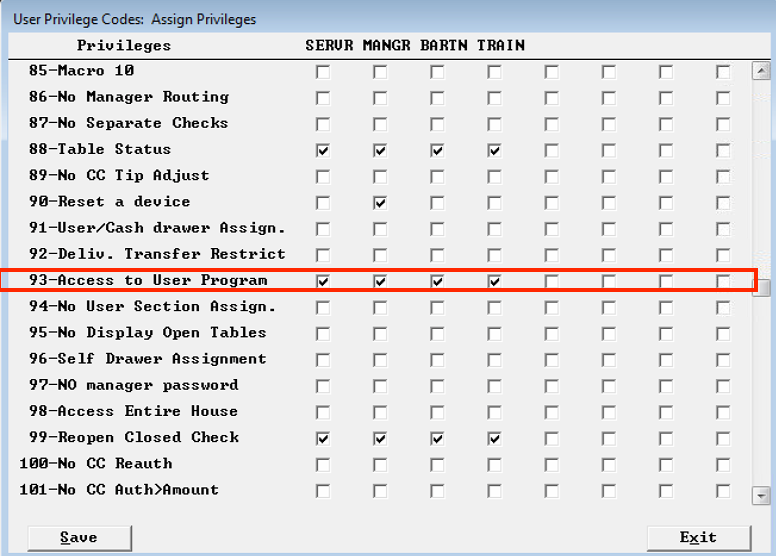
Go to Back Office Setup → User Privilege Codes. Enable the flag “Access to User Program” for the roles you want to perform loyalty functional. Click Save to save.
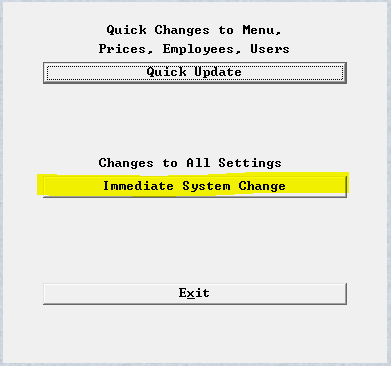
- Back Office Setup > Immediate System Change
Installation Instructions
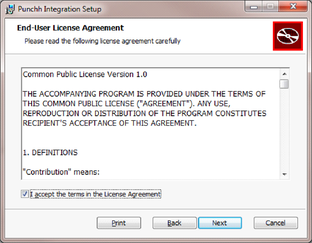
Click Next, agree to terms; click Next, verify the install path; click Next; click Install; click Finish.
-
On the back-office PC, login as an administrator, and run the SetupPunchh.msi installer:
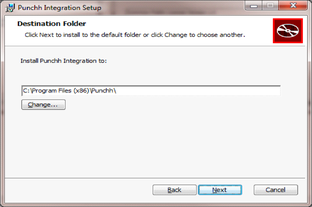
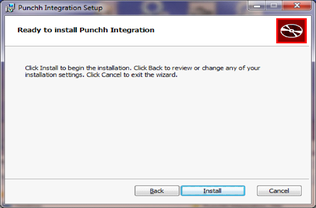
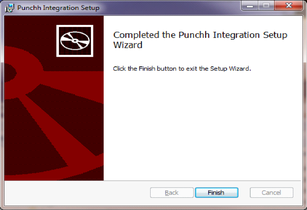
-
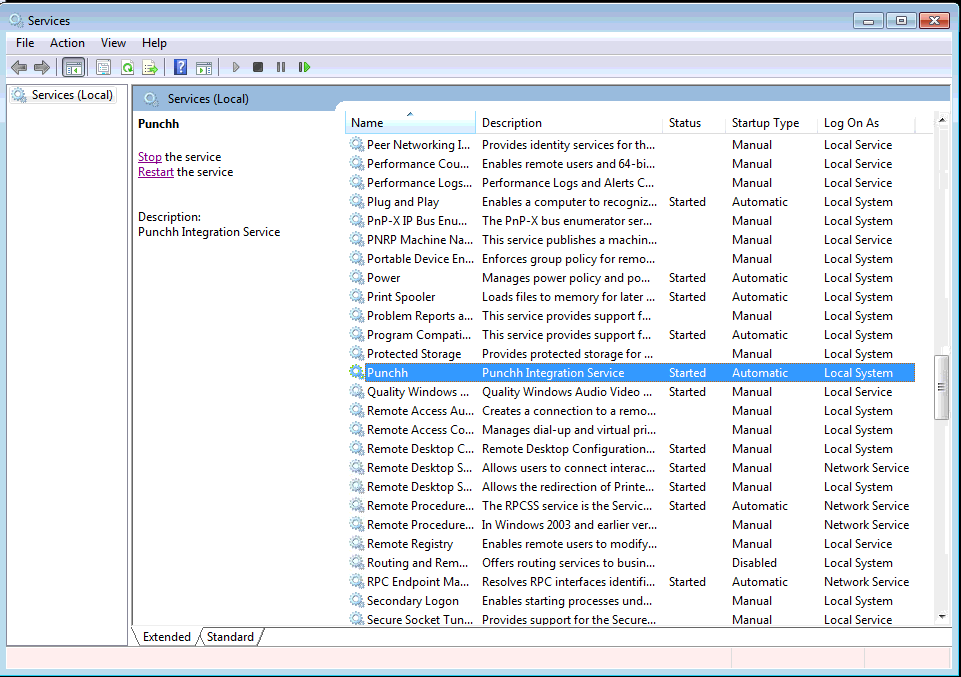
After installation, you can see that the Punchh service is now running:
-
Navigate to the folder C:\Program Files (x86)\Punchh and open PunchhConfigurator.exe.
-
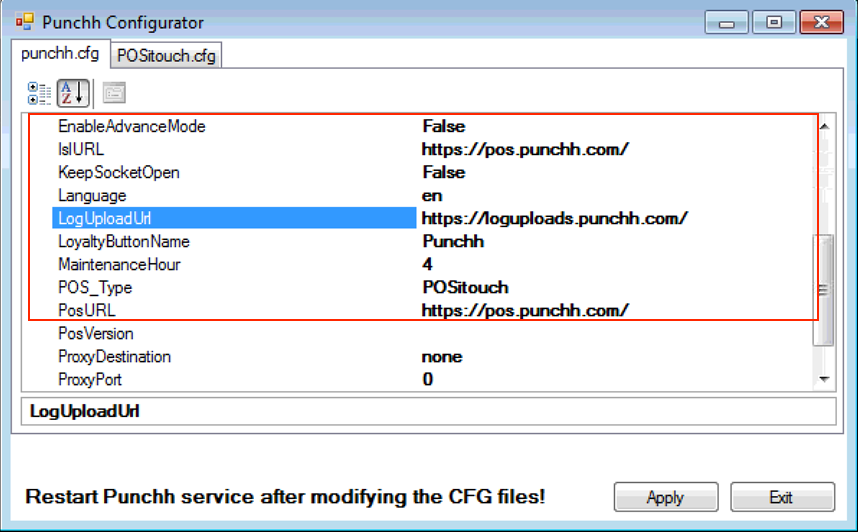
Under the punchh.cfg, configure the following:
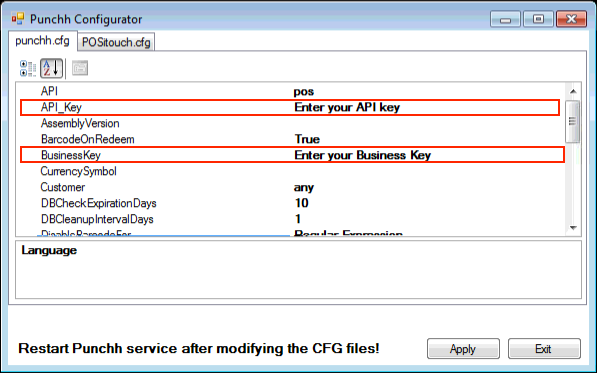
- API_Key = Location API Key
- BusinessKey= Business API Key
- EnableAdvanceMode = False
- IslURL = https://pos.punchh.com or https://pos.us-west.punchh.com
- KeepSocketOpen= False
- LogUploadURL= https://loguploads.punchh.com
- POS_Type= POSitouch
- POSURL= https://pos.punchh.com or https://pos.us-west.punchh.com
-
Under the POSitouch.cfg tab, configure the following and leave all other settings with their default values.
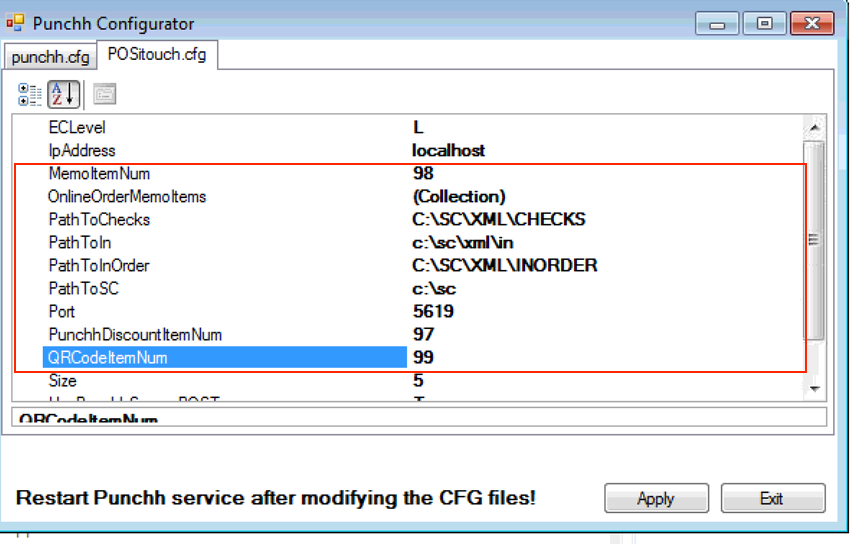
- MemoItemNum= Set this value to the Item ID of the cell type 9 “MEMO” item that was previously created.
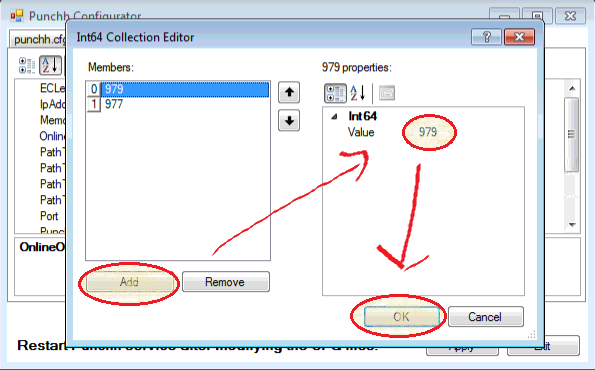
- OnlineOrderMemoItems= ONLY CONFIGURE IF THE BRAND IS USING OLO.This is used to capture and send OLO transactions to Punchh for those OLO checks that are paid online and injected into POSitouch. Enter the menu item ID that OLO uses to inject Memo messages onto the check.
- PathToChecks= Refer to the “Create the virtual XML Printer” section of this guide to obtain the values for these settings.If the POS Driver is hosted on another computer then replace "C:" with the network path to the C drive on the POS Driver. Don't use mapped letters like "L:", it has to be full network path instead, for example like this: \192.168.2.1\C\SC
- PathToIn= Refer to the “Create the virtual XML Printer” section of this guide to obtain the values for these settings. If the POS Driver is hosted on another computer then replace "C:" with the network path to the C drive on the POS Driver. Don't use mapped letters like "L:", it has to be full network path instead, for example like this: \192.168.2.1\C\SC
- PathToInOrder= Refer to the “Create the virtual XML Printer” section of this guide to obtain the values for these settings. If the POS Driver is hosted on another computer then replace "C:" with the network path to the C drive on the POS Driver. Don't use mapped letters like "L:", it has to be full network path instead, for example like this: \192.168.2.1\C\SC
- PathToSC= Refer to the “Create the virtual XML Printer” section of this guide to obtain the values for these settings. If the POS Driver is hosted on another computer then replace "C:" with the network path to the C drive on the POS Driver. Don't use mapped letters like "L:", it has to be full network path instead, for example like this: \192.168.2.1\C\SC
- Port= The default port is set to 5614. If this port is already in use by another application, then an error will appear in the log files. See the Troubleshooting section of this guide for more details.
- PunchhDiscountItemNum= Set this value to the Item ID of the cell type 12 discount item that was previously created.
- ORCodeItemNum= Set this value to the Item ID of the cell type 7 “LOYALTY QR CODE” item that was previously created.
- UsePunchhSecurePOSType= True.
- UseV1PosiIntegration: Leave this as False
-
Click Apply to restart the Punchh Proxy service and then exit.
Create the User Program Button for the Punchh GUI on Each Terminal
For each POSitouch terminal: Copy the Punchh GUI + edit the WINTERM.INI
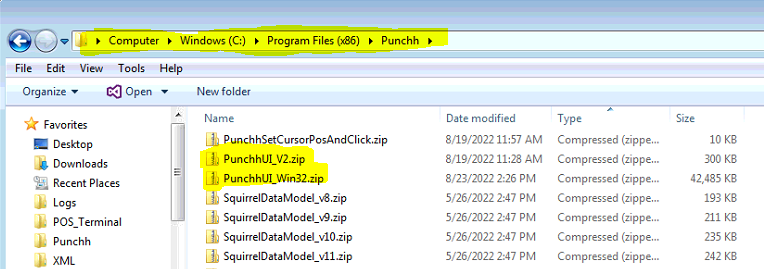
New POSitouch V3 setup exe file contains two terminal UI app zip files.
- PunchhUI_V2.zip for Windows XP terminals
- PunchhUI_Win32.zip for Windows 7 and latest terminals.
-
Copy the Punchh GUI to each POSitouch terminal:
- Create a new folder named “Punchh” somewhere on the terminal(s).
- From the back office, copy PunchhUI zip file to the terminal, then extract the zip file to the recently created “Punchh” folder on the terminal(s).
- For Windows XP terminal: copy the C:\Program Files (x86)\Punchh**PunchhUI_V2.zip**
- For Windows 7 and latest terminal: copy the C:\Program Files (x86)\Punchh**PunchhUI_Win32.zip**
-
In the Punchh folder on the terminal, open/create the file PunchhUI.cfg in Notepad.On the third line, enter the terminal ID as defined in the back office (Back Office Setup > Hardware > Terminal Stations).
Also, (if not present) set service IP address on first line and service port number on second line.
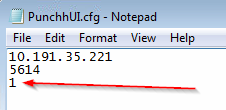
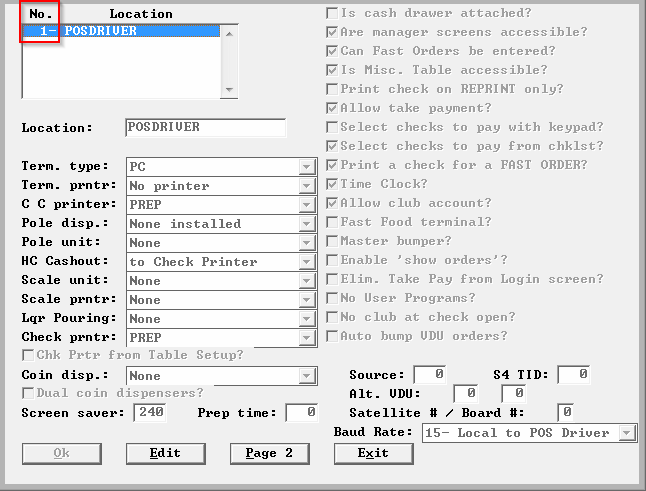
-
Save the file and close Notepad.
-
Open the WINTERM.INI file on the POSitouch terminal (i.e. C:\SC\WINTERM.INI) in Notepad, and edit the file as follows:
-
In the [WINTERM] section, add:
-
UserProg_1="","USER PROG"
-
UserProg_2="PATH_TO_PUNCHHUIEXE",Punchh
-
Replace PATH_TO_PUNCHHUIEXE with the local path to the PunchhUI.exe on the terminal PC. Ex: If you extracted the zip file to the folder C:\Punchh, then the path would be C:\Punchh\PunchhUI.exe.
For Windows XP terminals: C:\Punchh\PunchhUI_V2\PunchhUI.exe. For Windows 7 and latest terminals: C:\Punchh\PunchhUI_Win32\PunchhUI.exe. -
The text after the comma (i.e. “Punchh“) is the label of the user program button. Edit this if you don’t want the button to be named “Punchh”.
-
-
UserProgMinimize=NO
-
UserProgPositermMaximize=NO
-
UserProgOnTop=YES
-
-
-
Back Office Setup > Immediate System Change
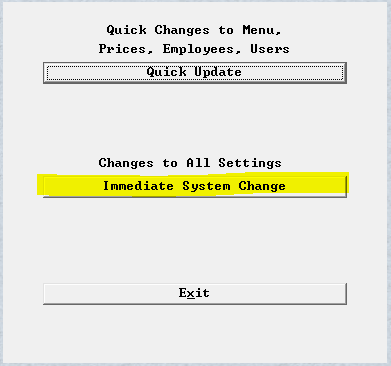
For Each POSitouch Terminal: Create the Macro for the User Program Button
-
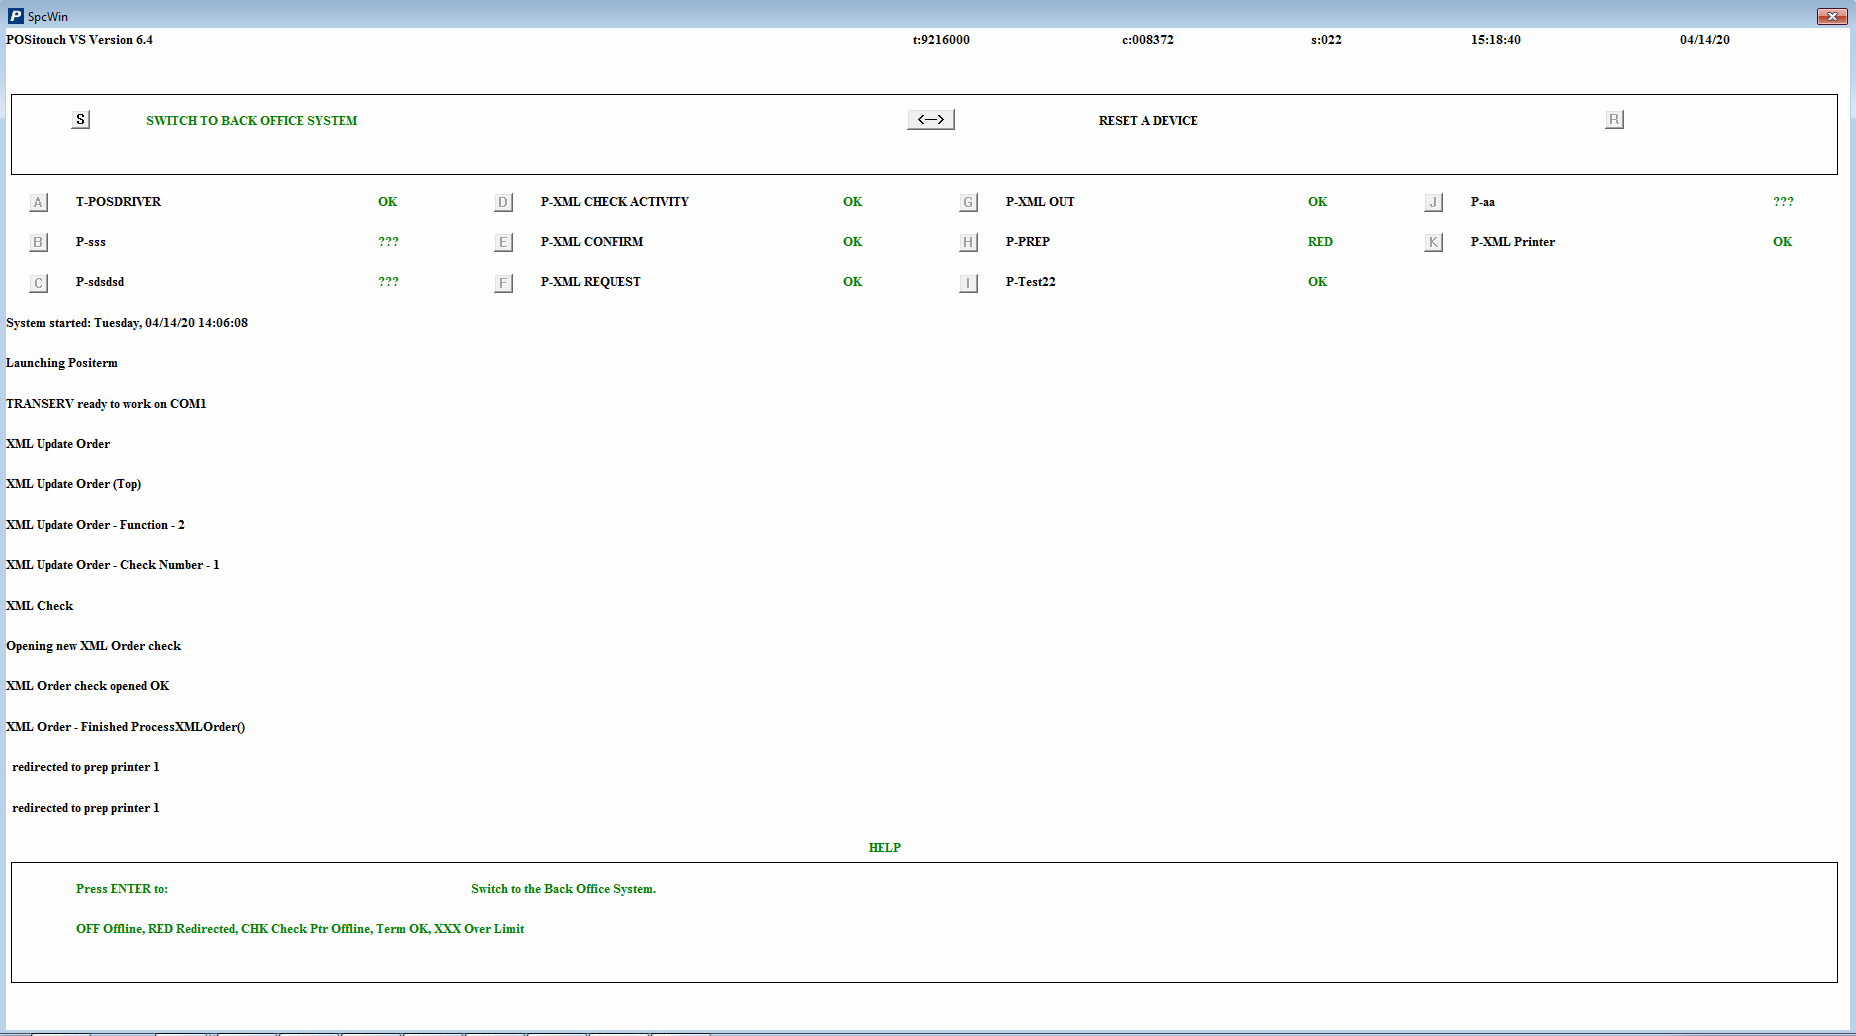
On the POSitouch terminal, go to SpcWin, and press CTRL+Q.
-
Follow the prompts:
-
Enter Macro number: Type “1”, then hit Enter.
-
Enter Macro button label: Type the label of the button, followed by “^2“ (i.e. "Punchh^2"), then hit Enter.
- Note: The button label entered here (i.e. “Punchh”) needs to match the button label entered in the WINTERM.INI (UserProg_2).
-
Enter terminal number: Type the terminal number, then hit Enter.
-
-
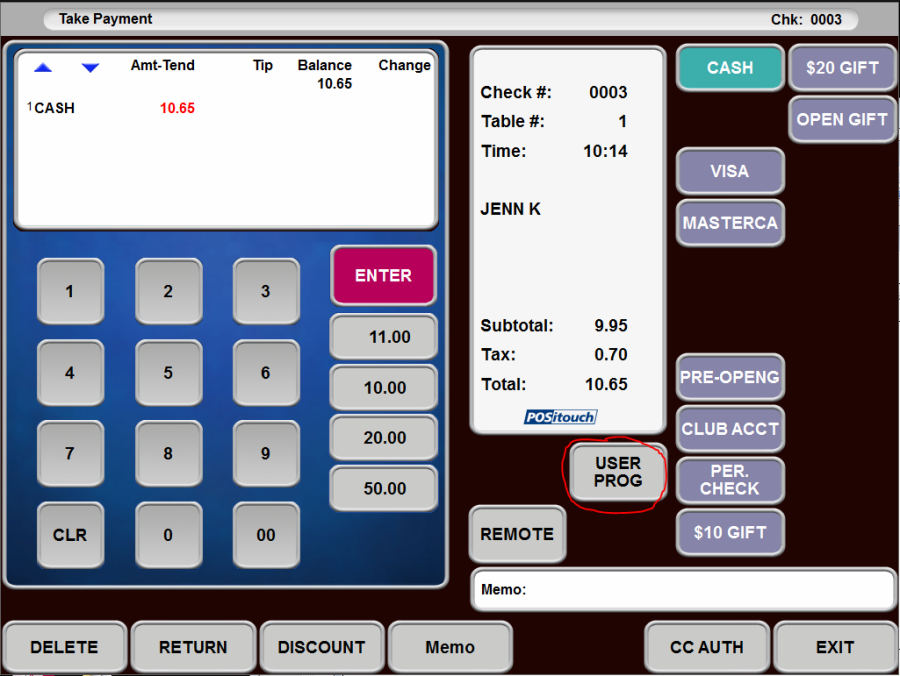
Go to POSiTerm, and click the "USER PROG" button twice (once to add the name to the button, and once to signal a touch of the button).
-
Go back to SpcWin, and press CTRL+Q again to finish the macro.
-
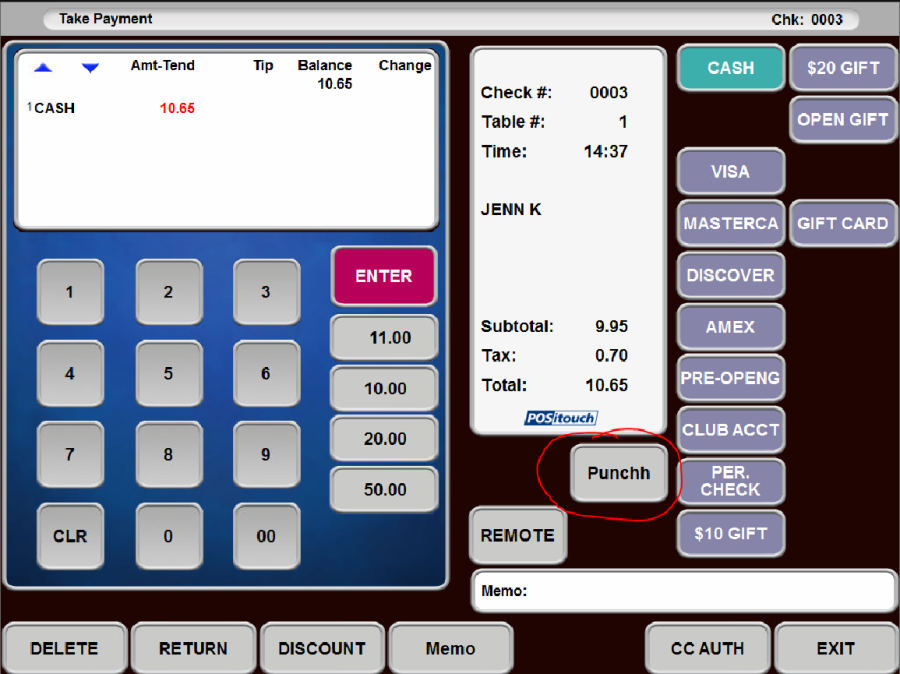
The button should now have the label that you entered:
-
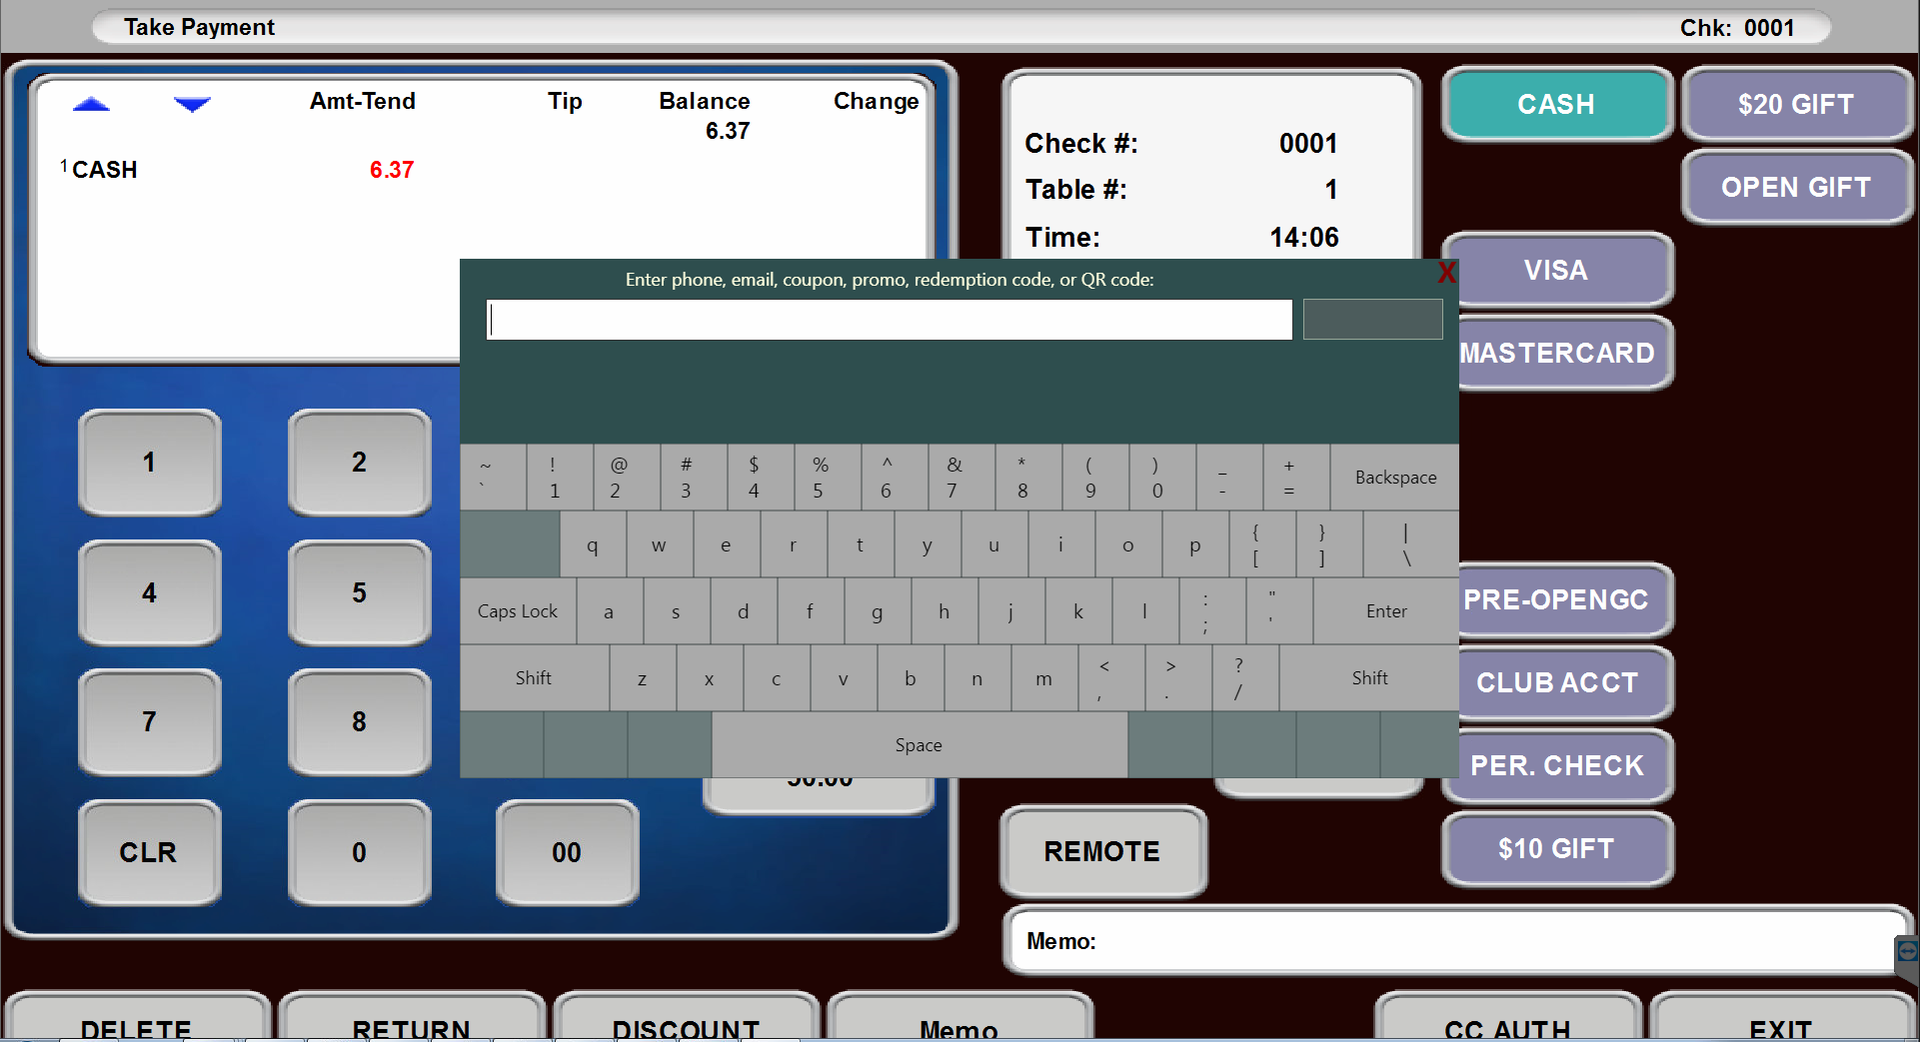
Restart SpcWin and POSiTerm, then ring in an order and try clicking the user program button. It should display the PunchhUI:
-
If the PunchhUI is not displaying, then try creating the macro again. If still having trouble:
- Download this MACROS.XML file into the C:\SC folder
- Open the MACROS.XML file in Notepad, and replace the string “Punchh” with the button label that you’d like.
- Restart SpcWin and POSiTerm.
- Try clicking the button again.
