Micros RES 3700 Configuration and Installation Guide
POS Prerequisites/Requirements
Primary Server (Back Office)
Prerequisites
- Windows OS: Windows 7 or higher
- .NET 4.6.1 or higher
- Micros RES 5.4 or higher
- SIM License
- Punchh Proxy version 7.12.2 or higher
Terminal(s)
Prerequisites
- Supported guest check printers interface type:
- RS-232
- IDN
- OPOS (Ethernet/Network)
- TCP/IP Interface
Guest check printers that will print the Punchh barcode and messages:
- You CANNOT use a combination of IDN and RS-232 printers.
- You CAN use a combination of IDN and OPOS (Ethernet/Network) printers.
- You CAN use a combination of RS-232 and OPS (ethernet/Network) printers.
Configure Firewall/AV
POS Firewall Settings
Network Firewall and Antivirus Setup
Confirm that the following FQDN (Fully Qualified Domain Names) endpoints are properly whitelisted in the site's firewall/router.
(PUNCHH DOES NOT SUPPORT FIREWALL RULES USING IP ADDRESSES.)
Network Firewall Configuration
| ALLOW TCP using port 443 FROM: POS BOH Server TO: |
|
| ALLOW Web surfing FROM: POS BOH File Server TO: | https://*.punchh.com |
Network Firewall Validation
| From the POS BOH PC, open a web browser and navigate to the following web pages. Each web page should return a plain white page with OK. If any page does not return OK, the firewall needs to be reviewed to ensure the correct FW rules are in place. |
POS Setup
Setup for Punchh Loyalty
Step 1: Open the POS Configurator application and login.

Step 2: Go to the Devices tab and click on Interfaces.
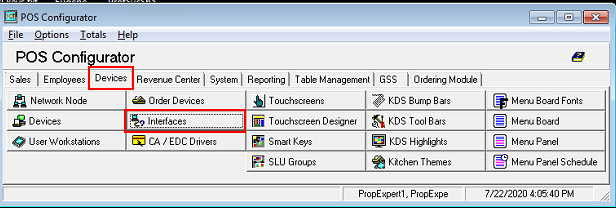
Step 3: Create a new interface record number and save.
By default, Punchh uses interface 90. If interface 90 is already in use, then you can create any interface ID record; however, make a note of it because you will need to edit the Punchh configurator utility to make the change from the default setting.
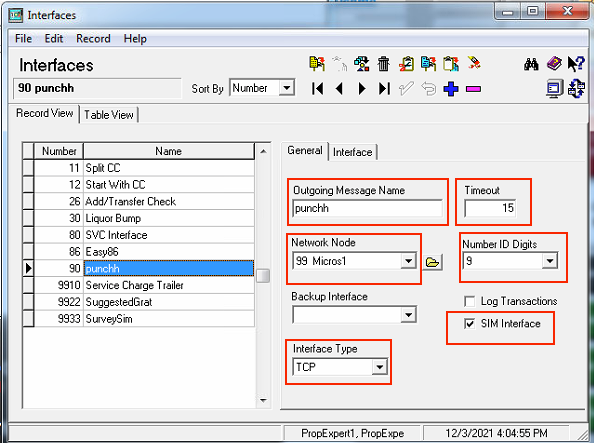
- Outgoing Message Name: punchh (must be lower case)
- Timeout: 15
- Network Node: Select your particular Micros server from the drop-down list
- Number ID Digits: 9
- Backup Interface: Leave it blank
- Log Transactions: Unchecked
- SIM Interface: Checked
- Interface Type: TCP
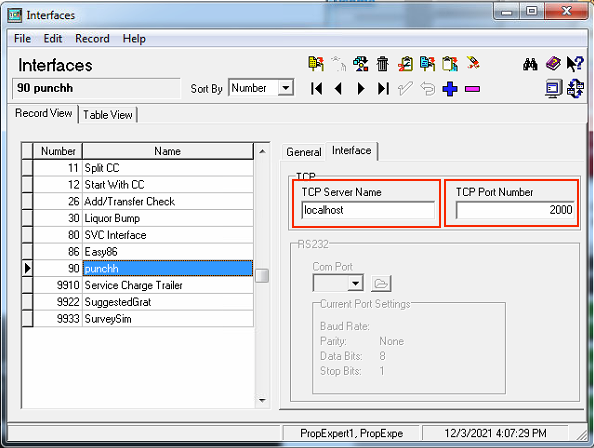
- TCP Server Name: Internal IP address of the BOH Server
- TCP Port: 2000 (it is the default port number)
Step 4: Go back to the POS Configurator → Sales tab → Discounts
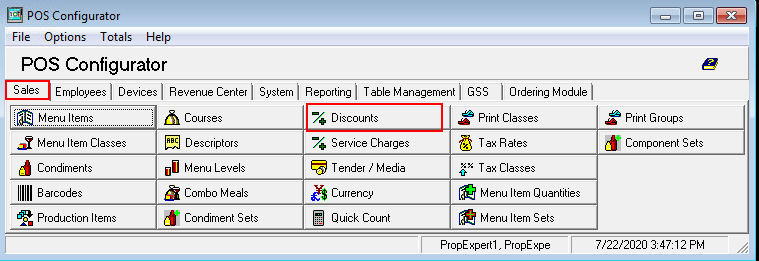
Step 5: Create a new Punchh discount and save.
By default, Punchh uses discount ID 300. If discount ID 300 is already in use, then you can create any discount ID record; however, make a note of it because you will need to edit the Punchh configurator utility to make the change from the default setting.
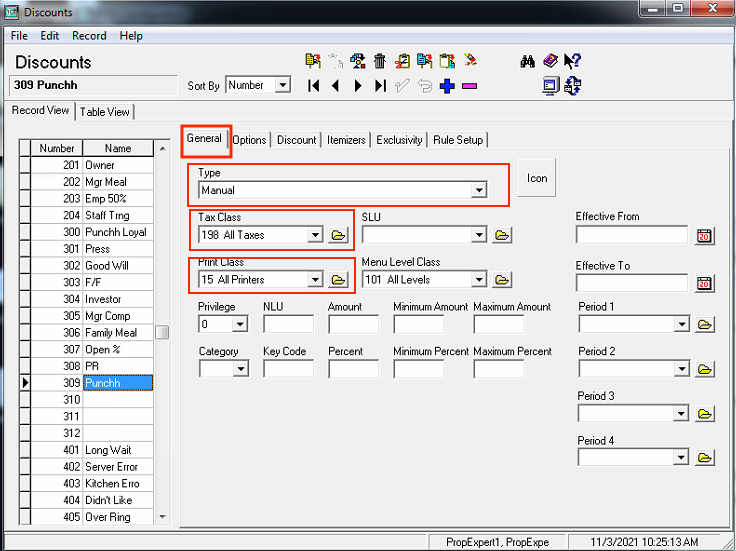
- Discount Name: Business Choice (this is the name of the discount that applies to the check)
- Type: Manual
- Tax Class: All (as default)
- Print Class: Guest check printers only
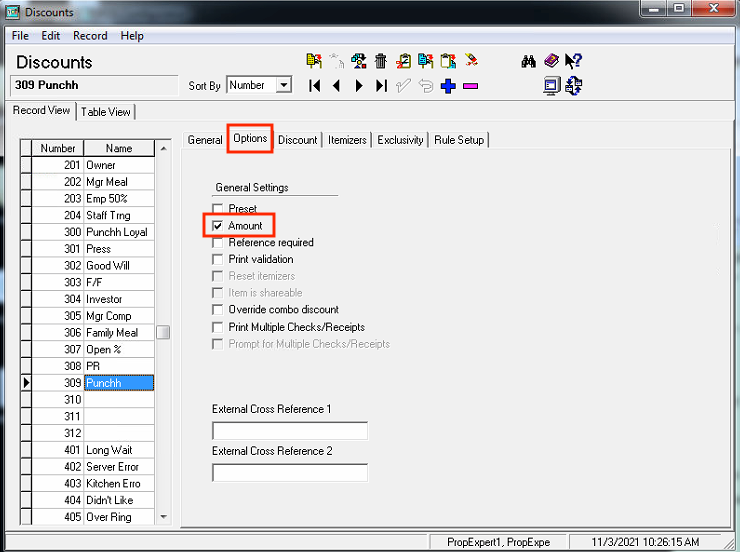
- Amount: Checked
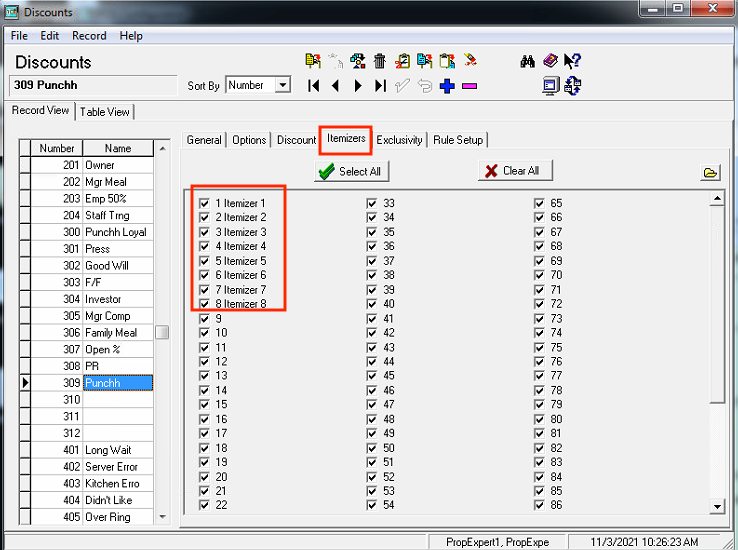
- Itemizers: Check all (as default)
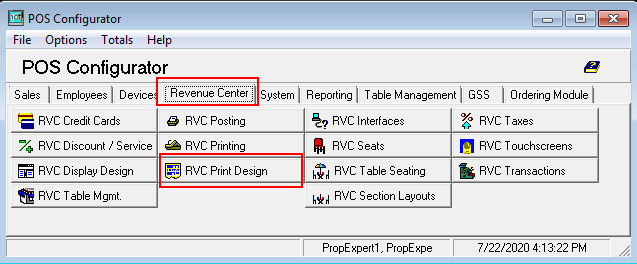
Step 6: Go to Revenue Center tab → RVC Print Design.
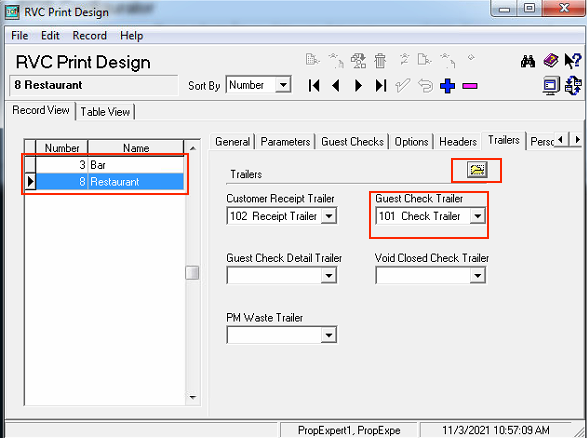
Step 7: Go to the Trailers tab and select the folder.
If you do not have a Guest Check Trailer descriptor selected here, then you will need to create a new one once you select the folder from this screen.
You will also have to choose the Guest Check Trailer descriptor for each revenue center you want to have Punchh messages printed on.
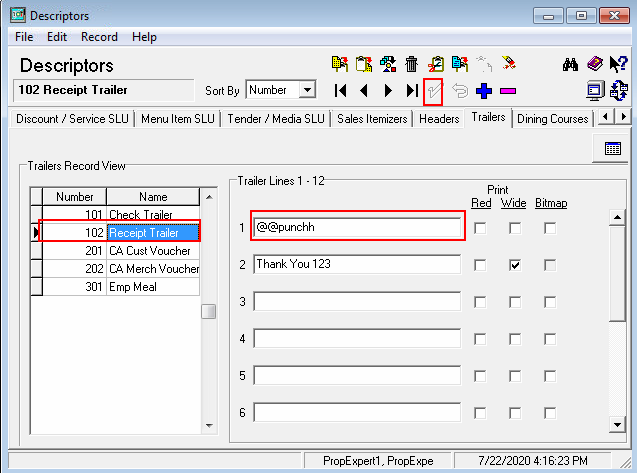
Step 8: On the Descriptors screen, select the Trailers tab. Select the record associated with Guest Check Trailer.
If you did not have a Guest Check Trailer selected from the previous step, you will need to create a record named “Receipt Trailer”
Step 9: Add @@punchh in the trailer line(s) you wish to print the receipt messages on and save.
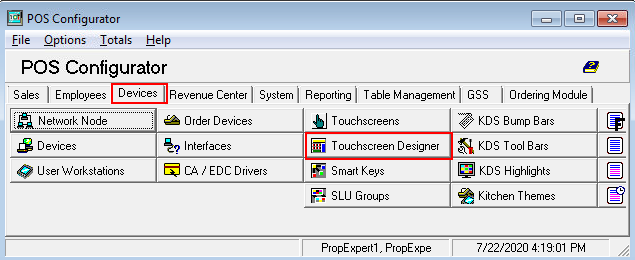
Step 10: Go to Devices → Touchscreen Designer.
Step 11: Select the screen(s) you want to place the Punchh button on.
This is typically created on the payment screen; however, it can be placed wherever the business chooses.
Step 12: Create and configure the Punchh button.
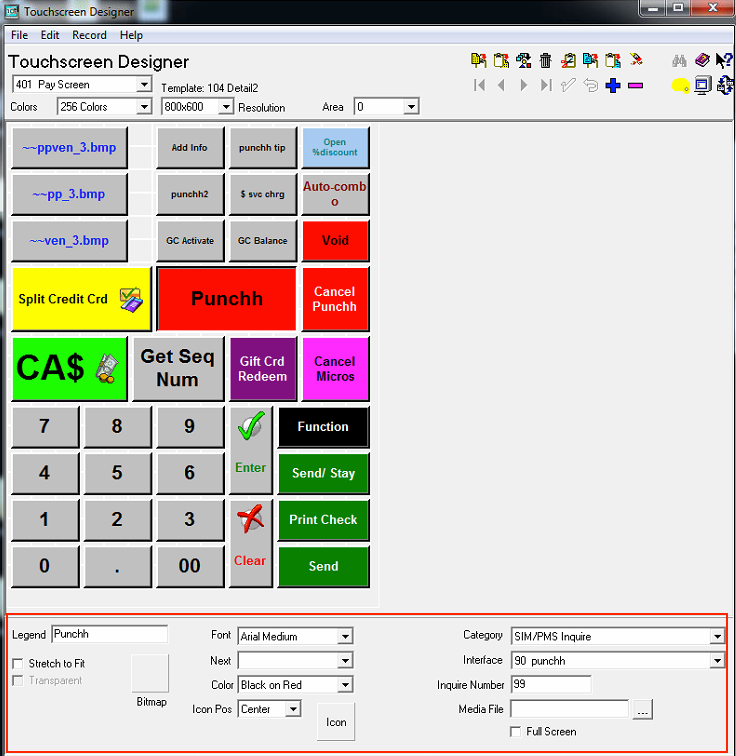
- Legend: Business choice (this is the name of the button that shows on the terminals)
- Category: SIM/PMS Inquire
- Interface: Choose the interface record created for Punchh
- Inquire Number: 99
Installation Instructions
Step 1: Run the SetupPunchh.MSI on the BOH server.
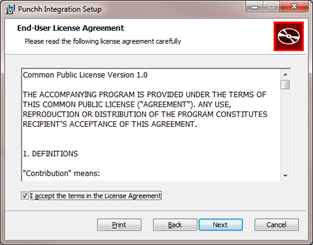
Step 2: Check the box to Accept the License Agreement and choose Next.
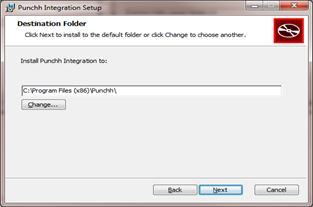
Step 3: Verify the installation path and choose Next.
Step 4: Confirm by choosing Install.
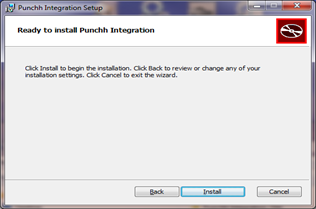
Step 5: Choose Finish to complete the installation.
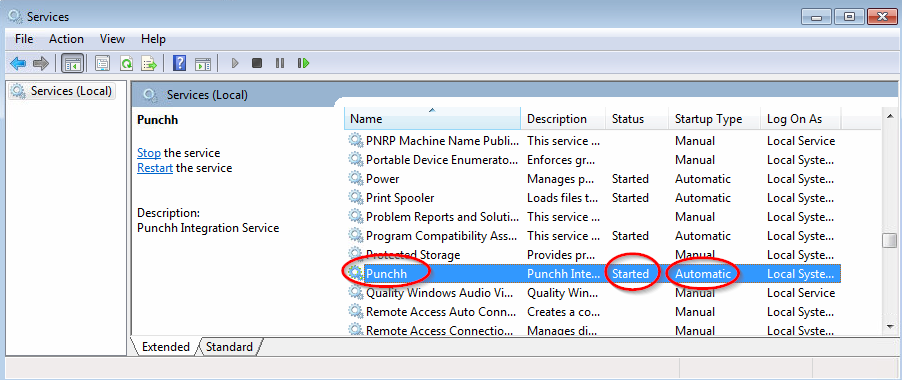
Step 6: Verify that the Punchh installer has started the Punchh service (open Services on the PC and find the Punchh service).
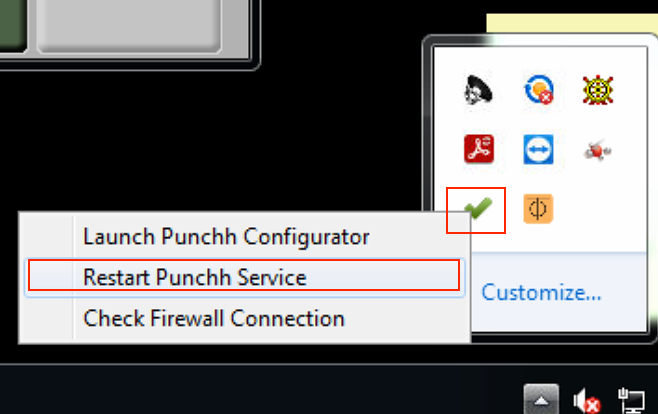
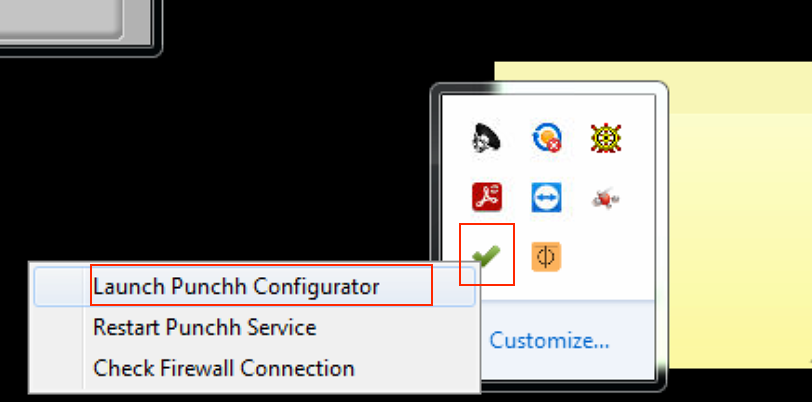
Step 7: Launch the Punchh Configurator utility from the notification tray on the desktop. Right-click on the green check and choose Launch Punchh Configurator.
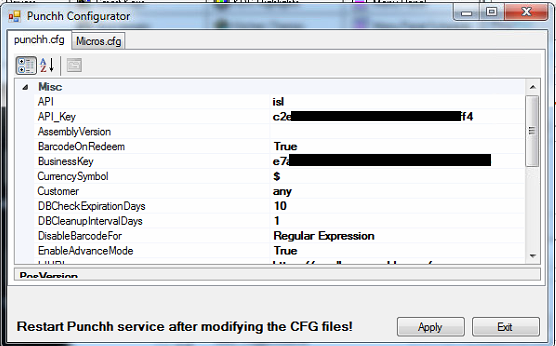
Step 8: Configure the Punchh.cfg and click Apply.
-
API: isl (default)
Micros-specific API endpoint for Micros API calls
Do not change -
API_Key: <API Key for the location being set up>
- Will be unique for each location. You can find this in the Punchh platform under Settings → Locations → POS tab
-
AssemblyVersion: <blank>
-
BarcodeOnRedeem: <True or False>
- Whether to print a barcode on checks that have a Punchh redemption
-
BusinessKey: <Business API key for the location being set up>
- You can find this in the Punchh platform under Cockpit → POS Integration → Business Key
- Will need to be provided by Punchh staff; will be the same value for ALL POS locations
-
CurrencySymbol: $ (default) Not Applicable to Micros RES
-
Customer: any (default)
- This setting is used to provide Micros alternative error messages and POS prompts for specific brands. Requires development to provide this extended functionality
-
DBCheckExpirationDays: 10 (default 10)
- Oldest age of transactions stored in Proxy for offline uploads saved on the POS DB for uploading after an Internet outage
-
DBCleanupIntervalDays: 1
- Number of days between the check details DB being purged for transactions older than DBCheckExpirationDays
-
DisableBarcodeFor: Regular Expression (default value)
- This value may be replaced with a regular expression to conditionally allow printing of barcodes on POS transactions
- Example: Registered User Online Orders
-
EnableAdvanceMode: True
- Enabling this functionality adds support for new messages and logging data to be written to logs
- Empowering Proxy service to use the POS Library
-
IslURL: https://pos.punchh.com (default) or https://pos.us-west.punchh.com
- Confirm this setting for your brand with your Punchh Customer Success Manager
-
KeepSocketsOpen: True
- Setting allows multiple POS<-->Proxy transactions to be performed over a single open TCP thread
Required for Micro RES for optimal performance and reliability
- Setting allows multiple POS<-->Proxy transactions to be performed over a single open TCP thread
-
Language: en (default)
- Default English
- Supported languages: es (Spanish)
-
LogUploadURL: https://loguploads.punchh.com (default)
- This setting is used in conjunction with the business key set.
- For older integrations without the business key setting available, set this to: https://poslogs.punchh.com
-
LoyaltyButtonName: Punchh (Not applicable for Micros RES)
-
MaintenanceHour: 4 (default)
- Hour of the day that log file rotation, uploads, and database maintenance are performed
-
POS_Type: Micros
- Once this is set, the Generic.cfg tab will change to Micros.cfg
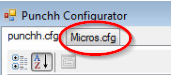
- Once this is set, the Generic.cfg tab will change to Micros.cfg
-
PosUrl: https://pos.punchh.com (default) or https://pos.us-west.punchh.com
- Confirm this setting for your Brand with your Punchh Customer Success Manager
-
ProxyDestination: <blank> (default)
- Set when the POS network needs to use a Proxy server for connection to the internet
-
ProxyPort: <empty> (default)
- Set when the POS network needs to use a Proxy server for connection to the internet
-
PunchhUIChunkSizeKB: 150 (default) (Not applicable for Micros RES)
- Setting that breaks the PunchhUI application files into smaller chunks for distribution to POS terminals (Micros Simphony)
-
PunchhUIStartupLocation: 1 (Not applicable for Micros RES)
- New UI starting location when opened
- 0 = Display in center of the screen
- 1 = Upper left of the screen
- New UI starting location when opened
Step 9: Configure the MICROS.cfg and click Apply.
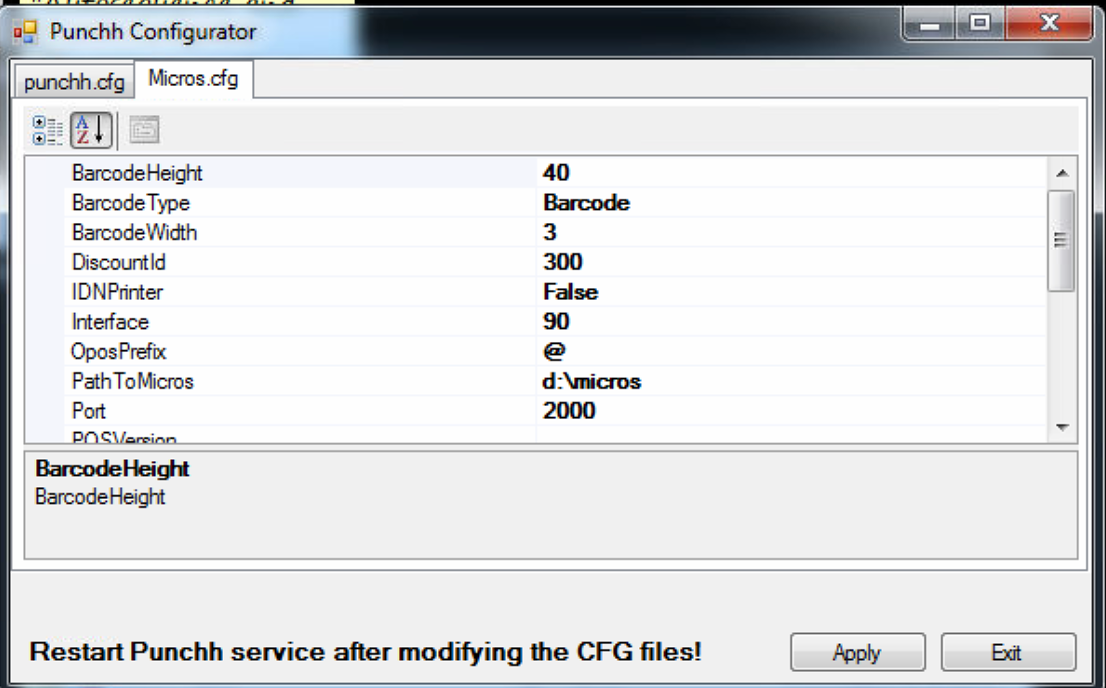
- BarcodeHeight: 40
- Based on Epson TM-88 type printers
- BarcodeType: Barcode
- BarcodeWidth: 3
- Based on Epson TM-88 type printers
- DiscountId: 300 (default)
- Set this to the value set in Setup Micros Punchh Discount
- IDNPrinter: False (default)
- False for RS-232 / TCP/IP based printers
- False Plus OPS Prefix = OPOS Printer
- True for IDN printers
- Interface: 90 (default)
- Set to 90 unless during step Interface Parameter you identified another interface using this ID. In that case, set this to the Punchh Interface you created.
- OposPrefix: @ (default)
- Set to match the correct OPOS Printer Prefix
- PathToMicros: d:\Micros
- Path without trailing slash to where Micros is installed on the Micros BOH
If the path defined in the PathToMicros setting is a path other than the Micros RES POS installation path:
-
The designated path MUST have the same directory structure as the Micros RES POS installation folder.
Example:
Actual Micros RES POS installation path = D:\Micros
Punchh Micros.cfg PathToMicros = D:\Punchh\Micros -
The D:\Punchh\Micros\Res\Pos\Etc directory MUST exist
- If the folder does not exist, the Punchh installer will not be able to copy the proper Punchh ISL file to the designated path.
-
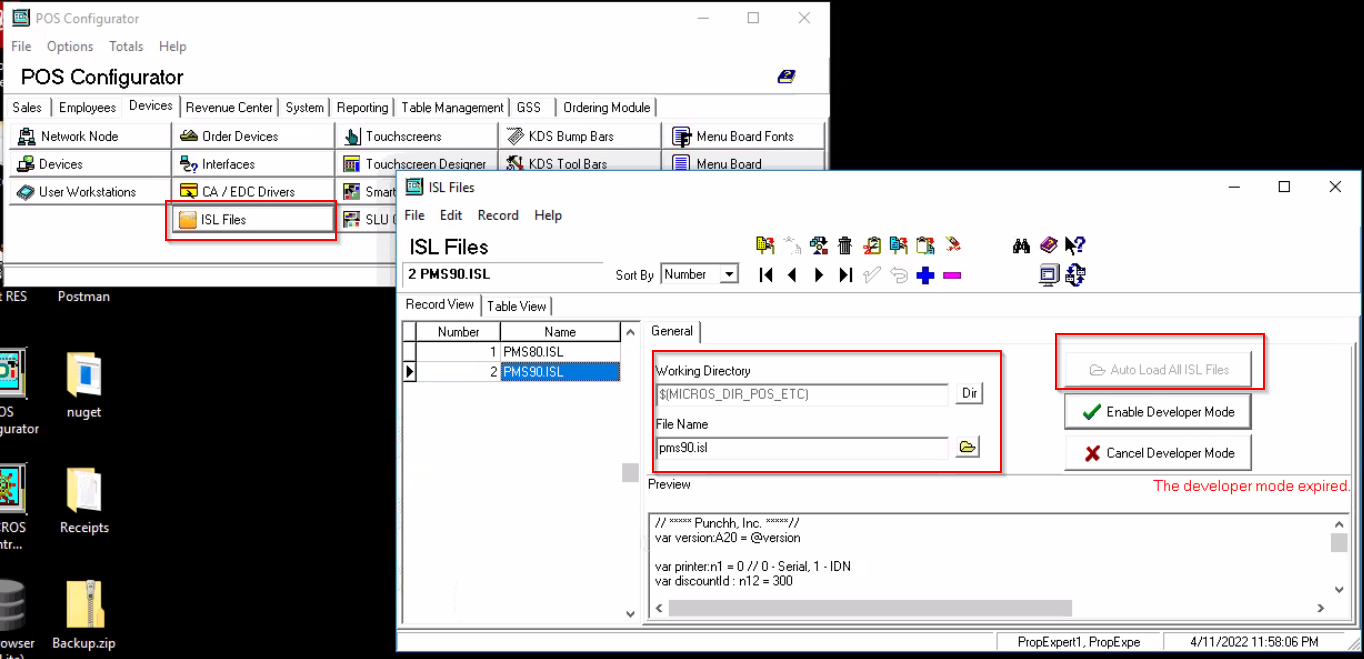
The Punchh installation will copy the punchh.isl to this directory.
- The business will be required to manually inject/copy the ISL file into the \Etc directory in the actual Micros RES POS path.
-
If using version Micros 3700 v 5.7, you will also need to use the ISL File utility in the Micros POS Configurator manager to add the ISL file to the list.
-
Port: 2000 (default)
- Do not change unless there are known conflicting applications running in the Micro BOH where the Punchh Proxy application will run
-
PrintVoucher: False (default)
- True = Print a redemption voucher chit when a Punchh redemption occurs on the POS order. Used for cashier redemption validation tracking
-
SendFamiliyGroupName: False
- False = Send the Micro Family Group ID instead of the Group Name. Best practice is to use ID since it is less likely to ever be charged on the POS
- True = Send the Micro Family Group text name instead of the ID. This is useful for when the brand is using more than one POS type and one of the POS’s cannot set the Group ID values
Once set for the brand, do not change this setting unless all Punchh Portal Line Item Sectors are also updated
-
SendMajorGroupName: False
- False = Send the Micro Major Group ID instead of the Group Name. Best practice is to use ID since it is less likely to ever be charged on the POS
- True = Send the Micro Major Group text name instead of the ID. This is useful for when the brand is using more than one POS type and one of the POS’s cannot set the Group ID values
Once set for the brand, do not change this setting unless all Punchh Portal Line Item Sectors are also updated
-
SVCSeqNo: 12
-
TenderTimeout: 25 (default)
-
UseProperGroups: True
Step 10: Select Restart Punchh Service from the notification tray on the desktop. Right-click on the green check and choose Launch Punchh Configurator.