Multi-Factor Authentication (MFA) Setup & Troubleshooting for Your Punchh Account
Multi-Factor Authentication (MFA) adds an extra layer of security to your Punchh account by requiring a secondary code in addition to your password. This guide provides step-by-step instructions for setting up, using, and troubleshooting MFA on the Punchh platform.
All Punchh Platform users are required to enable MFA as of February 25, 2021. Only third-party authentication apps are supported for MFA.
Setting Up MFA for Your Punchh Account
Step 1: Download an Authenticator App
To enable MFA, you will need an authenticator app on your device. Punchh supports the following free apps:
-
Google Authenticator
-
Twilio Authy
If you do not have a smartphone, you can use the Authy Desktop App or browser extensions for Google Authenticator.
Step 2: Begin Setup in the Authenticator App
Open your chosen authenticator app and follow its instructions to begin the setup process.
Step 3: Obtain Your Security Token
The app will display a string of numbers (your security token), which refreshes periodically for security.
Note: If you sign up with SMS, allow notifications to receive alerts when codes arrive via text. However, Punchh does not deliver MFA codes via SMS or email; you must use an authenticator app.
Step 4: Access Your Punchh Account Settings
- Log in to the Punchh platform with your credentials.
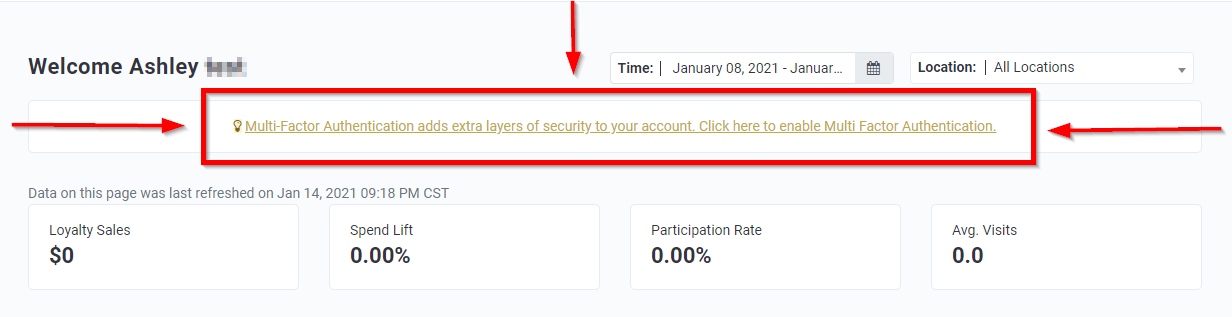
- On your dashboard landing page, look for a link at the top to enable MFA. Click this link to access your account settings.
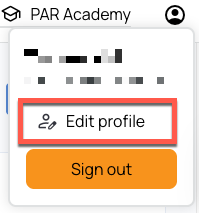
- If you do not see the link, click the profile icon at the top right, then click Edit Profile from the dropdown.
Step 5: Enroll in Multi-Factor Authentication
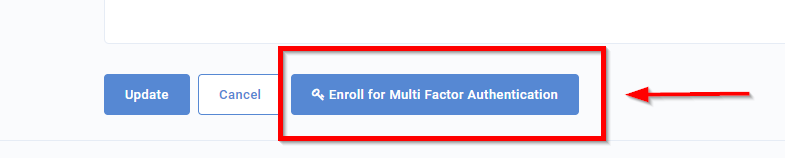
- Scroll to the bottom of your account settings page.
- Click the Enroll for Multi Factor Authentication.
- You will be directed to a page displaying a QR code.
Step 6: Link Your Authenticator App
You have two options:
- Scan QR Code: Use your device’s camera within the authenticator app to scan the QR code.
- Enter Key Manually: Type the security token code generated by the authenticator app into the provided field, then click Enable MFA.
Once completed, you will see a success message confirming your enrollment in MFA.
Using MFA to Log In
Each time you log in to the Punchh platform, you will be prompted to enter a 6-digit code from your authenticator app in addition to your username and password. Open your app, retrieve the current code, and enter it to complete the login process.
Troubleshooting MFA
Common Issues and Solutions
1. Error: MFA authentication could not be enabled
- This occurs if the verification token entered is expired, invalid, or if the field is left blank. Ensure you enter a valid, current code from your authenticator app.
2. Not Receiving MFA Codes via SMS or Email
- Punchh does not send MFA codes via SMS or email. You must use an authenticator app to generate your codes.
3. No Smartphone? Use Desktop or Browser Extensions
-
Download the Authy Desktop App or use browser extensions:
4. Resetting MFA for Yourself or Another User
- If you cannot access your account because your authenticator app is not linked, contact Punchh Support at support@punchh.com to reset your MFA settings.
- To reset MFA for another admin user:
- Log in to the Punchh Platform.
- Go to Administration > All Users, Roles and Permissions.
- Select the admin user and click Reset MFA at the bottom of their profile page.
- The user will be prompted to set up MFA again at their next login.
5. Missing Reset MFA Button
- If the Reset MFA button is missing, the user has not set up MFA yet and will be prompted to do so upon next login.
6. Alternative to QR Code
- If you cannot scan the QR code, enter the token code from your authenticator app manually in the Verify Token field and click Enable MFA.
Additional Support
If you require further assistance, please submit a ticket to Punchh Support via the Punchh Support Portal.
