FreedomPay Lane 3600 USB Setup Guide
Overview
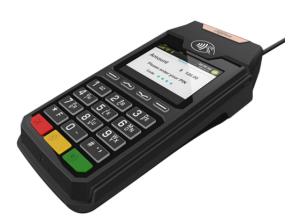
This document outlines the setup/configuration of the Lane 3600 using FreedomPay, and tips to prevent common errors that may be experienced with the device. The Lane 3600 supports all payment types including EMV Contact, EMV Contactless, Magstripe, and Contactless.
System Requirements
| Requirement | Value |
|---|---|
| PAR POS Register Version | Version 5.0+ |
| Microsoft SQL Server Compact 3.5 SP2 ENU | Version 3.5.8080.0 |
| Microsoft SQL Server Compact 3.5 SP2 x64 ENU | |
| Par Terminal (Helix) | Windows 10 OS |
| Lane 3600 N CL/Eth |
|
| FreedomPay FCC | v5.1.4.12 |
| FreedomPay POI | Lane3600NoPIN_NEW |
Ingenico Lane 3600 Device Setup
Ensure the following items are included with the Lane 3600:
- USB 5v cable
- Ingenico Lane 3600 credit card reader
Initial Configuration
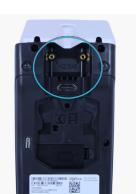
- Flip the terminal over and locate ports on the back for power and communications.
- Connect the power cable to the terminal.
- Connect the other end to the power supply unit and a Host (PC/Cash register).
- Plug the power supply into the mains.
Note: Two screws may be added (M2.5 x 8) to hold the cable firmly to the terminal.
Important Note: If the reader shows "This Lane Closed" right out of the box, please follow the steps in the "This Lane Closed Configuration" section.
Verify Merchant and Configuration Files
Prior to installation, ensure the following files have been provided by Freedom Pay:
- FCC (version 5.2.1.4)
- POI.zip (Lane3600NoPIN_NEW)
In addition, ensure the following Merchant information has been provided by Freedom Pay:
- FreedomPay Enterprise Portal
- Enterprise Code
- Username and Password
- MerchantID
- TerminalID
Note: This setup assumes that you are doing the typical installation for FreedomPay in which the FCC client and server are both installed on the same machine the register is installed on.
FreedomPay Activation Key
Prior to setup, you must first obtain a login from FreedomPay for the enterprise portal. You must have an Enterprise Code, Username, and Password.
For production use the following URL:
https://enterprise.freedompay.com/
Once logged in:
- Navigate to "Device Management > Manage Activation Keys".
- Click on "Generate".
- Copy the "Key" column text and save it for later.
This auto-generated activation key is used to activate every device that will be part of this enterprise. The same key may be used to activate up to 50,000 devices. Once the key is used to activate a device, it creates a link between that device and the enterprise which could potentially be used in the future to push updates to all devices remotely. Contact FreedomPay for additional details.
Installing FreedomPay FCC software
FreedomPay has three pieces of software that need to be installed. The "Freeway Commerce Connect" or "FCC" software, FreedomPay Remote Update Service and the drivers for the device that need to be installed.
- Download the FCC.zip software from FreedomPay (FCC v5.2.1.4+).
- Locate the FreewayCommerceConnect.exe inside the DISK1 folder. Right click on the executable and select "Run as an Administrator."
- The first software that is installed is the Remote Update Service.
- The Device Management Portal Activation URL should default to production.
- Enter the Device Management Portal Activation Key copied in Step 3 of the FreedomPay Activation Key section above.
- The installation of the FCC software should automatically begin.
- Select "Typical" setup.
- The FCC Installer will run through the installers for any of the prerequisites that are not already installed. This includes the ODBC Driver 11 for SQL Server, Express LocalDB SQL Server, SQL Server (Native Client), Command Line Utilities for SQL Server, and .NET 4.6. For each one, accept all default options and accept the License Agreements.
- Once the installation is complete, you can continue to setup device communication.
Installing USB Devices
- Plug in the payment device.
- Navigate to the Windows "Device Manager" and ensure the device looks like the Lane 3600. The sub-item will usually be the model of payment device you are using.
- If it does not look like the Lane3600, follow the steps below:
- For USB devices supported by the FCC, you will need the PAL package for the Lane3600. Install the Freeway MsrLib POI Device Drivers.
- Download Lane3600NoPIN_NEW.zip
- On the register, navigate to C:\ProgramData\FreedomPay\Freeway Commerce Connect\pal and delete all existing files.
- Unzip the pal zip file (Lane3600NoPIN_NEW.zip) and place the files it contains into the location path in Step c.
- Open Regedit.exe using "Run as Administrator" and navigate to Computer\HKEY_LOCAL_MACHINE\SOFTWARE\Freedompay\Atlas\PAL\Devices
- Delete any existing devices.
- If the PAL or Devices folder do not exist in RegEdit.exe, follow the steps below:
- If the PAL folder does not exist, create one within the Regedit path Computer\HKEY_LOCAL_MACHINE\SOFTWARE\Freedompay\Atlas
- Right click on "Atlas"
- Select "New > Key"
- Name the Key "PAL"
- If the \PAL\Devices folder does not exist, create one within the Regedit path Computer\HKEY_LOCAL_MACHINE\SOFTWARE\Freedompay\Atlas\PAL
- Right click on PAL
- Select New > Key
- Name the Key 'Devices'
- If the PAL folder does not exist, create one within the Regedit path Computer\HKEY_LOCAL_MACHINE\SOFTWARE\Freedompay\Atlas
- Open Windows Services and restart the Freeway Client Service.
- Device should start to update. You may see Firmware.OGZ on the screen, then Config.TGZ, then IUSN.TGZ, with a reboot after each update. This process may take up to 15 min, but the screen will eventually return to "Secured by FreedomPay".
Configuration in PAR POS Integrations Portal
Payment Device Configuration
The payment device must be configured for a specific location using the PAR POS Admin Portal > Integration Portal:
- Navigate to the Integrations Portal for your location using the PAR POS Admin Portal.
- Navigate to the "Payment Devices" section.
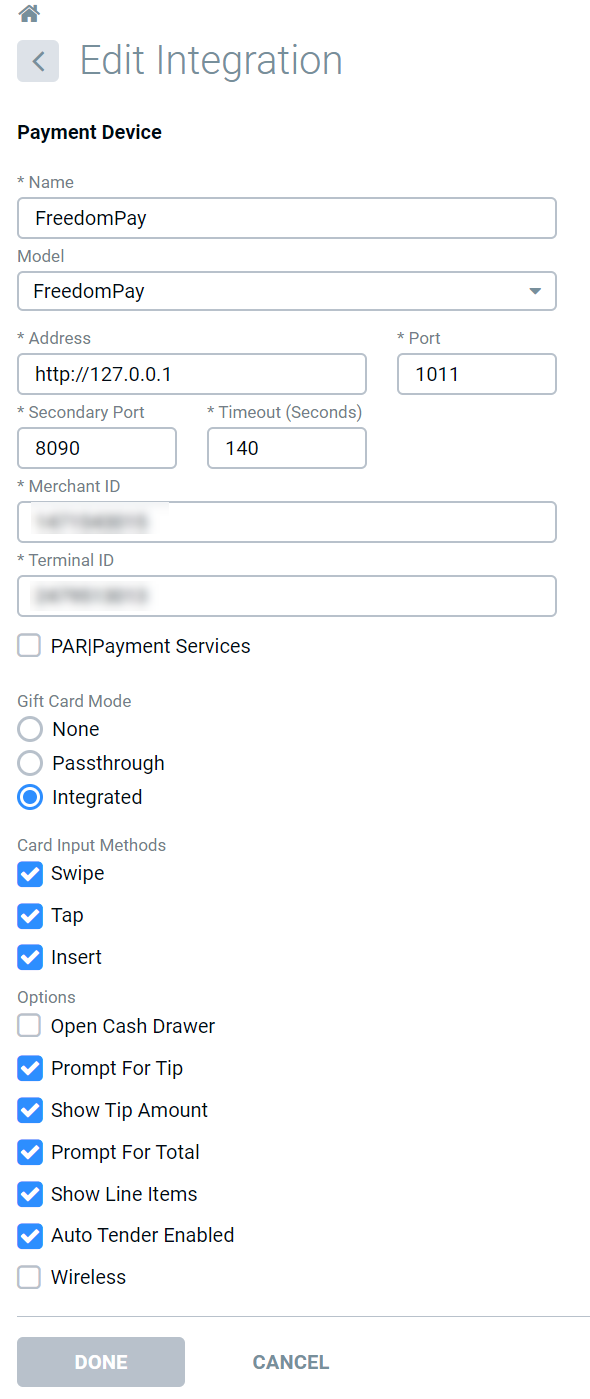
- Click the "NEW" button and populate the following fields:
| Field | Value/Description |
|---|---|
| Name | Customer preference (i.e., "FreedomPay") |
| Model | FreedomPay |
| IP Address | 127.0.0.1 (localhost) |
| Port | Default = "1011" |
| Secondary Port | 8090 |
| Timeout | 140 (this value should be greater than the Freeway Server timeout of 135 seconds) |
| Merchant ID | Provided by FreedomPay |
| Terminal ID | Provided by FreedomPay |
| Gift Card Mode | "Integrated" |
| Card Input Methods | Select all that apply |
| Open Cash Drawer | Unchecked ("false") |
| Prompt for Tip | Device prompts the customer to enter a tip amount (optional) |
| Show Tip Amount | Unchecked ("false") |
| Show Line Items | Checked ("true") |
| Auto Tender | Checked ("true") |
- Click the "Save" button.
Terminal Peripherals Configuration
- Navigate to the Integrations Portal for your location using the PAR POS Admin Portal.
- Navigate to the "Hardware & Devices" section.
- Navigate to the "Peripherals" section.
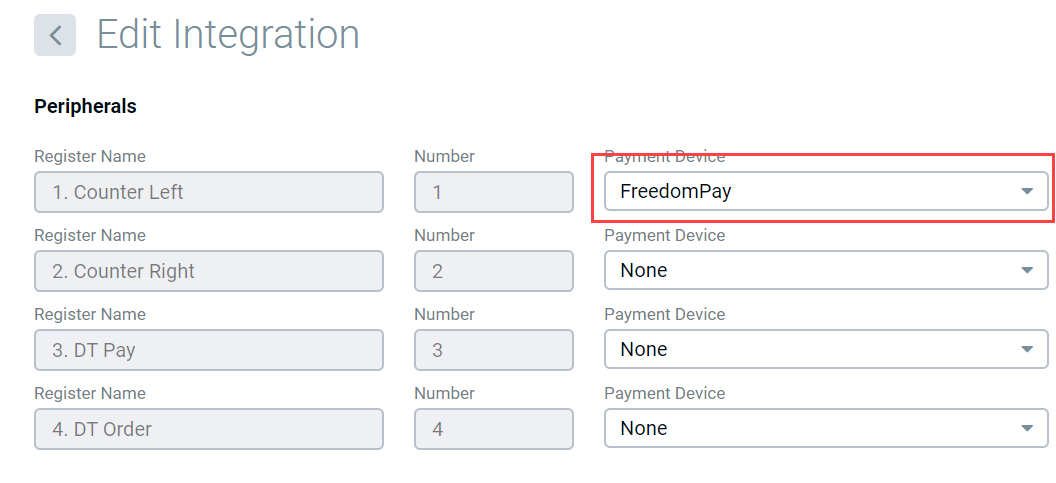
- Select the Register connected to the pin pad (i.e., "Register 1").
- Click on the "Payment Device" drop down menu.
- Select the payment device from the list (i.e., "FreedomPay").
- Click Save.
Configuration in PAR POS Settings Editor
Create Integration Json
- Navigate to Settings Editor for your location using the PAR POS Admin Portal.
- Navigate to "Integrations" on the left-hand side menu.
- Click "Add" to create new integration settings for the location.
- Paste the following json string into the configuration textbox:
{
   "CardInputMethod":"Swipe, Tap, Insert",
   "UriAddress":"http://127.0.0.1",
   "Port":1011,
   "TerminalId":"xxxx",
   "GiftCardProcessingMode":"Integrated",
   "IsSwipeAheadEnabled":false,
   "Model":"FreedomPay",
   "Name":"FreedomPay Device",
   "OpenCashDrawer":true,
   "PromptForTip":true,
   "PromptForTotal":true,
   "ShowTipAmount":true,
   "MerchantId":"xxxx",
   "SecondaryPort":8090,
   "AutoTenderEnabled":true,
   "PaymentMethods":"CreditCard, GiftCard, DebitCard, ManualCreditCard",
   "ShowLineItems":true,
   "Timeout":140
}
- Replace the MerchantID and TerminalID with the values provided by FreedomPay.
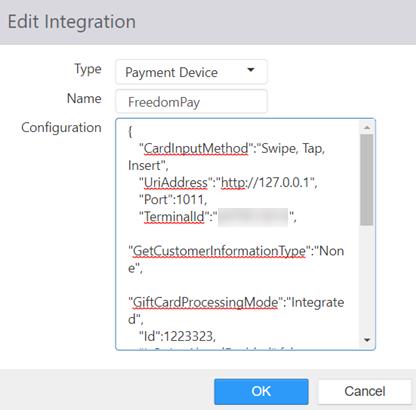
Note: Ensure the "Name" value entered in the screenshot above matches the file name of the integration you are deploying. For example, if the filename is "PARPOS.Hardware.PaymentDevice.FreedomPay.dll", the "Name" value should be "FreedomPay".
- Click "OK".
- Click "Save" then "Publish".
Assigning Integration Json to Register
- Navigate to Settings Editor for your location using the PAR POS Admin Portal.
- Navigate to "Registers" on the left-hand side menu.
- Select the POS Register that will be connected to the payment device.
- Navigate to "Integrations" tab.
- Click "Add Integration".
- Select "FreedomPay" by checking the checkbox and then clicking "OK".
- Ensure there is no payment device already selected under the "Peripherals" section. If one is already selected, select "None" from the "Payment Device" drop-down list.
- Click "OK" on the "Edit Register" screen.
- Publish the settings.
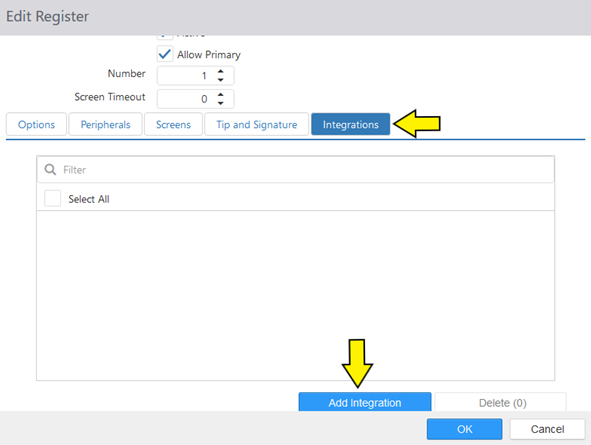
The FreedomPay integration should have all the following set up:
- Payment device and associated drivers
- FCC software installed and configured
- Settings Editor settings configured and published
You can now run a test transaction. If you are running a test in production, you can proceed to refund the test amount.
After the test, navigate to the Windows Event Viewer section in PAR POS and ensure there are no logged errors related to FreedomPay.
Verify that the integration has successfully loaded by checking the Windows Event Viewer in PAR POS.
Version History
| Version | Date | Updates |
|---|---|---|
| 01 | 2/23/21 | Initial Release |
| 02 | 10/24/24 | Updates to formatting and branding |
