PAR POS™ v5.16r4 (5.0.16403) Release Notes & Feature Guide
About This Release
PAR POS 5.16r4 is a point release covering enhancements to limited-use promo codes, non-cash payments without a cash drawer, Brother label printing, Print All on First Bump kitchen printing, Deliverect driver check-in, and bug fixes. This document summarizes what's new, how each change works, and what, if anything, you need to do to use it.
Promotions
Limited-Use Promo Codes
Reference: BRNK-64837
Promo codes can be limited to a configurable number of redemptions (for example first 20 orders, or use this code up to 18 times), instead of only single-use or unlimited. Limits are enforced in real time, including optional per-customer and time-window controls.
How It Works
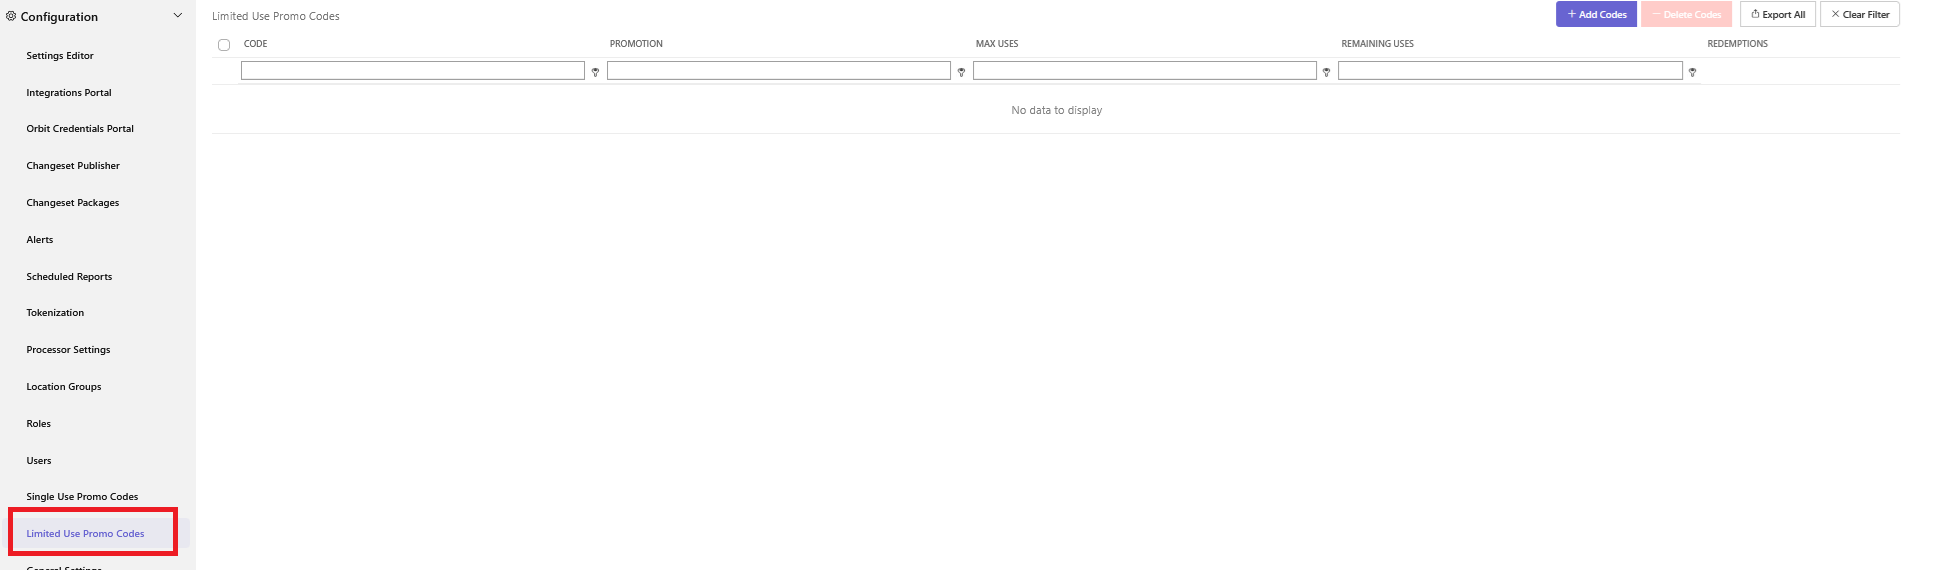
- The list view displays each code's name, associated promotion, maximum uses, remaining uses, scope, and status.
- A redemption detail view shows expanded transaction history for individual codes.
- A delete confirmation dialog allows administrators to remove promotion codes safely.
- The existing "Promo Codes" navigation item has been renamed to "Single Use Promo Codes" to avoid confusion with the new limited-use type.
- Export option allows the user to export the redemption detail view.
- A Role permission controls access. Users with existing single-use promotion permissions automatically receive equivalent limited-use permissions.
- This is located on the Admin Portal ->Configuration->Roles
NOTE: The redemption limit can go up to 99999, but the best practice is to limit auto generation of codes to 500 at a time, to prevent timeout issues.
Feature Enablement
Log into the Admin Portal and:
- Click Configuration → Limited Use Promo Codes
-
Click Add
-
Choose Manual (to enter all codes manually) or Generate (PAR POS will auto generate the codes)
-
From the Select a Promotion drop down, choose the promotion to work with the codes
-
If Manual was selected in step 3 above:
-
Enter codes — one per line or comma-separated, max 20 characters each
-
If Generate was selected in step 3, enter the:
-
Count — the number of codes to be generated
-
Length — the length of each code
-
Characters:
-
Alpha — letters only
-
Numeric — numbers only
-
Alphanumeric — both letters and numbers
-
-
-
-
Set Redemption Limit (minimum 1)
-
In the Limit to Locations section, choose which location(s) will be using the promo and the codes generated in step 5 and click Add
-
Click Save
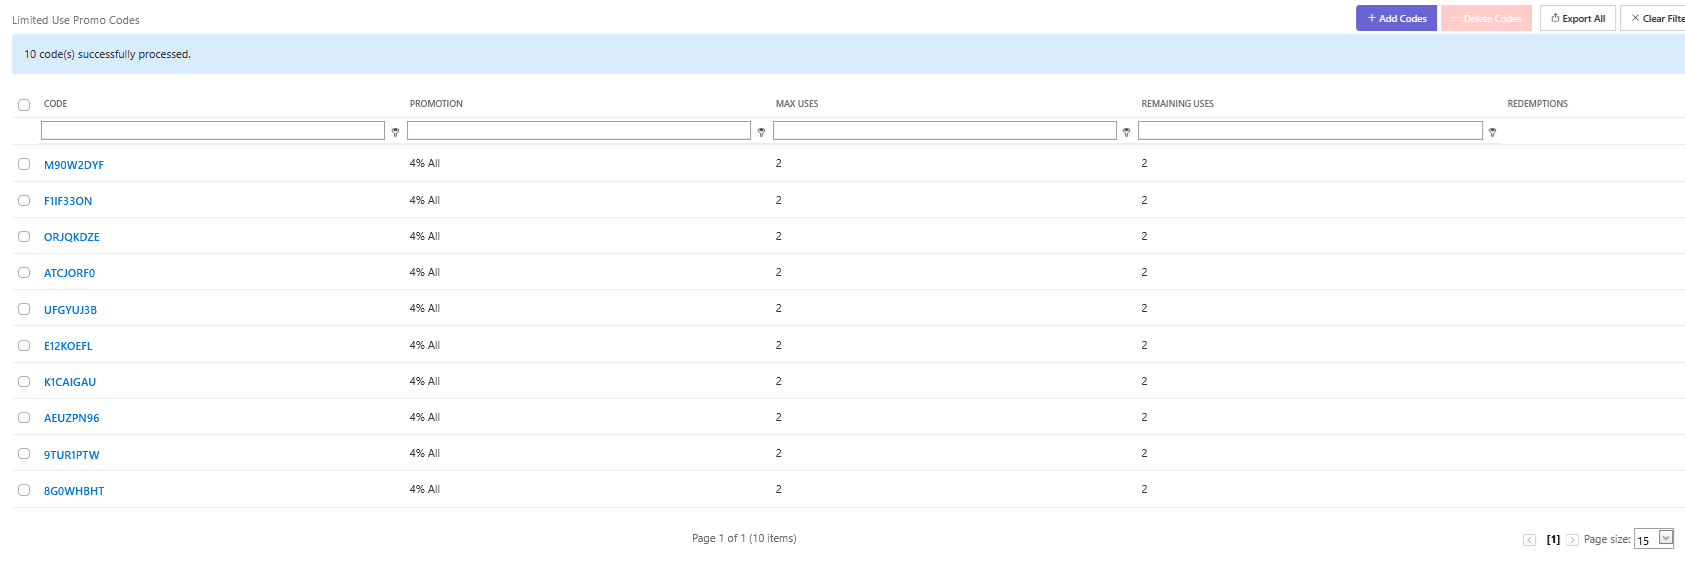
Register Workflow For this example, the configuration for the limited-use promotion is:
- Generate, Promo = 10% Off, Count = 3, Length = 5, Alphanumeric, Redemption Limit = 2
- Ring in an order.
- Apply the 10% promotion that was configured with limited use (see Feature Enablement above).
- Enter the 5-digit alphanumeric code.
- Confirm the 10% promotion was added to the order and the order total was reduced.
- Tender and close the order.
- Ring in a second order.
- Apply the 10% promotion that was configured with limited use.
- Enter the 5-digit alphanumeric code (same code as in step 3).
- Confirm the 10% promotion was added to the order and the order total was reduced.
- Ring in a third order.
- Apply the 10% promotion that was configured with limited use.
- Enter the 5-digit alphanumeric code (same as in steps 3 and 8).
- Note the error message indicating that the promotion has exceeded the number of allowed uses.
Ordering & Checkout
Non-Cash Payment Without a Cash Drawer
Reference: BRNK-69864
Phone-order staff who are not assigned a cash drawer can now take credit card and gift card payments. Before the 5.16r4 release, those employees were blocked from any payment with a “You do not have cash drawer assigned” error message.
How It Works
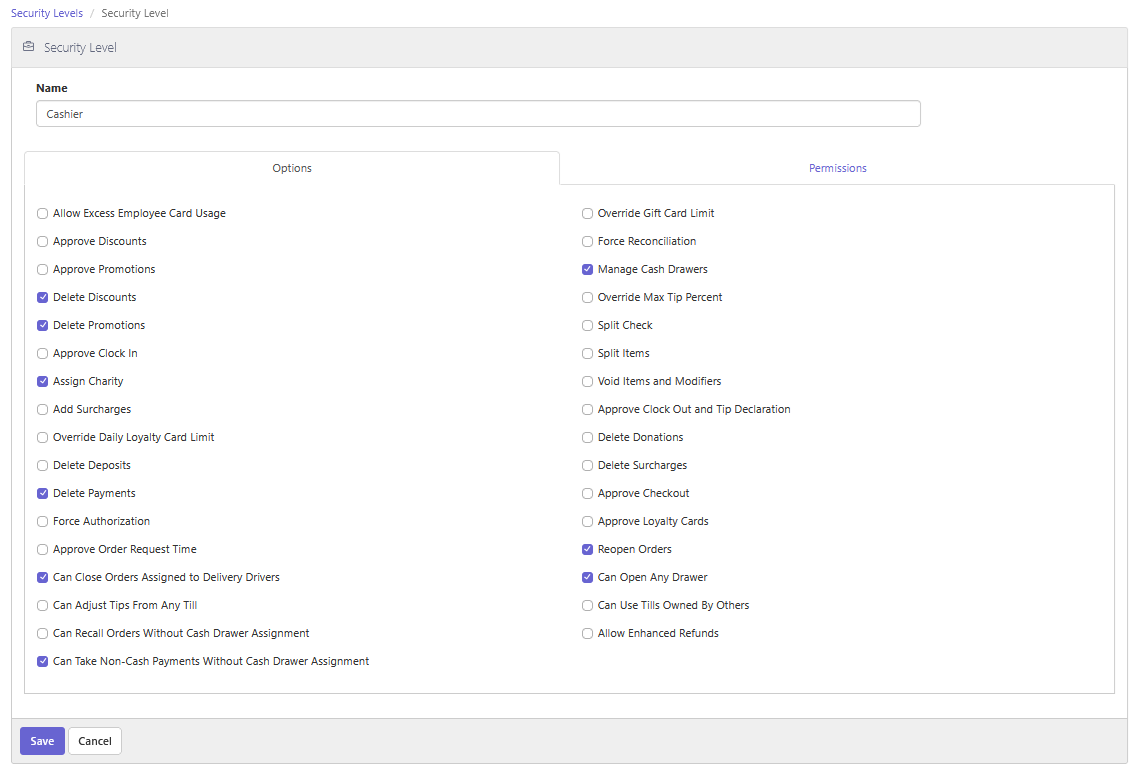
- A new security-level checkbox gates the behavior. If it is enabled, the register allows only Credit Card and Gift Card tenders without a till assignment.
Note: Cash payments still require a drawer. Mixed tenders (cash + card) are out of scope.
Feature Enablement
In Admin Portal, navigate to Staff, then Security Level.
- Select the desired Security Level or create a new Security Levels.
- Enable Can Take Non-Cash Payments Without Cash Drawer Assignment
- Click Save
- Assign that security level to the Job setup for employees who take phone orders.
- Navigate to Staff -> Jobs
- Select the job that is setup for employees who take phone orders
- Click the Security Level drop down
- Select the Security Level created above
- Click Save
Register Workflow
- An employee with the Phone-Order security level logs into the register.
- Select the Phone Order destination.
- Ring in items ordered by the guest.
- Tender the order using a Credit Card or Gift Card tender.
Kitchen
Print All on First Bump Updates
Reference: BRNK-70767
Print All on First Bump (introduced in 5.16r2) now covers orders that never appear on the kitchen display, and times void labels so the kitchen receives one accurate set instead of duplicates. These updates apply to script-based chits/labels only. Existing PAR POS (non-script) bump printing is unchanged. There is no new setting.
How It Works
Orders that include at least one KDS-routed item still print on the first item bump. Later bumps for the same order do not reprint the full set.
Orders with no KDS items
Some orders never appear on the KDS (for example beverage-only orders). Those orders used to skip printing entirely because no bump ever occurred. They now print at the earliest available event:
- Above-store / injected orders: labels print immediately when the order is injected.
- In-store POS orders: labels print immediately when the order is Sent and Paid.
Mixed orders
When an order has both KDS items and items that are not routed to a kitchen display, printing still waits for the first KDS bump. That print set now includes all items on the order, including items that never appear on the KDS.
Void labels
Void printing is aligned with the first-bump workflow so a void does not create a second label set:
- Order still on the KDS: voiding an item does not print on Send. VOID labels are held and included in the next first-bump print. Only one updated set is produced.
- Order already fully bumped off the KDS: VOID labels print immediately, because no later bump will occur.
Note: In 5.16r2, void item chits always printed immediately, even when Suppress Chit/Label Printing on Send was enabled. For script-based printing with Print All on First Bump enabled, that is no longer true while the order is still on the KDS.
Print accuracy
- After an order is recalled, edited, and resent, the next bump prints one revised set. Subsequent bumps do not print additional sets.
- An item that is bumped, edited, and resent back to the makeline is included in the next bump print.
- The Print Chit button on Recall Order prints even when Suppress Chit/Label Printing on Send is enabled.
Feature Enablement
No new toggle is required. Enable the existing Print All on First Bump configuration, with script-based chits/labels.
Kitchen queue (required)
In Admin Portal, navigate to Configuration → Settings Editor → Kitchen Queues, then select the Spark makeline queue:
- Set On Bump Print To to the chit/label printer. This field is required.
- Check Print All on First Bump.
- Leave Show Unsent Orders off.
- Confirm the kitchen view for that queue is Item Mode.
- Click Save and Publish.
Note: Print All on First Bump does not work with Show Unsent Orders. If both are enabled, Save/Publish shows an error and the publish does not process. The feature applies to Item Mode only.
Suppress print on send (typical workflow)
In Settings Editor, navigate to Options → Kitchen → General:
- Check Suppress Chit/Label Printing on Send.
- Click Save and Publish.
With both settings on, send does not print; the first bump prints the full set.
Script-based printing
These updates apply only to script-based chits/labels. Classic PAR POS bump printing is not changed.
Kitchen Workflow
| Scenario | Expected result |
|---|---|
| Order with KDS items; bump the first item | One full label/chit set prints. Later bumps print nothing extra. |
| Soft-drink-only (or other non-KDS) order | Prints on inject (above-store) or Sent and Paid (POS). |
| Mixed pizza + drink | Prints on first pizza bump. The drink is included in that same set. |
| Void an item while the order is still on the KDS | No print at send. The next bump prints one set with VOID labels. |
| Void after the order is fully bumped off the KDS | VOID set prints immediately. |
| Edit and resend after a bump | The next bump prints one revised set, not multiples. |
Printing
Brother Printer Label Parity
Reference: AS1-3739
Brother TD label printing enhancements when using script-based chits/labels. Print jobs are no longer lost when the printer sleeps. Includes a feature-flagged new driver, layout and calibration work, vertical and horizontal text printing, and retry after idle exceptions.
How It Works
- A new Brother driver can be enabled with the
PARPOS.EnableNewBrotherPrinterDriverfeature flag. - Layout work matches the label (fields, bold, spacing, height/width for calibration).
- Sleep/retry checks: wake from sleep, queued jobs, unplug/replug network, open/close roll compartment, remove/reinsert roll.
Note: Cutting power mid-job is expected to fail.
- Reconnect timeout: TD-4420DN ignores a duplicate status poll on a new session.
- Vertical and horizontal text printin and fixed-position center and right lines.
Feature Enablement
Note: Used only with script-based chits/labels. Must use a supported Brother printer (TD-4420DN class hardware for the timeout work).
- Enable feature flag
PARPOS.EnableNewBrotherPrinterDriverfor the new driver path.
Bug Fixes
| # | What Was Fixed | Ticket |
|---|---|---|
| 1 | Fixed an application error that occurred when searching Changesets by date in Changeset Publisher. | BRNK-70617 |
| 2 | Fixed a Changeset Publisher issue where keyword search was no longer searching within Changeset details — only the title was being searched. | BRNK-70618 |
| 3 | Fixed Changeset Publisher displaying an incorrect Original Location for changesets. | BRNK-70619 |
| 4 | Fixed Changeset Publisher timing out when searching by both User and Date at the same time. | BRNK-70620 |
| 5 | Added a status indicator in Changeset Publisher so staff can see at a glance whether a Changeset Package retry succeeded or failed. | BRNK-70621 |
| 6 | Fixed an issue where the Changeset Service would stop responding (hang) under high load. | BRNK-70622 |
| 7 | Menu updates, price changes, and configuration changes that stop syncing to one or more locations can now be recovered by the PAR support team without a full service restart, reducing the time locations are out of sync. | BRNK-70623 |
| 8 | The Parent Location Group field on the Location Group Creation screen in Admin Portal is now a searchable autocomplete — type part of the name to filter the list instantly, instead of scrolling through a long dropdown. | BRNK-70624 |
| 9 | Fixed an issue where looking up a delivery customer and then editing Delivery Notes detached the customer, so Address Notes and Copy disappeared until lookup was repeated. | BRNK-70543 |
| 10 | Spark Kitchen now shows the Loyalty badge only when a Punchh account is attached, not whenever any customer is assigned. | BRNK-70721 |
| 11 | Fixed a future-order print failure on the primary register after upgrade that showed “Order not found.” | BRNK-70503 |
| 12 | Digital and kiosk orders with nested modifiers now honor Kitchen Sort Priority on Spark Kitchen instead of arriving with SortPriority 0. | BRNK-70723 |
| 13 | Inbound Orbit currency amounts are now rounded to 2 digits so extra decimal precision can no longer hang the register. | BRNK-70883 |
| 14 | Fixed a KDS layout changeset overlaying the menu. Applying a KDS layout changeset no longer leaves layout chrome covering the menu, and a register restart is no longer required as a workaround. | BRNK-71081 |
| 15 | Fixed Print All on First Bump skipping an item that was bumped, edited, and resent back to the makeline. The edited item is now included in the next bump print. | BRNK-70558 |