SOCi Reviews Implementation
Overview
The SOCi Reviews Integration leverages the capabilities of the Punchh data exports and FTP endpoints services to extract and export user feedback data from Punchh to the SOCi platform.
Requirements
Admin account in Punchh with Business Manager level access or higher and all necessary access permissions enabled. The permissions must include the following:
- Settings Advanced (needed for FTP endpoint access configuration)
- Guest Export (needed to access schedules)
- Feedback Management (needed to access the feedback management data page)
- Basic Support (needed to access schedules)
- Extended Support (needed to access schedules)
- Manage Additional Schedules (needed to configure schedules)
- Allow Access to Reports Section (needed to access data exports)
- Control Access to Report Center (needed to access data exports)
The brand must have a Super Admin account in SOCi with the following settings enabled by the SOCi Implementations team:
- platform_of_record
- reviews
A Super Admin account in SOCi with the following access is required to configure stack URLs:
- extension_marketplace
- Punchh_Listings extension
The admin in SOCi needs to complete the FTP site setup process with SOCi DevOps. SOCi DevOps will provide the username and password to the SOCi Super Admin. These credentials are required to set up the FTP endpoint in the Punchh platform.
Before proceeding to Step 1 below, you must complete the setup in the SOCi platform for Punchh’s Marketplace card (Punchh_Listings). This setup is detailed in SOCi Location Services Implementation.
Step 1
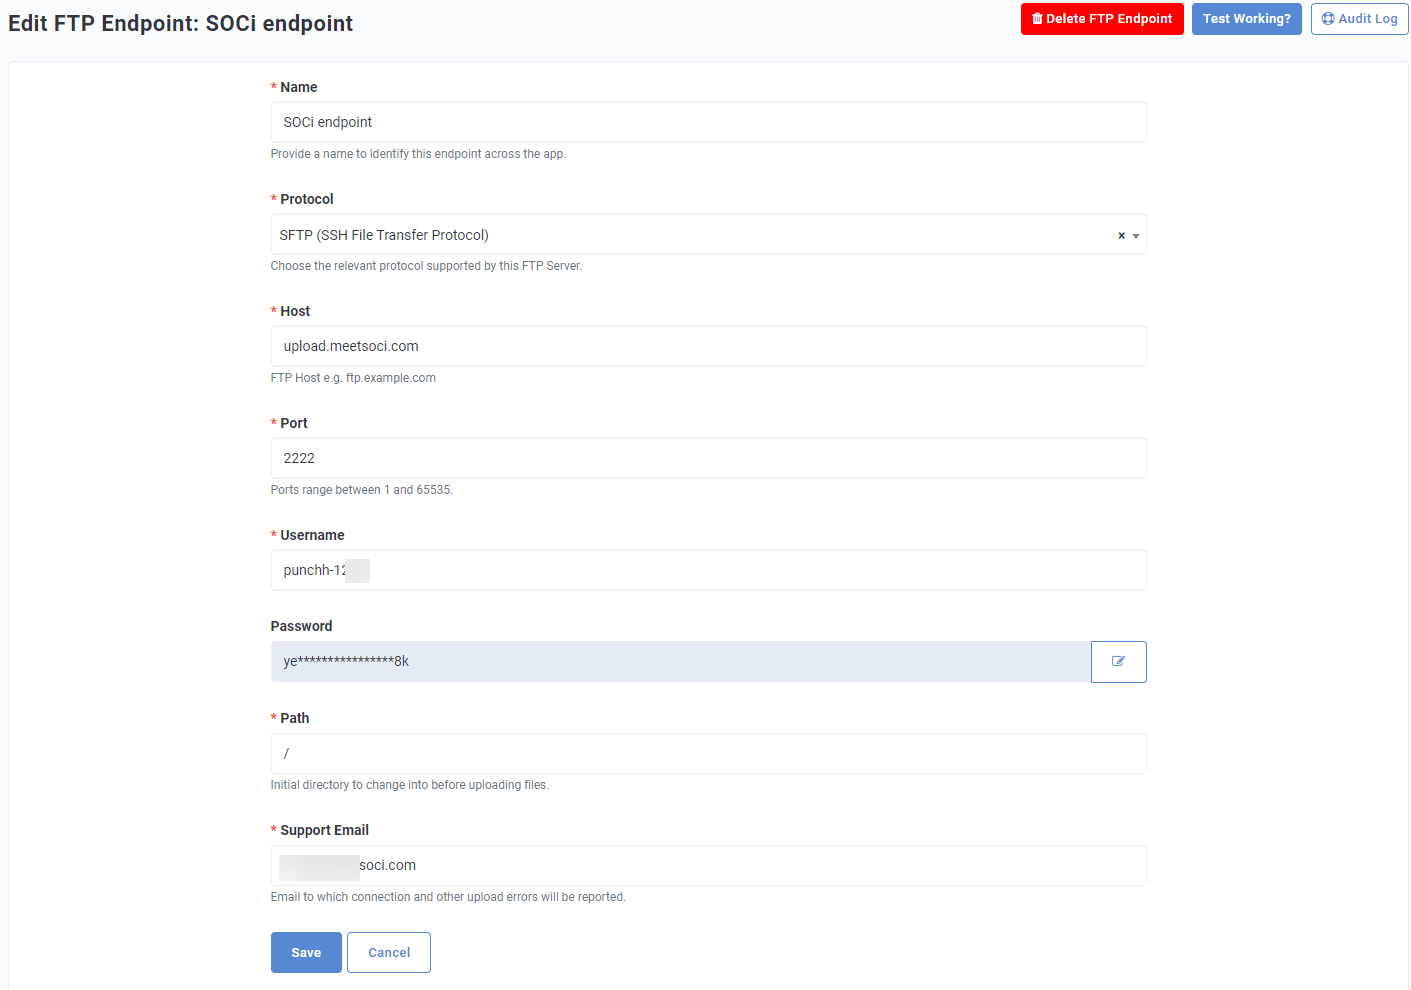
The brand's admin must configure the FTP endpoint in the Punchh platform:
- Navigate to Diagnostic > FTP Endpoints.
- Select Add New FTP Endpoint.
- Enter the name for the FTP endpoint.
- Select SFTP (SSH File Transfer Protocol).
- Enter upload.meetsoci.com for the host (provided by SOCi).
- Enter port 2222 for the FTP port.
- Enter the username (provided by SOCi).
- Enter the password (provided by SOCi).
- Enter / for the path (provided by SOCi).
- Enter the desired email address for support issues and upload error reporting.
Step 2
The brand's admin must configure the User Feedback Data Export file for the FTP endpoint:
- Navigate to Data Sharing > Data Export.
- Select the Data Export tab.
- Enter a name for the new data export.
- Select yesterday’s time frame for the date range.
- Select All Locations. SOCi will attempt to find the matched location. If there are any locations in the file that have not already been mapped to a SOCi location, they will be ignored.
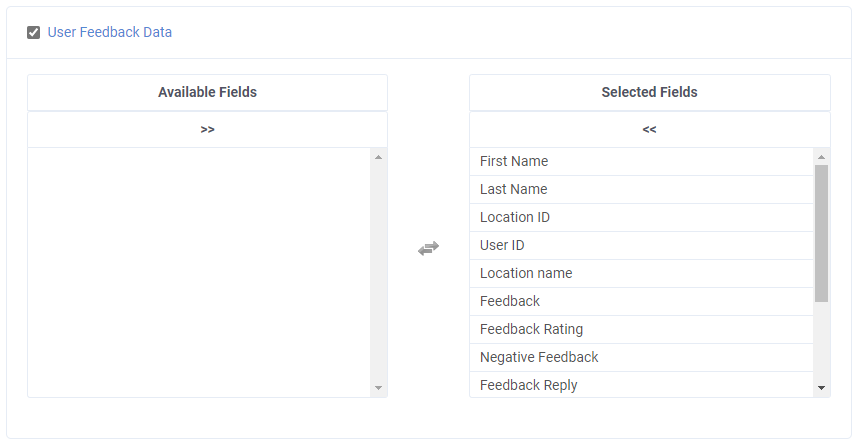
- Click the check box next to User Feedback Data.
- Click the User Feedback Data hyperlink to expand the section.
- Click the double arrows to move the available fields to the Selected Fields box.
- Click Save & Create Schedule. You will be taken to the Diagnostic > Schedules page to further edit your scheduling settings.
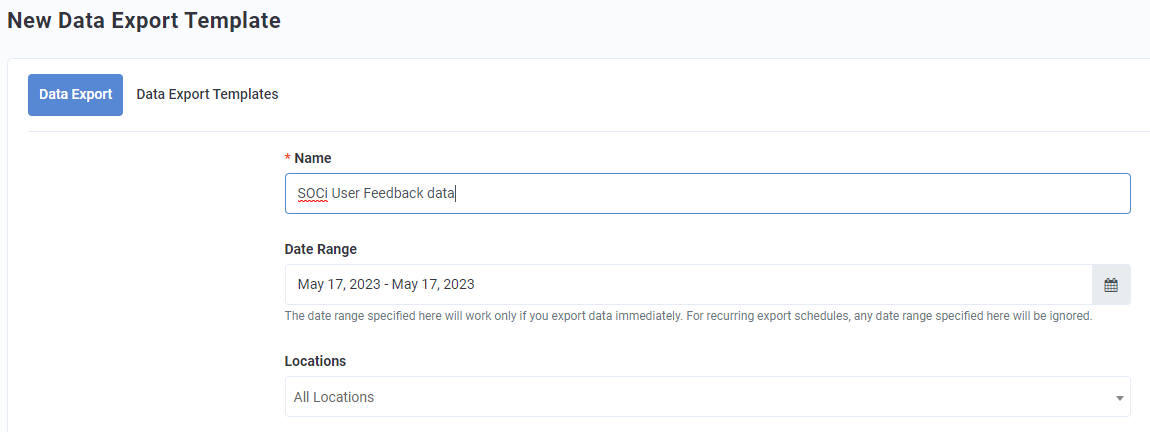
Any date range picked will be ignored when scheduling recurring schedules.
Step 3
The brand's admin must configure the schedule for the User Feedback Data Export job to run:
- Navigate to Diagnostic > Schedules.
- Select the data export created in Step 2 above under the Source drop-down list.
- Select Daily from the Frequency drop-down list.
- Choose a Start Date (optional, daily file only).
- Select a Start Time (the time of day the report will be exported).
- Select the appropriate time zone.
- In the Email Recipients field, enter the email addresses of all the people who will be sent the report if desired (optional).
- From the FTP Endpoint drop-down list, select the SOCi FTP site where the User Feedback Data Export will be automatically uploaded once exported.
- Enter a custom file name in the Export File Prefix field to apply to the report (optional).
- Click Save Schedule.
If the brand does not see the SOCi outbound FTP site from the drop-down, ensure they have completed all initial requirements and Step 1.
When selecting the Start Time, please ensure you do not select a time ‘in the past’. For example, if it is currently 4 PM today when setting up your schedule and you have selected the Start Date as today, select a time after 4 PM. If you select a time ‘in the past’, like 10 AM today, your first daily report will not run until 10 AM the following day, and thus you run the risk of missing reviews from the previous day.
