Micros Simphony POS by Punchh Installation and Configuration
Configuration Flow
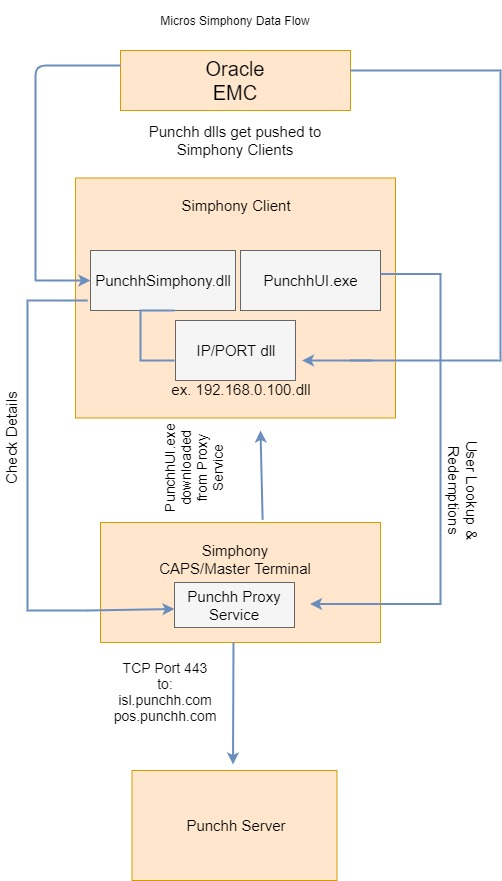
Configuration Steps
- Configure firewall and whitelisting
- Configure the Punchh discount in Micros Simphony EMC
- Install the Punchh Service
- Add "PunchhSimphony" extension to EMC
- Add the IP/PORT and discounts in EMC
- Configure the Loyalty button
- Set up / run the Punchh look- up UI for the first time
System Prerequisites
-
System requirements for the PC hosting the Punchh service (i.e., the CAPS terminal)
- Minimum OS: Windows 7 with SP1 + .NET Framework 4.6.1
-
System requirements for POS terminals
- Minimum OS: Windows 7 with SP1
-
There are no Punchh RAM requirements to work alongside Simphony, though, keep in mind that there are minimum requirements for Windows 7:
- 1 gigahertz (GHz) or faster 32-bit (x86) or 64-bit (x64) processor
- 1 gigabyte (GB) RAM (32-bit) or 2 GB RAM (64-bit)
- 16 GB available hard disk space (32-bit) or 20 GB (64-bit)
- DirectX 9 graphics device with WDDM 1.0 or higher driver
1. Firewall Configuration
Punchh firewall rules. Confirm that the following FQDN (fully qualified domain names) endpoints are properly whitelisted in the site's firewall/router.
(PUNCHH DOES NOT SUPPORT FIREWALL RULES USING IP ADDRESSES.)
Network Firewall Configuration
| Allow | From | To | By (Software firewall on PC running Punchh processes) |
|---|---|---|---|
| TCP using port 443 | The PC/terminal (CAPS/master terminal running the Punchh Proxy Service) | pos.punchh.com pos.us-west.punchh.com poslogs.punchh.com loguploads.punchh.com | Punchh.exe (Running on either the back office or CAPS Server) |
| Web surfing | POS BOH and terminals | https://*.punchh.com |
Endpoint Details
Please contact Punchh support if your portal is a dedicated instance to get the endpoints specific for you. If you log in to your Punchh portal via any other URL than https://punchh.com, then you will need to get your brand's specific endpoints.
Default Endpoints
pos.punchh.com - Punchh check-in and redemption transactions - Mothership 1
pos.us-west.punchh.com - Punchh check-in and redemption transactions - Mothership 2
loguploads.punchh.com - Punchh log file repository #1
poslogs.punchh.com - Punchh log file repository #2
Software Firewall/Anti-virus and Application Whitelisting Configuration
Anti-virus
Files in these folders need to be able to be updated and automatically added to the POS BOH PC application whitelist when updated by our update service.
- Verify that the designated directories and sub-directories below are excluded from anti-virus and real-time scanning on the POS.
- Executable application files in these directories should also be whitelisted in any software application whitelisting control.
| Location | Directory | Files |
|---|---|---|
| CAPS server/BOH PCF | c:\Program Files\Punchh\* c:\Program Files (x86)\Punchh\* | All files ending in .exe |
| POS terminals |
Application Whitelisting
- Whitelist all of the Punchh EXE in the Application Whitelisting Control to allow communication over the network designated in the table above.
- Whitelist all applications that are digitally signed by "Punchh, Inc." to allow updates without having to go back and "re-fingerprint" individual EXEs.
Doing the above whitelisting will allow for updates to be managed without having to "re-fingerprint" the updated individual EXE files in the installation directory; this makes updating, when needed, an easier experience.
Network Firewall Validation
From the POS CAPS Server or the back-office PC (wherever the Punchh Proxy punchh.exe service is installed), open a web browser and navigate to the following web pages:
- https://pos.punchh.com/ping
- https://pos.us-west.punchh.com
- https://poslogs.punchh.com/ping
- https://loguploads.punchh.com/ping
Each web page should return a plain white page with an OK. If any page does not return OK, the firewall needs to be reviewed to ensure the correct firewall rules are in place.
2. Configure Loyalty Discount in EMC
-
In EMC, navigate to Configuration > Sales > Discounts.
-
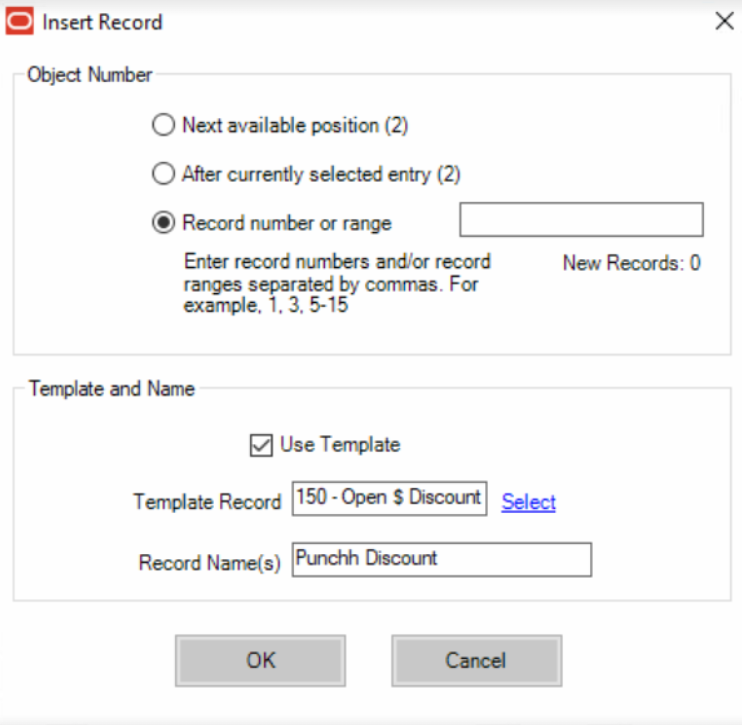
Click the Insert button.
-
Check the box for Use Template near the bottom of this pop-up.
Click Select and choose the existing Open $ discount from the list that displays, and then click OK.
Input a name for the discount in the Record Name(s) field.
Click OK to confirm.
-
After you click OK, you will be taken to the Table View for your discounts. The new discount that you have created should automatically be selected, though if not click on the line containing your new discount.
In this line, configure the following columns: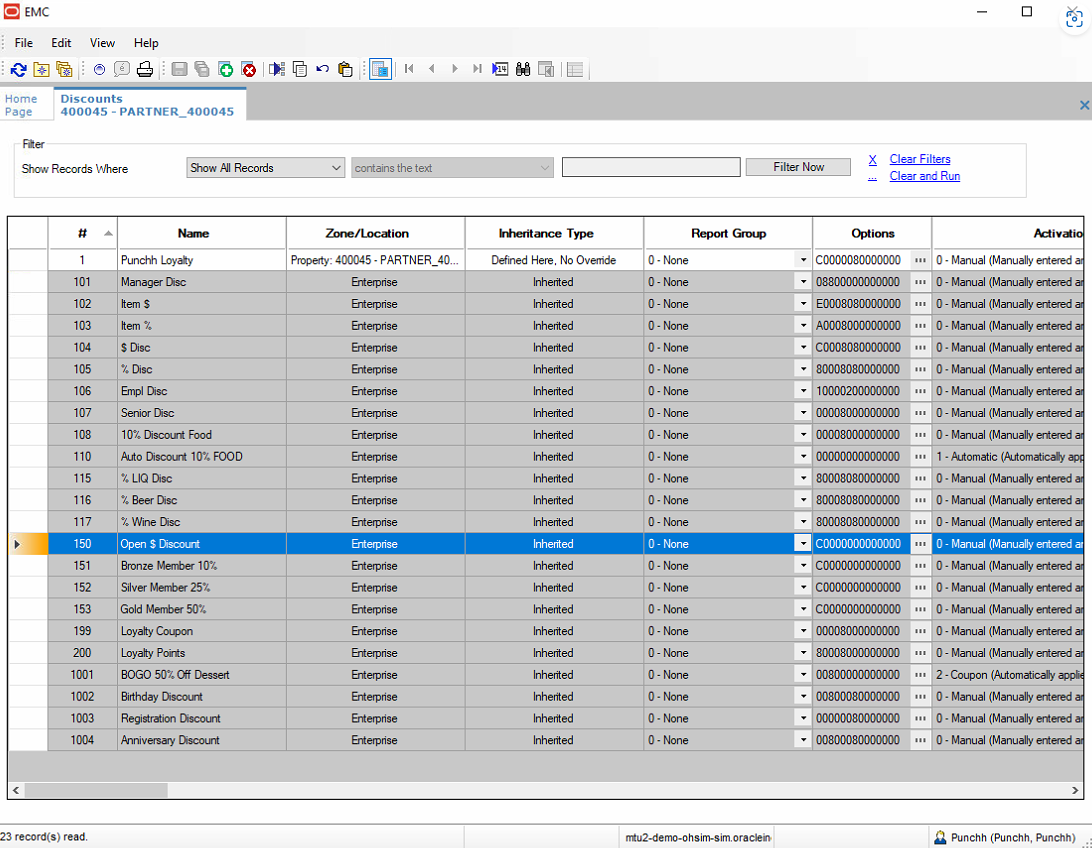
-
Name: The name you chose for the discount
Zone/Location: Automatic selection of your property name
Inheritance Type: Defined Here, No Override
Report Group: 0-None
Activation: 0-Manual (Manually entered and applied) -
RVC Type
Configure RVC types by clicking the "..." where "FFFFFFFF" is currently displayed. You will get a pop-up.
Select the RVCs (revenue centers) to which you would like to apply the discount. Click OK when complete.
For the sake of testing, Punchh utilized all RVCs. -
Options for Configuring Discounts
Step 1: Setting up a Check-level Discount
In the Options panel, the following options are selected by default:
"1 - On = Open; Off = Preset"
"2 - On = Amount; Off = Percentage"Also, make sure that the following option is selected as Punchh will not function properly with only default options 1 and 2 selected.:
"25 - Discount Combo Meal Group Items"Step 2: Setting up a Line-item Discount
In the Options panel, the following options are selected by default:
"1 - On = Open; Off = Preset"
"2 - On = Amount; Off = Percentage"Also, make sure that the following options are selected as Punchh will not function properly with only default options 1 and 2 selected.:
"3 - This is an Item Discount"
"25 - Discount Combo Meal Group Items"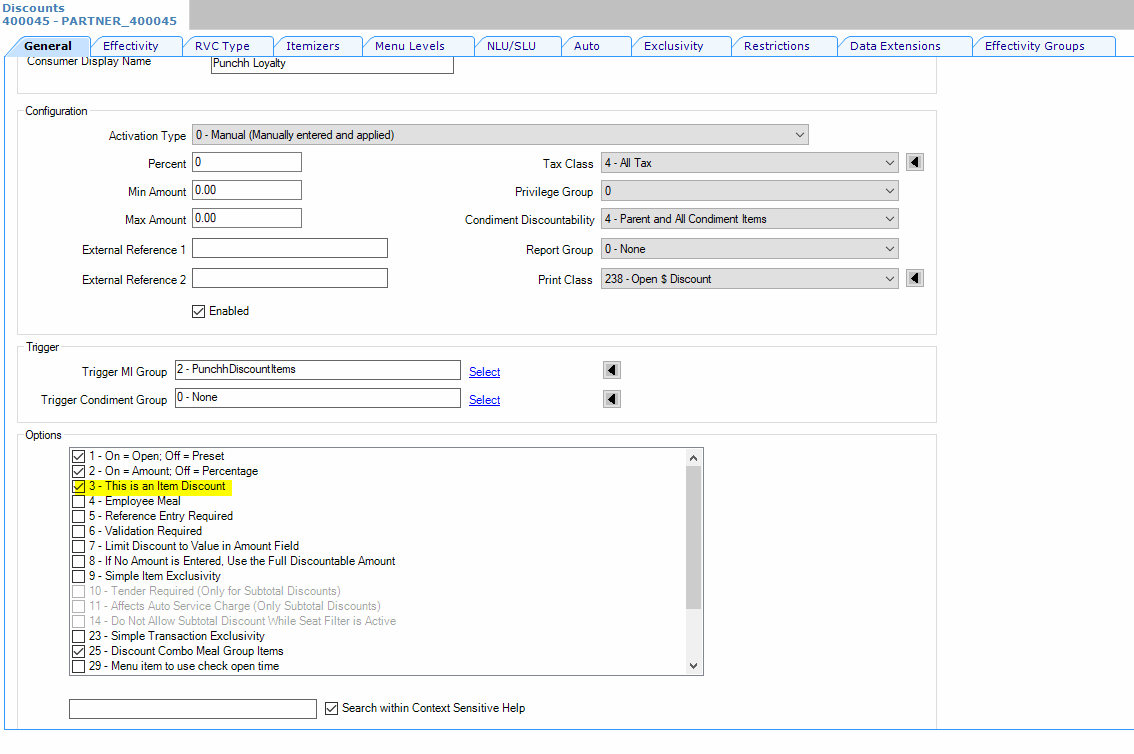
-
Itemizers
With Itemizers, think of this as "what options should be able to be discounted." Some brands choose not to allow for alcohol to be discounted; if applicable, do not check the box for "Alcohol" if configured in your Simphony.
NOTE: Any restrictions on the POS that are also not set in the Punchh Portal will result in failure to apply Punchh reward discounts. -
Main Level and Sub Level
In the Menu Level Configuration section, select the Active On Main Levels and Active On Sub Levels on which the discount is active.
During our installation, we left all options checked to apply to all levels and saw no issues with functionality. -
Main Level Popup / Sub Level Popup and Trans DFLT Main / Trans DFLT Sub
In the Main Level Popup and Sub Level Popup sections, select Transaction Default to return the transaction to the default Main Level or Sub Level after the discount is pressed.
Select 0 - Stay Downto keep the current transaction levels, or select one of the levels (1-8) to become active.
Deselect Transaction Default to make the other levels active for selection. In testing, we found no errors with these not being selected. -
Condiment Discountability
Select the method to determine how condiment menu items are discounted from the Condiment Discountability drop-down list.
4- Parent and All Condiment Itemsis suggested. -
Remaining Settings
There are no further configurations needed for Punchh functionality. Leave the remaining settings blank/deselected or default.
3. Install the Punchh Service
The following steps describe how to install and configure the Punchh service and configurator:
-
Choose a PC at the location to install the Punchh service on. When choosing this PC, keep the following in mind:
- If there is a CAPS terminal at the location, then this PC should be the CAPS terminal.
- This PC needs to have internet access so that check/transaction data can be sent to the Punchh server.
- This PC must meet these system requirements:
Minimum OS: Windows 7 with SP1 + .NET Framework 4.6.1
-
Log in as an administrator, and run the SetupPunchh.msi installer.
-
Leave the installation path as C:\Program Files (x86)\Punchh.
-
After installation, check to see that the Punchh service is installed and running.
Do so by opening the Windows services and looking for "Punchh".
You may access the Windows services by:- Typing WIndows Key + R > typing services.msc > Enter
- Searching for "Services" from the Windows Start menu
-
Navigate to the installation folder C:\Program Files (x86)\Punchh.
Open PunchhConfigurator.exe:
If you or your company use an Application Whitelisting Service, ensure that the contents of this directory are whitelisted so that updates and functionality are not impeded. -
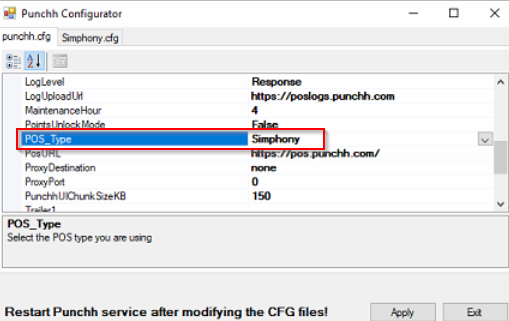
Enter the location-specific API_Key and set the POS_Type to Simphony.
If you are unsure about your location's API_KEY, you will find this in the Punchh platform under:
Settings > Locations > [find your location] > POS Tab > [scroll down and find the Location Key]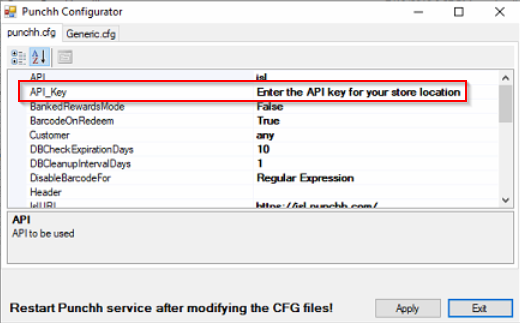
-
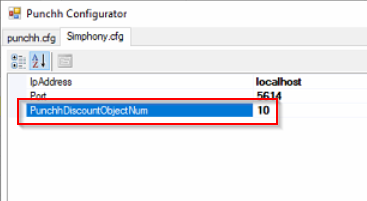
Click on the Simphony.cfg tab:

The default port is set to 5614. If this port is already in use by another application, then an error will appear in the log files. See the Troubleshooting section of this document for details.
-
Change the value of PunchhDiscountObjectNumto the loyalty discount ID from the EMC setup.

-
Click the Apply button. The Punchh service will be restarted, and the configuration files will be updated.
The PunchhConfigurator.exe will not close automatically; click Exit to do so after clicking Apply.
4. Add the "PunchhSimphony" Extension Application in EMC
When the Punchh application is installed on the CAPS server, the Punchh application DLL files will be written to: C:\program files (x86)\Punchh
If that computer does not have EMC, then copy these DLLs so that they may be used used in the next step for installing on EMC.
Note: The "PunchhSimphony" extension applications should be configured at the enterprise level so that this section does not need to be repeated at each location.
-
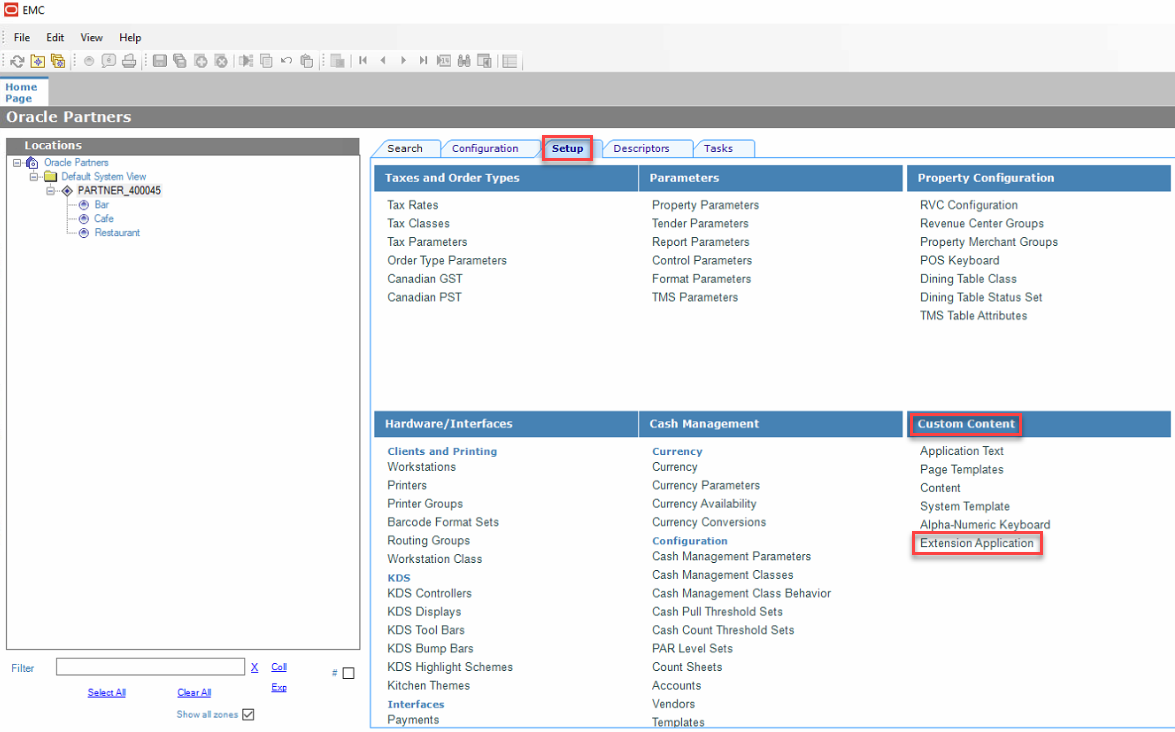
In EMC, navigate to Setup > Custom Content > Extension Application.
-
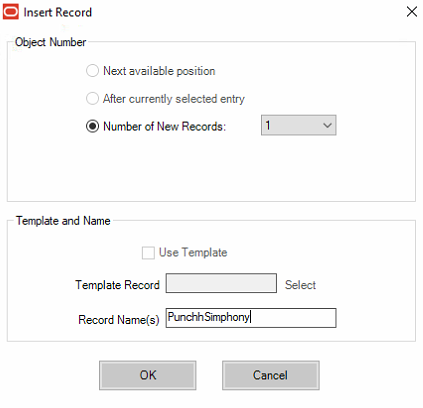
Click the Insert button.

-
Enter "PunchhSimphony" in the Record Name(s) field.
-
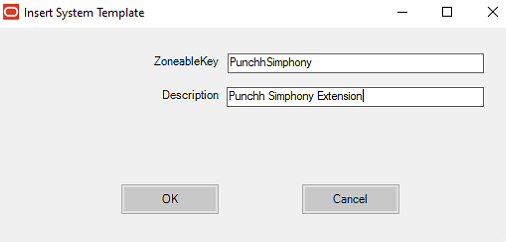
Click on the record you just created and toggle to the Form view.

-
Enter "PunchhSimphony" for ZoneableKey, and give this record an applicable description. Click OK.
-
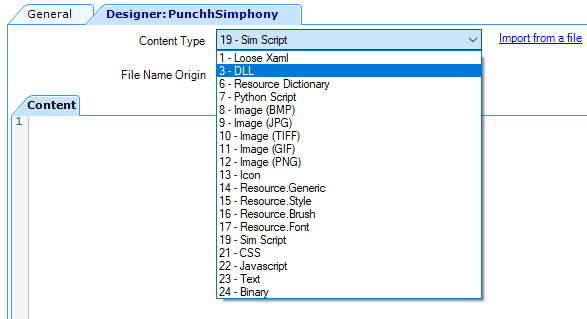
From the Content Type drop-down menu, select DLL.
-
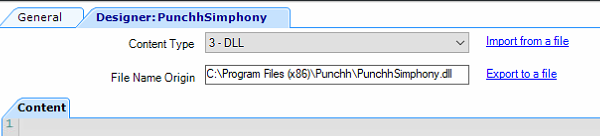
Click Import from a file, and navigate to C:\Program Files (x86)\Punchh\PunchhSimphony.dll. Click Open.
-
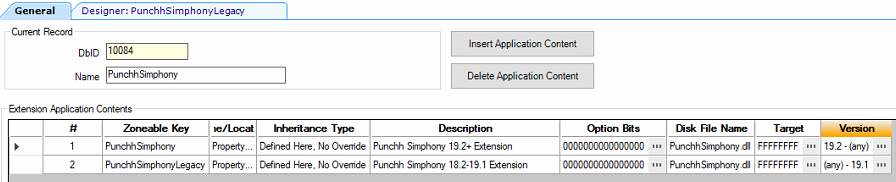
For Simphony version 19.2+, click the General tab, click Insert Application Content and enter "PunchhSimphony.dll" under Disk File Name for the extension application. Under Version, select "19.2 - (any)" Note: If you are running 19.2 or greater, you do not require the legacy DLL, so skip step 9.
-
For Simphony versions 18.2-19.1, follow steps 1-7 and name the ZoneableKey "PunchhSimphonyLegacy"and enter "PunchhSimphony.dll" under Disk File Name for the extension application. Under Version, select "(any) - 19.1".
-
Click the triple dots button under Option Bits.
-
Make sure the "Do not load DLL" checkbox is unchecked, and then click OK.
-
Click the Save button in the toolbar of EMC.
5. IP/Port and Discounts Configuration in EMC
Note: Since the IP address of the hosting computer will be different at each location, this process MUST be re-done for each location.
The IP and port settings are specified using a simple text configuration in EMC as shown below. The EMC admin will need to add a Text record (Content Type = "23 - Text") named “PunchhSettings” alongside the Simphony extension application DLL ("PunchhSimphony.dll") that includes the following:
ProxyAddress=[IP Address of proxy host]ProxyPort=[Port of Punchh Proxy]DiscountItemNum=[Discount item number of Primary Punchh Discount]LineItemDiscountItemNum=[Discount item number of Line Item Punchh Discount]
IMPORTANT: In the text configuration, the parameter names must exactly match the example below (no spaces, etc.).
Example:
ProxyAddress=10.191.35.109
ProxyPort=5614
DiscountItemNum=1
LineItemDiscountItemNum=4
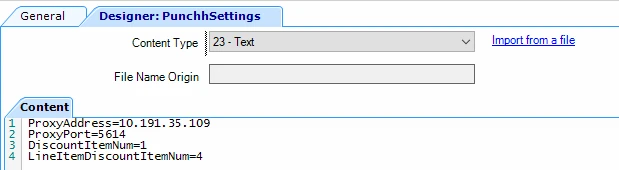
Note: Notice that there is NOT a disk file name for the "PunchhSettings" text configuration. This means this file will not be copied down to the local machine, but it will get read into memory when the app loads.

6. Configure the Punchh Loyalty Button
-
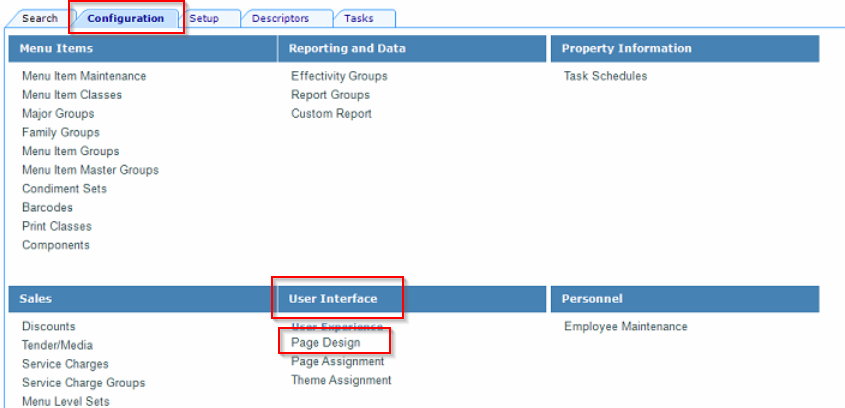
In the EMC, navigate to Configuration > User Interface > Page Design.
-
From the available list of pages, choose "Transaction Page".

-
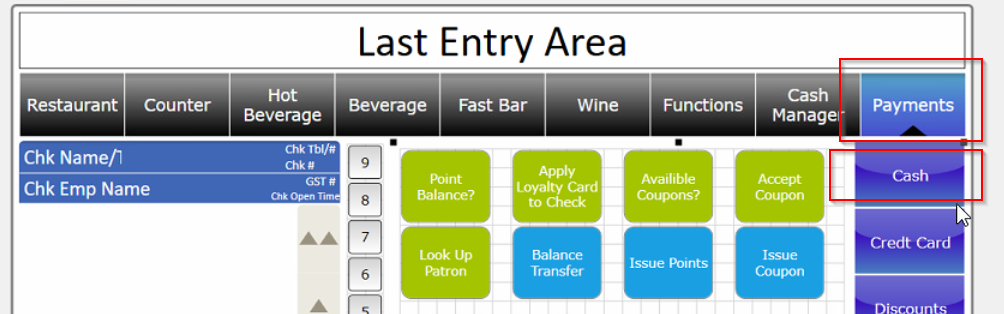
Navigate to the page that you want the Loyalty button to appear on. We chose the Payments > Cash location as there was adequate room. You may choose whichever page makes sense for your operation.
-
Add the loyalty button using Edit > Button.
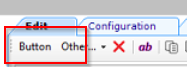
A gray button will show. Drag and drop this to the appropriate location. A detail panel will show on the left-hand side.
-
Follow the next steps to configure the button:
On the General tab:
Legend: Punchh (this is the name that will display on the button)
Type: Function
Click the arrow
Search for "Run Extensibility App", select this item, and then click OK.
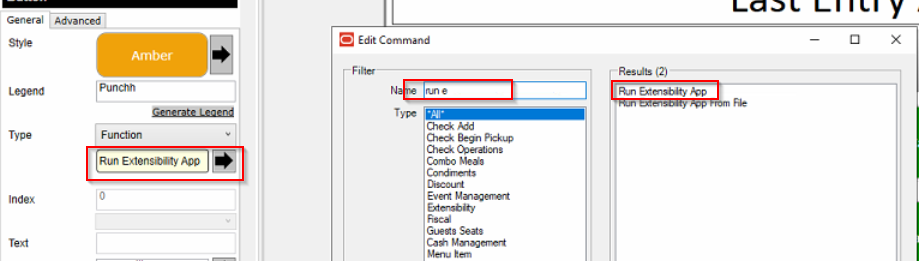
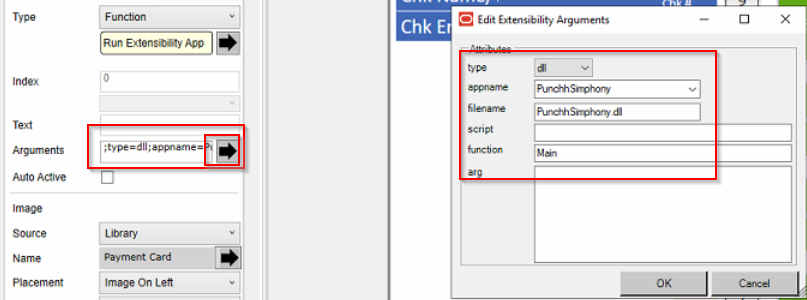
Arguments
Click the arrow
Enter the following:
- Type: dll
- appname
- filename: PunchhSimphony.dll
- function: Main
Click OK.
-
Customize the rest of the button to your liking. There are no further configurations that affect functionality. Click the Save button.
7. Setting up and Running the Punchh Look up User Interface for the First Time
- On the computer/terminal hosting the Punchh service, usually referred to as the CAPS server, verify that the Punchh service is currently running (Services app).
You may access the Windows services by:- Typing Windows Key + R > typing services.msc > Enter
- Searching for "Services" from the Windows Start menu
- Start the Simphony client if it is not already running. The name of the Simphony client is ServiceHost.exe.
- Ring in an order and navigate to where you placed the Loyalty button in the previous step.
POS Configuration Validation
After the Loyalty UI loads, confirm the last few details to ensure configuration all around:
-
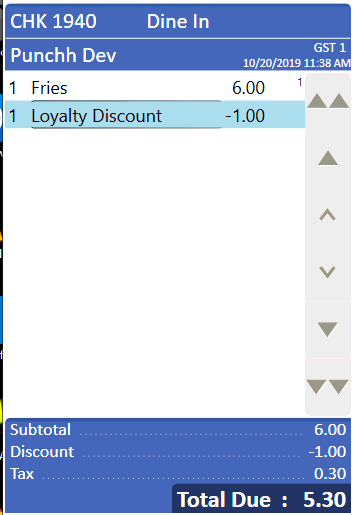
The "Loyalty Discount" line item should appear when discounts are redeemed.
-
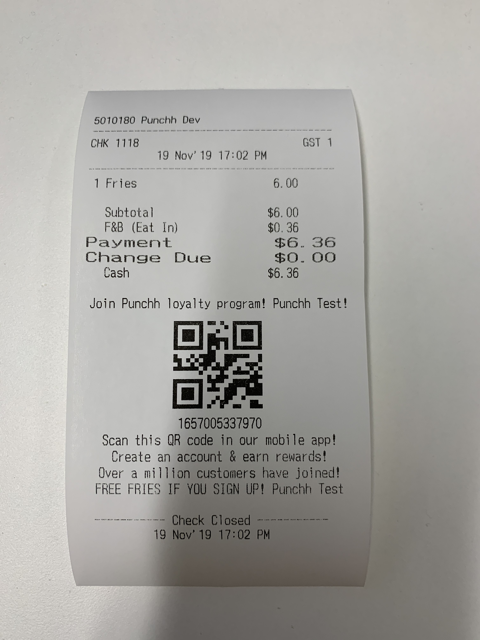
The QR code is printed correctly when the check is closed.
-
Close the Search UI using the red X in the top-right corner.
-
Repeat the steps for each Simphony client.
Note: If the UI fails to load, try repeating the above steps for "Setting Up Simphony Clients". However, tap Reload Workstation Database after Update Database. If you are still having trouble, refer to the Troubleshooting section.
NOTE: For QR code printing, the Summary Totals and Pre-Trailer sections of the receipt will be replaced by the contents of the QR code. These sections should be ignored when defining receipt descriptors in the EMC.
8. Troubleshooting
When updating to a new version of the PunchhSimphony.dll in EMC, you must perform the following steps even if the file is located in the same directory:
- Delete the existing application content.
- Insert the new application content.
This process ensures that the updated PunchhSimphony.dll file is properly uploaded to the EMC cloud host. To verify that the PunchhSimphony.dll has been correctly updated on the client side:
- Navigate to the following directory: C:\Micros\Simphony\WebServer\wwwroot\EGateway\Handlers\ExtensionApplications\PunchhSimphony
- Right-click on the PunchhSimphony.dll file.
- Select Properties and then go to the Details tab. If the information displayed does not correspond to the expected version, the update may have failed.
NOTE: The Simphony terminal client's ServiceHost application may not successfully load the PunchhSimphony.dll file on the initial attempt. If the appropriate version is not present in the extension directory, close the terminal client ServiceHost application and then restart it to resolve the issue. You may need to close/restart Simphony ServiceHost two times before the PunchhSimphony.dll will properly load.
Log Files
If you are getting errors when applying redemptions or when trying to scan the QR code to earn points, check the Punchh logs for errors. Logs are located in:
C:\Program Files (x86)\Punchh\Logs
or
C:\Program Files\Punchh\Logs
Log files are named by date.
For example:
2017-0223-000050.log
was created on February 23, 2017
Port Conflict Error
Identification
If the default port is already being used by another application, a port conflict error will occur. In the log file, search for the text "Port conflict occurred". If this text was found, then the error occurred.
Resolution
To resolve this error, use the PunchhConfigurator tool to change the default port to an unused TCP port. Some suggested ports usually not in use are: 5619, 7482, 24473, 10123.
How to make Punchh work in Micros Simphony whenever an IP address gets changed:
- Verify that the IP address and ports are correctly defined in Simphony.cfg.
- Verify IP that the address and ports are correctly defined in EMC.
- Uninstall Punchh completely.
- Remove all folders and files inside C:/Program Files/Punchh except for the Config, Data, and Logs folders.
Known Issues
- QR code may be too large
- No single scan functionality
Appendix: Scanning With Micros Simphony POS
For more information, see Micros Simphony POS - Zebra/Motorola DS9308/DS9208 Scanner Setup Guide.
