System
The system tab contains sub-tabs that deal with system-wide settings.
General
General settings related to overall system functions.
-
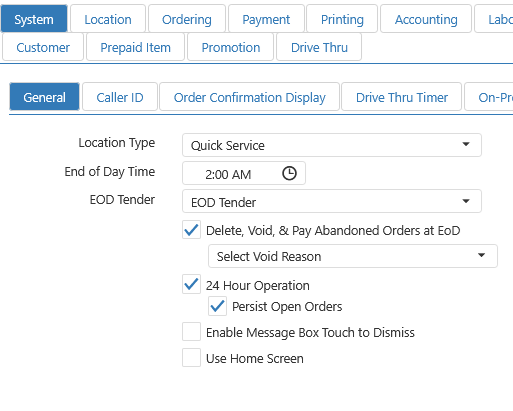
Location Type: Controls access to functions that are Table Service specific; overridden by Job > Order Entry Type.
-
End of Day Time: Time of day when the end of day process is expected to run, used to determine valid times for future orders and start time of the first day part.
-
Delete, Void, & Pay Abandoned Orders at EoD: For stores not set up as 24-hour stores. When checked, abandoned orders at the End of Day are automatically dealt with according to the user-selected Void Reason. Void Reasons include:
- 86'd Item
- Kitchen Error
- Server Error
- Test Order
- Waste
- Decision Logic at EOD:
- Unpaid, unsent items only (Prior business day) Delete items, close order (no sales impact)
- Unpaid, sent items, (Prior business day) Void items, close order (reporting per accounting config)
- Partially paid (Prior business day) Pay remaining balance to configured EOD tender type
- Fully tendered but open (Any) Close order (no extra payment)
- Any unpaid/open order (Current business day) Persist across EOD (24-hour behavior preserved)
-
24 Hour Operation: Employees are not automatically clocked out by the end of day process.
- Persist KDS Orders: Persists KDS orders after End of Day for 24-hour operations – only actionable if "24 Hour Operation" is checked.
-
Enable Message Box Touch to Dismiss:
- Checked: Dialog windows, such as the `Change Due' dialog, are dismissed simply by touching anywhere on the screen.
- Unchecked: Dialog windows include an OK button that must be selected in order to dismiss the dialog.
-
Use Home Screen: Enables the use of a "Home Screen" as opposed to the default "Enter Employee" screen for Logging and Clocking In/Out. Allows the employee to Clock In/Out through the Home Screen when another employee is already logged into the same register.
Caller ID
Configuration settings for caller ID device, which communicates caller name and number to the POS when an incoming call is received. When enabled, displays caller name and phone number at the top of the `Future Order' screen.
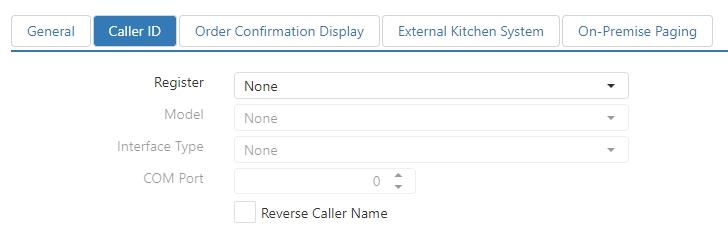
- Register: Register that is caller ID device is physically connected to.
- Model: Make and model number of the caller ID device.
- Interface: Interface type of the caller ID device.
- COM Port: COM port that the device is connected to.
- Reverse Caller Name: Displays the caller name as "Last Name, First Name", rather than "First Name Last Name".
Order Confirmation Display
Configuration settings for Order Confirmation Display (OCD) that is used to display order details to the customer, typically used in a single or multi lane drive thru operation.
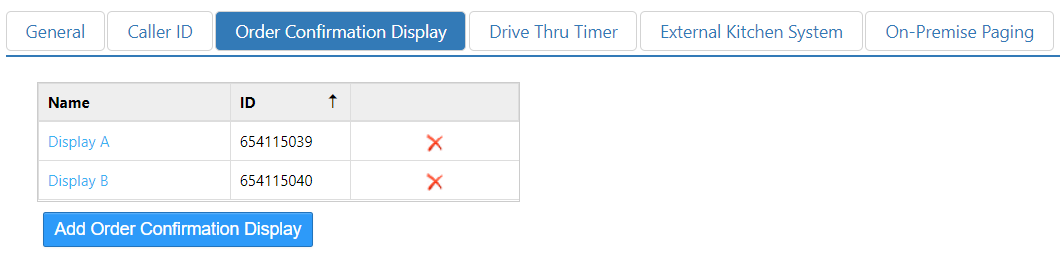
Order Confirmation Display: Single or Multiple
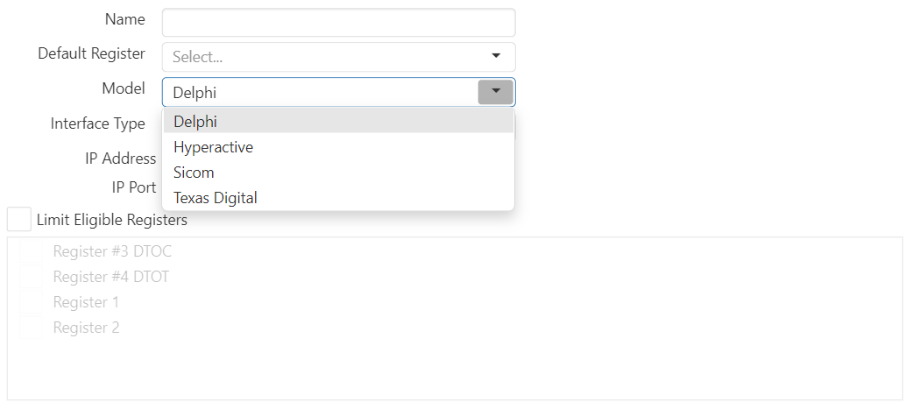
- Name: Name of the Order Confirmation Display.
- Default Register: Register that the Order Confirmation Display is connected to by default. This register is responsible for the communication to the device over the network.
- Auto Claim: When checked, eliminates the need to auto claim the default register for the Order Confirmation Display at the beginning of every day (register selection persists after End of Day).
- Model: Select the Order Confirmation Display model in the drop-down list.
- Interface Type: Interface type of the OCD. The available options are Ethernet and Serial.
- Ethernet: OCD is connected via an ethernet connection.
- IP Address: IP address provided by the Order Confirmation Display manufacturer.
- IP Port: Port number for the OCD Ethernet port. This is a configurable field, with a default value based on model.
- Delphi: 48501
- Hyperactive: 29000
- Sicom: 3742
- Texas Digital: 5557
- Serial: OCD is connected via a serial connection.
- COM Port: COM port that the device is connected to the on the selected Register, provided by the Order Confirmation Display manufacturer.
- Baud Rate: Baud rate setting provided by the Order Confirmation Display manufacturer.
- Ethernet: OCD is connected via an ethernet connection.
- Limit Eligible Registers: Limit the eligible register terminals that can be set as claimable for a specific Order Confirmation Display.
Drive Thru Timer
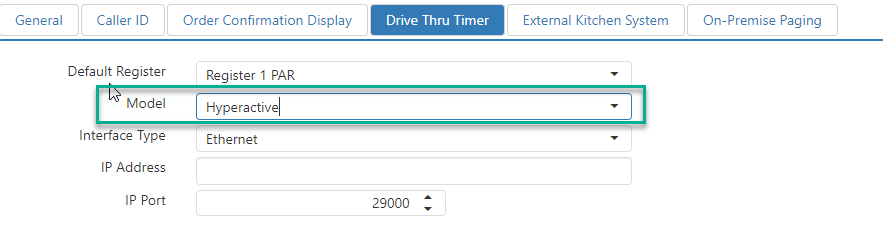
- Default Register: Register that the Hyperactive device is connected to by default. This register is responsible for the communication to the device over the network.
- Interface Type: Interface type of the Hyperactive device. Ethernet is the only available option for Hyperactive.
- Ethernet: Hyperactive device is connected to the POS network.
- IP Address: IP address provided by Hyperactive.
- IP Port: Port number for the Hyperactive device's Ethernet port. This is a configurable field, with a default value of 29000.
External Kitchen System
Configuration settings for third-party kitchen video systems connected to the POS network.
External kitchen system settings are accessed via Admin Portal > Integrations Portal. Please see the Integrations Portal User Guide for detailed configuration information.
On-Premise Paging
Configuration settings for pager systems.
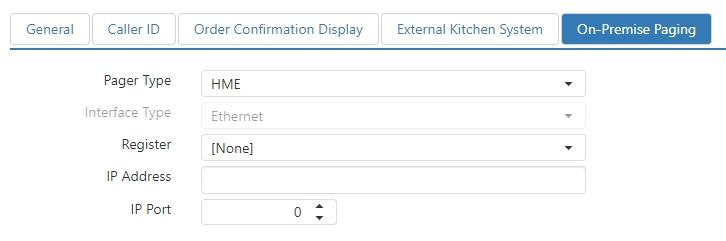
- Pager Type:
- HME: HME brand paging
- Interface Type: Set to Ethernet
- IP Address: IP address of the pager device.
- Port: Port that the pager device listens on.
- Register: Register that is responsible for communicating with the pager device.
- LRS: LRS brand paging
- Interface Type: Set to Serial
- Parity: Choose Odd or Even.
- Handshake: Set to XOnXOff or DTR/DSR.
- Com Port: Enter the com port number in the field.
- Baud Rate: Select the baud rate.
- Register: Register the pager device is physically connected to.
- HME: HME brand paging
