PAR Pay EMV Setup Guide
Revision 04
Overview
PAR Pay is a unique payment processing service that is owned and operated by PAR and is fully integrated into PAR POS. Payment devices are purchased from PAR and come pre-configured with all the necessary information to begin processing order payments right away.
Settings Editor Configuration
The following settings need to be set in Settings Editor before PAR Pay can process credit card and gift card payments:
Payment Devices
To set up a new Payment Device:
- Navigate to the Payment Devices page
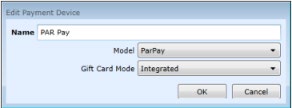
- Click the Add button to open the Edit Payment Device dialog
- Select PAR Pay from the Model dropdown
- If using PAR Pay for gift cards, select Integrated from the Gift Card Mode dropdown — if not, the selection may be left at [None]
NOTE: Only one PAR Pay Payment Device needs to be defined in Settings Editor for the entire store.
Registers
To configure each register:
- Navigate to the Peripherals tab on the Registers page
- Select PAR Pay from the Payment Device dropdown at the bottom of the tab
IMPORTANT: This must be done for every register.
![Edit Register dialog Peripherals tab with the Payment Device dropdown open, showing [None] and PAR Pay options](/docs/par-pos/87722a8faa12-image0969.jpg)
Tenders
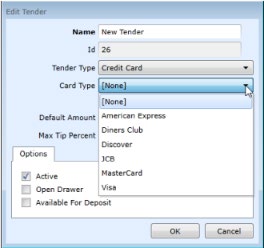
Tenders must be created for all types of credit cards accepted as well as debit transactions. If you are using PAR Pay for gift cards, a tender must be created for gift card transactions as well:
- Navigate to the Edit Tender dialog
- Select the appropriate Tender Type and Card Type from the provided dropdowns
- Ensure the Active checkbox is checked for all tenders
Layout
Only one button with the 'Payment Device' behavior needs to be created for both credit card and debit card transactions.
NOTE: The Do Not Prompt radio button should be selected in the Prompt Employee for Payment Method dialog.
To add a Payment Device button:
-
Navigate to Settings Editor > Layout
-
Select the desired panel from the panels list
-
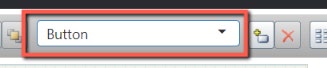
Select Button from the dropdown at the top of the panel screen
-
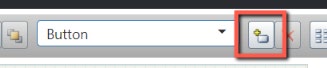
Click the Add New Control button to the right of the dropdown
-
Size and style the button as desired
-
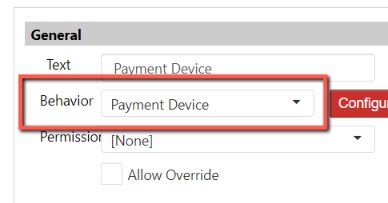
Select Payment Device from the Behavior dropdown
-
Enter desired display text for the button in the Text field
Credit Draft Options
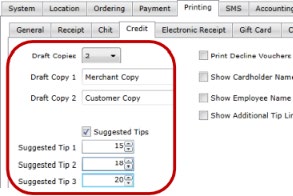
The only settings on the Printing > Credit tab on the Options page that apply to PAR Pay are the Draft and Suggested Tip options on the left. No other Options settings apply.
If you do not wish to print Credit Drafts:
- Navigate to Options > Payment > Credit Options > Set Minimum Printing Threshold
- Set the value to desired dollar amount
- Check Card Present checkbox
A customer can dip, swipe, tap or manually enter their card to pay for their order and the Merchant Copy receipt(s) will only print if the set threshold has been exceeded.
Firewall Ports
For PAR Pay to work properly, network hardware must have certain ports in the firewall open for outbound traffic. The ports defined below should be defined with 'outbound' rules/services on the firewall.
IMPORTANT: Network Profile should be set to "Private" for All POS Registers
| CCT Communication Type | Map to | Mx | Ingenico |
|---|---|---|---|
| PAR POS PAR Pay | Set LAN user to static IP address of each PAR POS register | TCP Port: 8030 | TCP Port: 8030 |
| CCT Software Downloads | Set LAN user to range of CCT static IP addresses | TCP Port: 22 | TCP Port: 990 and 64000 to 64500 |
| CCT Transaction Processing | Set LAN user to range of CCT static IP addresses | TCP Port: 443 | TCP Port: 443 |
Unblocked List
For managed firewalls, the following need to be unblocked:
Important: Software Download Rules require the unblocking of both URLs, IP Addresses, and Ports in the table below.
Production Firewall Outbound Rules/Services for PAR Pay Software Downloads
| Device Type | Primary | Secondary | Port |
|---|---|---|---|
| Verifone Devices | Pos1.auruspay.com / 198.22.206.246 | pos41.auruspay.com / 209.236.103.68 | TCP: 22 |
| Ingenico Devices | Pos1.auruspay.com / 198.22.206.246 | pos41.auruspay.com / 209.236.103.68 | Active Mode: TCP: 990 Passive Mode: TCP: 64000 - 64500 |
Installing Windows Service for USB Payment Devices
- Follow all steps in the above "Settings Editor Configuration" section except Firewall Settings.
- Download Verifone PARPay USB AESDK .exe Build zip from the PAR POS Downloads page and find the batch file named
AESDKCleanInstall.bat - Run the batch file as an Administrator.
- Once installed, navigate to Task Manager > Services tab and ensure the "AurusEnterpriseSDK" service is running.
- Plug in the PAR Pay USB device to begin using for transactions
- NOTE: Ensure the device is connected through USB — it will not work if connected through TCP.
Troubleshooting
If the Windows service is installed at a location where TCP is used instead of USB, the PAR Pay device will not work. Two corrective actions may be taken to fix this issue:
-
Uninstall the Windows service "AurusEnterpriseSDK" and restart the register to begin using a TCP PAR Pay device
-
Change the config file automatically installed with the Windows service:
- Locate the AurusEnterpriseSDK.exe.config file in the same location in which the service was installed (common path = \AurusInc\AurusEnterpriseSDK)
- Open the config file and locate the "POSMODE" parameter — change the value from "2" to "1" if using a TCP-based device
- Update the "CCTDEVICECODE" parameter based on device type:
Device Type CCTDEVICECODE Verifone Mx915/Mx925 16 Ingenico 9 Verifone P400 20 - Update the "ISOLDSTDSDK" parameter based on device type:
Device Type ISOLDSTDSDK Verifone Mx915/Mx925 1 Ingenico 1 Verifone P400 0 - Save the config file, restart the service, and restart the register
- The PAR Pay TCP device should now be operational
Version History
| Version | Date | Updates |
|---|---|---|
| 01 | 9/19/22 | Genesis |
| 02 | 6/9/23 | Updated firewall rules table in Whitelist section. |
| 03 | 11/27/23 | Updated SDK version in Step 2 of the Installing Windows Service for USB Payment Devices section. |
| 04 | 10/30/24 | Updated SDK version in Step 2 of the Installing Windows Service for USB Payment Devices section, updated "Brink POS" to "PAR POS" branding. |
