Menu Builder: How to Build Your Menu from the POS
This article explains how to use the Menu Builder to pull your POS menu structure directly into the Management Center with no manual data entry required.
Prerequisites
Before you begin, make sure you have the following:
- Brand-level access with Menu permissions. The Menu Builder is available at the brand level only.
- An integration store group. This is a store group that has been connected to your POS. The Menu Builder reads from this integration to know what your POS menu looks like.
If you don't have an integration store group set up yet, go to Store groups, create a new store group, select the Integration purpose, and connect it to your POS. Until this is done, the Menu Builder displays the message: "No integration store groups are available for this brand."
The Menu Builder Layout
The Menu Builder has two main panels and an action bar at the top (see screenshot below).
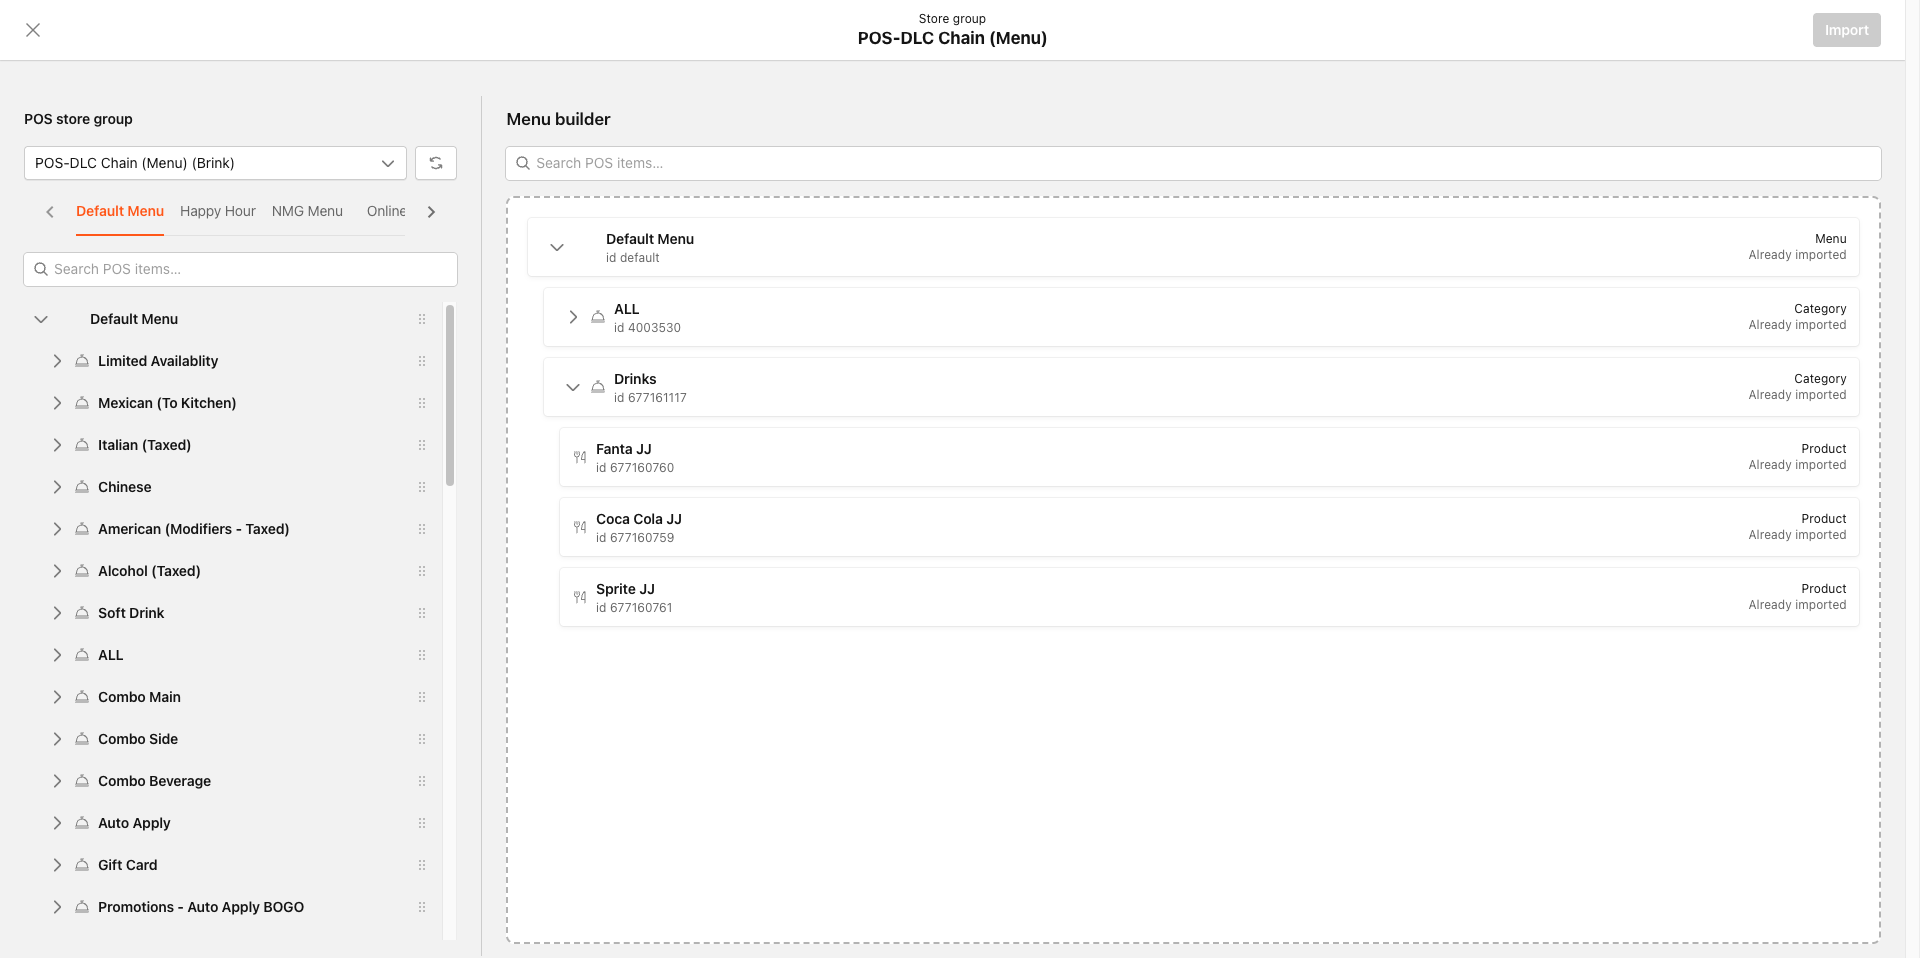
- POS catalog (left panel): Shows your POS menus, categories, products, and product groups. Use the store group dropdown to select a POS source, the Refresh button to pull the latest POS data, the left and right arrows to navigate between menus, and the search field to filter items. Each item has a drag handle.
- Product groups that are new or have changed since your last import are highlighted in the POS catalog so you can identify updates at a glance.
- Canvas (right panel): The menu you are building. Starts empty; also has a search field to find items you've already added.
- Action bar (top): Shows the selected store group name and two actions: the Import button, which stays disabled until you have unsaved changes, and Compare to POS, which checks your canvas menu against the POS Rules.
- Errors drawer (right side): Slides in automatically if your canvas has problems that would prevent importing. Each error includes a Go to group button that scrolls directly to the problem item.
Building Your Menu
The store group you select is saved in the URL. Bookmark a Menu Builder page to return directly to that store group.
-
In the brand sidebar, open the Menu section, then click Menu Builder.
-
Select a POS store group from the dropdown in the left panel. The POS catalog loads with that store group's menu data.
-
If your POS has multiple menus, use the left and right arrows to navigate to the menu you want to work with.
-
Drag items from the POS tree onto the canvas on the right. Grab each item by its drag handle and drop it onto the canvas.
The canvas follows the same hierarchy your menu uses:
- Menus go on the top level of the canvas.
- Categories go inside menus.
- Products go inside categories or inside product groups.
- Product groups go inside products (used for modifiers and combos). You can import up to 6 modifier groups per product from your POS. If a product has more than 6 modifier groups in the POS catalog, only the first 6 are available for import.
-
If your menu is large, use the search field on either panel. The POS search filters the items available to drag; the canvas search helps you locate items you've already added.
-
To reorder items on the canvas, drag them to a new position. To remove an item, use the remove control on that item.
-
When you're done building, click Import. (The Import button stays disabled until you have unsaved changes. If it's grayed out, you haven't made any changes yet, or you've already imported.)
-
A full-screen progress dialog displays "Importing menu…" while the import runs. Do not close the page until it finishes.
-
When complete, you'll see a "Menu saved successfully" confirmation. The canvas updates to reflect what is now stored in the Management Center.
Importing updates menus for the selected store group only. It does not affect menus for any other store group, and it does not publish anything to your customer-facing channels. To make the imported menus visible to customers, use Menu Publishing as a separate step.
Compare to POS
Before you import, run a comparison to check that your canvas matches the rules in your POS. It catches configuration issues (such as modifier conflicts or missing required selections) before they cause problems at import.
To compare your menu to the POS:
- Assemble your menu on the canvas.
- In the action bar, click Compare to POS.
- The system pulls the latest rules for every linked item from your POS. While the check runs, a progress indicator appears and editing controls are disabled.
- When the check finishes, review the result:
- Validation passed: No issues found. The Import button becomes available.
- Validation failed: One or more issues found. Fix the errors on the canvas and run the comparison again.
What the comparison checks
| Rule | What it checks |
|---|---|
| Min/max selections | Each product group's minimum and maximum selection counts match POS rules |
| Required modifiers | All selections marked as required in your POS are present |
| Price consistency | Item prices on the canvas match POS-defined prices |
| POS linkage | Every item on the canvas is linked to an entry in your POS |
Note: If you change your canvas after running a comparison, run it again before you import.
Importing with Containers
PAR Ordering can automatically create virtual containers for size-variant product groups during the import process. When you select the Optimize option, the system uses AI-powered detection to identify groups of size-related items (for example, Small, Medium, Large, and Extra Large of the same drink) and creates a virtual container for each group at import time.
This removes the manual step of creating containers one by one after import and means you can begin configuring at the container level right away.
If you are not familiar with virtual containers, see How to Use Virtual Categories (Container) before using this feature.
Select Optimize when your POS menu includes size-variant product groups that you want structured as containers from the start.
If your menu does not have size variants, or you prefer to build containers manually, use the standard import. All existing import workflows are unchanged.
Optimize only detects size-related groupings. Non-size-based groupings such as flavor families are out of scope and must be set up manually.
-
In Management Center, go to Brand > Menu > Import.
-
Select your POS source and follow the standard import steps.
-
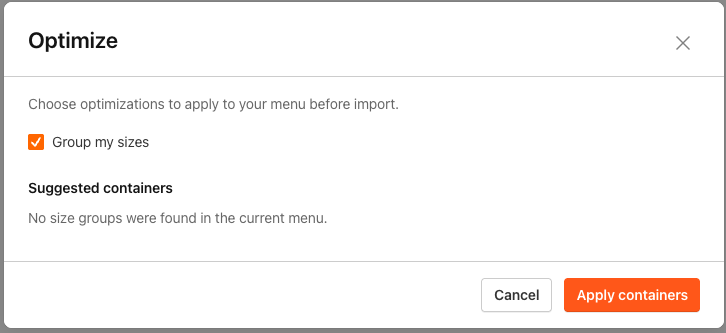
Click Optimize.
-
Select Group my sizes.
-
Click Apply containers.
-
Complete the import. The system identifies size-variant groups and creates a virtual container for each.
-
After import, review the auto-created containers in Menu Builder and adjust contents as needed.
Fixing Errors Before Importing
If your canvas has problems, the Errors drawer opens automatically. Each entry tells you what's wrong and includes a Go to group button to scroll directly to the problem item. The drawer updates as you make fixes. Any resolved errors disappear from the list automatically.
Common errors and how to fix them:
| Error Message | How to Fix |
|---|---|
| "Product group has no products." | Drag at least one product into the empty product group on the canvas. |
| "The minimum quantity for this product group exceeds the number of selected products." | Lower the minimum quantity in the POS, or add more products to the group on the canvas. |
| "Item cannot be dropped on the item that is not its parent on POS." | The Menu Builder follows the parent-child relationships defined in your POS. To create a structure that doesn't exist in your POS, use a virtual item instead. |
| "Item cannot be ancestor to itself." | You attempted to drop an item inside one of its own descendants. Select a different drop target. |
| "This item already exists in the target location." | That item is already in the target spot. Drop it elsewhere or keep the one that's already there. |
| "Product has more than six modifier groups" | Only the first 6 modifier groups from your POS are available for import. Remove or consolidate modifier groups in your POS, then click Refresh and rebuild the affected product. |
Things to Know
Unsaved changes
- If you switch menu tabs, click Refresh, or try to leave the page while you have unsaved changes, a confirmation dialog asks whether to import, discard, or cancel. Closing the browser tab without importing will lose your work.
Import is per store group
- The Menu Builder works on one store group at a time. If you need the same menu for multiple store groups, repeat the process for each one.
The POS is the source of truth
- You can only place items that exist in your POS. To add something that isn't in your POS, add it to your POS first, then return to the Menu Builder and click Refresh.
Troubleshooting
| Issue | Explanation |
|---|---|
| I don't see any store groups in the dropdown. | The dropdown only shows store groups with the Integration purpose. If your brand has none, set one up under Store groups first. |
| Some POS items I expected are missing from the tree. | POS data is cached when the page loads. Click the Refresh button next to the store group dropdown to pull the latest data from your POS. |
| I can't drop an item where I want it. | The Menu Builder enforces the menu hierarchy (menus → categories → products → product groups) and follows the parent-child relationships from your POS. When you hover over the canvas, a red dashed border shows where dropping is not allowed; a green border shows where it is. To build a structure your POS doesn't have, use virtual items. |
| I refreshed the page, and my work is gone. | Anything you didn't import is lost on refresh. Always import your changes before reloading or closing the page. |
| Some modifier groups from my POS aren't showing up in the canvas after import. | The Menu Builder supports up to 6 modifier groups per product. If your POS has more than 6, only the first 6 are available for import. Consolidate modifier groups in your POS if needed. |
| Some of my size products were not grouped into a container after using Import with Containers. | The system only auto-groups items it detects as size-related variants. Products that do not match a size-variant pattern are imported as-is. You can create containers for those products manually after import. |
| My import failed when using the Import with Containers option. | If the import fails, no partial containers are saved. Check the error message for details, correct the issue, and run the import again. |
| I deleted an auto-created container and now the products are not grouped. | Deleting an auto-created container returns its size products to the unorganized state. The next time you run Import with Containers on that store group, those products will be available for optimization suggestions again. |
