RevQ Release Notes
PAR POS™ v5.16 Release Notes & Feature Guide: Revenu Québec
Version 2.0
Administrative Portal/Settings Editor
Language Localization – French First (BRNK-41758)
To better serve French-speaking customers and staff, French is now available as a supported language. Once enabled, the language localization feature automatically updates all customer-facing screens and displays in French. Activating French is simple and can be done directly from the administrative portal.
This ensures that PAR POS is compliant with Quebec's Bill 96 (an update to the Charter of the French Language / Bill 101), which legally requires that:
-
French is the main and most common language used in business.
-
Businesses with 5+ employees must be able to serve customers in French.
-
Software and interfaces used to interact with the public or support business operations must first work in French.
How to enable French on the Admin Portal
The language setting is available directly on the admin portal's login screen. Changing it to French will also update the language via Reports and the Settings Editor.
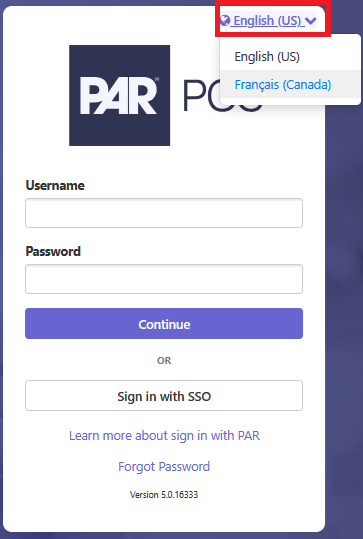
-
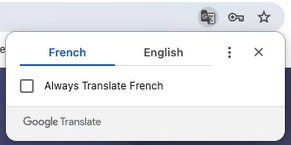
Please note that some browsers may attempt to replace and translate the page. If this happens, turn off the "Always translate French" (or equivalent) option.
-
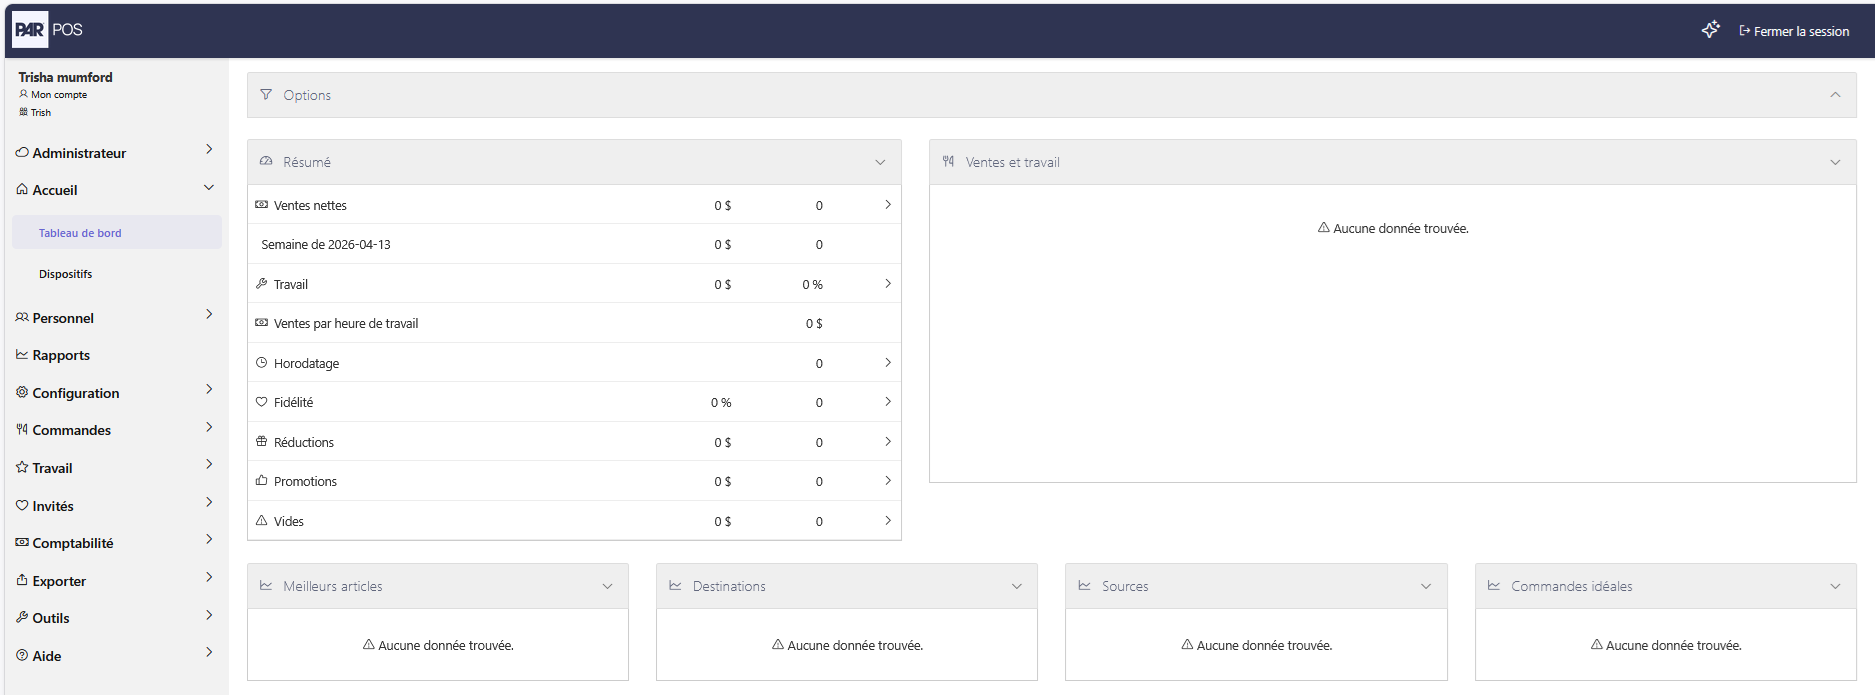
Once logged in to the Admin Portal with French enabled:
Settings Editor with French enabled:
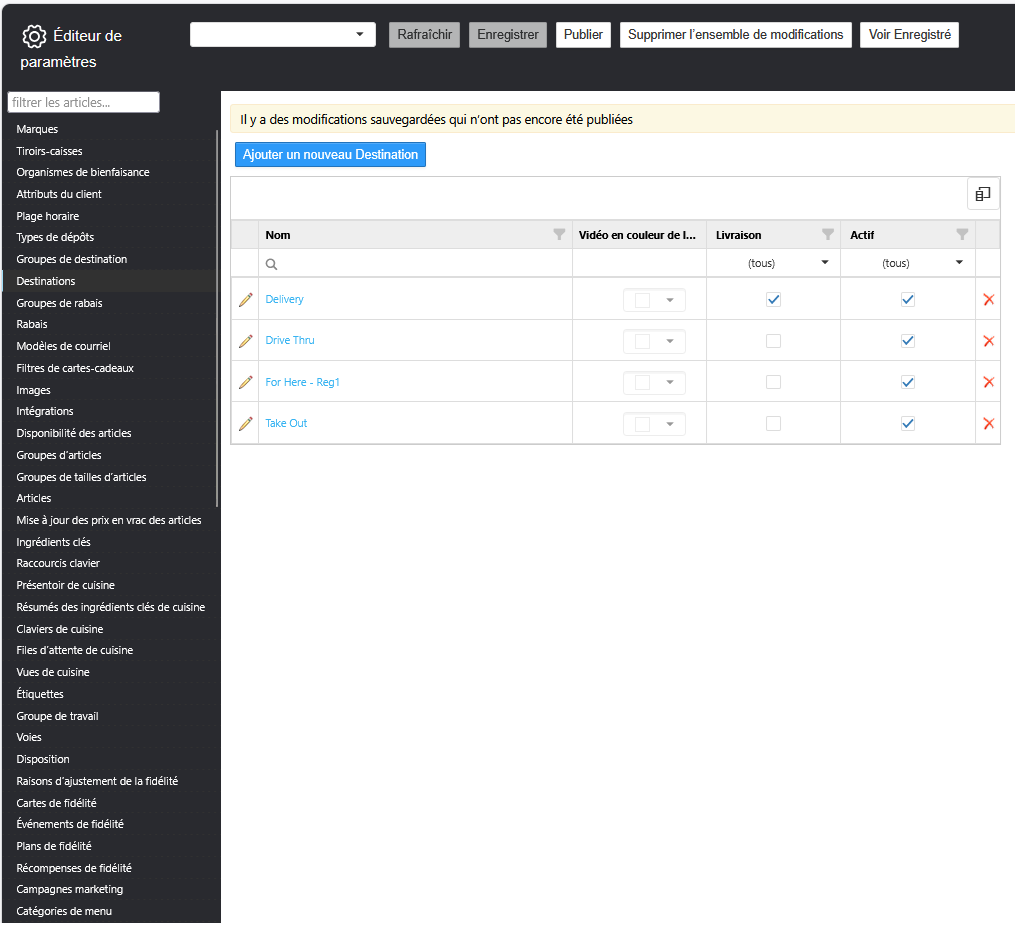
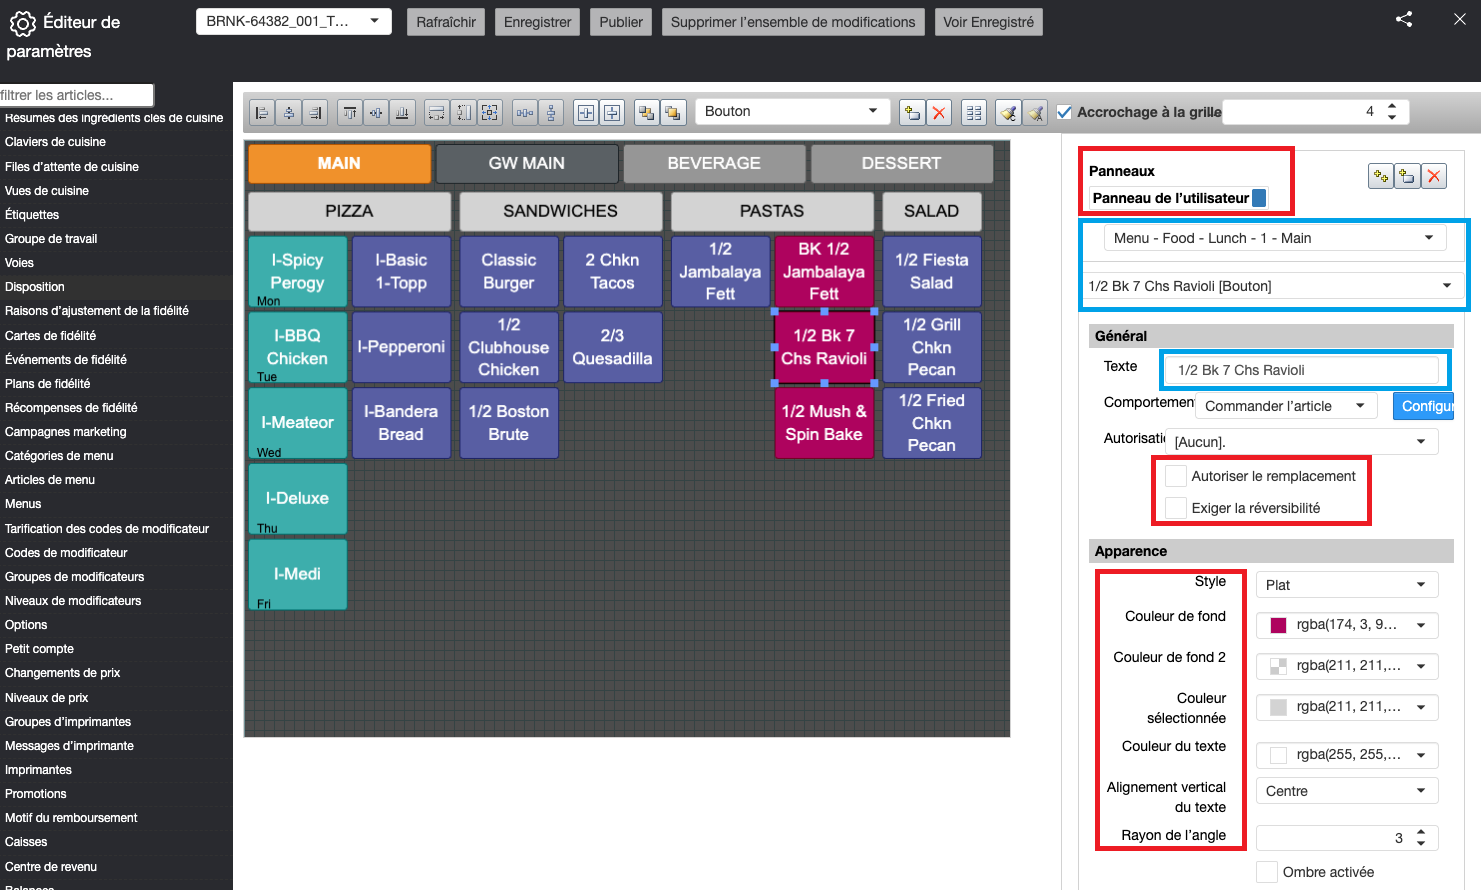
Please note that the system screens are in French, but any information entered by the user does not translate automatically.
-
The red boxes show examples of how the system automatically translated the software portion of the displays.
-
In the blue boxes, there are examples of how the information entered by the user is NOT automatically translated.
What to expect on the Register
The following registry items will automatically display or print in French when the feature is enabled:
-
Prompts – All prompts on the screen will be displayed in French
-
Error messages – System error messages will be displayed in French
-
Receipts – Customer receipts will be printed in French
-
Reports – Reports generated from the cash register will be printed in French
Number and Currency Formatting
Enabling French localization will also change the format of the currency to align it with French standards. The table below shows how the values will appear in English vs. French:
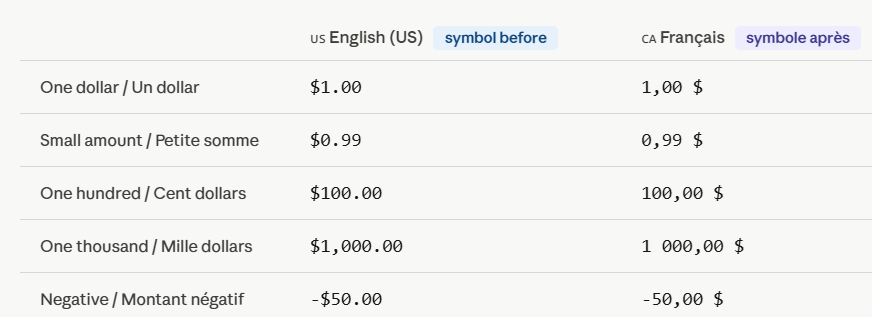
*Note the placement of the $ (there is a space between the last number and the $)
*Note comma and decimal mark differences
Date Format –
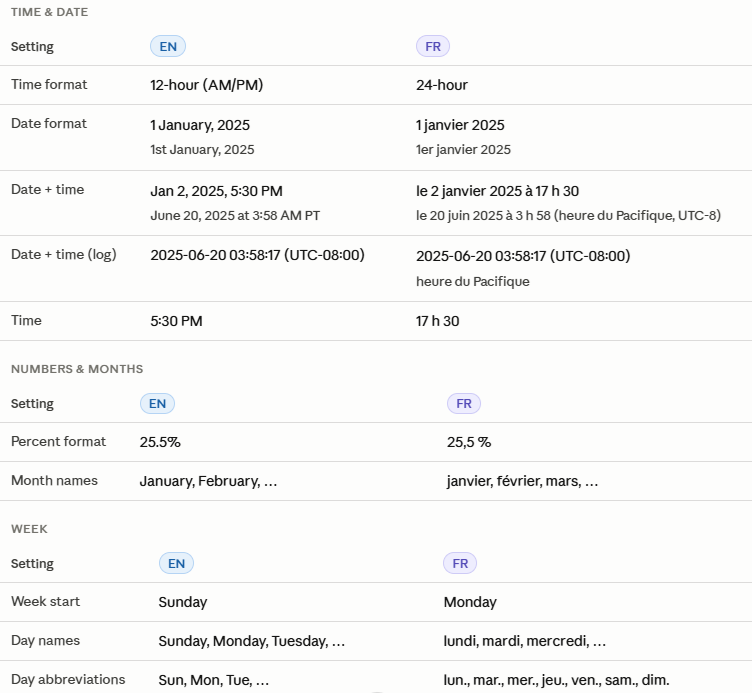
The date format also differs when the French language is enabled. The format is as follows:
- YYYY-MM-DD
Feature Enablement
-
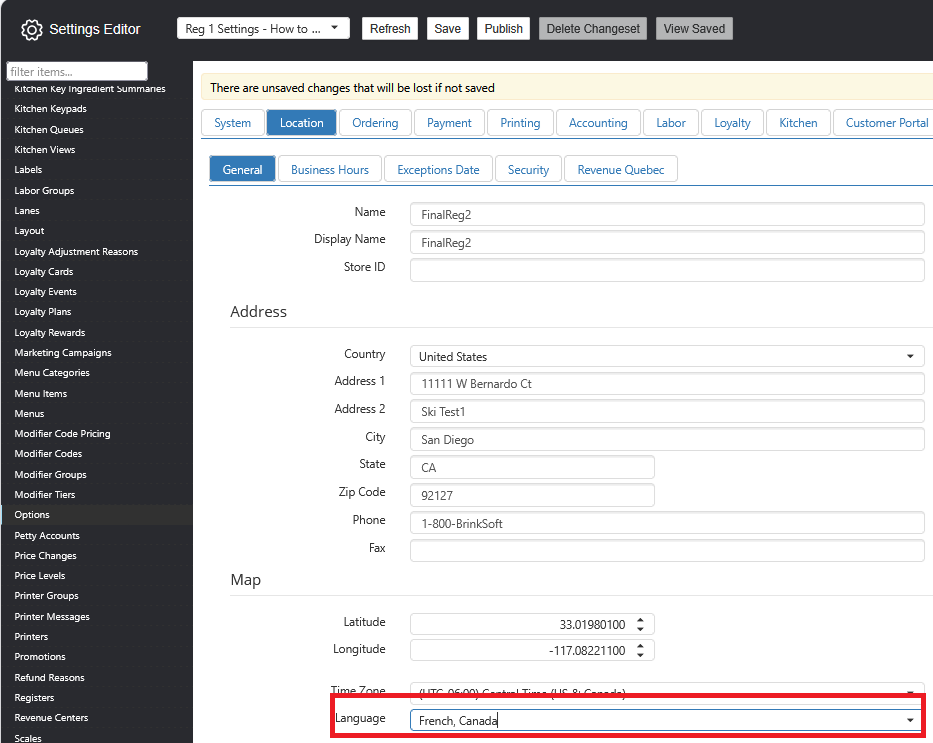
Navigate to the Settings Editor > Options > Location > General
-
Click the drop-down menu next to Language
-
Select French, Canada
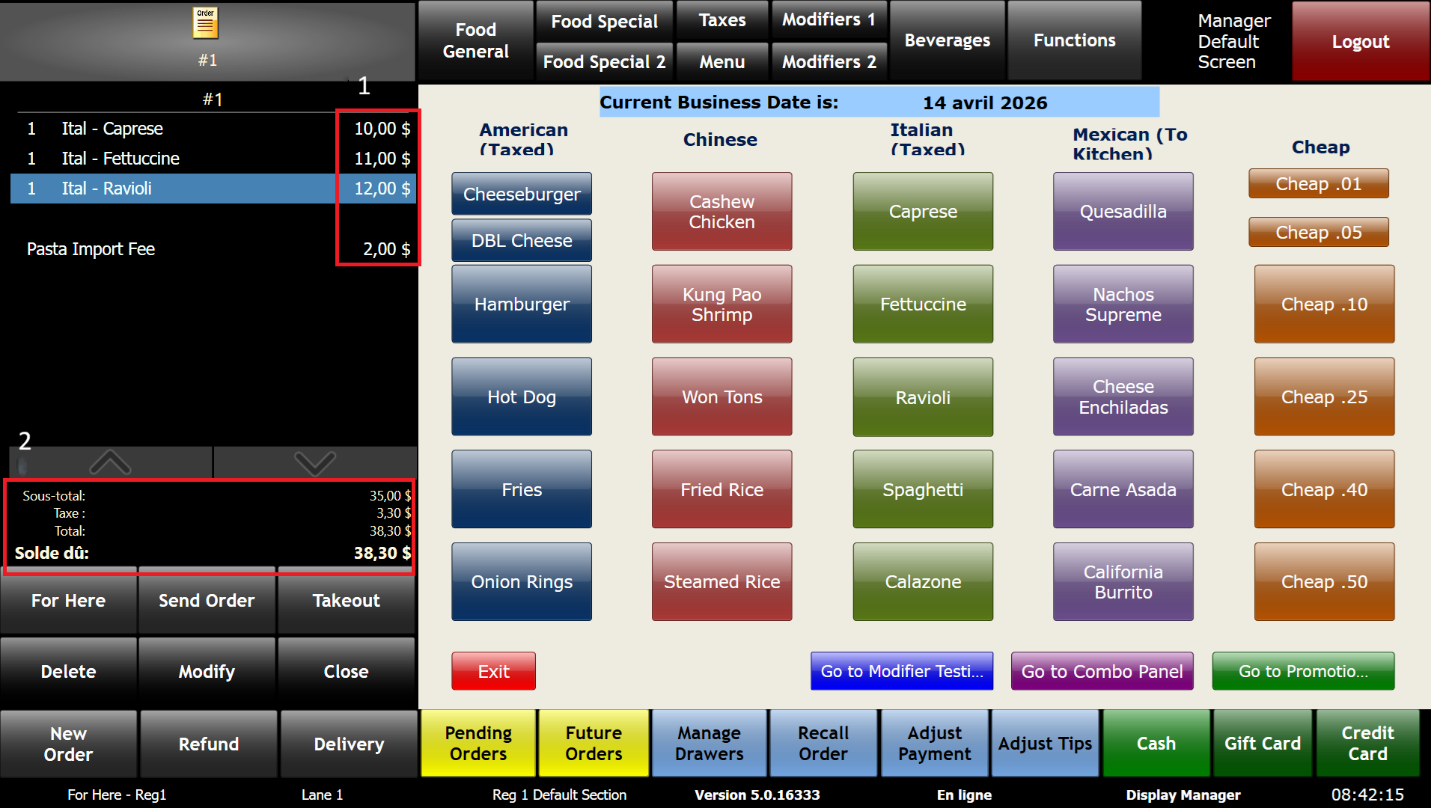
The cash register order window displays the currency format, the system screen, and user-defined buttons
-
The red section indicates 1, the currency difference is displayed
-
The dollar sign is at the end of the dollar amount
-
Instead of using a decimal to indicate the separation between the dollar and cents, there is a comma.
-
-
The second section, titled 2, shows how a system screen is automatically translated into French.
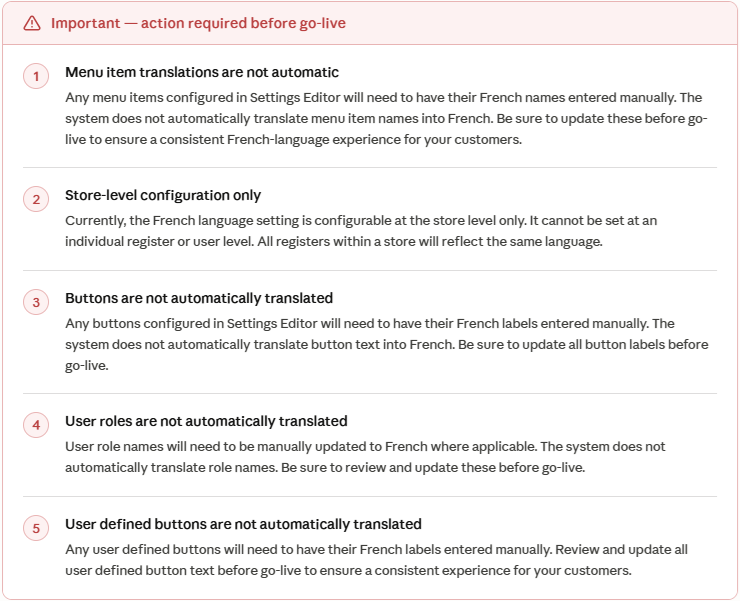
The menu buttons are always in English. Any configurable button must be manually translated into French.
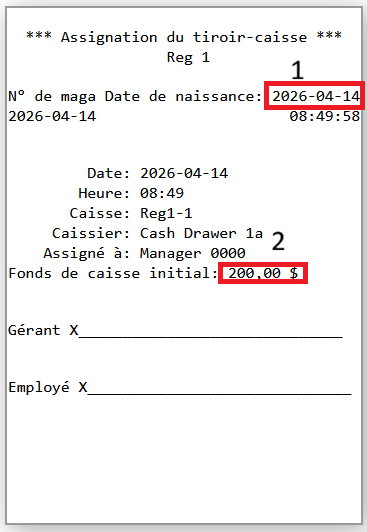
Assign a drawer receipt with French currency and time format
-
The red section labeled 1 indicates that the date format is also different.
- The format is YYYY-MM-DD
-
The red section labeled 2 displays the format of the currency.
-
The dollar sign is at the end of the dollar amount
-
Instead of using a decimal to indicate the separation between the dollar and cents, there is a comma.
-
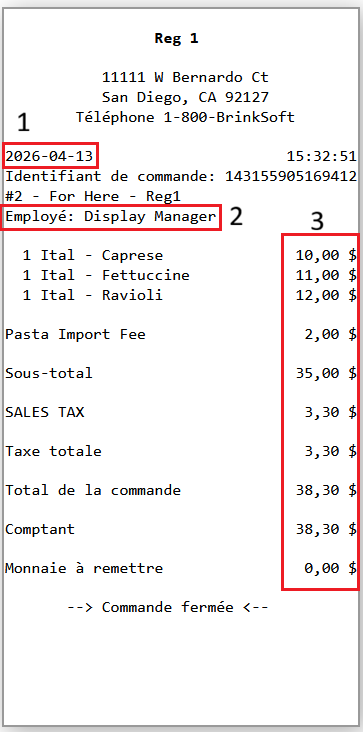
Customer receipt with French currency enabled
-
The red boxed section 1 displays the date format in French format
- The format is YYYY-MM-DD
-
The red boxed section titled 2 shows how system information is translated, but the name Display Manager is entered manually and will need to be updated to "Gestionnaire d'affichage."
-
The red box section labeled 3 shows the change in currency format
-
The dollar sign is at the end of the dollar amounts
-
Instead of using a decimal to indicate the separation between the dollar and cents, there is a comma.
-
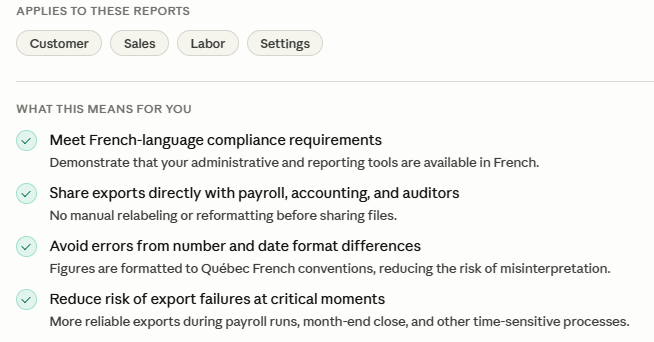
Exports are fully localized for Quebec French (fr-CA) (NUC-1506)
The Export section in the Administrator Portal now follows Quebec French language and formatting standards — both in the interface and in the downloaded files.
Additional French Formats
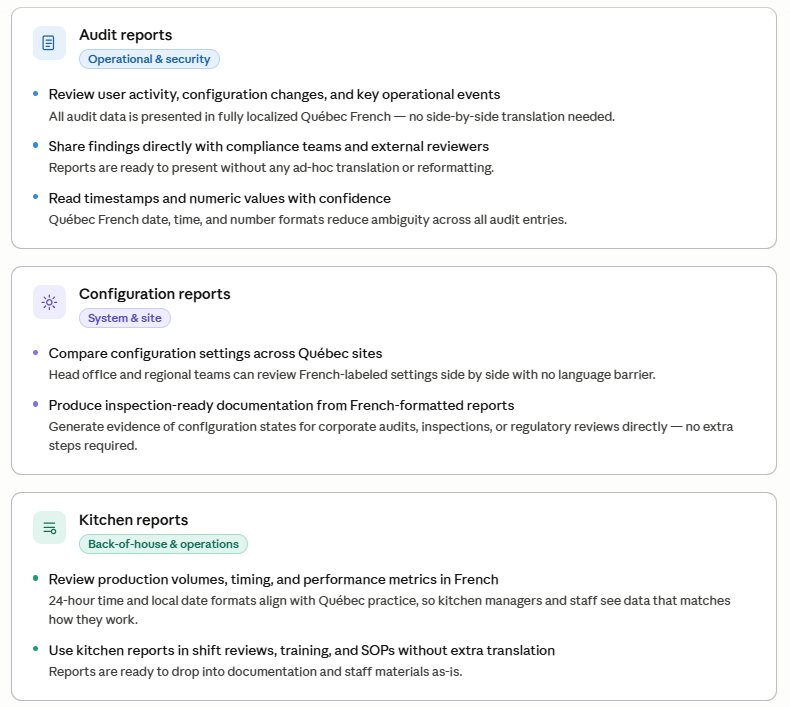
All administrative portal reports translated into Quebec French (NUC-1396) (NUC-1395)
We located all reports and audits in French Quebec (fr-CA). Quebec operators can now review, export, and share background data entirely in French – without manually translating or reformatting.
Bilingual corporate reporting between provinces
Chains that operate in both Quebec and the rest of Canada can:
-
Use English reports when appropriate outside of Quebec.
-
Use French (or bilingual French-first) reports in Quebec, with French content and fr-CA layout ensuring compliance and consistency.
-
For instructions on how to change the language on the Administrative Portal, see Language Localization – French First (BRNK-41758)
-
Report Use Cases
Activate Revenu Québec – Admin Portal (BRNK-59723)
Before activating Revenu Québec, make sure you have your Revenu Québec accreditations handy. Stores that open without the required information will not see orders reported and may be sanctioned by the Quebec government. The Quebec government requires that all real-time orders be sent.
- Note: Before activating Revenu Québec, the language must first be set to French. For instructions, see Language Localization – French First (BRNK-41758)
Feature Enablement
-
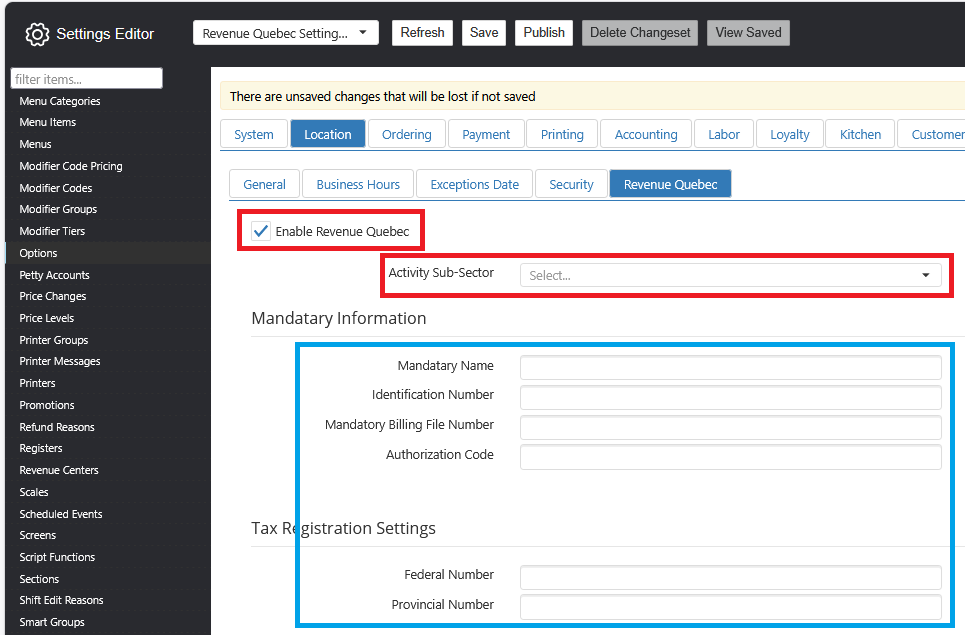
Log in to the Settings Editor -> Options -> Location tab -> Revenue Quebec tab
-
Click on the box to the left of Allow Quebec Revenue
- If the box to the left of Enable Revenue Quebec is grayed out, the Canadian French language has not yet been configured – see page 15 for instructions on how to enable the Canadian French language.
-
Select the correct sub-sector from the drop-down list
-
Select Restaurant if the store does NOT sell alcohol
-
Select Bar if the store sells alcohol
-
-
All options under Mandatory Information will be provided by Revenu Québec
-
All options under the tax registration settings will be provided by Revenu Québec
-
Save and publish
-
The above options in red are required
-
The above options in blue are required and will be provided by Revenu Québec
Certification Manager (BRNK-57800)
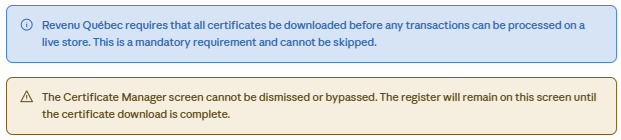
After Revenu Québec is activated and your settings have been published in the Settings Editor, two steps must be completed BEFORE the register can process transactions. This feature will guide you through step 1 of 2: downloading the store certificates.
-
This step only needs to be done one time.
-
This step will need to be performed on each register in the store, individually.
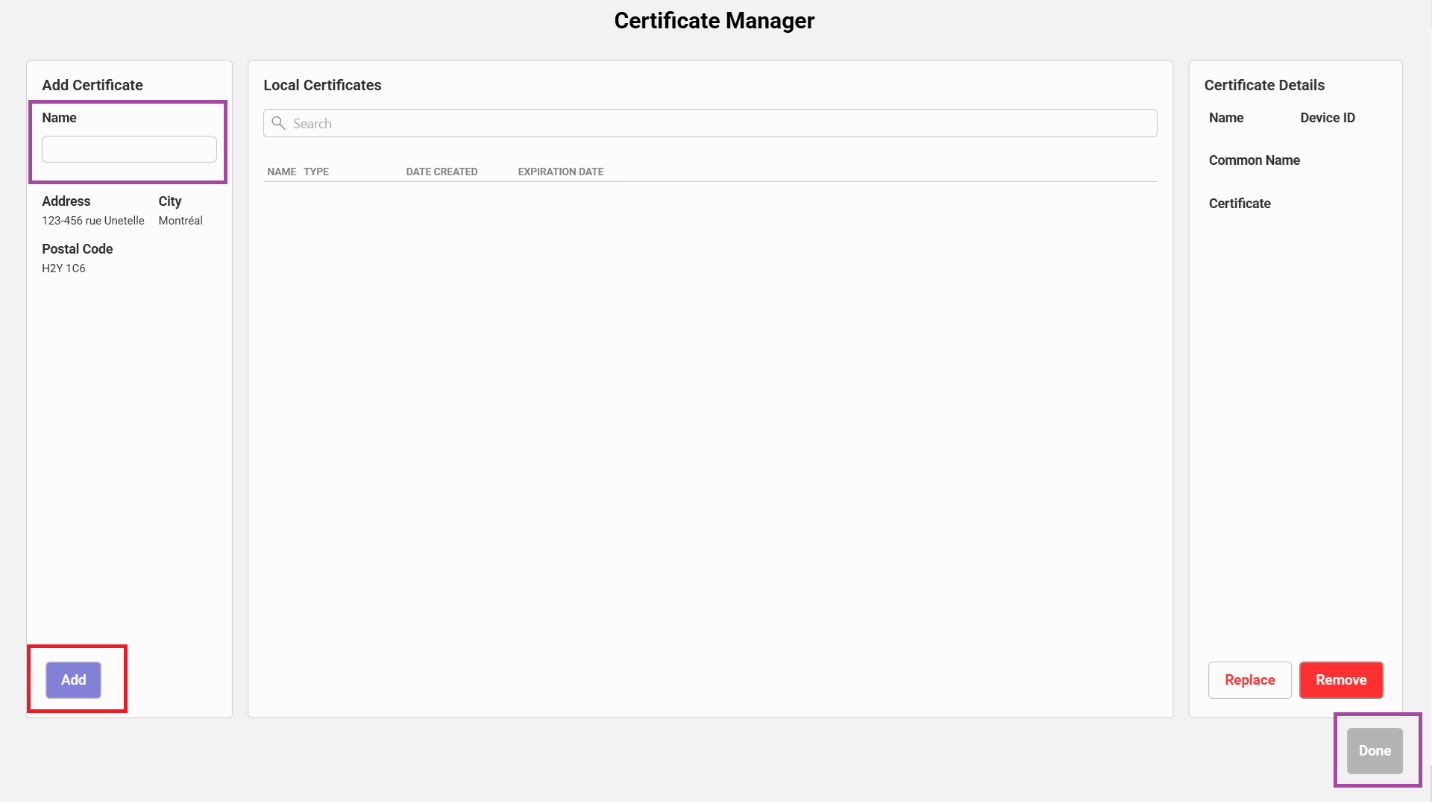
The Certificate Manager screen
-
The Name field is located at the top left of the screen, in the purple box above.
-
The Add button is located at the bottom left of the screen, in the red box above
-
The Done button is in the bottom right of the screen, in the purple box above
- The Done button is grayed out until the certificates have been successfully downloaded. This is to ensure compliance with Revenu Québec requirements.
Feature Enablement
This feature is enabled automatically when a location is specified for Revenu Québec in the Settings Editor, as described in Settings Editor – Activate Revenu Québec (BRNK-59723).
Workflow
-
The register will boot up to the Certificate Manager screen.
-
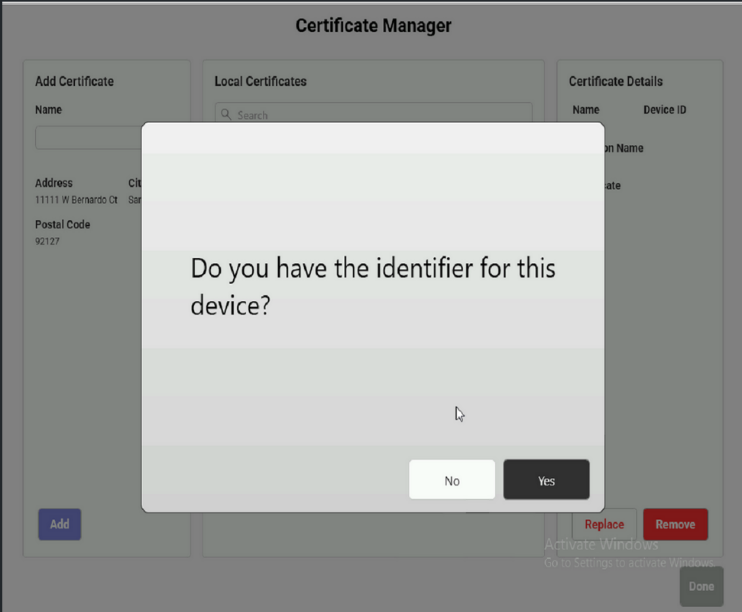
A pop-up message will ask if you have an identifier for this device
-
The device identifier is provided by Revenu Québec.
-
If the store has its device ID
-
It is a 12-digit number
-
Click Yes
-
Enter the device ID
-
-
-
If the store doesn't have a device ID, click No
-
On the Certificate Manager screen, enter a name that is 8 to 32 characters long in the Name field.
-
The naming convention must contain the name of the register.
-
Example: Register 1 = Reg 1
-
An on-screen keyboard will open once the user clicks in the Name field.
-
-
Spaces are NOT allowed
-
-
Click Add
-
-
-
-
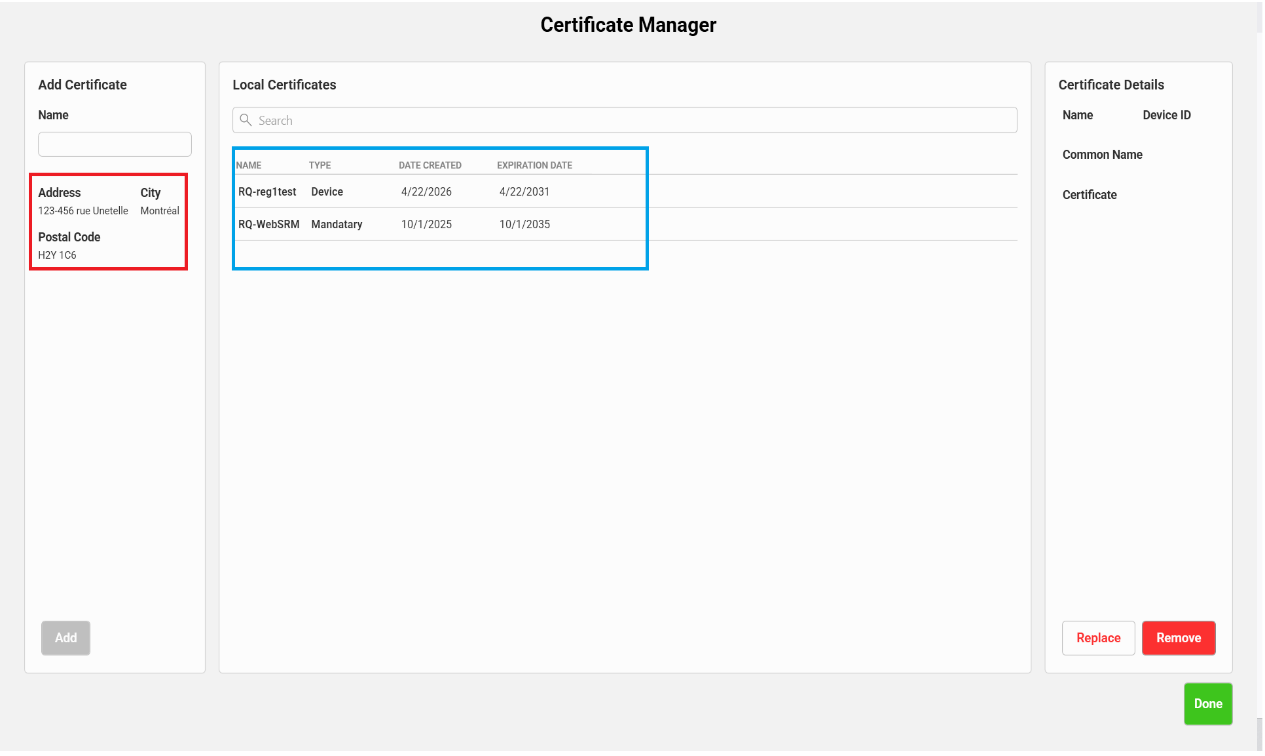
The required certificates will be uploaded, all at once.
-
Once the download is complete, a message will appear stating that the download was successful
-
The Done button will be enabled, and the Add button will be disabled.
-
The Done button is on the bottom right of the screen
-
The Add button is on the bottom left of the screen
-
-
Click Done
-
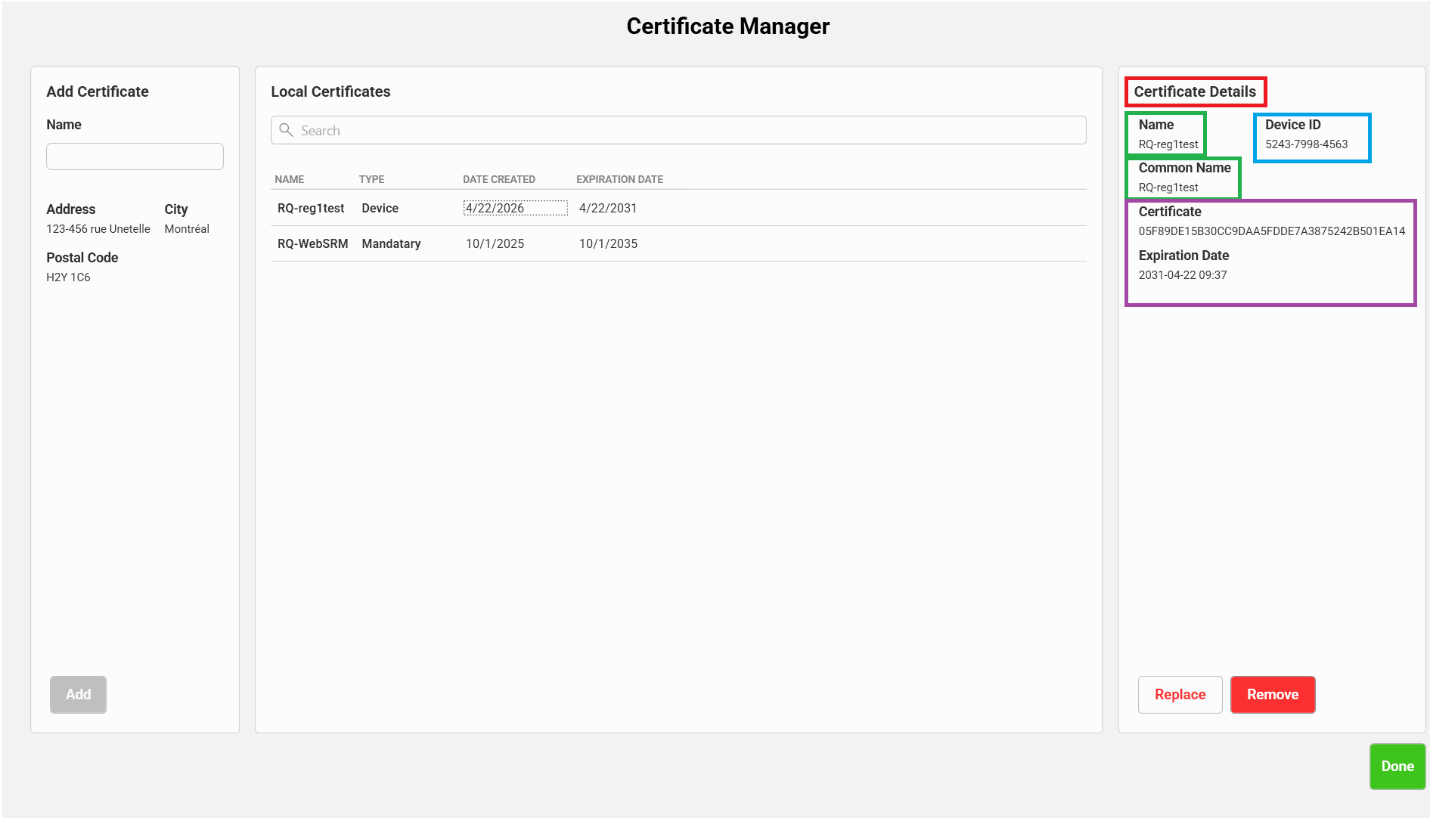
In the red box above is the Address, City, and Postal Code of the store
-
In the blue box above are the 2 required certificates
-
-
Click on one of the certificates, and the certificate details will show up on the right-hand side of the screen under Certificate Details (in the red box above).
-
The green boxes are the Names that were entered in the Name field in step 2 above.
-
The blue box is the device ID
-
The number in the box is an example, not the device ID that should be entered
-
Each register in the store will have its own device ID.
-
-
The purple box shows the certificate ID and the date when that certificate expires
- The certificate expires approximately every 5 years
Tips:
-
There is a new button behavior called Open Certificate Manager Panel. When pressed, this button opens the Certificate Manager panel (shown above).
-
The best practice is to create a button and place it on a panel that is protected by Manager Permissions.
-
Because certificates expire after 5 years. The store will be forced to go through this process again once the certificates expire.
-
The store will need a way to get into this panel to replace the certificates BEFORE they expire.
-
The Replace button in the certificate manager will most likely be used when the client needs to replace the certificates.
-
If the customer desires, they can use the Delete button to delete the old certificates, then press Add to download the new certificates.
-
Create User Session Login and Logging in to the User Session (BRNK-57847)
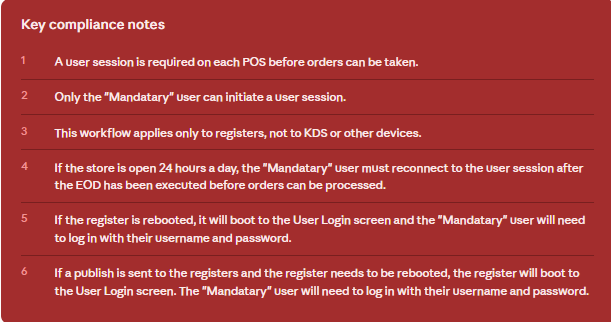
After downloading the certificates, step 2 is signing into the User Session. Revenu Québec mandates that the store logs in to the User Login page to start a User Session before the store can process live orders. This is step 2 of 2: starting the User Session.
-
This step will need to be taken every day.
-
The user who logs into the User Session MUST clock in, or the User Session will not start.
-
Once the person who is logged in to the User Session clocks out, the User Session will be closed. Another User Session is required to start before the store can continue to take orders.
-
If the register is rebooted or if the register application is restarted, the register will boot up to the User Login screen. A User Session must be started before the store can take orders.
- This includes sending a Publish to the store that requires the Register application to restart.
-
This step needs to be taken on each register individually.
Feature Enablement
Create the User Session Login
-
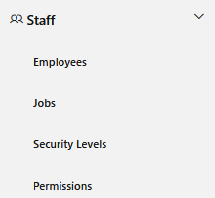
Log in to the Admin Portal -> Staff
-
-
Click Permissions
-
Click + New Permission on the top right-hand side of the screen
-
-
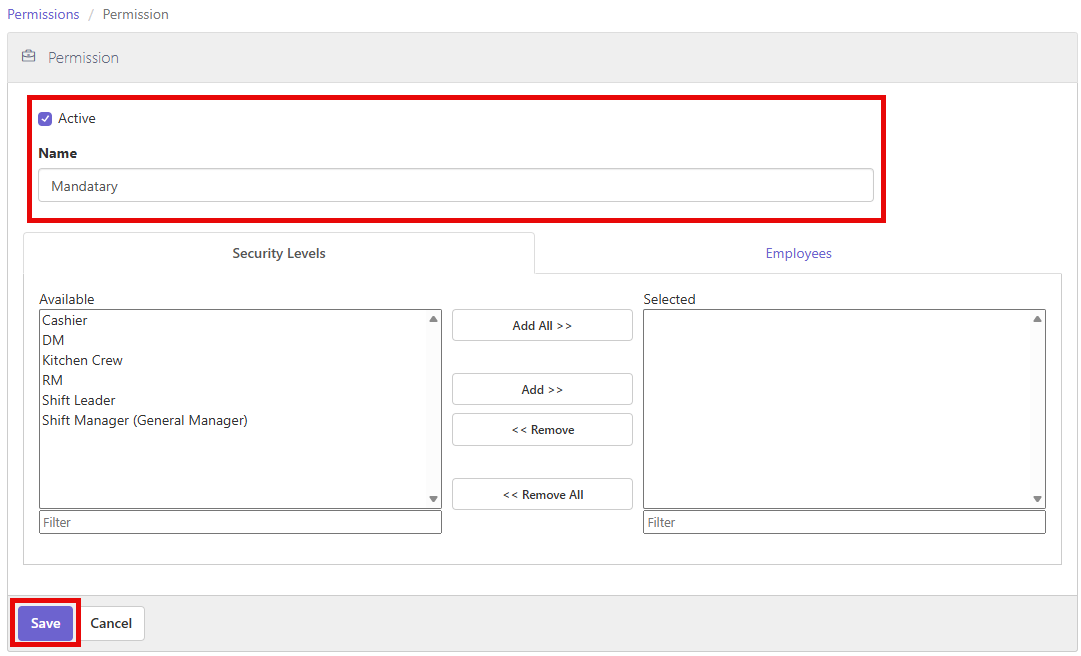
Enter a desired name (I will call this user Mandatary as an example) – do not enter the Security Level
-
Make sure to click the Active check box
-
-
Click Save
-
Click Security Levels
-
Click + New Security Level on the top right-hand side of the screen
-
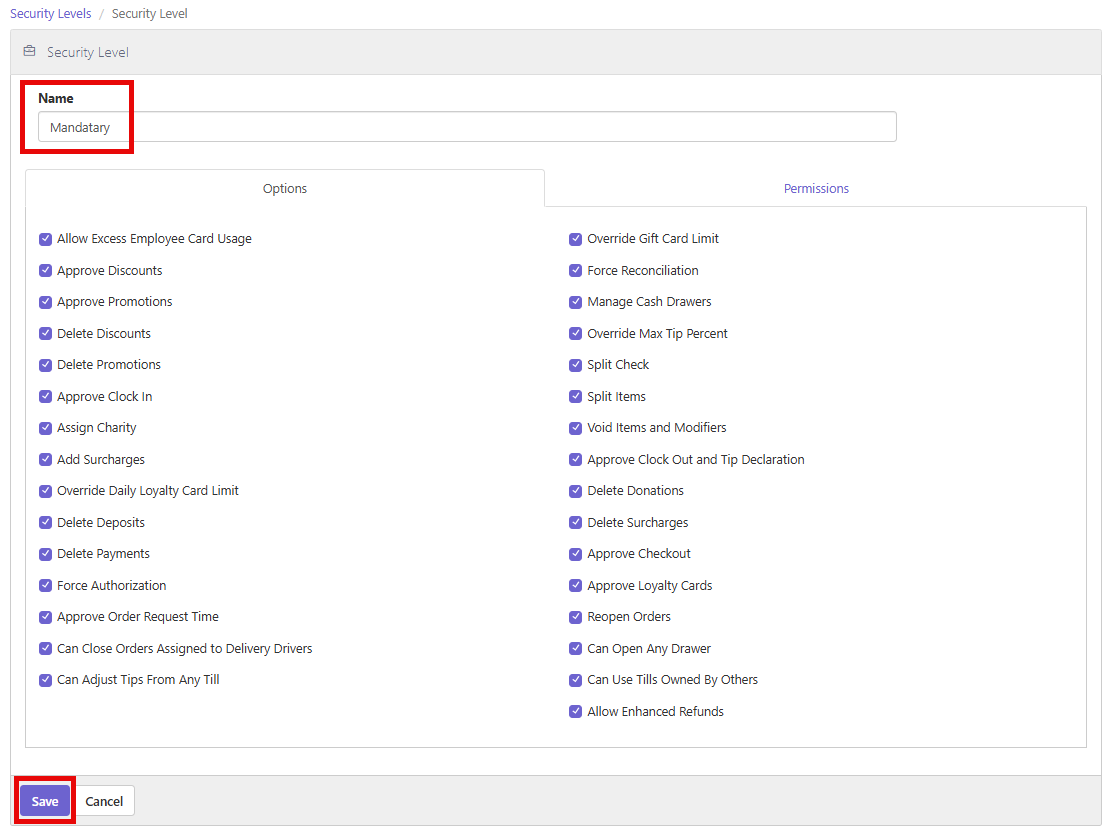
Enter a desired name (I will call this user Mandatary as an example).
-
Enable every option on the Options tab
-
On the Permissions tab, add the Mandatary permission created in step 3 above.
-
-
-
Click Save
-
Click Jobs
-
Click + New Job, on the top right-hand side of the screen
-
Enter the desired name (I will call this job Mandatary as an example)
-
Security Level should be Mandatary (created in step 4)
-
Can Login with Pin should be enabled
-
Can Login with Username/Password should be enabled
- If you do not see this option, Revenue Quebec is not enabled. See Settings Editor – Activate Revenu Québec (BRNK-59723)
-
Can log into Multiple Registers at the Same Time
- Enabling this setting is considered best practice because a User Session must be started on each register individually to be able to take orders.
-
We do not suggest the following settings be enabled:
-
This Job is for Training Purposes
-
Cannot Close Orders
-
Requires Approval to Clock In
-
Requires Approval to Clock Out
-
No Cash Transactions
-
Requires Approval to Check Out
-
-
-
Click Employees
-
Click + New Employee
-
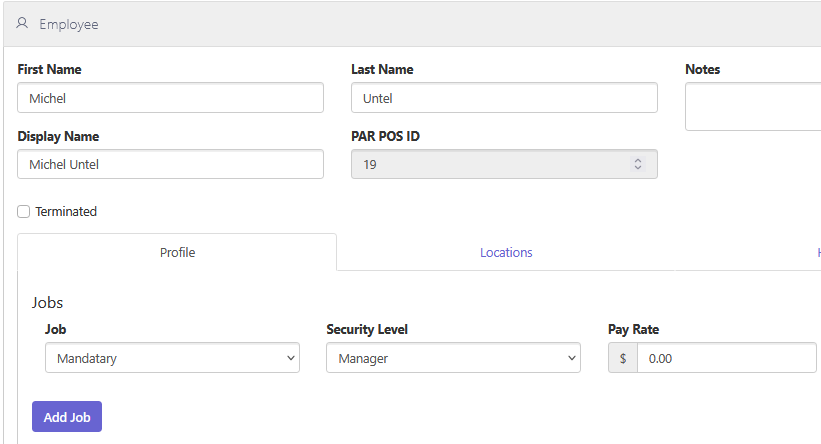
Enter the desired name (I will call this employee Michel Untel as an example)
-
Enter the desired First, Last, and Display Name
-
Add the Mandatary Job created in step #5 above
-
-
In the Security Level field – enter the security level created in step #4 above
-
In the Username field, enter the desired username
-
In the Password field, enter the desired password
-
In the PIN field, enter the desired PIN
- This is required in case the register goes into sleep mode, and the user needs to log back into the register
-
In the Permissions field, enter the permission created in step #3 above
-
-
Click Save

Workflow
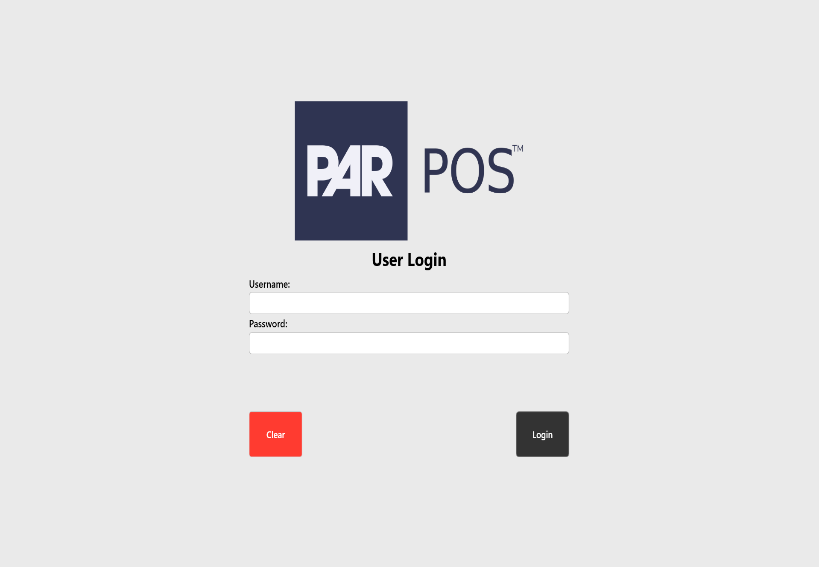
Once the Certificates have been successfully downloaded, the register will boot to the User Login screen
-
Enter the Username and Password that were created in the steps above
- Once the user clicks on the Username or Password field, an on-screen keyboard will open
-
Click Login
-
If the user presses Clear, all numbers/letters previously entered in the Username and/or Password fields are deleted.
-
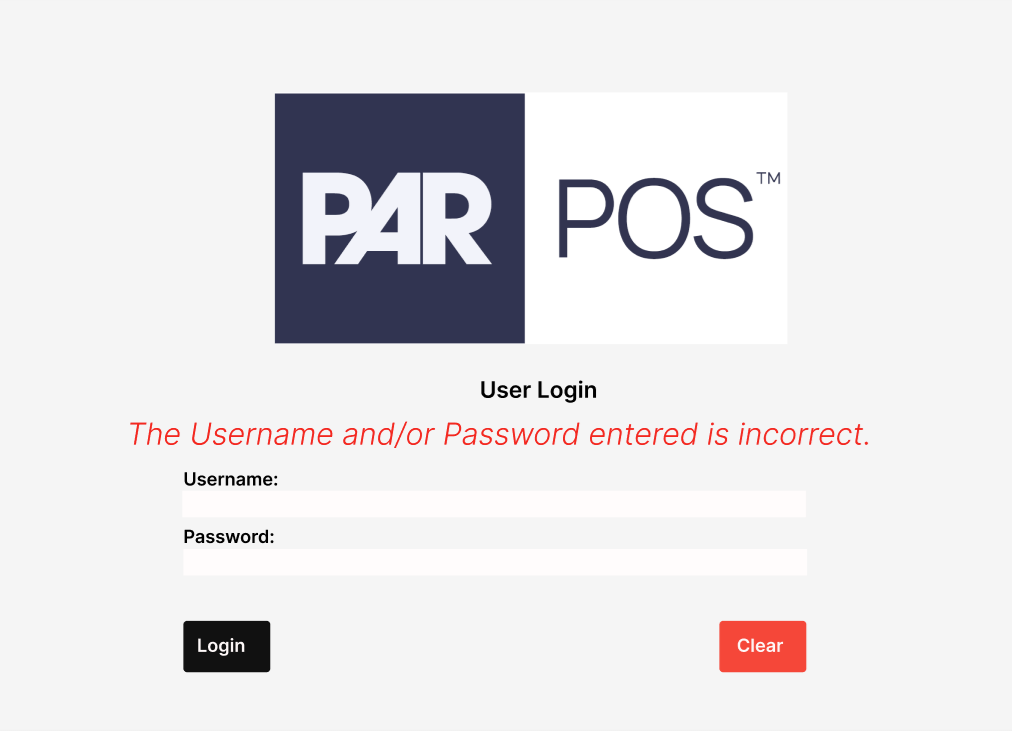
If the user has entered incorrect information, the screen will refresh with a red error message stating "The username and/or password entered is incorrect."
-
-
-
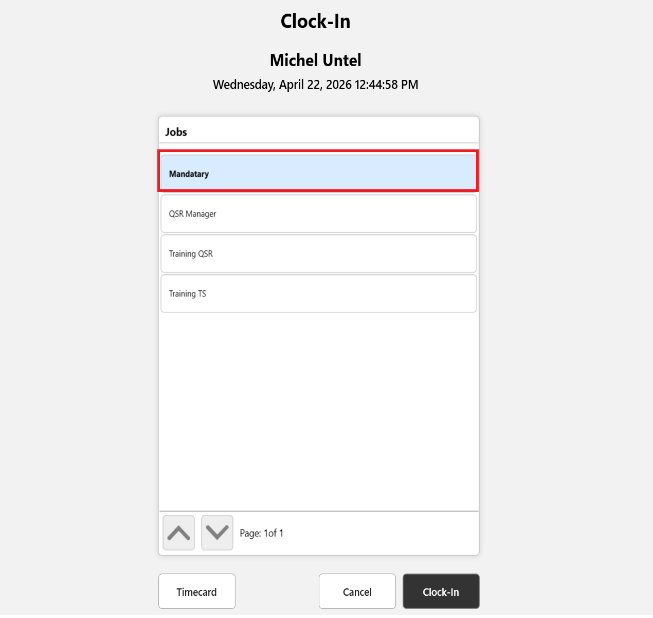
The Clock In screen will open
-
The user MUST clock in using the Job created above, or the User Session will not be started.
-
-
The User Session MUST be started BEFORE orders can be taken
-
-
The Register’s menu will open
-
The user can assign a drawer and start taking orders
-
The user can also Logout – once logged out, the normal screen where the user can enter their PIN will open.
-
New Cancel Button Behavior for Revenu Québec (BRNK-59425)
To comply with Revenu Québec requirements, a new cancellation behavior — RQ-Cancel Order — has been introduced. When Revenu Québec is enabled, this button replaces the standard cancellation flow and applies in both of the following scenarios:
-
Before the order is sent to the kitchen, the order is canceled before being sent to the kitchen
-
After the order is sent to the kitchen – the order is cancelled after being sent to the kitchen.
RQ-Cancel Order replaces the following button behaviors when Revenu Québec is enabled:
-
Cancel
-
Delete All
Feature Enablement
This button behavior can be used when Revenu Québec is enabled, when a location is specified for Revenu Québec in the Settings Editor, as described in Settings Editor – Activate Revenu Québec (BRNK-59723).
Offline Orders (BRNK-59425)
Revenu Québec mandates specific handling for orders taken while the system cannot communicate with their servers. During this offline period, orders are stored locally and automatically batched for submission to Revenu Québec once connectivity is restored.
There are four ways an offline batch can be triggered:
-
5-Minute Timer — Once the system comes back online, a timer will automatically submit the offline batch within 5 minutes, requiring no user action.
-
First Online Order — The first order processed after connectivity is restored will automatically trigger the offline batch to be submitted alongside it.
-
End of Day — Running the End of Day process will automatically detect and submit any remaining offline orders.
-
RQ-Send Offline Transactions — Pressing this button will manually batch and submit all stored offline transactions on demand.
Feature Enablement
This button behavior can be used when Revenu Québec is enabled, when a location is specified for Revenu Québec in the Settings Editor, as described in Settings Editor – Activate Revenu Québec (BRNK-59723).
Enhanced Refunds ONLY (BRNK-59425)
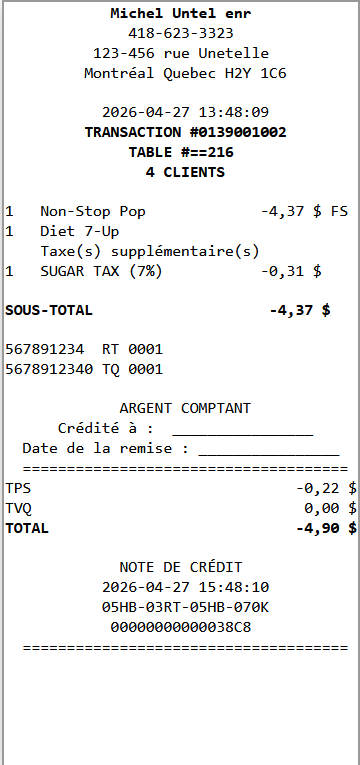
When Revenu Québec is enabled, stores must use Enhanced Refunds. This is a Revenu Québec compliance requirement — all Credit Notes (refunds) must be linked to their original order.
As a result of this requirement, please note the following limitations:
-
Credit Notes (refunds) can only be processed for orders placed on the current business day. Orders from previous business dates cannot be refunded.
-
The Restrict Voids on Paid Orders setting cannot be enabled for Québec stores.
Feature Enablement
This button behavior can be used when Revenu Québec is enabled, when a location is specified for Revenu Québec in the Settings Editor, as described in Settings Editor – Activate Revenu Québec (BRNK-59723).
Enhanced Refunds MUST be enabled:
-
Navigate to Settings Editor -> Options -> Accounting tab -> General Tab
-
Click the box to the left of Allow Enhanced Refunds
-
Save and Publish
Note: When Revenu Québec is enabled, the Restrict Voids on Paid Orders setting will appear greyed out and is unavailable. This is expected behavior — Revenu Québec's strict Credit Note (refund) requirements will not allow this option to be supported in Québec stores.
Workflow
-
Log in to the Register
-
Ring in a few orders and tender the orders.
-
Click on a button with the Button Behavior Recall Order
- Should be configured to see Closed orders or Both
-
Search through the closed orders
-
Click on the desired order
-
Click Refund Item
-
Select a Refund Reason
-
Ring in the item(s) to be refunded
- The order total cannot exceed the order total
-
Click the button with the Button Behavior Close Order
-
Enter the dollar amount to be refunded
-
Click Done
-
Click OK on the Refund dollar amount message
Credit Note (refund)document:
Tax/Legal
Web-SRM Communication (BRNK-41759)
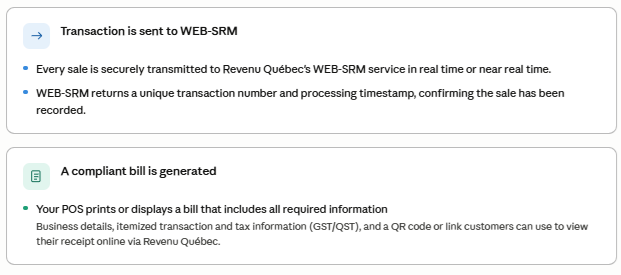
When Revenu Québec is activated, your point of sale connects directly to the WEB-SRM service – securely sending transaction data and receiving certified billing information in return.
Why is this necessary
Enabling Features
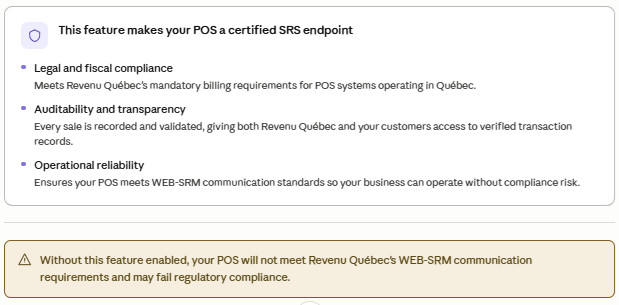
This feature is enabled once all the required settings in the Settings Editor -> Options -> Location -> Revenu Québec are correctly configured. For instructions see Settings Editor – Activate Revenu Québec (BRNK-59723).
User Reports (BRNK-38219)
This feature introduces a Revenu Québec-certified user report, accessible directly from the PAR POS register, designed to simplify compliance with franchisees operating in Quebec.
Generating the Report
The report can be run at any time from the register, for a single register or across all registers, and can be either displayed on the screen or printed. Report data is stored on the register for up to 2 years.
- Note: Only closed orders appear in the User Report. Any open orders that have not yet received payment will not be included.
Compliance and Certification
The report layout and content follow the Revenu Quebec specification, ensuring it meets all certification requirements. This means stores in Quebec can confidently operate knowing their reporting is audit-ready, and any inspection or audit can be addressed quickly using a dedicated, compliant report.
Data Transmission to Revenu Quebec
Behind the scenes, the report automatically sends relevant sales data to Revenue Quebec. The data transmitted includes up to 2 years of transactions and includes:
-
Total transaction dollar amount
-
Date and time the report was requested
-
Device Information
-
GST and QST figures
-
QR Code
Feature Enablement
To facilitate the authorization, make sure that Revenu Québec is activated via the steps of Activate Revenu Québec (BRNK-59723). Also, a button with the Button Behavior Report with Revenue Quebec User Report selected must be added to the Layout in the Admin Portal
-
Navigate to Settings Editor
-
Click Layout
-
Select desired User Panel
-
Add a new button
-
On the Behavior drop-down, select Reports
-
Click Configure
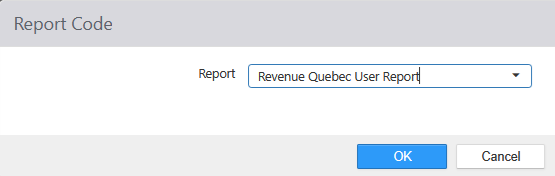
-
Select the Reveue Quebec User Report
-
If Revenue Quebec User Report does not show up in the drop-down, Revenue Quebec is not enabled.
-
To enable Revenue Quebec, follow the steps in Settings Editor – Activate Revenu Québec (BRNK-59723).
-
-
-
Click OK
-
Save and Publish
Workflow – Printing
-
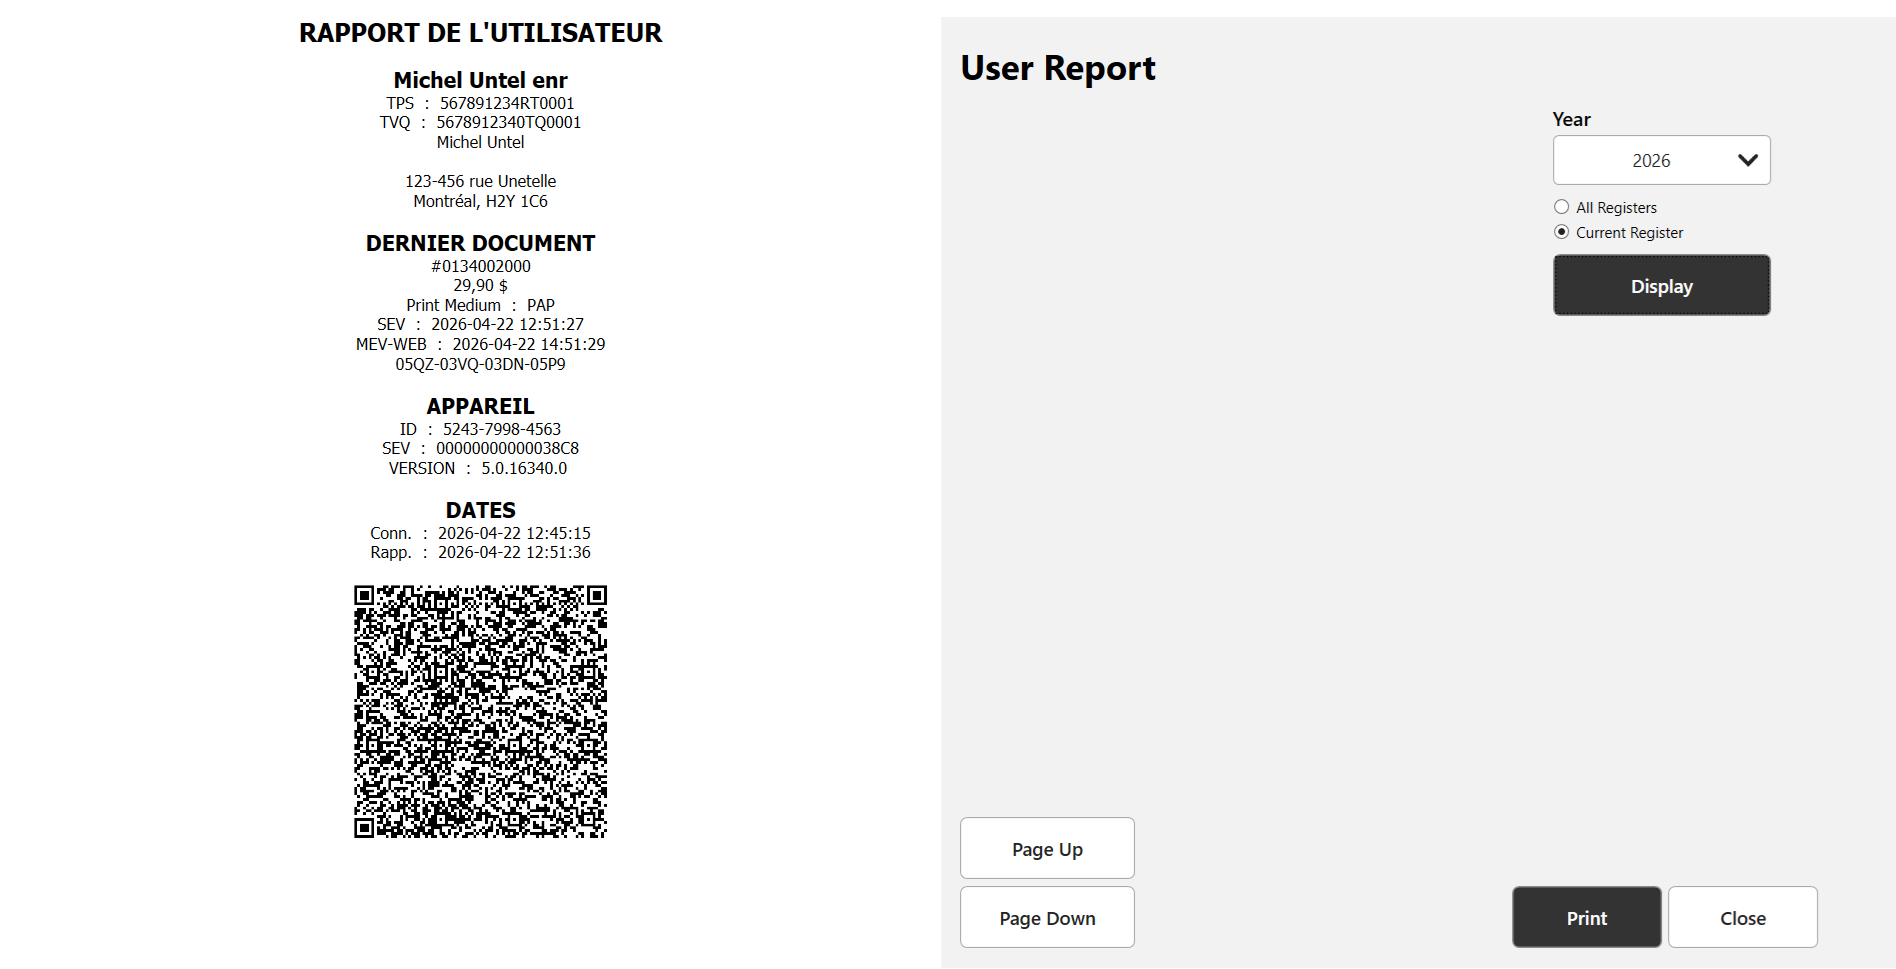
From the POS, navigate to the button with the Report Button Behavior Revenue Quebec User Report configured.
-
Select the year
-
Select if the report should include data from the Current Register or All Registers
-
Review the content of the report on the screen.
-
Print the user report.
-
File or store printed reports according to internal compliance policy.
Compliant Documents (Receipts) (BRNK-61109)
This feature brings PAR POS into full compliance with Revenu Québec's mandatory billing requirements for restaurants operating in Quebec. It introduces a complete suite of Quebec-specific transaction documents (receipts) that are purpose-built to meet all regulatory standards.
Every document generated:
-
Renders in the exact format prescribed by Revenu Quebec
-
Contains all required transaction information as defined by Quebec regulation
-
Automatically transmits all necessary transaction data to Revenu Quebec in real-time
-
Includes an official Revenu Quebec QR code, allowing guests to view their document (receipt) details online
Documents Available to be Printed
-
Temporary Bill – used in table service environments. This is the bill that is handed to the customer to let them know how much they owe for their meal. It does NOT have payment added to the document (receipt). Used with the Button Behavior RQ-Print Receipt.
-
Closing Bill – the receipt given to the customer after payment has been processed. Used in both Table Service and Quick Service Environments. Used with the Button Behavior RQ-Print Receipt.
-
Credit Note – this is the document (receipt) printed when a refund is given to the customer.
-
Training Document – a document (receipt) that prints when a user logs in to the register using a Training Job.
- All the above documents (receipts) will be printed with a Note on the document (receipt) that the order was taken in Training Mode
Two Different Types of Document (Receipt) Reprints:
-
Duplicates – document (receipt) that is printed and must be given to the customer. Used with the Button Behavior RQ – Print Duplicate.
-
Reproductions – document (receipt) that is printed and must NOT be given to the customer. It is printed when the store needs to keep the document (receipt) for themselves. Used with the Button Behavior RQ-Print Receipt
-
The system can automatically see the state of the document (receipt) and know that the document (receipt) is a reproduction.
-
If the store wants to reprint documents (receipts) for their own records, they MUST use the Button Behavior RQ-Print Duplicate.
-
Franchisees operating in Quebec can do so with confidence, knowing every document (receipt) issued is fully certified, audit-ready, and aligned with the latest Revenu Québec billing specifications.
New Button Behaviors for Printing Documents (Receipts)
-
RQ – Print Receipt – this button behavior replaces Print Receipt.
-
Used to print a temporary bill
-
Used to print a closing bill
-
Used to print a reproduction
-
-
RQ – Print Duplicate – this Button Behavior replaces Reprint Receipt; this button is only used when reprinting a document (receipt) that will NOT be given to the customer. It is only used for the store’s records.
-
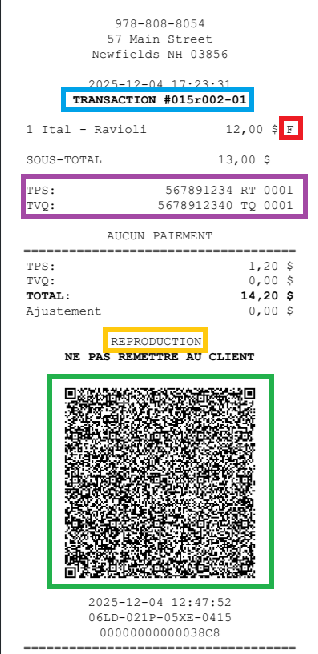
In the blue box, Transaction ID in the Revenu Quebec format
-
In the red box, the type of tax applied to each item
-
In the purple box, the tax information
-
In the yellow box, the indicator that the receipt is a Reproduction
- Right below is a statement that the user should NOT give the slip to the customer
-
In the green box, the QR Code
Feature Enablement
To facilitate the authorization, make sure that Revenu Québec is enabled via the steps of Activate Revenu Québec (BRNK-59723). The button behaviors above will also need to be set up on the desired panel(s) in Layout.
Workflow
-
Log in to the register
-
Assign a drawer
-
Ring an order, but do not pay for the order
-
Click the RQ-Print Receipt button
- A Temporary Bill will print
-
Tender the order
- A Closing Bill will print
-
Click the RQ-Print Receipt button
- A Reproduction will print
Taxes & Currency (BRNK-38219)
This feature adapts PAR POS to meet Revenu Québec's requirements for restaurant operators in Quebec. It allows customers to:
-
Calculate and display correctly:
-
Federal Goods and Services Tax (GST)
-
Provincial (Quebec) Sales Tax (QST)
-
Any applicable additional taxes (e.g., a specific tax on alcoholic beverages)
-
-
Clearly and separately display taxes on:
-
Temporary bills
-
Final/Closing bills
-
Credit Notes
-
-
Manage scenarios specific to Quebec:
-
Taxes on the item subtotal (including discounts, but not "tax on tax")
-
Tax included vs. tax-excluding price
-
Extraction of GST/QST from the included prices
-
Feature Enablement
To facilitate the authorization, make sure that Revenu Québec is activated via the steps of Activate Revenu Québec (BRNK-59723).
Once activated, taxes will need to be configured in Settings Editor -> Taxes. Every Quebec store must have at least the following two taxes set up:
-
GST – abbreviated as F on the printed documents (receipts)
- The system will automatically abbreviate the GST tax as F, no additional setup required.
-
QST – abbreviated as P on the printed documents (receipts)
- The system will automatically abbreviate the QST as P, no additional setup required.
Additional taxes may be required depending on the store’s specific location.
Terminal to Terminal Communication (SEL-1184)
Terminal-to-Terminal Communication enables an order to be started on one register and completed on another. Because Revenu Québec requires additional data — beyond standard order information — to be transferred alongside the order in these scenarios, this feature handles that exchange automatically in the background, ensuring compliance without any extra steps required from the user.
Feature Enablement
To facilitate the authorization, make sure that Revenu Québec is activated via the steps of Activate Revenu Québec (BRNK-59723).
Version History
| Version | Date | Updates |
|---|---|---|
| 1.0 | 4/23/26 | Initial Publication |
| 2.0 | 4/30/26 | Second Publication |
