PAR POS™ v5.16r3 Release Notes & Feature Guide
About This Release
PAR POS 5.16r3 is a point release covering enhancements to refunds, delivery order handling, the In-store API (Orbit), and integration updates. This document summarizes what's new, how each change works, and what, if anything, you need to do to use it.
Ordering & Checkout
Recall External Orders Without Cash Drawer Assignment
Reference: BRNK-69227
Staff can now recall and edit an order from the Recall Order screen, even if they aren't currently assigned to a cash drawer.
How It Works
-
Previously, the Recall Order screen blocked order selection entirely for anyone without a drawer assignment, showing an error that access to a till was required, even for orders that didn't need drawer access.
-
A new security level permission allows specific staff to bypass this restriction.
-
This addresses a workflow gap for restaurants that need shift leads or order coordinators to manage online and delivery orders without necessarily being assigned to a till.
Feature Enablement
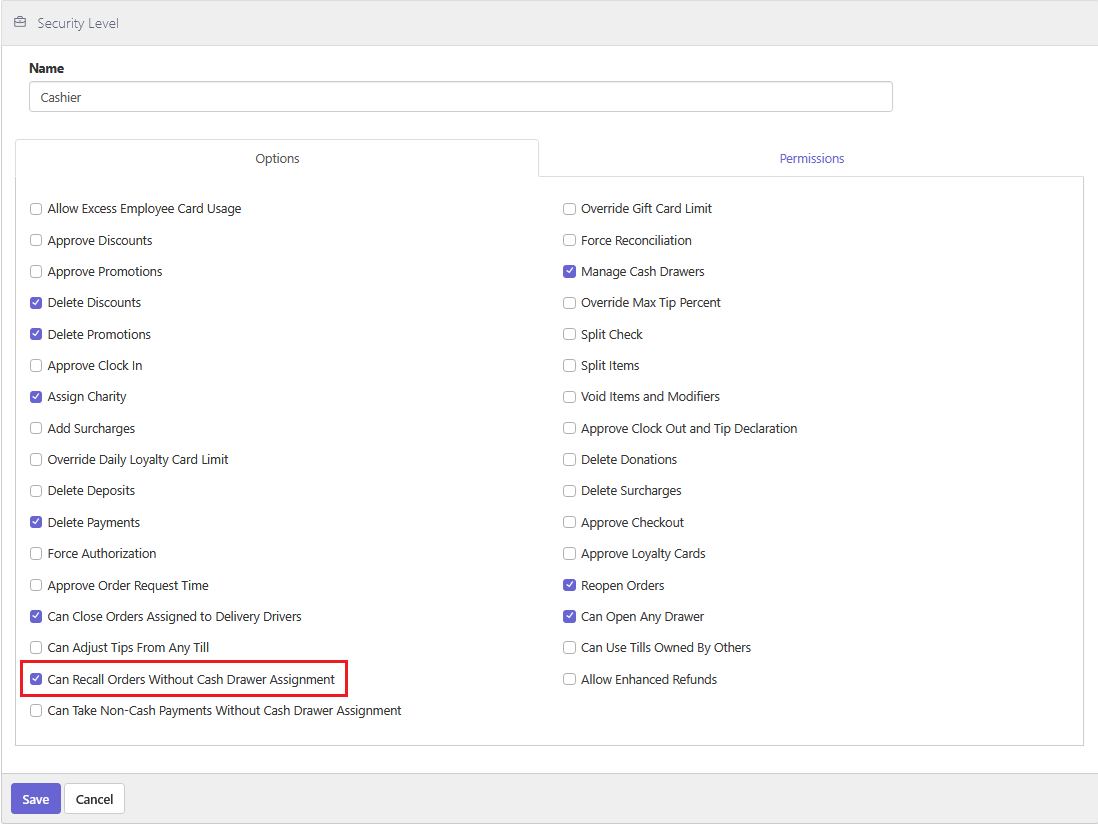
In Admin Portal, go to Staff, then Security Level.
-
For each security level that should have this ability, enable "Can recall order without cash drawer assignment" (off by default).
-
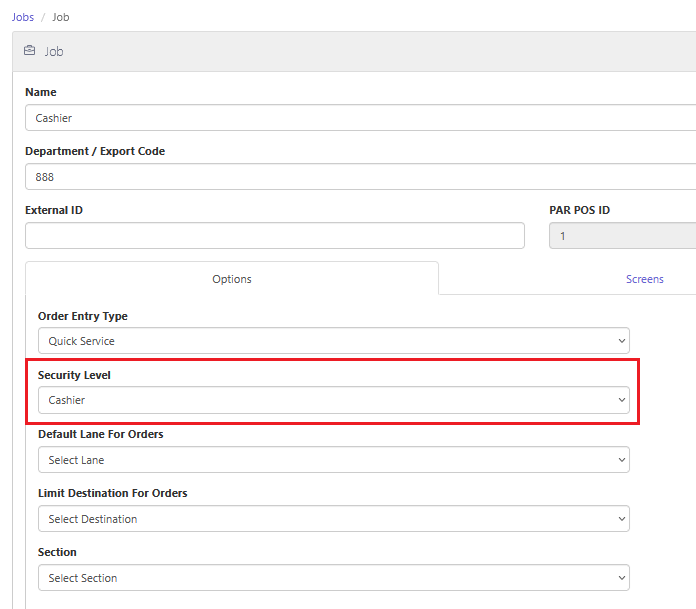
Assign that security level to the appropriate job roles, such as shift leads or order coordinators. Employees without this permission continue to need a drawer assignment for all recalls, as before.
-
Click Save if any changes are made
Workflow
-
An employee with a Job that has Can recall order without cash drawer assignment enabled logs into the register.
-
Click the Recall Order button
-
Navigate to an External order.
-
Make desired edits to the order
-
Close the order
-
Updates to the payment will be made automatically.
Automatic Driver Check-In & Check-Out for Deliverect Deliveries
Reference: AS1-3736
For delivery orders fulfilled through Deliverect, PAR POS now automatically updates the order when the driver checks out for delivery and checks back in, without a cashier having to manage every step manually.
How It Works
-
When a driver checks out for a delivery, the order is automatically marked in transit, and the departure time is recorded.
-
When the driver checks back in, PAR POS records the return time and, for cash deliveries, can apply the cash tender automatically.
-
Once the balance is settled, the delivered order closes automatically, without a cashier needing to close it out manually.
Getting Started
Confirm your Deliverect delivery event integration is enabled for the location.
-
Your PAR integration contact will be needed to verify webhook authentication and location mapping are configured correctly.
-
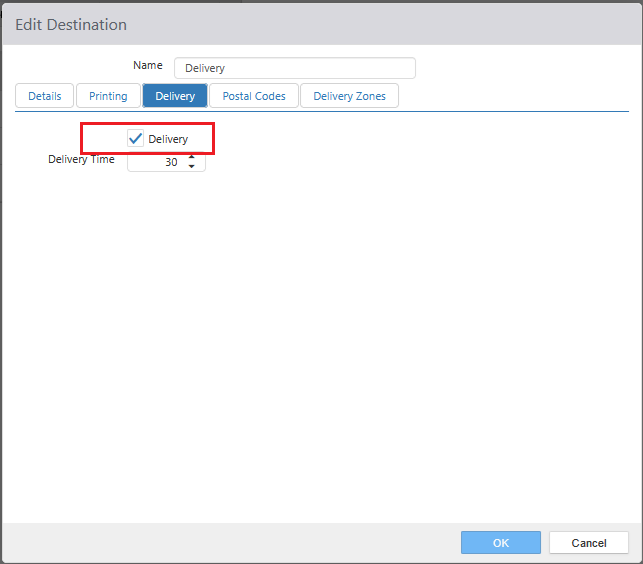
Verify the Delivery Destination is set up properly
-
Navigate to Settings Editor > Destinations
-
Click on Delivery Tab
-
Make sure Delivery is checked
-
-
-
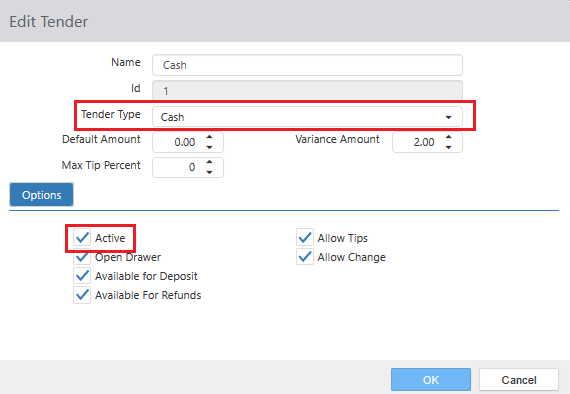
Verify the Cash Tender is set up properly
-
Navigate to Settings Editor >Tenders
-
Select the Cash tender
-
Verify Tender Type is set to Cash
-
Verify the Active box is checked
-
Click Save and Publish if changes are made
-
-
Verify the Delivery Employee is set up correctly
-
Navigate to Admin Portal > Staff >Jobs
-
A Delivery Driver Job needs to be created
-
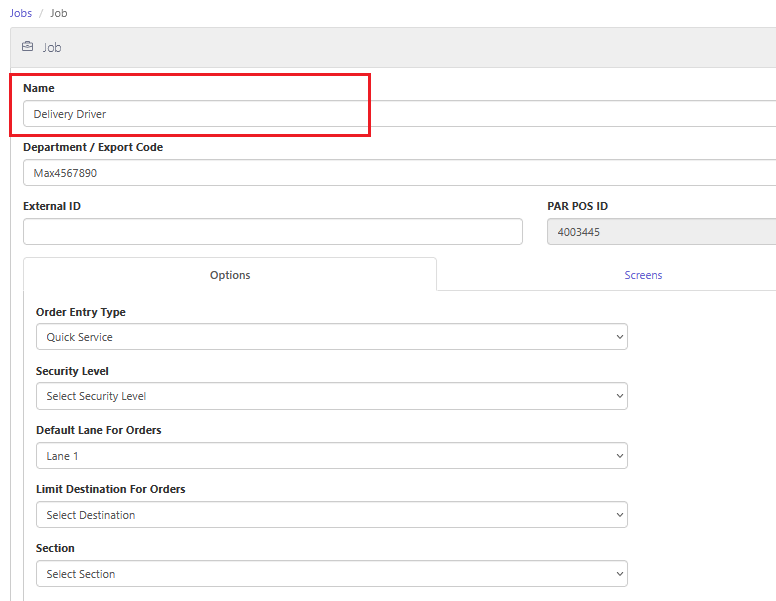
Please enter Delivery Driver in the Name field
-
Order Entry Type should be automatically populated to your store type
-
Quick Service
-
Table Service
-
-
Security Level needs to be set to the desired security level for the Delivery Driver
-
The Login Section > set to the way the employee with the Delivery Driver Job can log into the Register. If you do not want them to be able to log into the register, do not check any options in the Login Section.
-
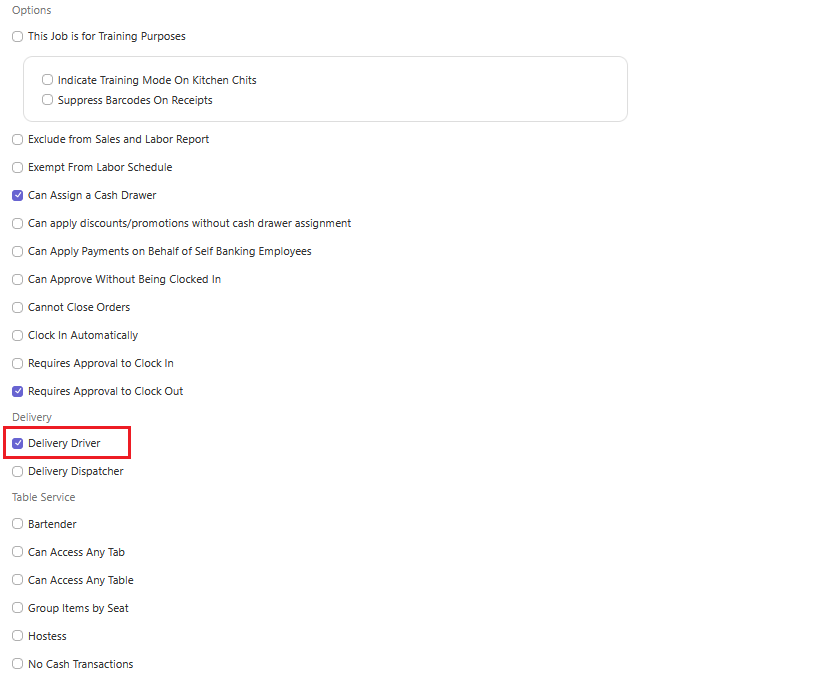
The Options Section > allows the Delivery Driver to perform certain actions on the Register while logged in. These are optional and depend on the Login section being set up to allow the employee to log in to the register.
-
The Delivery Section > Delivery Driver must be checked
-
The rest of the page is optional
-
Click Save if any changes are made
-
Workflow
-
Verify the employee with the Delivery Driver Job is checked in on the Deliverect terminal.
-
Ring in the order and assign the Delivery destination.
-
On the Deliverect terminal, the Delivery Driver checks out.
-
The system automatically changes the order to In Transit/Out for Delivery.
-
The Delivery Driver is automatically assigned as the order owner.
-
The Delivery Driver delivers the order and then returns to the store.
-
On the Deliverect terminal, the Delivery Driver checks in and updates order status
- Completed/Delivered – the cash tender closes the order
- Cash is the only tender that currently works with Deliverect. Card Collection on the road is not included in this release.
- Any other status – a log only, no payment, order is not closed.
- Completed/Delivered – the cash tender closes the order
Payments & Refunds
Current Day Enhanced Refunds 2.0
Reference: BRNK-62660
A more flexible refund experience: you can now configure whether cashiers can refund individual items, an entire order, both, or neither, to match your restaurant's refund policy.
How It Works
-
Refund Item lets a cashier refund one or more specific items from a closed order.
-
Refund Order refunds the entire transaction.
-
Settings Editor controls which of these workflows, if any, are available at each location.
-
Refunds stay linked to the original transaction and return to the original payment method, preserving your existing audit trail and reporting.
-
This isn't a redesign of the refund engine, refund calculation rules, or external payment provider integrations, just a more flexible way to trigger the refund workflows you already use.
Getting Started
-
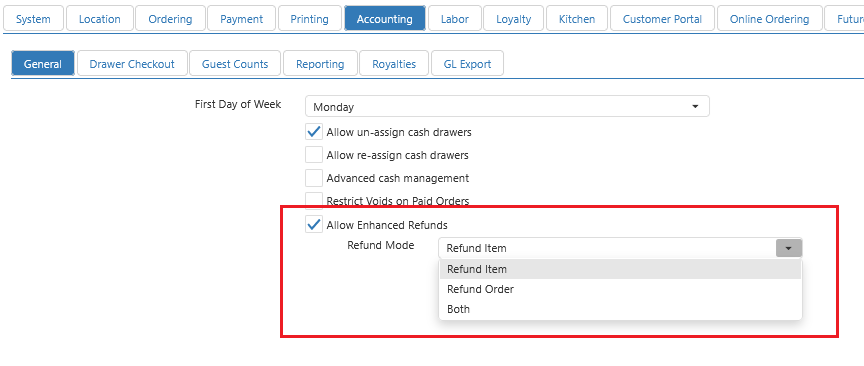
Navigate to Settings Editor >Options>Accounting
-
Verify Allow Enhanced Refunds is checked
-
Select the Refund Mode from the drop-down
-
Refund Item = allows a cashier to refund one or more items from the closed order
-
Refund Order = allows the cashier to refund the entire order
-
Both = allows the cashier to refund items as well as the entire order
-
-
Save/Publish
-
Confirm security levels allow the intended roles to use Enhanced Refunds, and train cashiers on the workflow you've chosen.
-
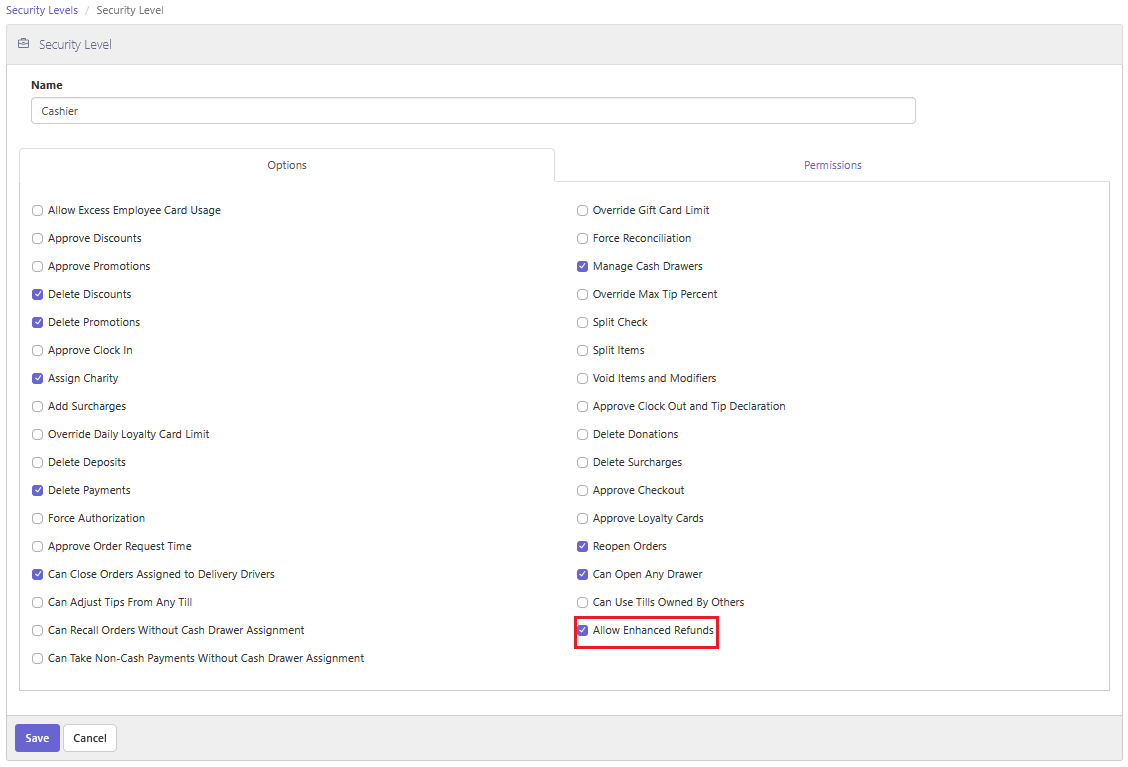
Navigate to Admin Portal >Staff>Security Levels
-
Select a Security Level
-
Click on Allow Enhanced Refunds to enable
-
Click Save
-
Workflow
Important Notes:
- When refunding a combo meal or an item with modifiers, the entire combo or item is always refunded, not just a single component.
- For example, if a customer ordered a burger combo and only wants to return the drink, the full combo will be refunded.
- If the Recall Order screen shows individual components and only one is selected, the system will still automatically refund the entire combo or item.
- Any change to the Allow Enhanced Refunds option in Settings Editor does require the registers to restart when published
- Once a refund has been started, and the system creates the linked refund transaction, no items can be added, removed, or changed. This applies to both Refund Item and Refund Order flows.
- If a cashier selects the wrong item by mistake, they can cancel the refund and start over; they cannot modify it after it has been created.
- Multiple refunds on the same original order are allowed; however, the combined total of all refunds can never exceed the amount of the original order.
-
Make sure there is at least one order that has been paid and closed
-
Click Recall Order
-
Select the order you want to refund
-
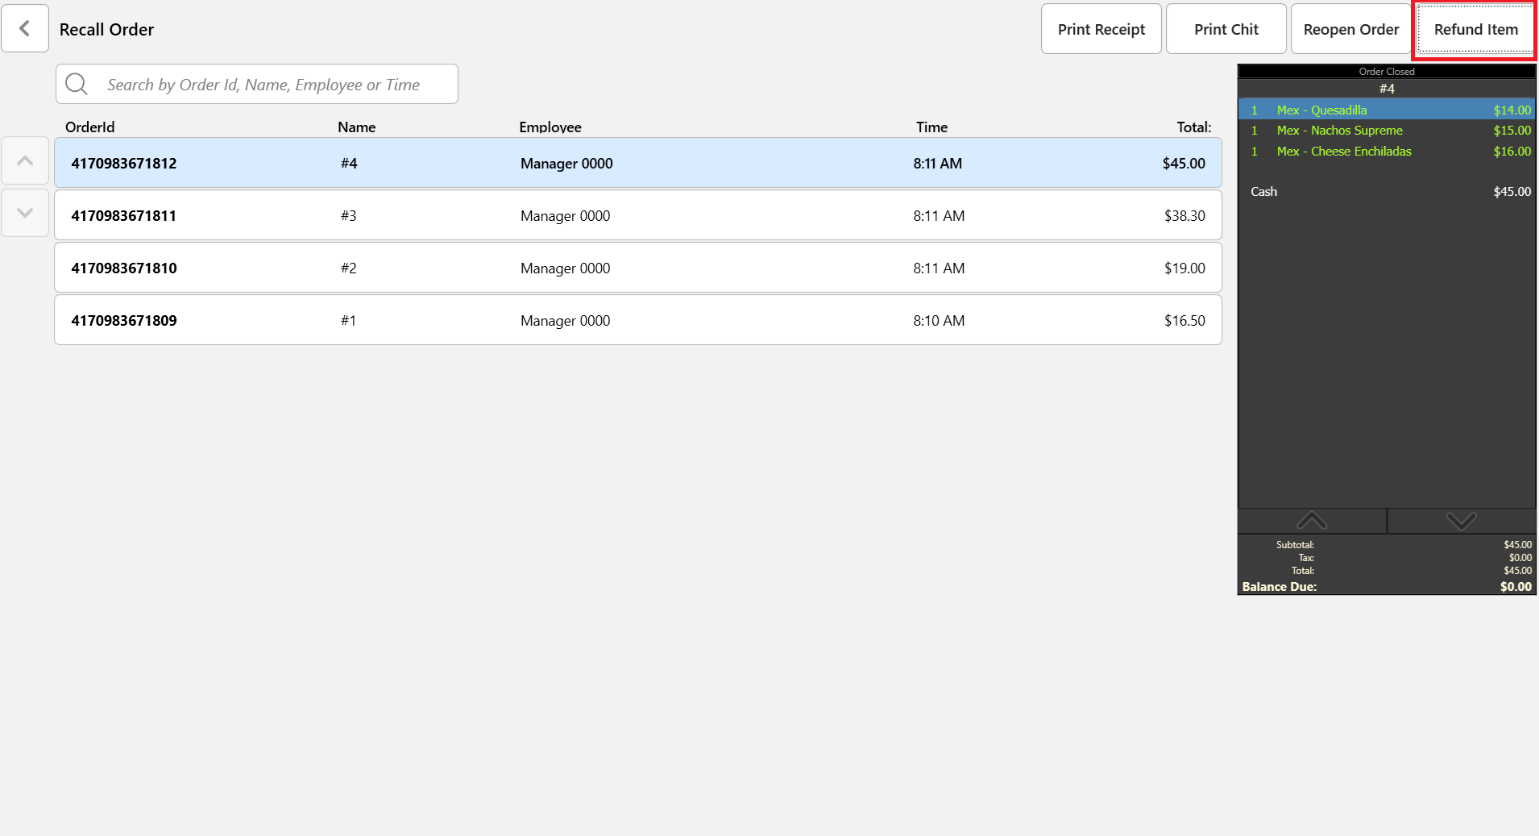
Depending on how Allow Enhanced Refunds are set up (See Getting Started section above), Refund Item, Refund Order, or both will show on the screen for selection.
-
Note: If there is a discount or promotion on an order, the Refund Item button will be disabled. If you want to allow Refunds on orders with a discount and/or promotion, it is recommended that Allow Enhanced Refunds be set to Refund Order or Both.
- If Allow Enhanced Refunds is set to Refund Item, select the item(s) to be refunded
-
Click Refund Item
-
Select Refund Reason
-
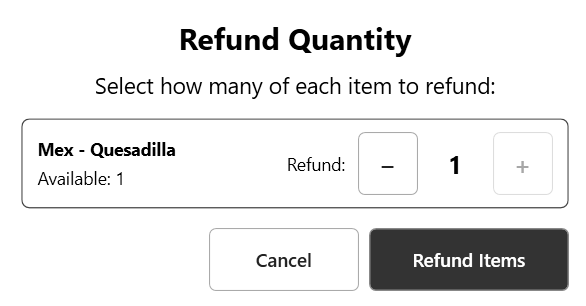
Select the Quantity of the item to be refunded
-
Click Refund Items
-
The Order Screen will open in Refund Mode
-
Close Order
-
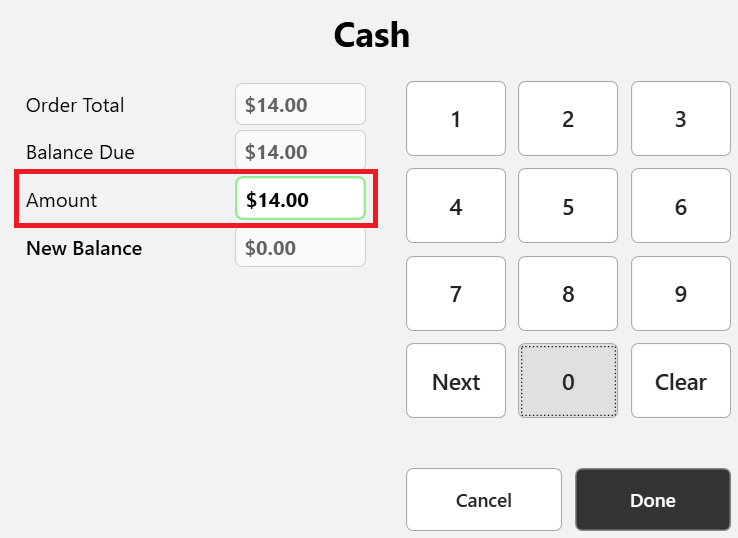
In the Amount field, enter the total dollar amount to be refunded
-
Note: When Allow Enhanced Refunds is set to either Refund Item or Both, and you want to choose more than one item on the order, Allow Multi Selection Mode must be enabled. To enable this option:
-
Navigate to Admin Portal > Settings Editor > Layout
-
Locate your Order List panel
-
Click on the Order List panel
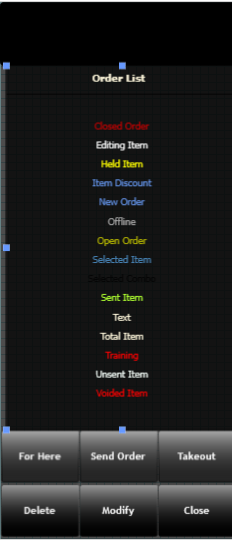
- Make Sure Allow Multi Selection Mode is checked
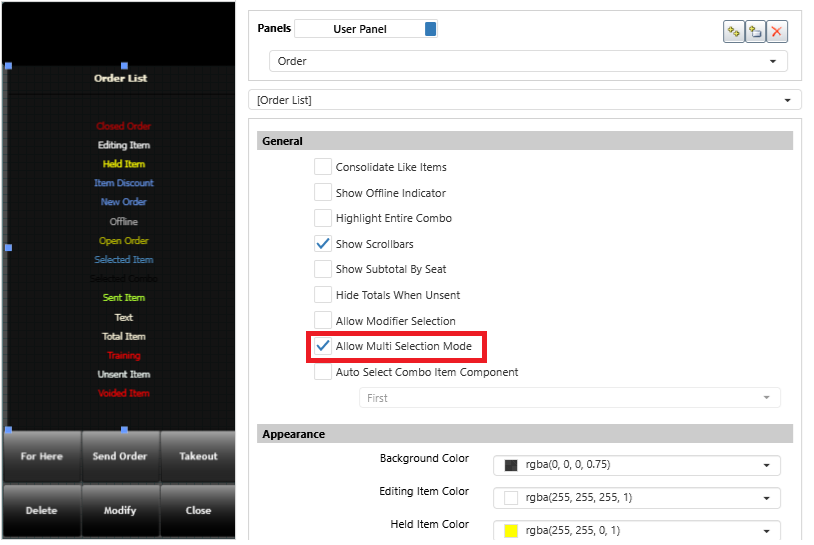
- Save and Publish if any changes are made
-
Click Done
-
Click OK on the Refund popup message
- If the message does not have an OK button, press anywhere on the message to close the popup message.
-
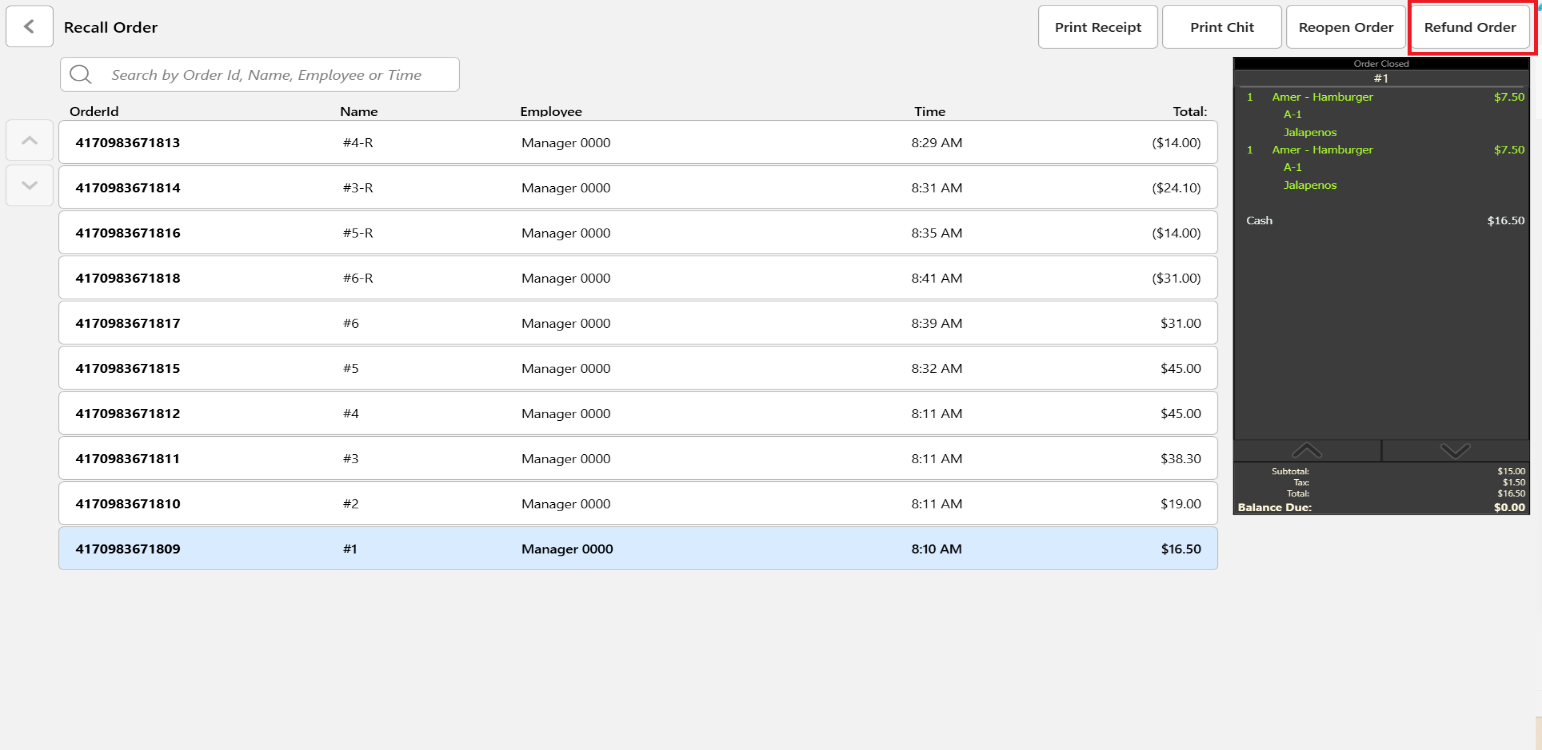
If Allow Enhanced Refunds is set to Refund Order:
-
Click Recall Order
-
Select the order
-
Click Refund Order
-
Select Refund Reason
-
The Order screen will open with all items from the order
-
Close Order
-
In the Amount Field, enter the total amount to be refunded
-
Click Done
-
Click OK on the Refund popup message
- If the message does not have an OK button, press anywhere on the message to close the popup message.
-
-
If Allow Enhanced Refunds is set to Both:
-
Click Recall Order
-
Select order
-
Click Refund Order or Refund Item
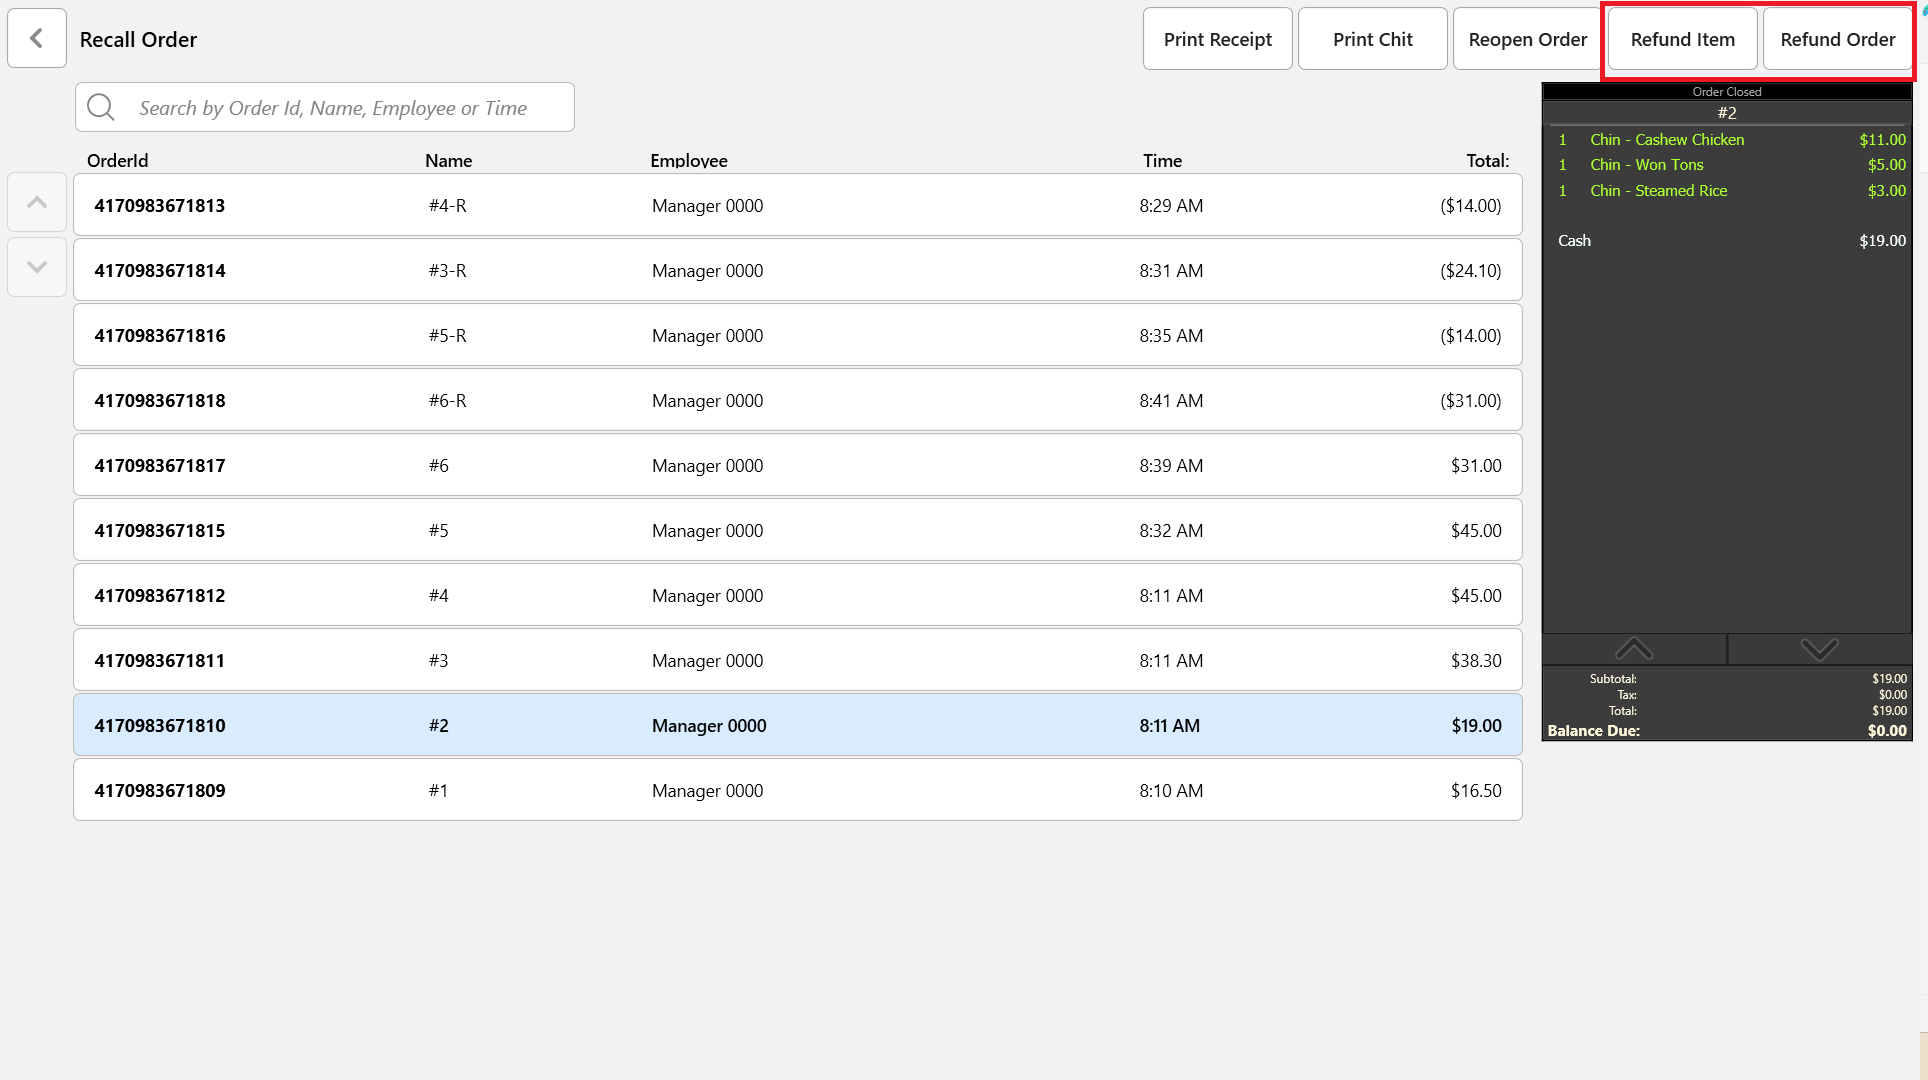
- Follow instructions above depending on button pressed
-
Prior-Day Refunds for Aurus In-Store API Orders
Reference: BRNK-69725
Managers will be able to issue a full refund for an actual prior-day Aurus online API order directly from the register, selecting the historical order rather than copying it into a placeholder record, and without asking the guest to re-present their card.
How It Works
-
To refund a Prior-Day (Historical) order, the order must have been submitted via the In-Store API with Provider Type = Aurus + 4 Payment Tokens. See External Tender Support
-
A new Historical Refund button, once added to your register layout, opens an Order Refund Lookup screen where staff can look up a closed order by its order ID.
-
The register retrieves the real order details from PAR's historical order records, so staff can review the original items before refunding.
-
Once confirmed, PAR creates a new refund order on the current business date that's linked back to the original prior-day order and processes the refund through Aurus using the payment reference already on file, with no card re-swipe required.
-
This replaces the previous manual workaround of copying an order into a placeholder record to process a prior-day refund, which didn't link back to the original order and could corrupt reporting.
Getting Started
-
Place the new Historical Refund button behavior on a Panel
-
Navigate to Settings Editor > Layout
-
Choose the panel to place the new button
-
Add a New Button
-
Click the Behavior drop-down
-
Choose Historical Refund
-
Make any other changes to how the button looks
-
Save and Publish
-
-
Create a new item (to be used as the Historical Refund reference)
-
Navigate to Settings Editor > Items
-
Add New Item
-
Name = Historical Refund
-
Description = Historical Refund
-
Ask Price = True
-
Revenue Center = Please assign (create new one if needed)
-
Save and Publish
-
WorkFlow
-
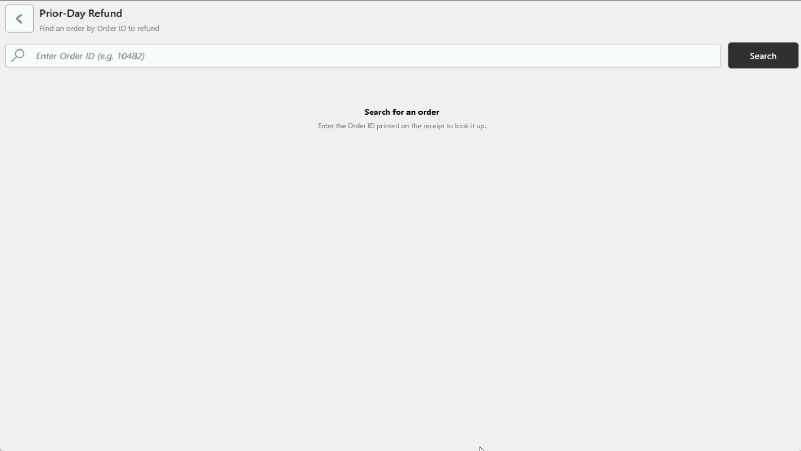
On register, click on Historical Refund button
- Prior-Day Refund will show
-
Enter Order ID in search bar
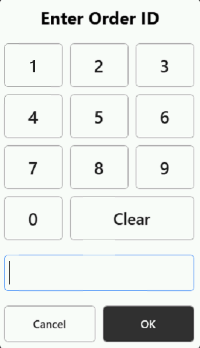
-
Input the 13-digit Order ID from a customer receipt or from Admin Portal and click OK
-
Then click on Search
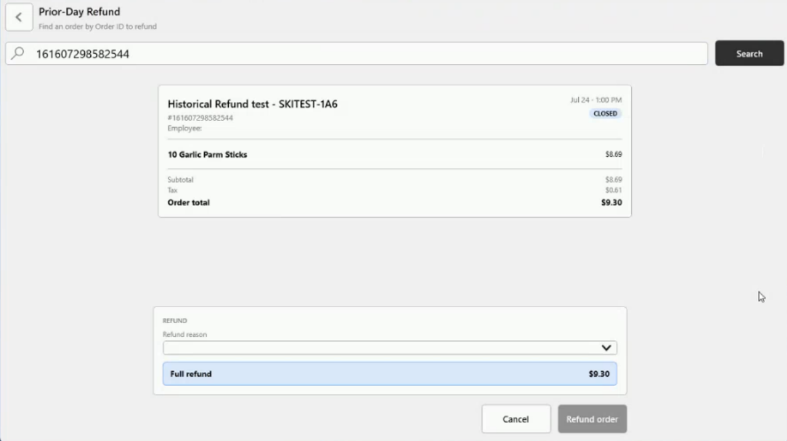
-
Click on the Refund Reason drop-down and select the reason
-
Click on Refund Order
- Refunds the entire original transaction back to the original payment type
-
Refund Complete message will appear

- Printed Transaction and POS Receipts
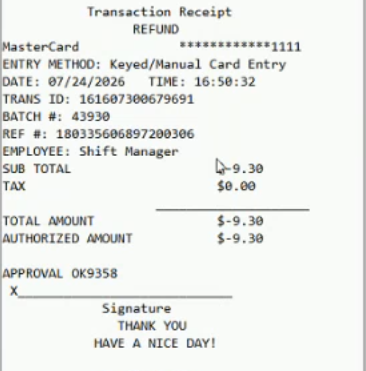
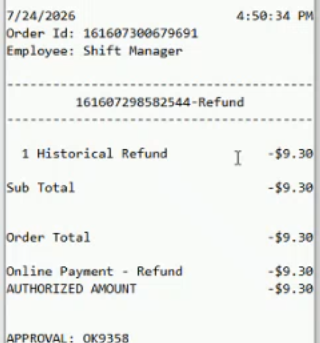
Note: The Open Item used will reflect 100% of the Order Total refunded amount
Out of Scope:
- Multiple Payments, Same-day Refund, Search Filters
- Original Item Id’s on Refund Order, Partial or Item Refund and Tip Refund
Tip Adjustments for Aurus In-Store API Orders
Reference: BRNK-69726
For online orders paid via the Aurus payment gateway, staff can adjust tips directly from the POS, without asking the guest to re-present their card.
How It Works
-
To Adjust Tips on an online order, the order must have been submitted via InStore API with Provider Type = Aurus + 4 Payment Tokens. See External Tender Support
-
Adjust Tips now work on these orders the same way they do for other tenders, if the tender is configured to allow it.
Getting Started
-
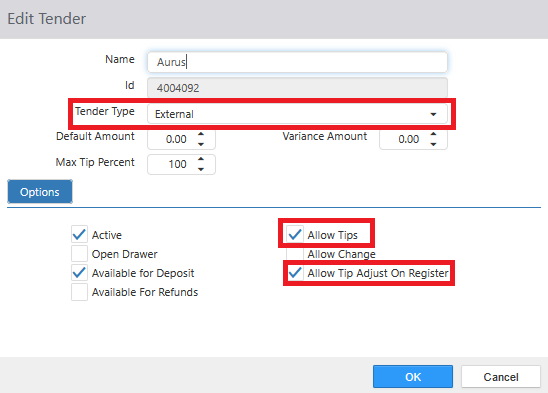
Navigate to Admin Portal > Settings Editor > Tenders
-
Select the Tender used for Aurus orders
-
Tender Type should be set to External
-
Allow Tips should be checked
-
Allow Tip Adjust on Register should be checked
WorkFlow
-
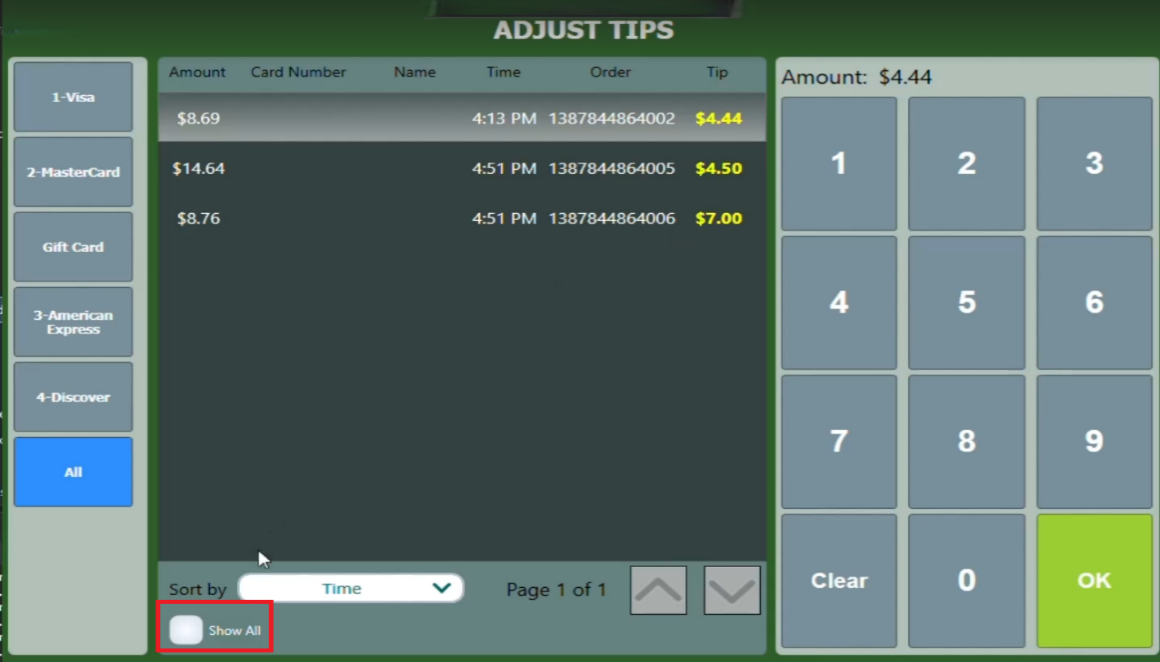
Click Adjust Tip
-
Click on the desired order
- You may need to check Show All on the bottom left-hand side of the Adjust Tips screen
-
Enter the new tip amount
-
Press OK
-
Tip amount updated
-
Click Done
-
Close the Order
-
Tip amount is added to the payment
Out of Scope:
- Adding a tip via External API will NOT contact the payment device
- Filtering by External Tender
Surcharge Adjustments (Adjust Payments) for Aurus In-Store API Orders
Reference: BRNK-69726
In the event a carryout order transitions to delivery or vice versa, there is a corresponding delivery fee surcharge that will either need be voided or added to the order subtotal.
How It Works
-
To Adjust Payments on an Aurus online order, the order must have been submitted via the In-Store API with Provider Type = Aurus + 4 Payment Tokens. See External Tender Support
-
Adjust Payments now work on external tenders the same way they do for other tenders
-
Previously, when using an external tender, the resulting addition or removal of the surcharge was cosmetic; in this release, this adjustment will now automatically reconcile payment adjustments with Aurus
Getting Started
-
Place the Adjust Payment button behavior on a Panel
-
Navigate to Settings Editor > Layout
-
Choose the panel to place the new button
-
Add a New Button
-
Click the Behavior drop-down
-
Choose Adjust Payment
-
Make any other changes to how the button looks
-
Save and Publish
-
WorkFlow
-
On the register, for a PAO change destination on an order, so it will remove/add delivery fee (surcharge)
-
The balance will show a +/- depending on above
-
Select payment on Order List
-
Click Adjust Payment
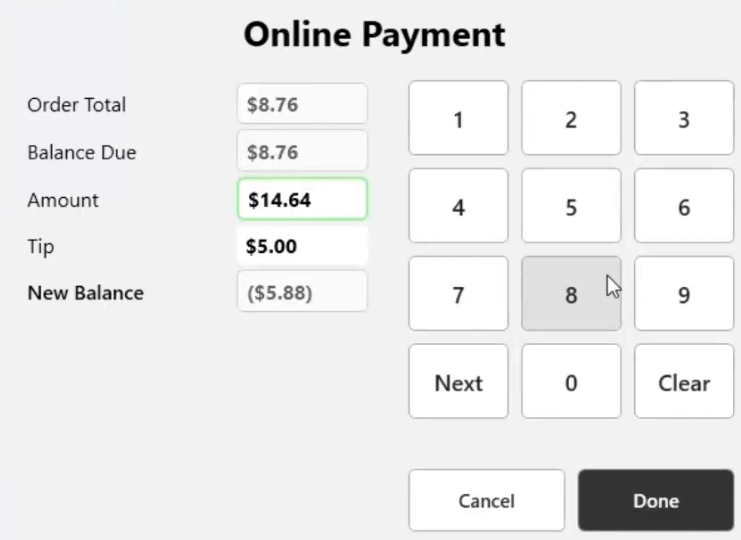
-
In the Amount field, enter the updated amount
-
Click Done
-
Close the Order
-
Updated payment amount now reflects on Order
Orbit – In-Store API
External Tender Support
Reference: BRNK-69726
Prerequisite: The Aurus Online Orders features included in this release require the Provider Type and Payment Tokens to be configured in the In-Store API. They are required for the Prior-Day Refund, Adjust Tips, Adjust Payment, and Refresh of payment tokens workflows to operate correctly. Missing or invalid token configuration will prevent these features from functioning properly.
How It Works
-
With the improved-on contract, many operations previously unsupported for external tenders are now unlocked.
-
New endpoint to support token refresh for longer running preauthorization’s
Getting Started
Updated Order Injection contract
The existing “Payments” node will require the “ProviderType” with a value of “Aurus” and the Payment tokens collected during authorization will be included in the “AdditionalData” node. (Note: this “AdditionalData” is in the payment itself, not to be confused with the same member at the order’s scope – for any questions or clarification please contact PAR)
- "Payments": [
{
"Amount": 18.13,
"TenderId": 649475174,
"Id": 10,
"ProviderType": "Aurus", // ← referenced new field
"AdditionalData": {
"OrigAurusPayTicketNum": "999999999999999998", // ← payment token 1
"OrigTransactionIdentifier": "888888888888888887", // ← payment token 2
"CardIdentifier": "7777777777777777", // ← payment token 3
"ProcessorToken": "6666666666666666" // ← payment token 4
}
}
New Endpoint – Support the ability to refresh existing payment tokens
/register/v1/Order/refreshPaymentTokens
-
This new route extends the current In-Store API
-
Example payload:
{
"OrderId": 2143731845121,
"PaymentId": 10,
"TicketNumber": "999999999999999999",
"TransactionId": "888888888888888888",
"CardIdentifier": "7777777777777777",
"ProcessorToken": "6666666666666666"
} -
To control who can refresh payment tokens via the In-Store API, go to the Orbit Credential Portal, open the relevant API user, and grant or deny the refreshPaymentTokens permission under Order Permissions.
Bug Fixes
| # | What Was Fixed | Ticket |
|---|---|---|
| 1 | Improved system stability under heavy load — the POS now handles memory more efficiently when many requests arrive at the same time, reducing performance slowdowns. | AS1-3738 |
| 2 | Fixed a chit printing issue where, after updating a customer's information, only the new name was printed correctly — the old address and phone number were still appearing on the chit. | BRNK-69968 |
| 3 | Fixed incorrect pickup ready times for ASAP delivery orders injected through Orbit (digital ordering). Drivers were sometimes being dispatched too early when the digital system did not include a pickup ready time. | BRNK-70150 |
| 4 | Fixed issue with exposing order delivery address and notes | BRNK-70394 |
| 5 | Corrected the QR code printed on receipts for Generic Loyalty — the store ID was missing and is now included correctly. | BRNK-70480 |
| 6 | Fixed an application error that occurred when searching Changesets by date in Changeset Publisher. | BRNK-70617 |
| 7 | Fixed a Changeset Publisher issue where keyword search was no longer searching within Changeset details — only the title was being searched. | BRNK-70618 |
| 8 | Fixed Changeset Publisher displaying an incorrect Original Location for changesets. | BRNK-70619 |
| 9 | Fixed Changeset Publisher timing out when searching by both User and Date at the same time. | BRNK-70620 |
| 10 | Added a status indicator in Changeset Publisher so staff can see at a glance whether a Changeset Package retry succeeded or failed. | BRNK-70621 |
| 11 | Fixed an issue where the Changeset Service would stop responding (hang) under high load. | BRNK-70622 |
| 12 | Menu updates, price changes, and configuration changes that stop syncing to one or more locations can now be recovered by the PAR support team without a full service restart, reducing the time locations are out of sync. | BRNK-70623 |
| 13 | The Parent Location Group field on the Location Group Creation screen in Admin Portal is now a searchable autocomplete — type part of the name to filter the list instantly, instead of scrolling through a long dropdown. | BRNK-70624 |
| 14 | Fixed issue with the CalculateOrder and AddOrder LaneID not matching request value. | BRNK-70779 |
| 13 | Fixed issue with generic loyalt to support loyalty code look up at the beginning of the order. | BRNK-71992 |
| 13 | Fixed issue with Verifone Integration: Error “Giftcard Cashout Not Configured” when trying to cash out a Gift Card | BRNK-71528 |
