PAR Ordering and Simphony Gen2 Configuration
Prerequisites
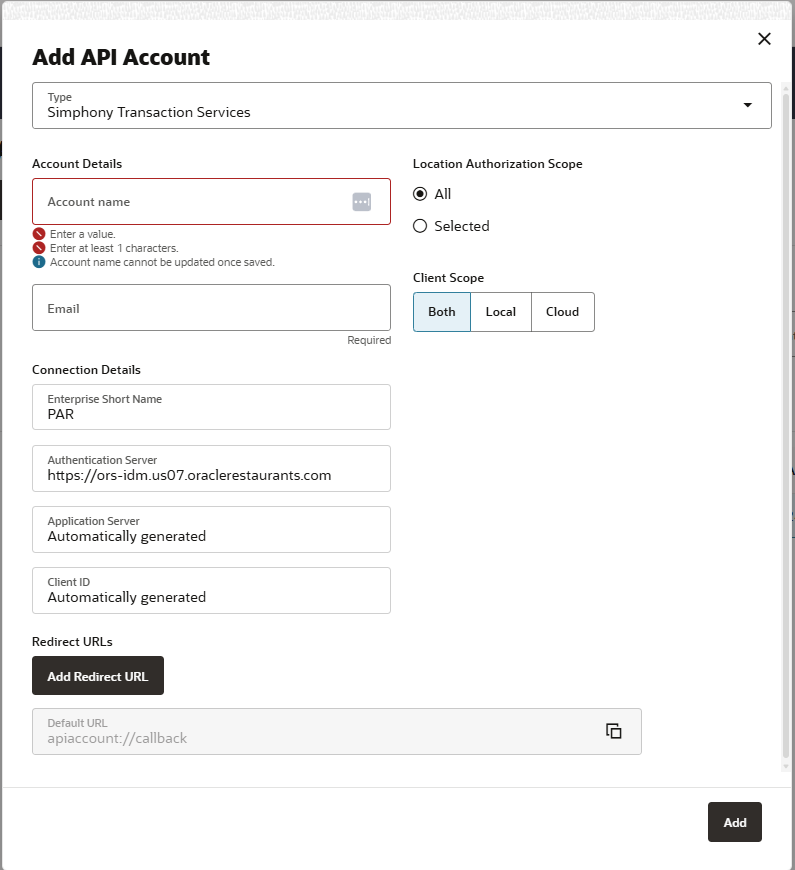
Create the Simphony Transaction Service (STS) API user in the Oracle Reporting and Analytics (R&A) site under Administration > System > API Accounts > Add API Account.
- Account name
- Email address
- Enterprise Short Name
- Authentication Server
- Client ID
- Account password
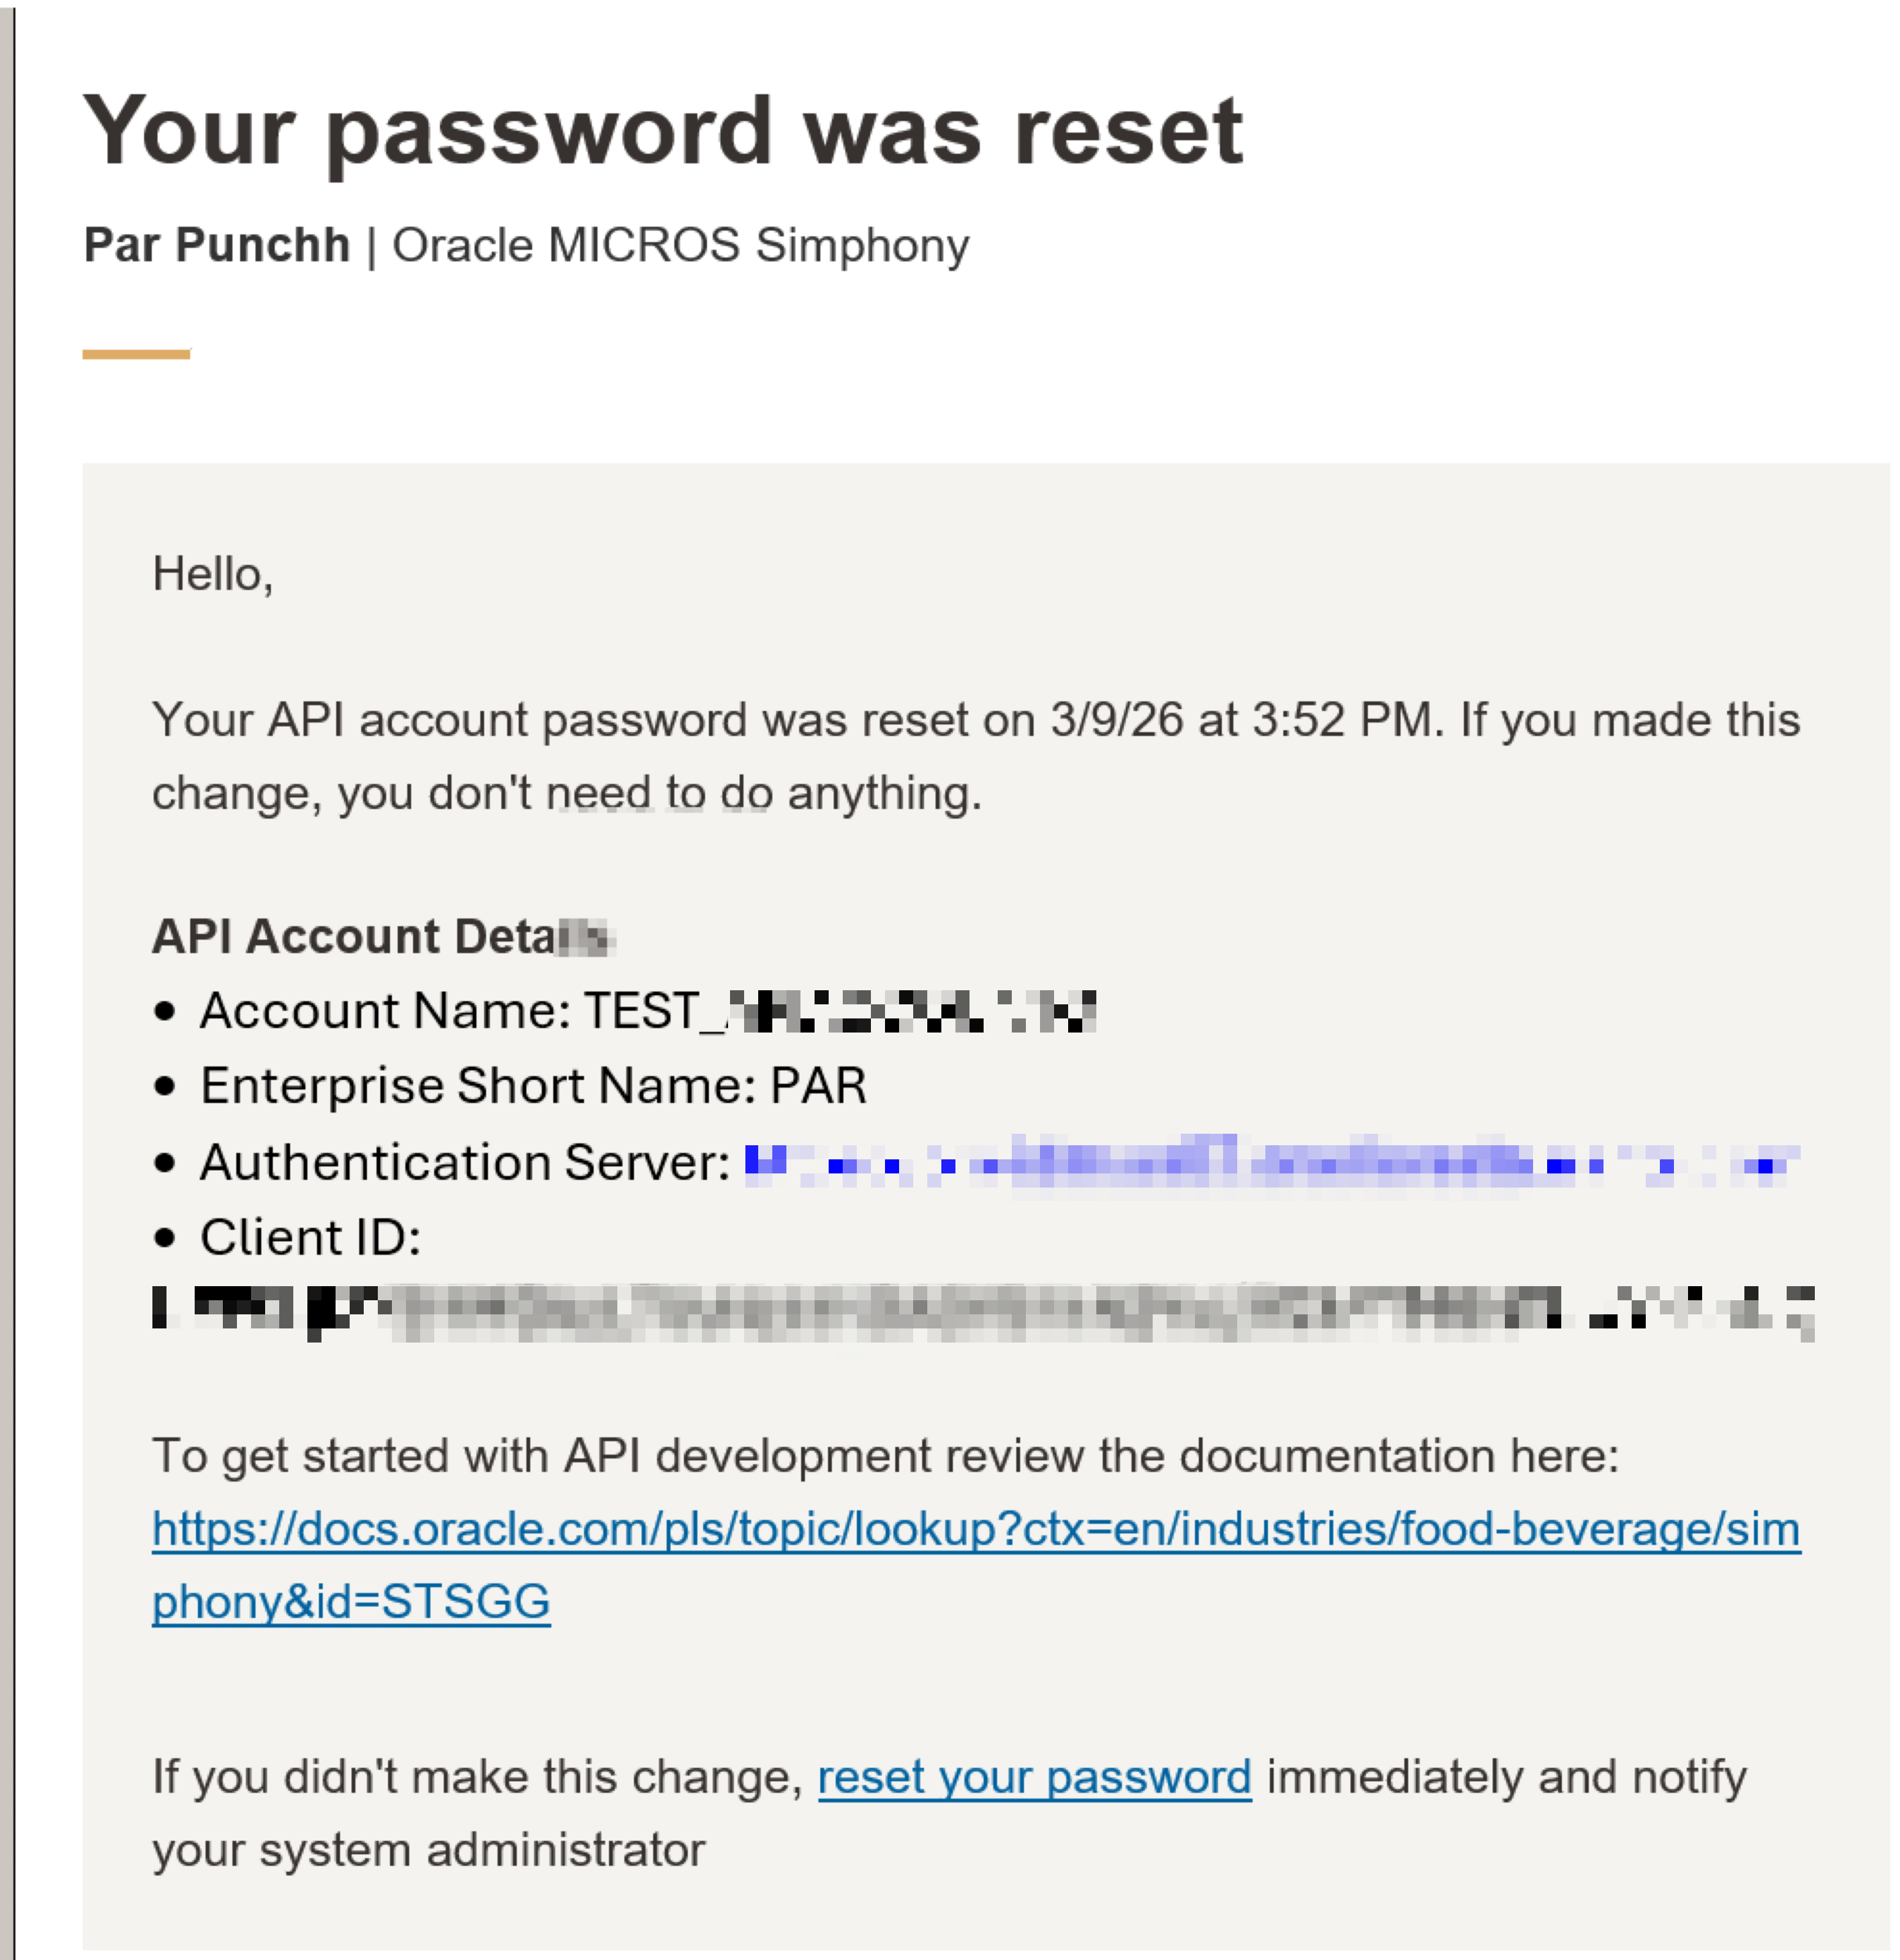
The password must be set via email after the user has been created.
Once the password is set, note the values of these fields in the password dialog box as you will need them for the PAR Ordering Management Center configuration fields.
Payment Type Configuration in Simphony (Tender Information)
Custom Payment Types
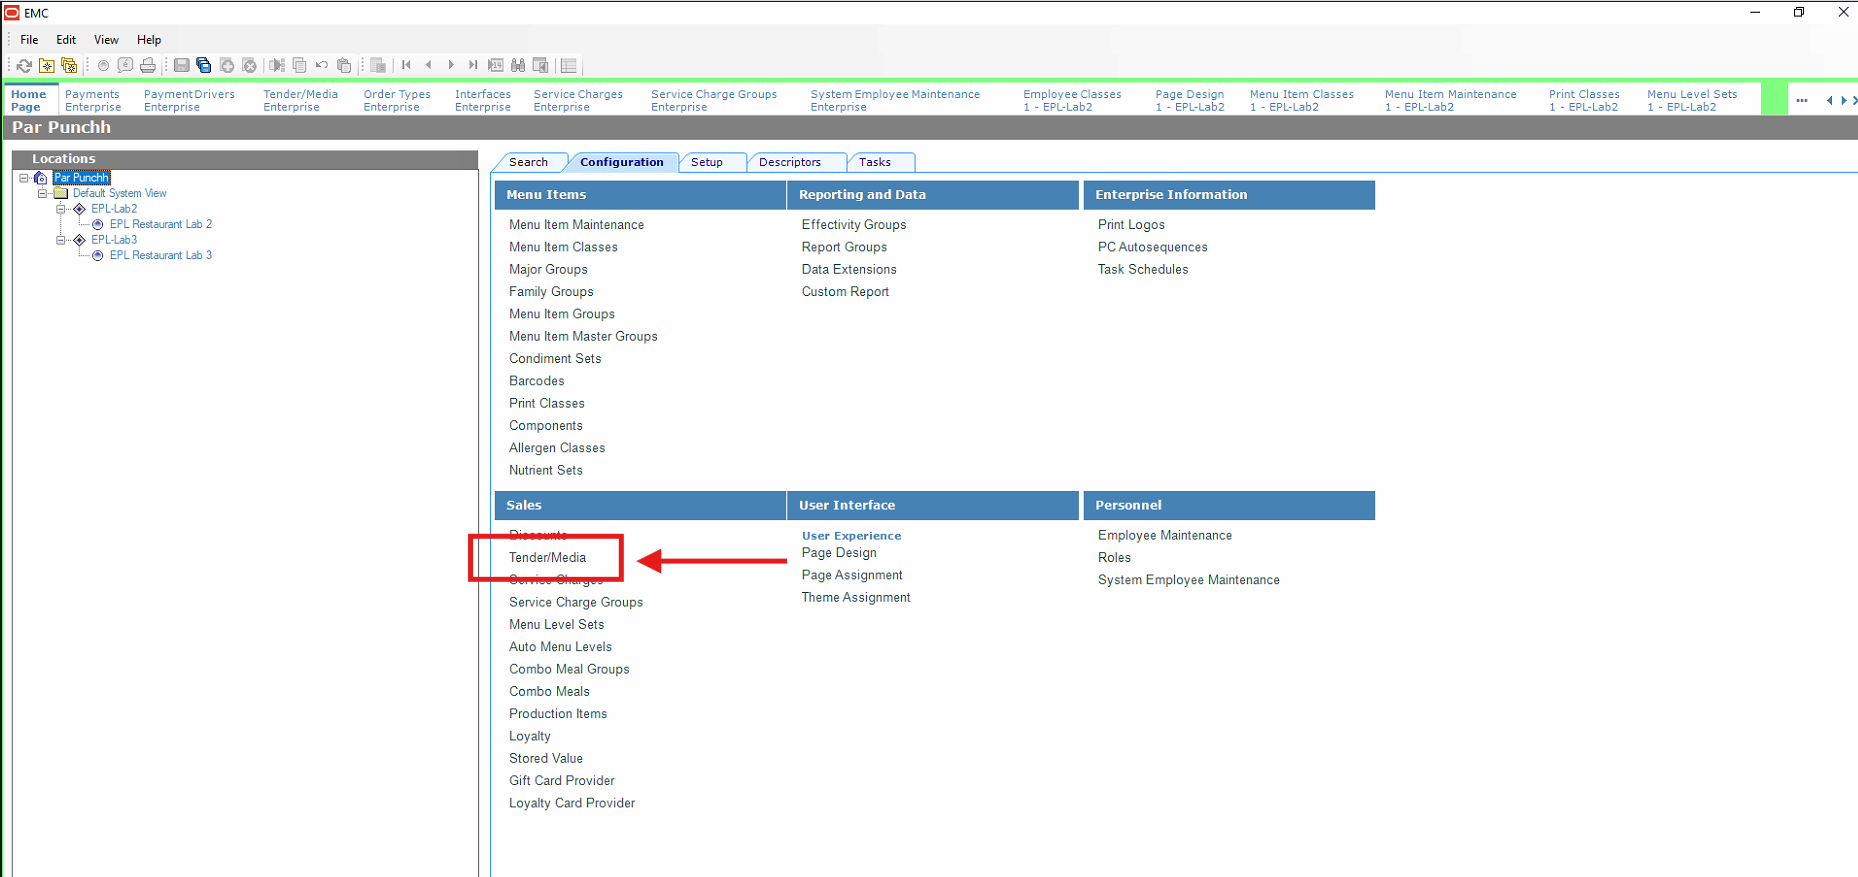
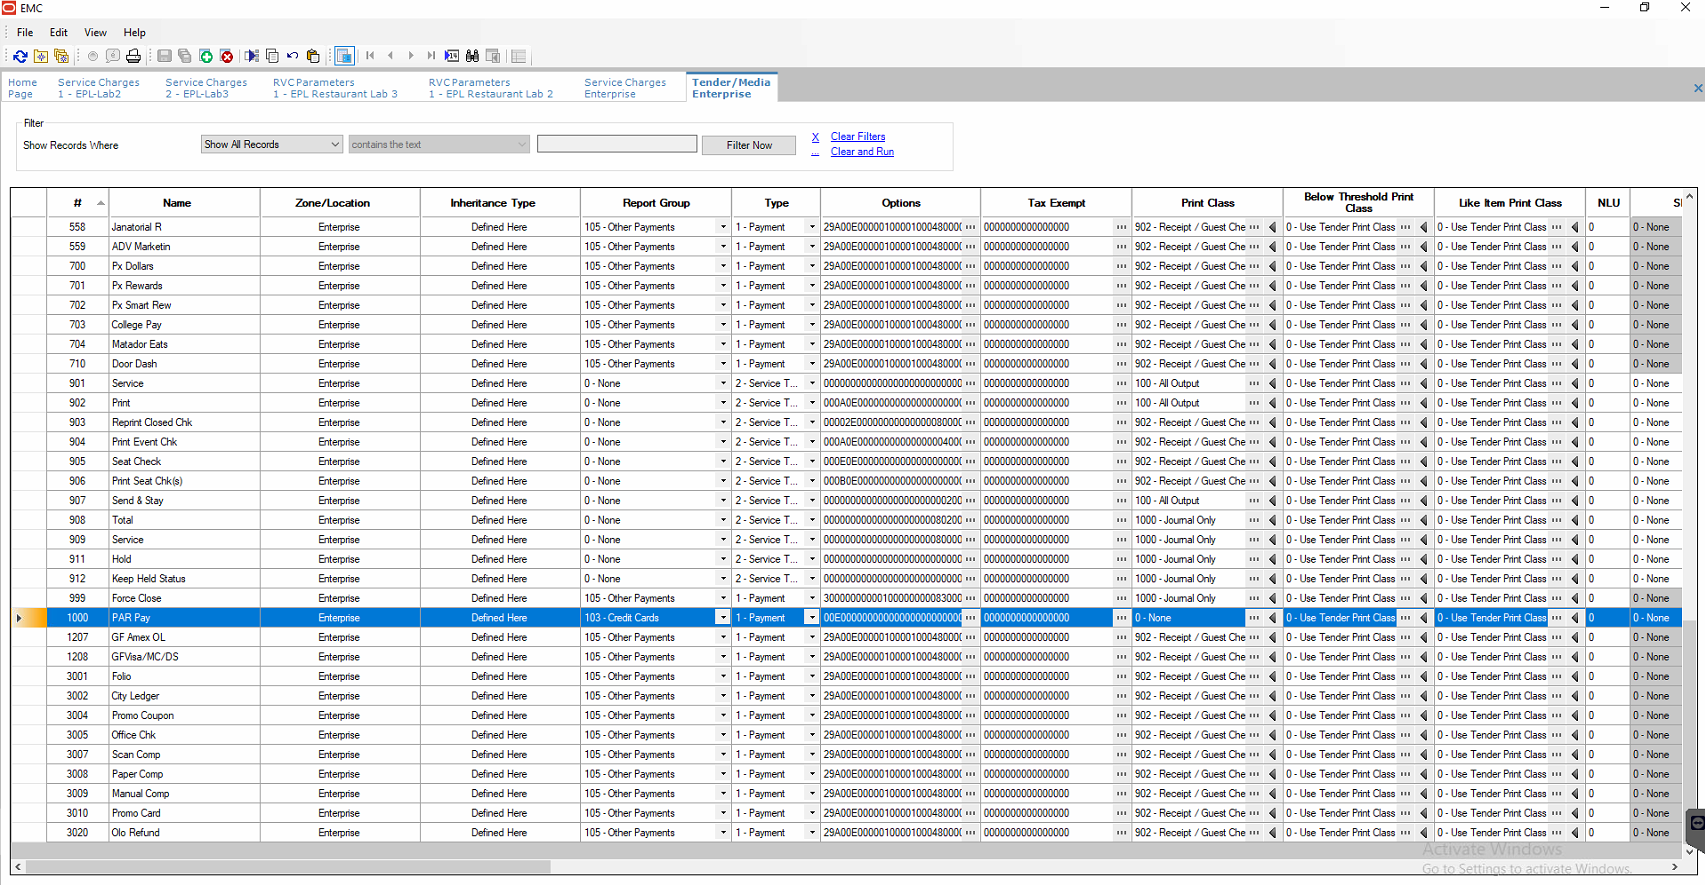
Custom payment types can be configured in Simphony’s EMC (Enterprise Management Console) by navigating to the Tender/Media section.
Steps
-
Open the Simphony EMC and select the appropriate level (Enterprise, Property, or Revenue Center).
-
Navigate to Tender/Media, click the Configuration tab, and then select Tender/Media.
-
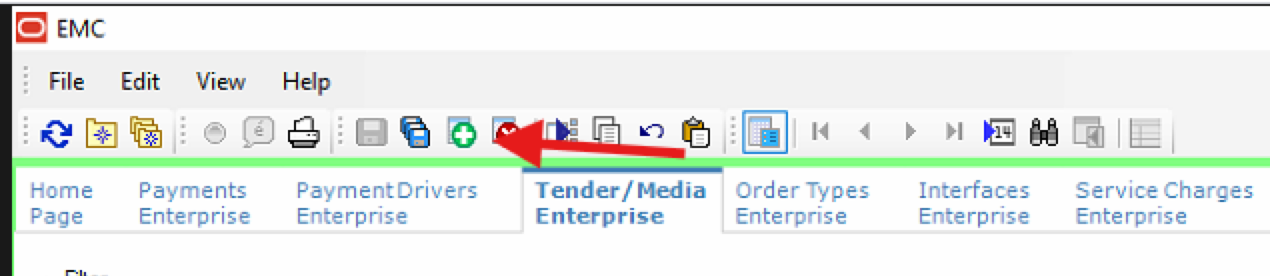
To insert new tender, click the Insert (plus) icon, enter a name for the new tender (e.g., “PAR Pay”), and then click OK.
-
Configure settings:
- Double-click the new tender record.
- General Tab
- Key Type to 1 - Payment.
- Report Group (e.g., 105 Other Payments)
- Select the appropriate Print Class for receipts (e.g., Receipt/Guest Check)
- Options Tab
- 8 - Print Customer Receipt
- 21 - Print Summary Totals
- 22 - Print Check Trailer
- 22 - Print Check on Demand
- Ops Behavior
- Amount Options
- 3 - Assume Paid in Full
- Security Options
- 68 - Mask Account Number
- 82 - Prompt for Reason
- Tender Options
- 85 - Not Allowed With Incomplete Meals (Meals with Placeholders)
- General Options
- 5 - Reference Entry Required
- 48 - Item is Shareable
- Tender Media Hold Types
- Hold Type -/-0 - Fire Order
- Amount Options
- Charge Tip Options
- 11 - Post Amount to Charged Receipts on Tip Reports
- 36 - On = Charge Tip Must Be Less Than Payment; Off = Any Amount
- Miscellaneous Options
- 18 - Enable HALO
This is used to enable tipping in the Tender with the tip assigned to the employee associated with the check.
Simphony assigns tip amount as a service charge for reporting purposes.
- Option 1 (ON = Open): Enable this so the API can send a variable dollar amount.
- Options → Charge Tip Options Tab: Select the following options to allow tip processing:
- 10 - Post Amount to Gross Receipts on Tip Reports. Adds the total sales amount of the check to the employee's taxable/tippable sales total on tip reports.
- 11 - Post Amount to Charged Receipts on Tip Reports: Ensures the tip is properly tracked against the tender's gross receipts.
-
Save settings.
Service Charge Setup To Enable Tips in Custom Tenders
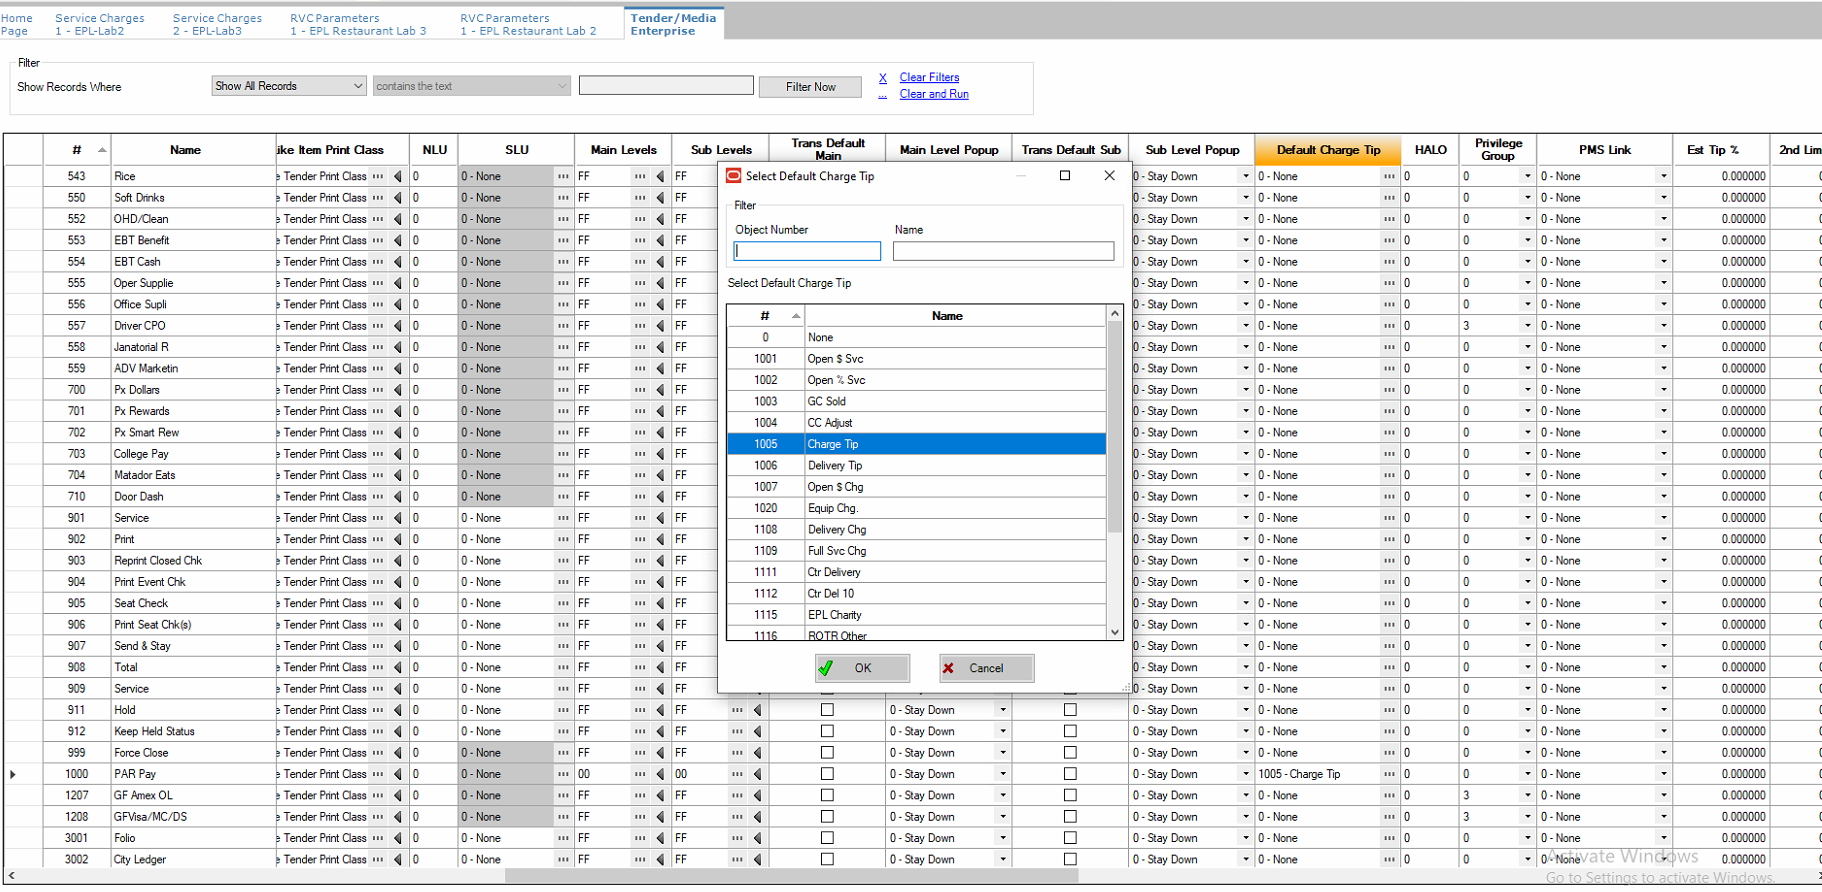
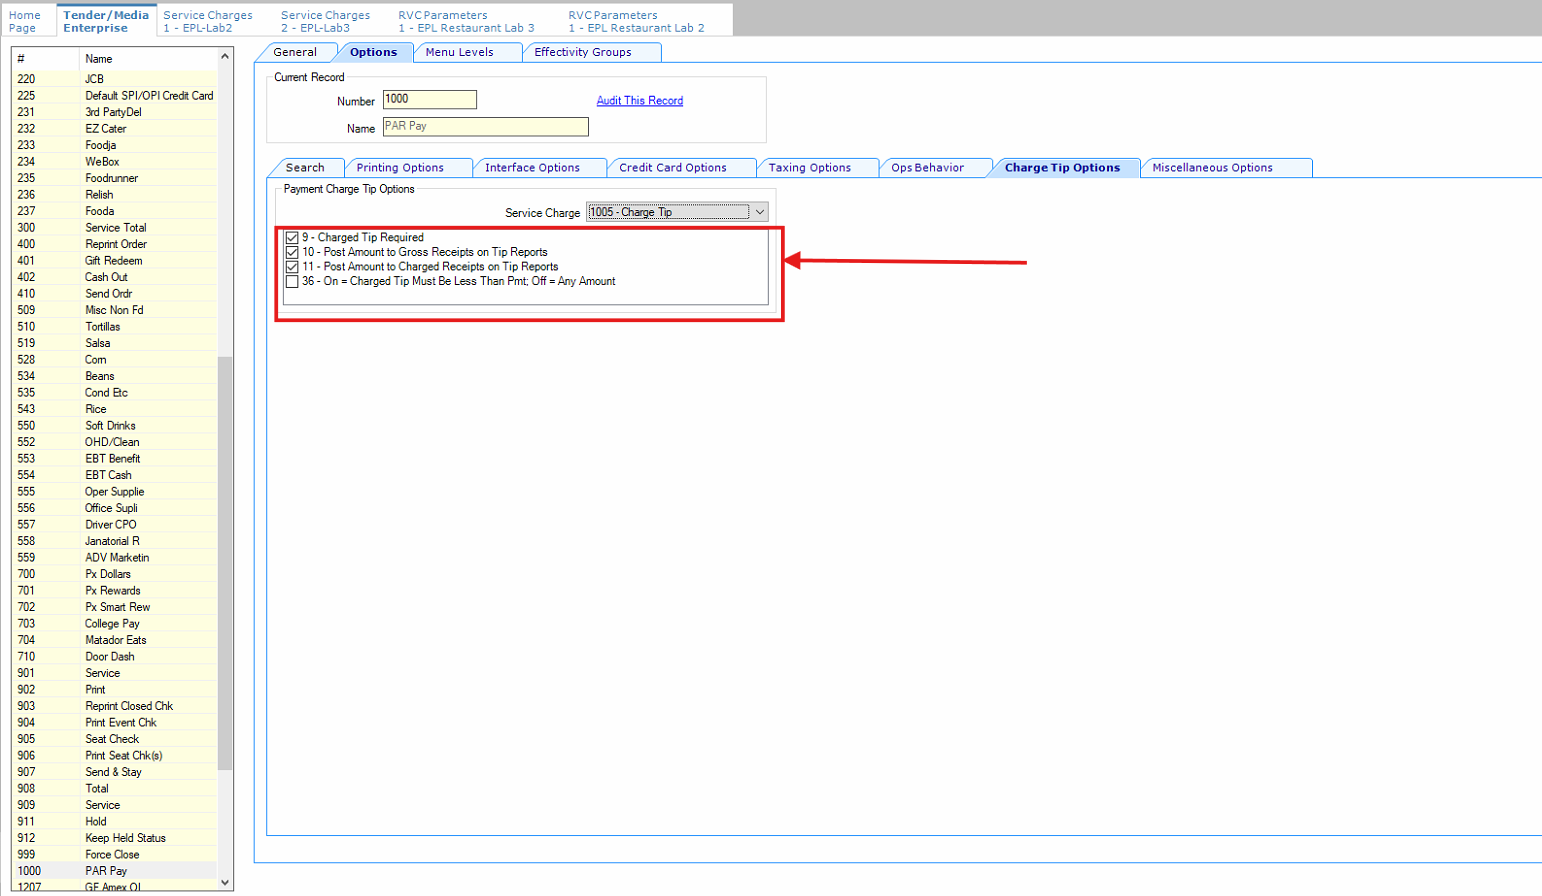
Our current integration supports tipping through Service Charge Setup.
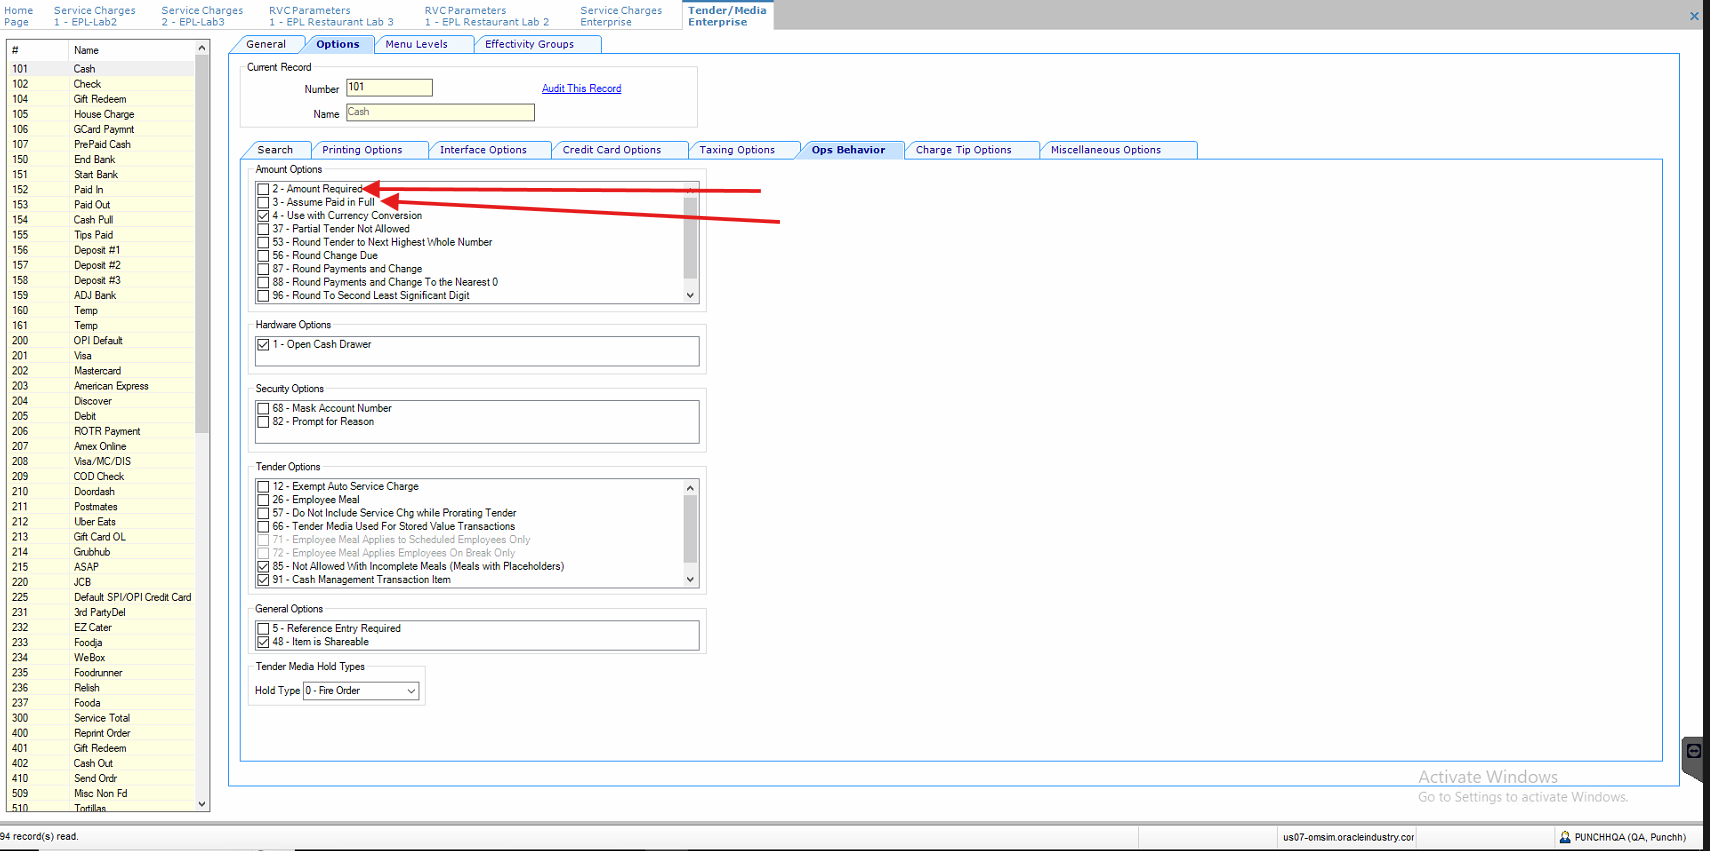
Configure Pay at Store Setup (Cash Payment)
- Deselect Option 2 (Amount Required): Allows the system to accept a blank or $0.00 entry.
- Deselect Option 3 (Assume Paid in Full): Prevents the system from automatically filling in the remaining balance and closing the check.
- Result: When both are OFF, the system records a $0.00 entry, keeping the check open for further activity.
Required Fields
- Simphony integration requires a tenderIdfor this custom payment type.
- tenderId is mapped from the incoming payload's payments[].tender_idfield.
Tender List Endpoint →
{{basePath}}/tenders/collection?OrgShortName={{orgShortName}}&LocRef={{locRef}}&RvcRef={{rvcRef}}

//Response Body
{
    "items": [
        {
            "tenderId": 101,
            "name": "Cash",
            "type": "payment"
        },
    ],
    "orgShortName": "opn",
    "locRef": "p400045",
    "rvcRef": 31
}
The tenderId is required in the submit check API.
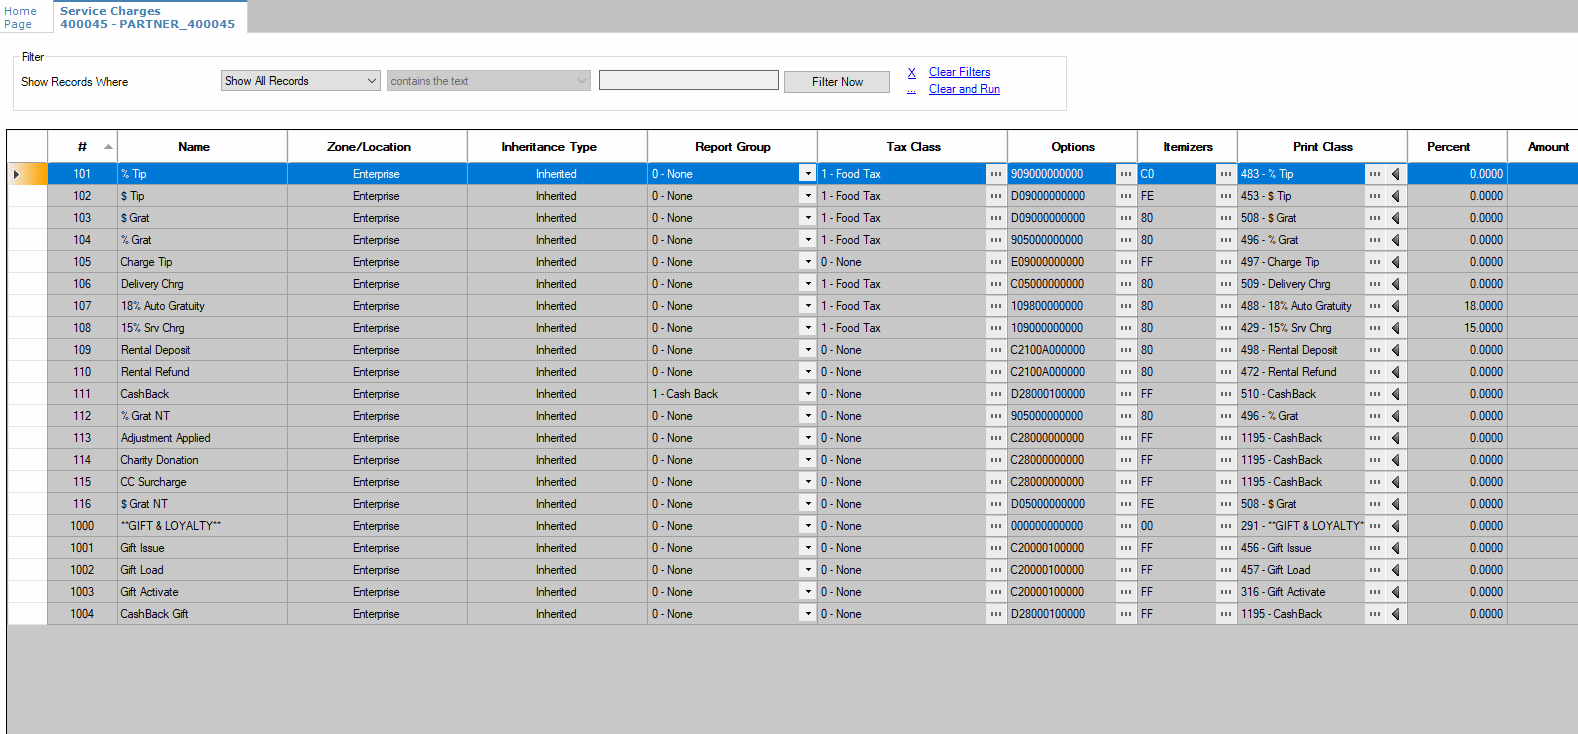
Service Charges Configuration
-
Go to Enterprise > Configuration > Service Charges.
-
Insert a new record and give it a descriptive name.
-
Set the Consumer Display Name. This is the name exposed through the STS Gen2 API and visible in responses.
-
Choose whether the charge is Open or Preset (Option 1):
- Open: The caller provides the amount or percentage at the time of the transaction.
- Preset: The value is fixed in EMC and applied automatically.
-
Choose whether the charge is an Amount or Percentage (Option 2), and enter the corresponding value.
-
Set a Tax Class if the fee should be taxable, or leave at 0 for non-taxable.
-
Click Save.
-
Note the Object Number from the table view. This is required for integration.
Employee Configuration
Steps to find EmployeeCheckRef
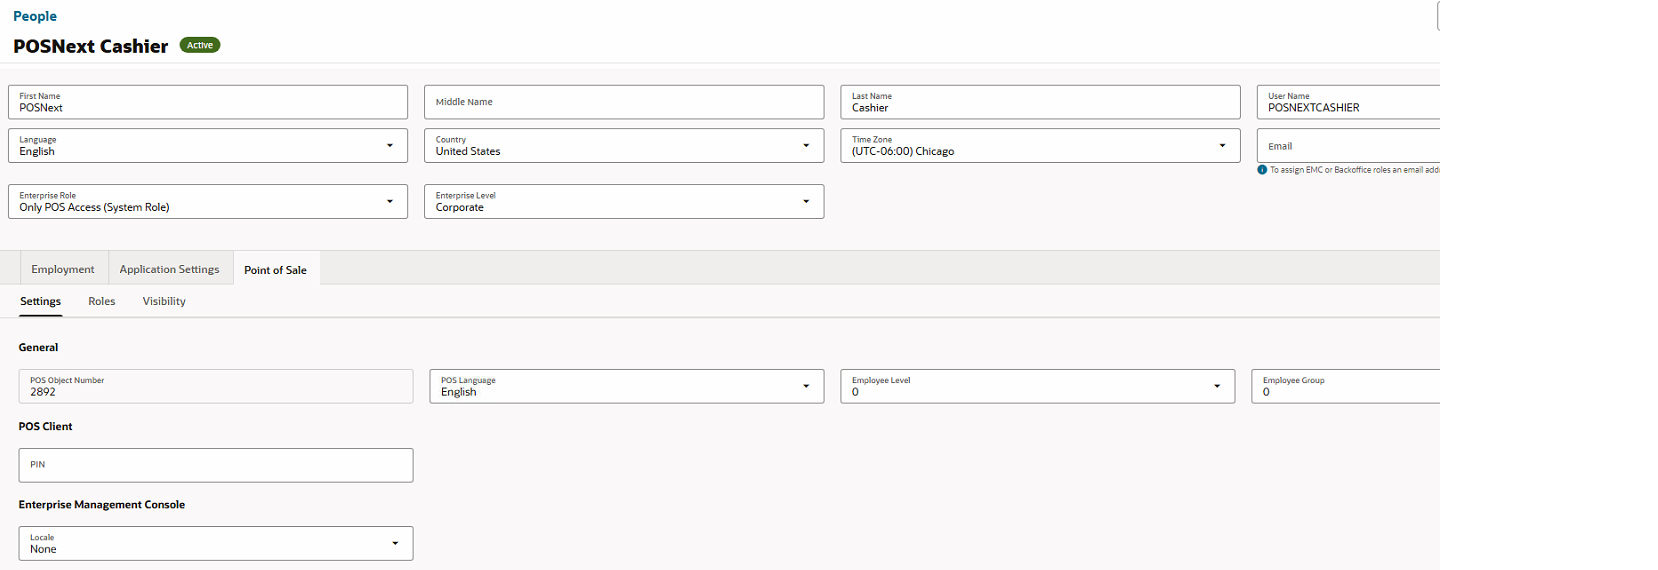
Steps to configure an employee for online ordering:
-
Log in to the Oracle Reporting and Analytics portal for the enterprise.
-
Click the application navigation icon (hamburger menu in the top-left corner).
-
Select People from the side menu.
-
Click Add Person at the top-right corner.
-
Add Employee with System Administrator Enterprise Role and Corporate Enterprise Level.
-
POS Object Number = EmployeeCheckRef
Order Type Configuration
Finding orderTypeReference in EMC
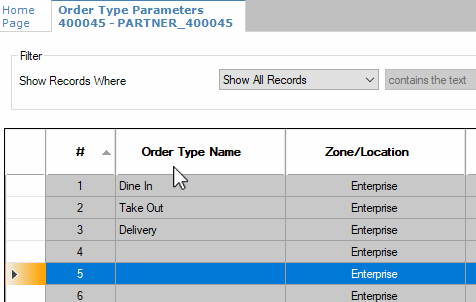
The orderTypeReference value is the Object Number of an Order Type record in Simphony. To find it:
- Go to Enterprise → Setup → Order Type Parameters
- The table view will show all configured order types with their Object Numbers in the # column — that integer is your orderTypeReference
Out of the box, Simphony Essentials comes with two: Dine In and Take Out. Additional types like Drive Thru, Delivery, etc., get added by the Simphony admin.
Configuring a new Order Type (if one you need doesn't exist):
- Go to Enterprise → Descriptors → Order Types and add the name (e.g., "Delivery")
- Then go to Enterprise → Setup → Order Type Parameters to configure its behavior (tax mask, print options, routing, etc.) and mark it Active
- Optionally set it as the default for a specific RVC via RVC → Setup → RVC Parameters → Default Order Type
Discounts Configuration
Creating Open $ Discount in EMC
-
Define the Discount Record.
-
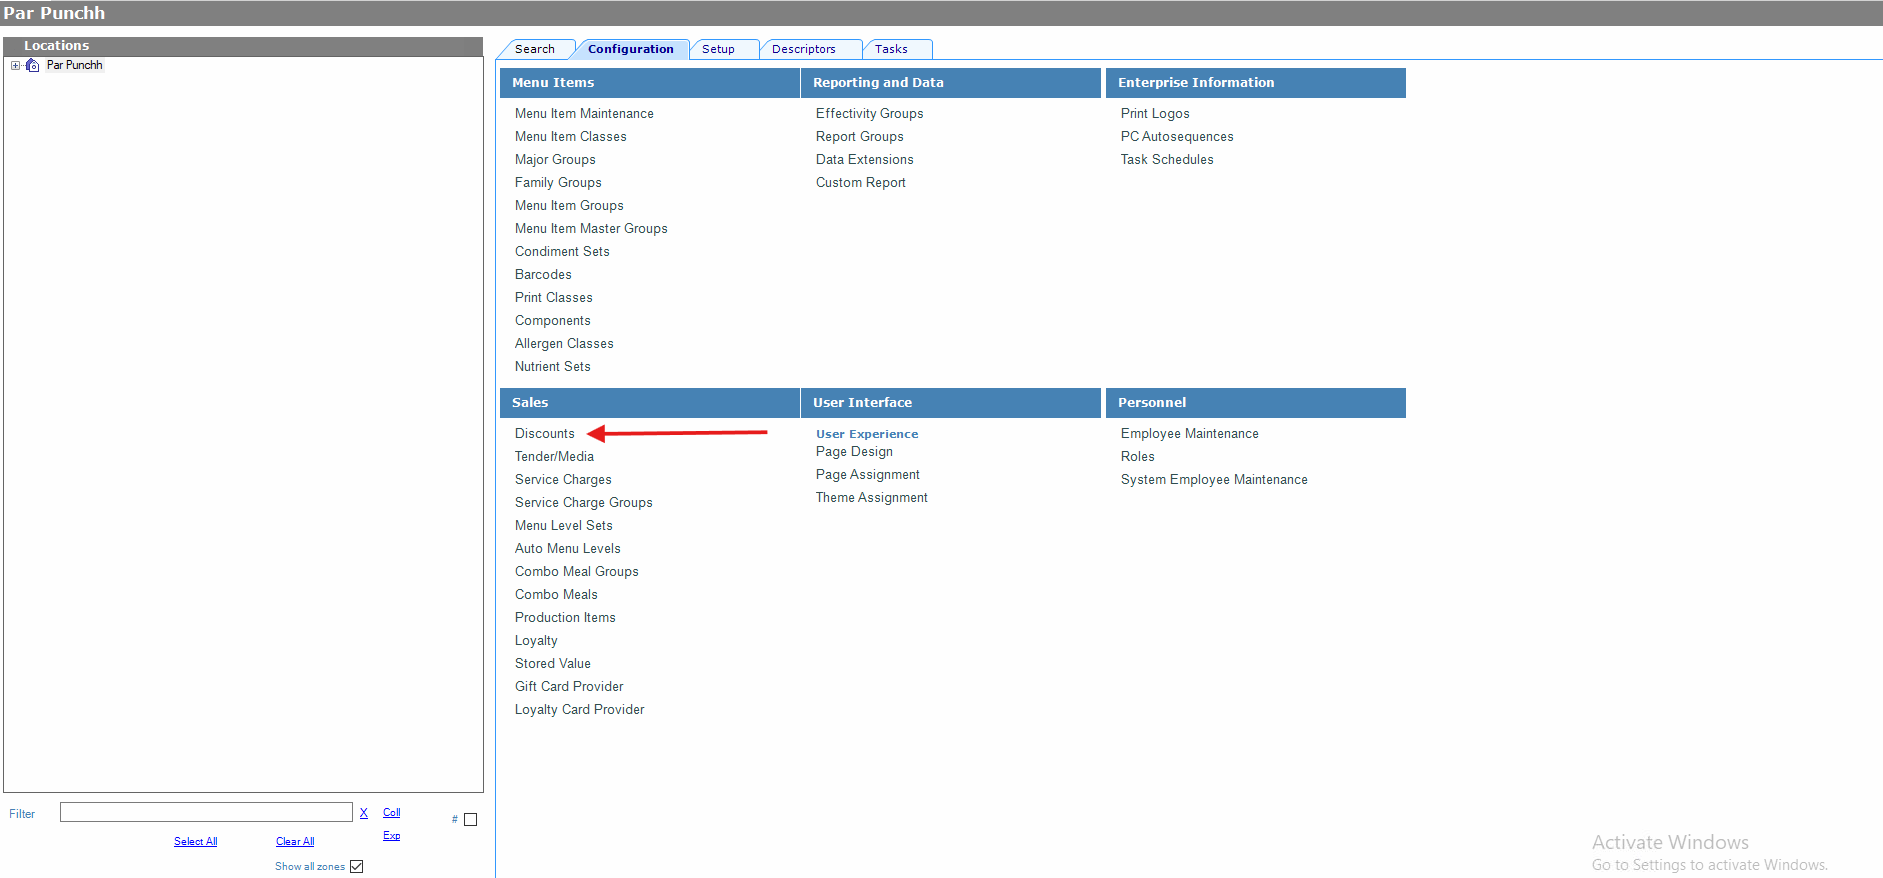
Navigate to Configuration > Sales > Discounts.
-
Click the Insert (+) icon to create a new record.
-
On the General tab, set the following:
- Name: Enter a name (e.g., Open $ Disc).
- Activation Type: Select 0 - Manual.
- Condiment Discountability: Select 0 - Use MI Class Options.
- Max Amount: 0.00
- Enabled: Ensure this box is checked.
-
-
Configure "Open" and "Dollar" Settings.
- In the Options section (still on the General tab), toggle these specific flags:
- Option 1 (Open): Set to ON. (This triggers the POS to ask for a dollar amount).
- Option 2 (Amount): Set to ON. (This defines the input as a Dollar ($) value instead of a percentage).
- Click Save to commit these settings.
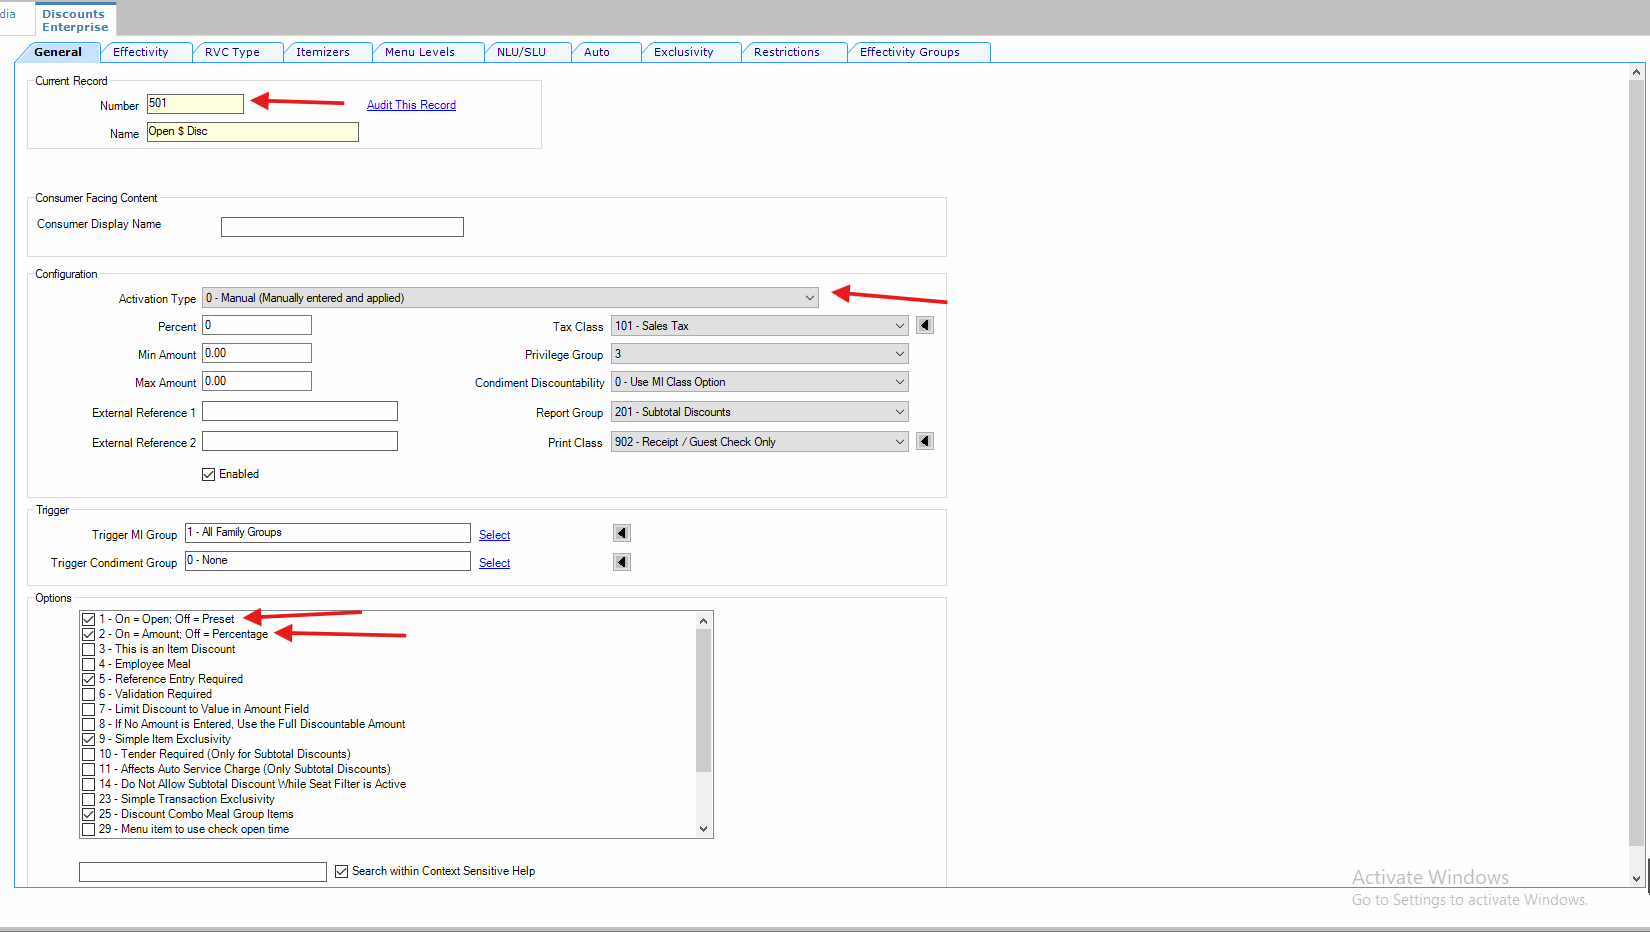
Notes:
- Number 501 is the discount Id in this case.
- Our current integration supports Open $ discounts.
Configuring PAR Ordering Management Center
Navigate to MC > All Stores > Configurations > Store Groups > Store group with integration purpose > Integration > Integration Type
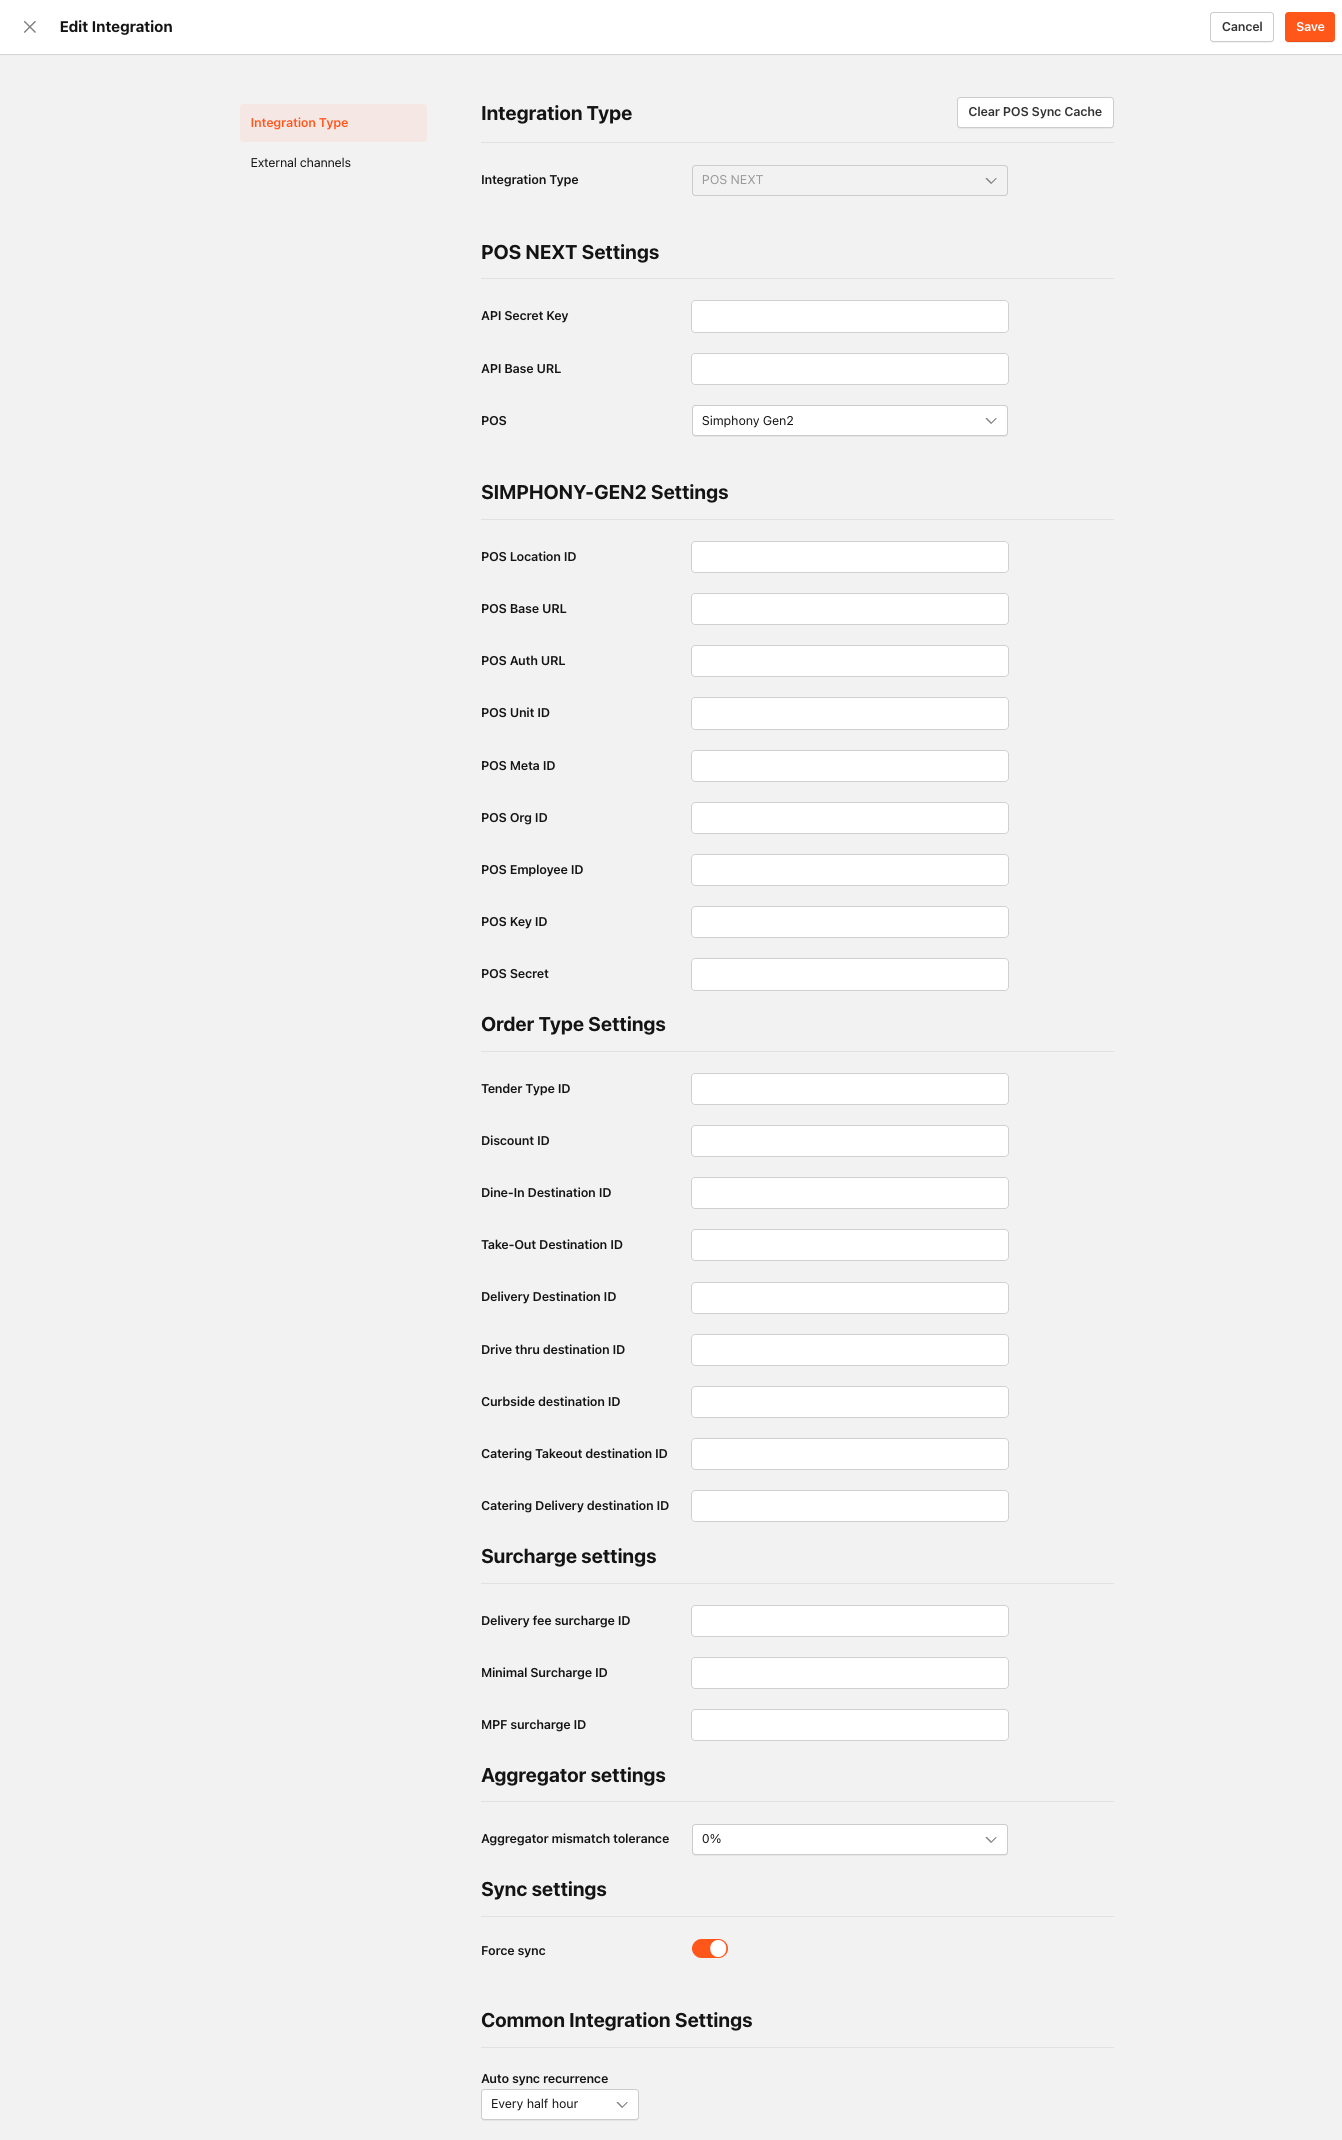
Integration Type
Make sure that POS NEXT is selected in the Integration Type drop-down list.
Clear POS Sync Cache
Click to clear stored POS menu data in Ordering for all locations in this store group. The next sync, whenever it runs, pulls fresh data from the POS. See more Sync Settings below.
POS NEXT Settings
| Field Name | Description |
|---|---|
| API Secret Key | This is the common JWT_KEY that is used to encrypt header values before making any HTTP request to PAR Ordering. |
| API Base URL | This is the endpoint that PAR Ordering uses to forward requests. |
| POS | Make sure that Simphony Gen2 is selected in the drop-down list. |
SIMPHONY-GEN2 Settings
| Field Name | Description | Where To Find Value |
|---|---|---|
| POS Location ID | Simphony Location Reference (LocRef) Example value: LocRef |
EMC > Setup > Enterprise Configuration > Properties Then Choose location config details General > Oracle MICROS Reporting and Analytics > Edit Value: Location Reference 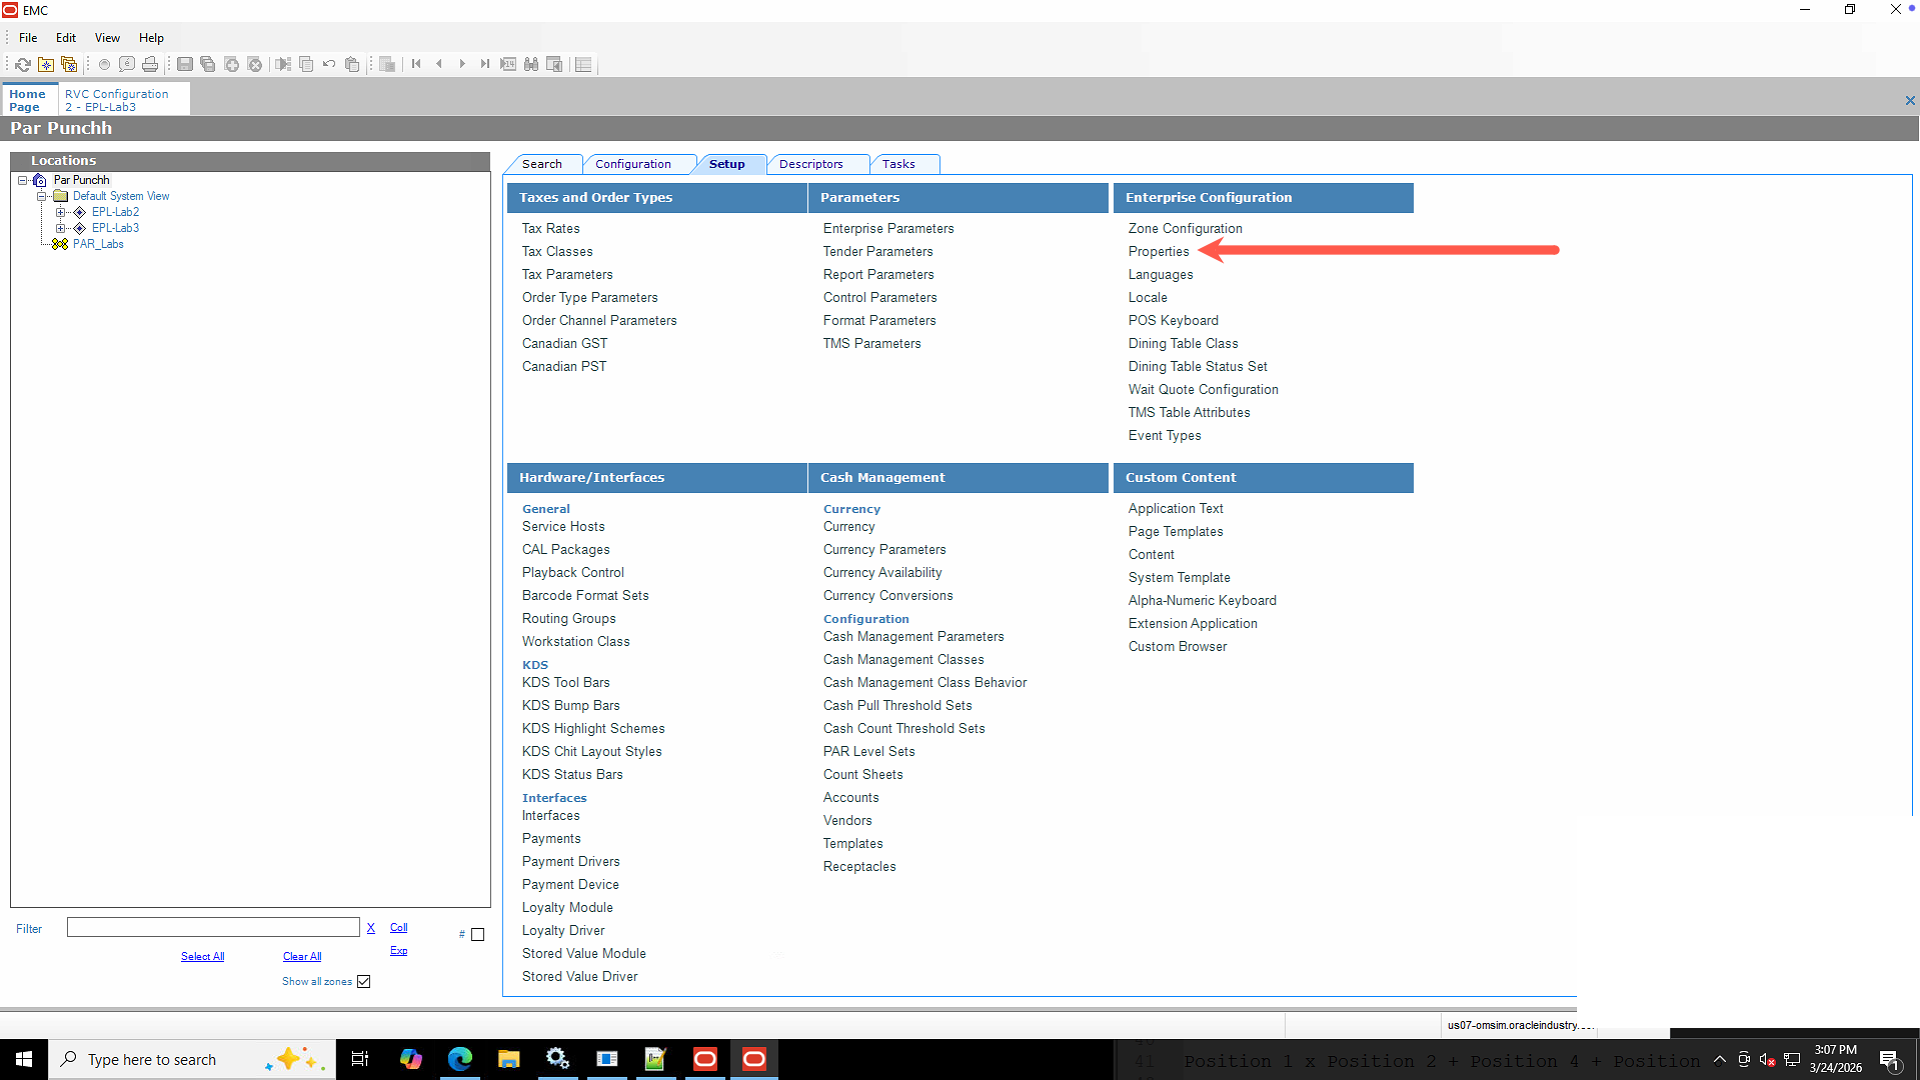 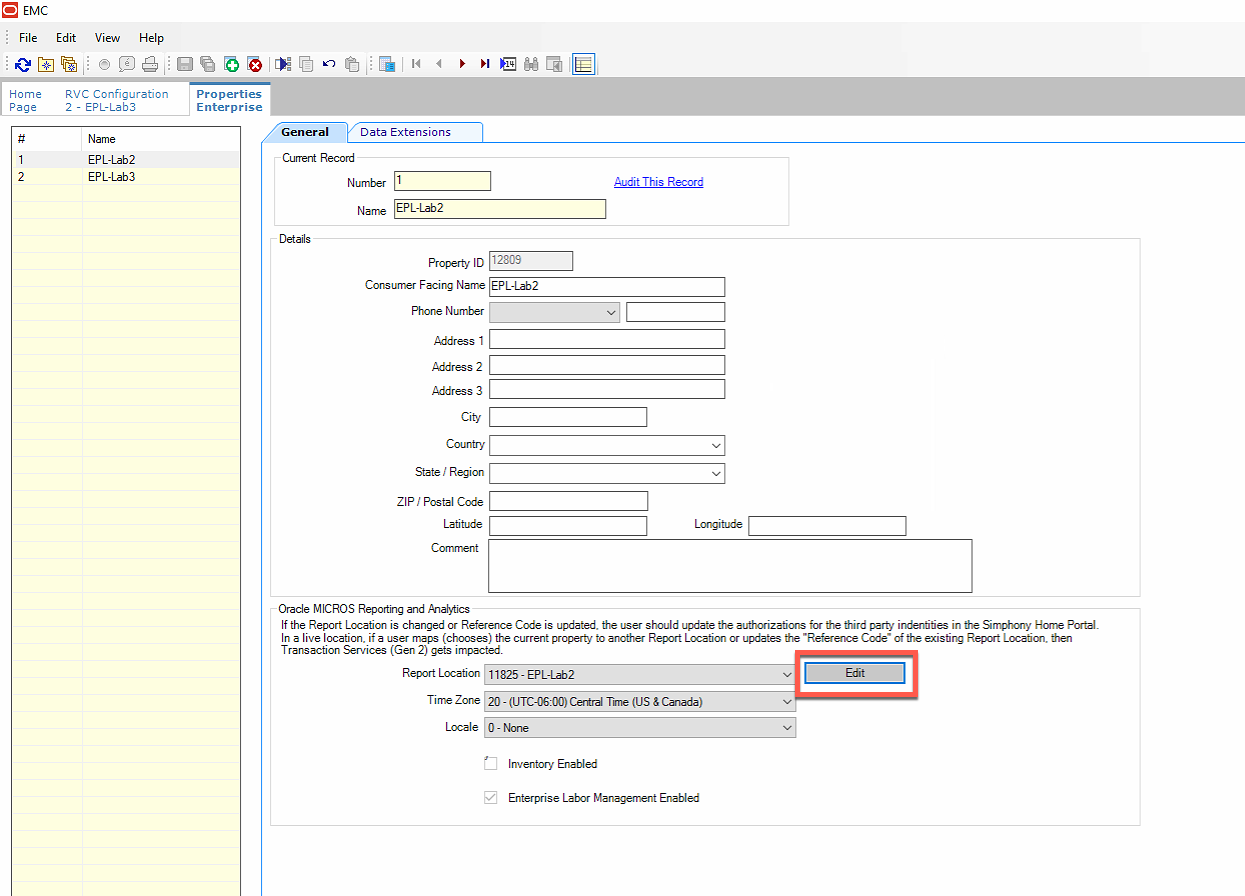 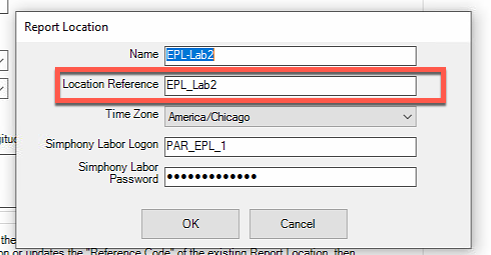
|
| POS Base URL | Base URL for the Simphony STS G2 API endpoint Example value: https://xyz-sts.oraclecloud.com |
EMC > Setup > Enterprise Parameters >Applications Tab> Transaction Services Generation 2 Services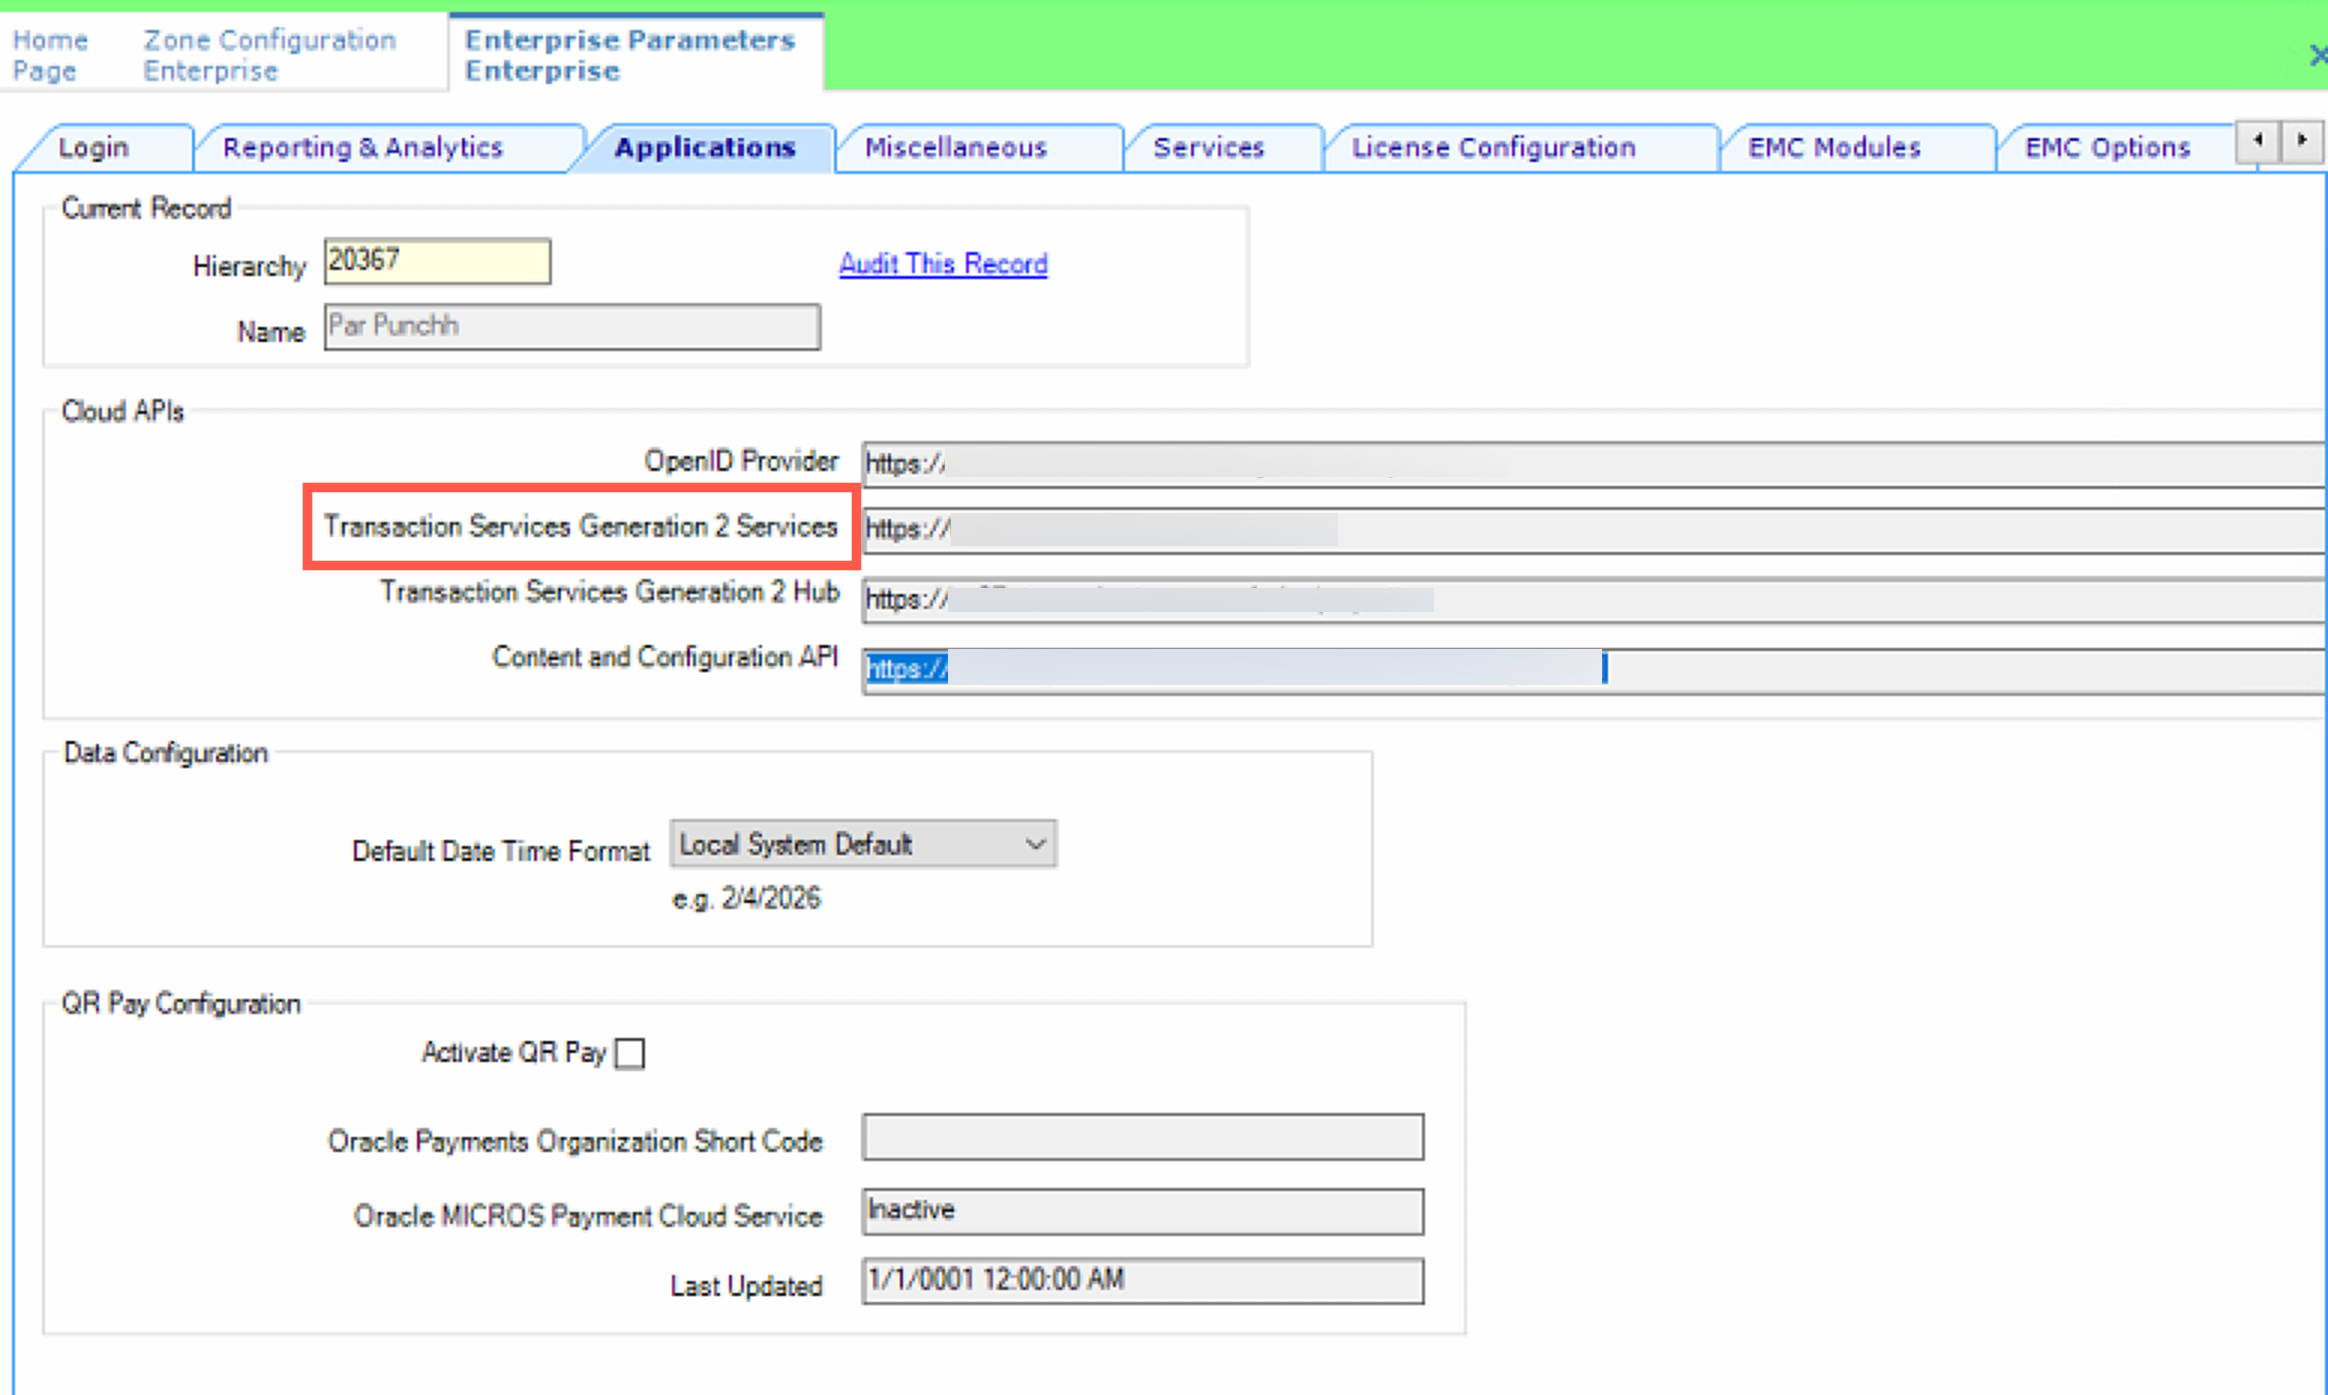
|
| POS Auth URL | Endpoint to generate Auth Token using OAuth Flow Example value: https://your-base-url |
After STS API User is created R&A Portal > Hamburger Menu Administration > System > API Accounts Select Type: Simphony Transaction Services > Search Select Assigned API User Value: Authentication Server 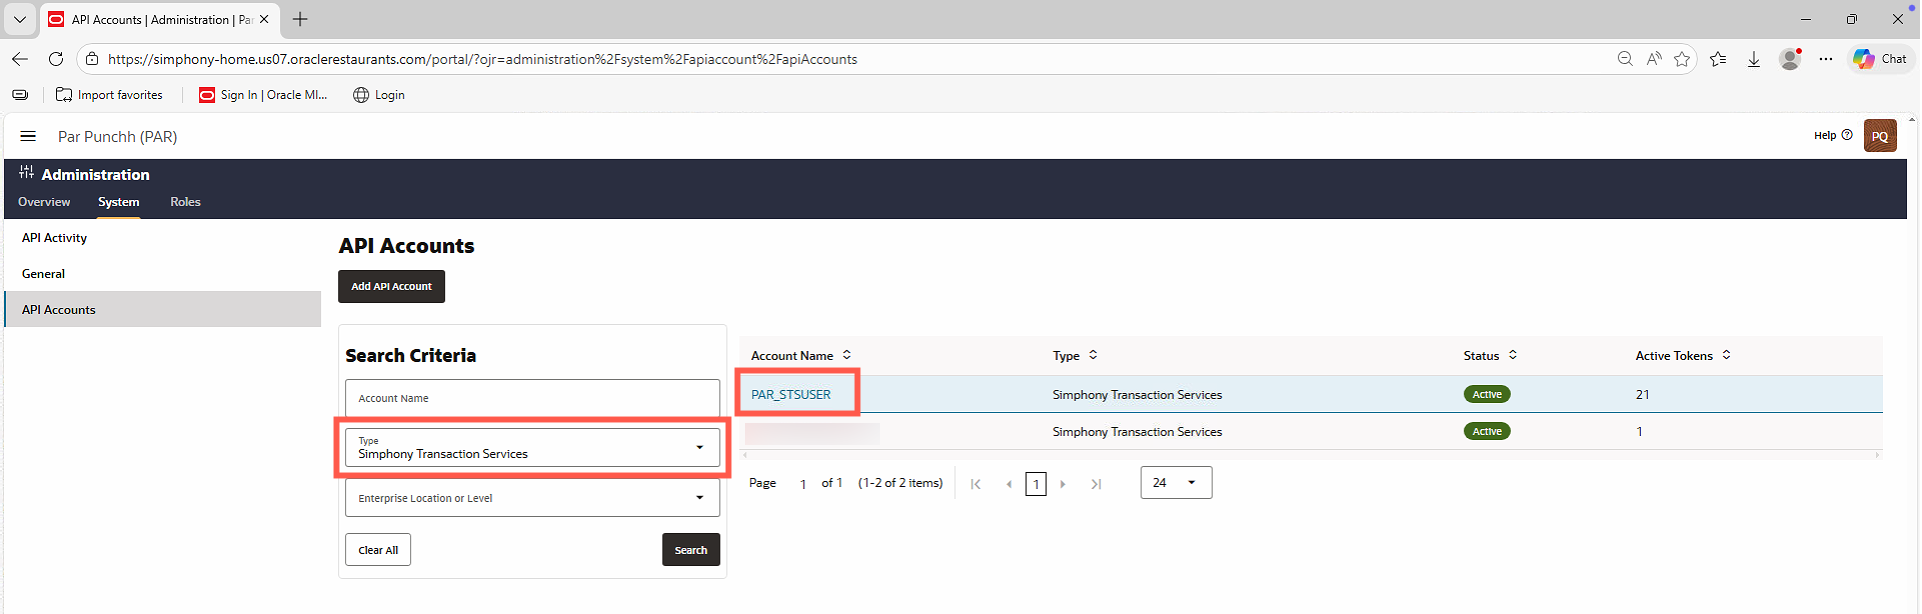 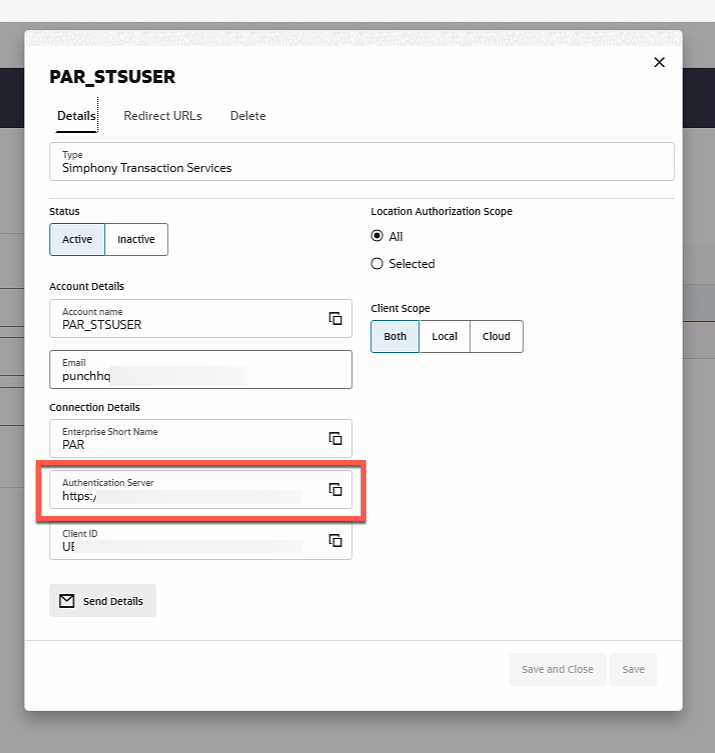
|
| POS Unit ID | Client ID for Simphony OAuth Endpoint Example value: clientId |
After STS API User is created R&A Portal > Hamburger Menu > Administration > System > API Accounts Select Type: Simphony Transaction Services > Search Select Assigned API User Value: Client ID 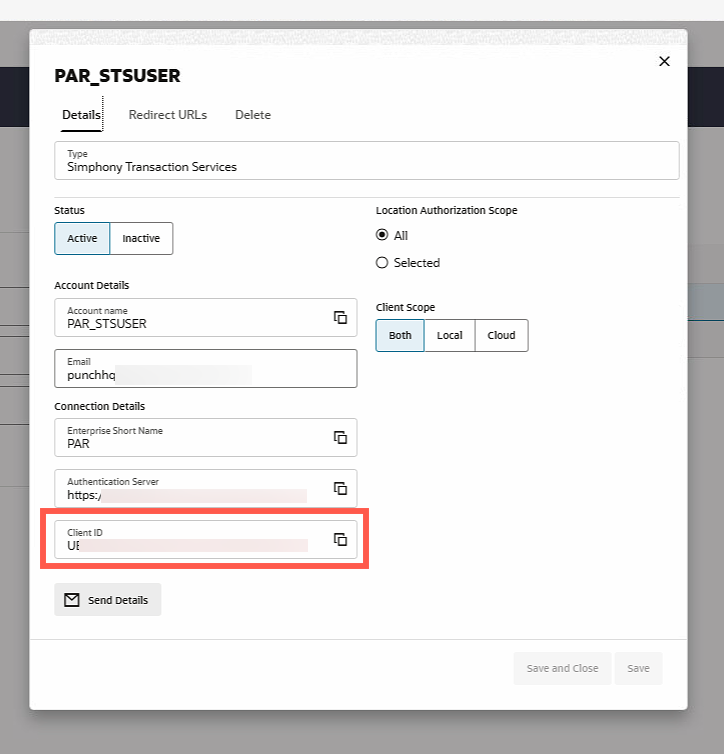
|
| POS Meta ID | Simphony Revenue Center Reference (RvcRef) Example value: revenue-center-id |
EMC > Setup > Property Configuration > RVC Configuration Value: # (Do not use Revenue Center ID value) 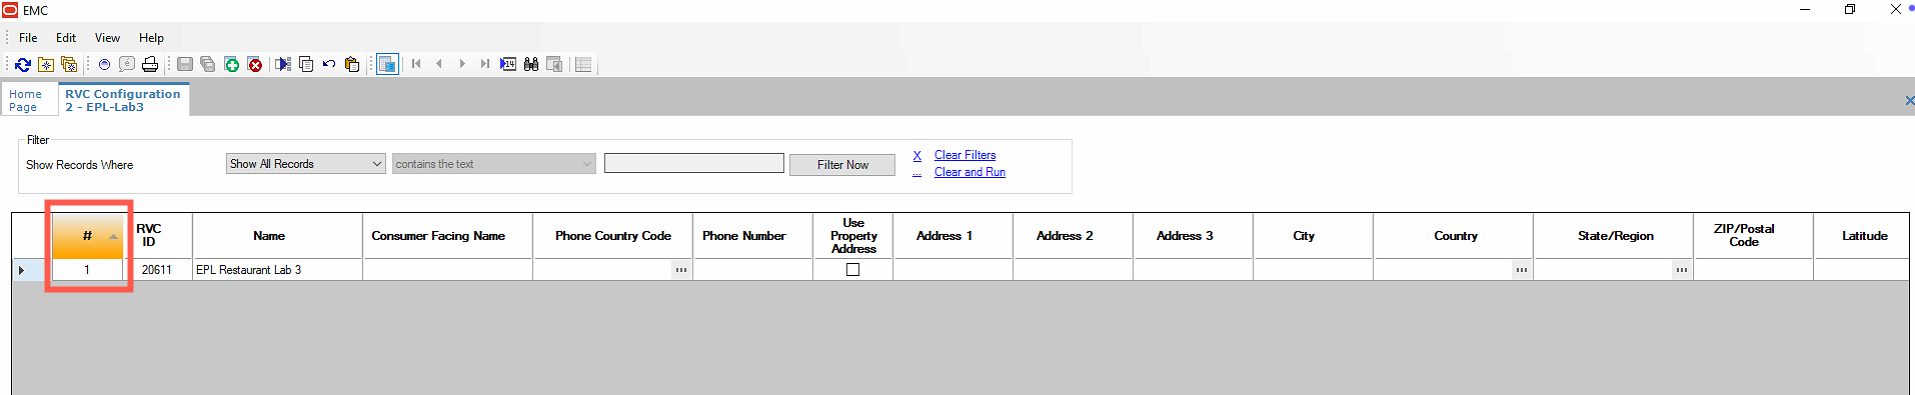
|
| POS Org ID | Simphony Organization Reference (OrgShortName) Example value: OrgShortName |
Short value ID used in all Simphony logins |
| POS Employee ID | EmployeeCheckRef See: Employee Configuration |
R&A Portal > Hamburger Menu > People Select Type: Online Ordering Employee previously set up Point of Sale Tab Value: POS Object Number 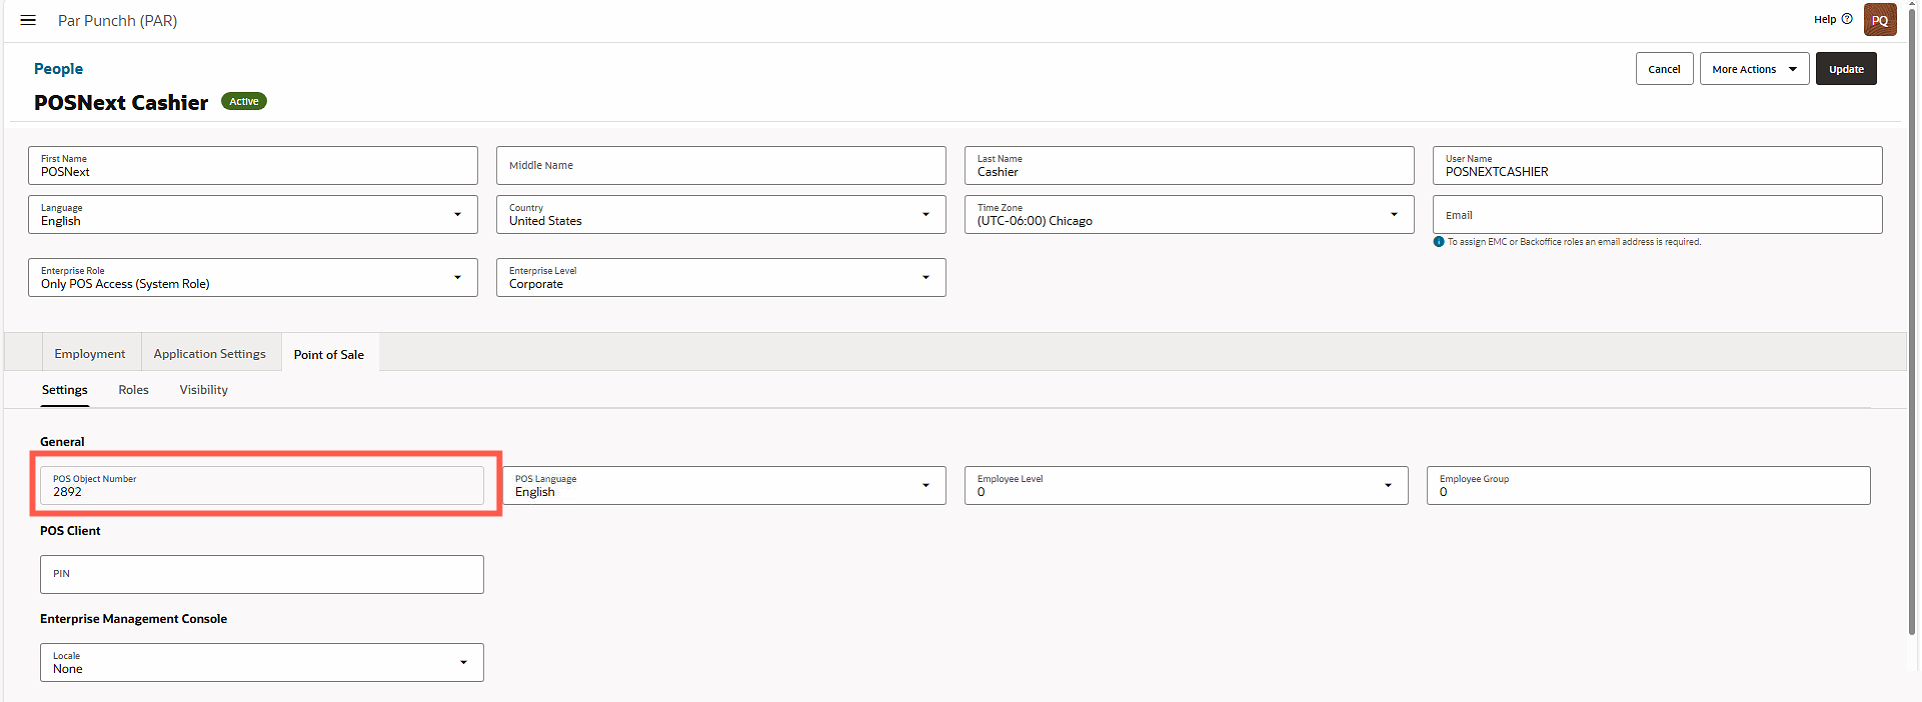
|
| POS Key ID | Username for Simphony OAuth Endpoint Example value: username |
After STS API User is created R&A Portal > Hamburger Menu > Administration > System > API Accounts Select Type: Simphony Transaction Services > Search Select Assigned API User Value: Account Name 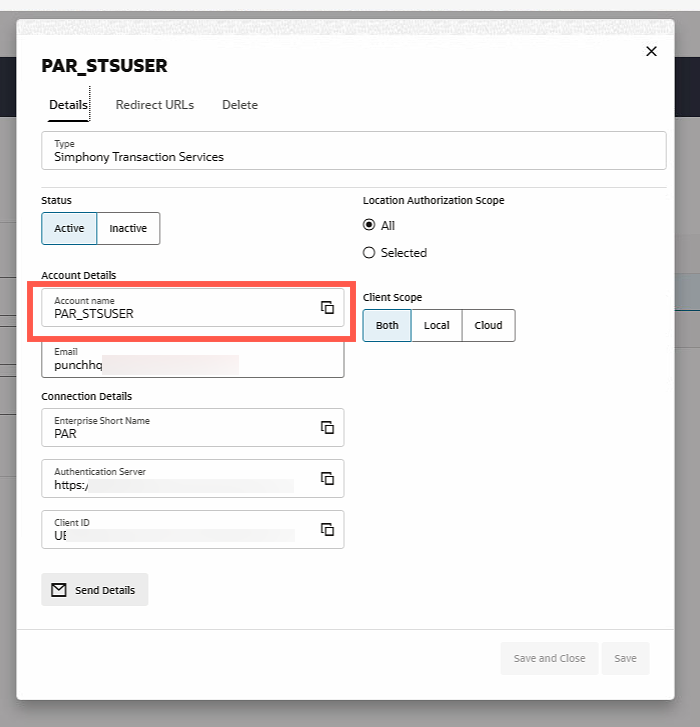
|
| POS Secret | Password for Simphony OAuth Endpoint Example value: password |
Password set for user above |
Order Type Settings
| Field Name | Description | Usage Guidance |
|---|---|---|
| Tender Type ID | tenderId Example value: 101 See: Payment Type Configuration in Simphony (Tender Information) |
It is required for the brand to set up Tender Type ID (Payment ID). This will be used to track down orders from PAR and help in reporting and payment settlement. |
| Discount ID | discountId Example value: 501 See: Discounts Configuration |
PAR Ordering currently supports order-level discounts. The brand should set up a dedicated discount for PAR. |
| Dine-In Destination ID | orderTypeReference See: Order Type Configuration |
This is one of several order types that PAR Ordering supports. The brand may choose to use one or many order types, which can be created in EMC. |
| Take-Out Destination ID | orderTypeReference See: Order Type Configuration |
This is one of several order types that PAR Ordering supports. The brand may choose to use one or many order types, which can be created in EMC. |
| Delivery Destination ID | orderTypeReference See: Order Type Configuration |
This is one of several order types that PAR Ordering supports. The brand may choose to use one or many order types, which can be created in EMC. |
| Drive Thru Destination ID | orderTypeReference See: Order Type Configuration |
This is one of several order types that PAR Ordering supports. The brand may choose to use one or many order types, which can be created in EMC. |
| Curbside Destination ID | orderTypeReference See: Order Type Configuration |
This is one of several order types that PAR Ordering supports. The brand may choose to use one or many order types, which can be created in EMC. |
| Catering Takeout Destination ID | orderTypeReference See: Order Type Configuration |
This is one of several order types that PAR Ordering supports. The brand may choose to use one or many order types, which can be created in EMC. |
| Catering Delivery Destination ID | orderTypeReference See: Order Type Configuration |
This is one of several order types that PAR Ordering supports. The brand may choose to use one or many order types, which can be created in EMC. |
Surcharge Settings
| Field Name | Description |
|---|---|
| Delivery Fee Surcharge ID | See: Surcharge Settings |
| Minimal Surcharge ID | See: Surcharge Settings |
| MPF Surcharge ID | See: Surcharge Settings |
Aggregator Settings
| Field Name | Description |
|---|---|
| Aggregator Mismatch Tolerance | Sets how much a third-party marketplace (DoorDash, Uber, etc.) order total can differ from what the POS expects before it is rejected. For example, 5% on a $20 order means up to a $1 difference is allowed. All orders within the set range go through. If set to 0%, any discrepancy will be rejected. Configurable from 0% to 25% difference. |
Sync Settings
| Field Name | Description |
|---|---|
| Force Sync | When enabled, the Ordering platform will force the POS to send fresh menu data on every sync instead of reusing cached data. |
Common Integration Settings
| Field Name | Description |
|---|---|
| Auto Sync Recurrence | Determines how often the Ordering platform syncs menu data with the POS, across all locations in a store group. Configurable to every 30 mins (default), once per day, once per week, or once per month. |
Setup to Enable Future Orders
Future Orders are enabled at Revenue Center level → Configuration Guide
To enable Begin Future Order:
-
Select the revenue center, click Setup, and then click RVC Parameters.
-
Click the Autofire tab, and then configure the fields as described in the following:
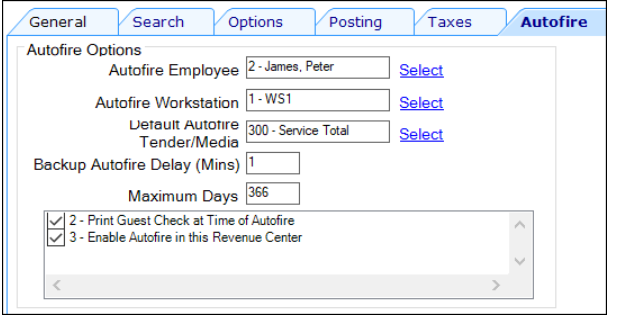
- Autofire Employee → Employee Used for Online Ordering
- Autofire Workstation → Workstation to Fire Order
- Default Autofire Tender/Media → Tender Information
- Backup Autofire Delay (Mins) → Enter the amount of time (in minutes) that the Future Orders workstation must try to fire the orders.
- Maximum Days → Enter the maximum number of days for which workstation operators can schedule orders to fire automatically.
- Print Guest Check at Time of Autofire → Select this option if you want a guest check to print when an order automatically fires to order devices.
- Enable Autofire in this Revenue Center → Select this option to allow the revenue center to create orders that fire automatically.
-
Save Settings.
-
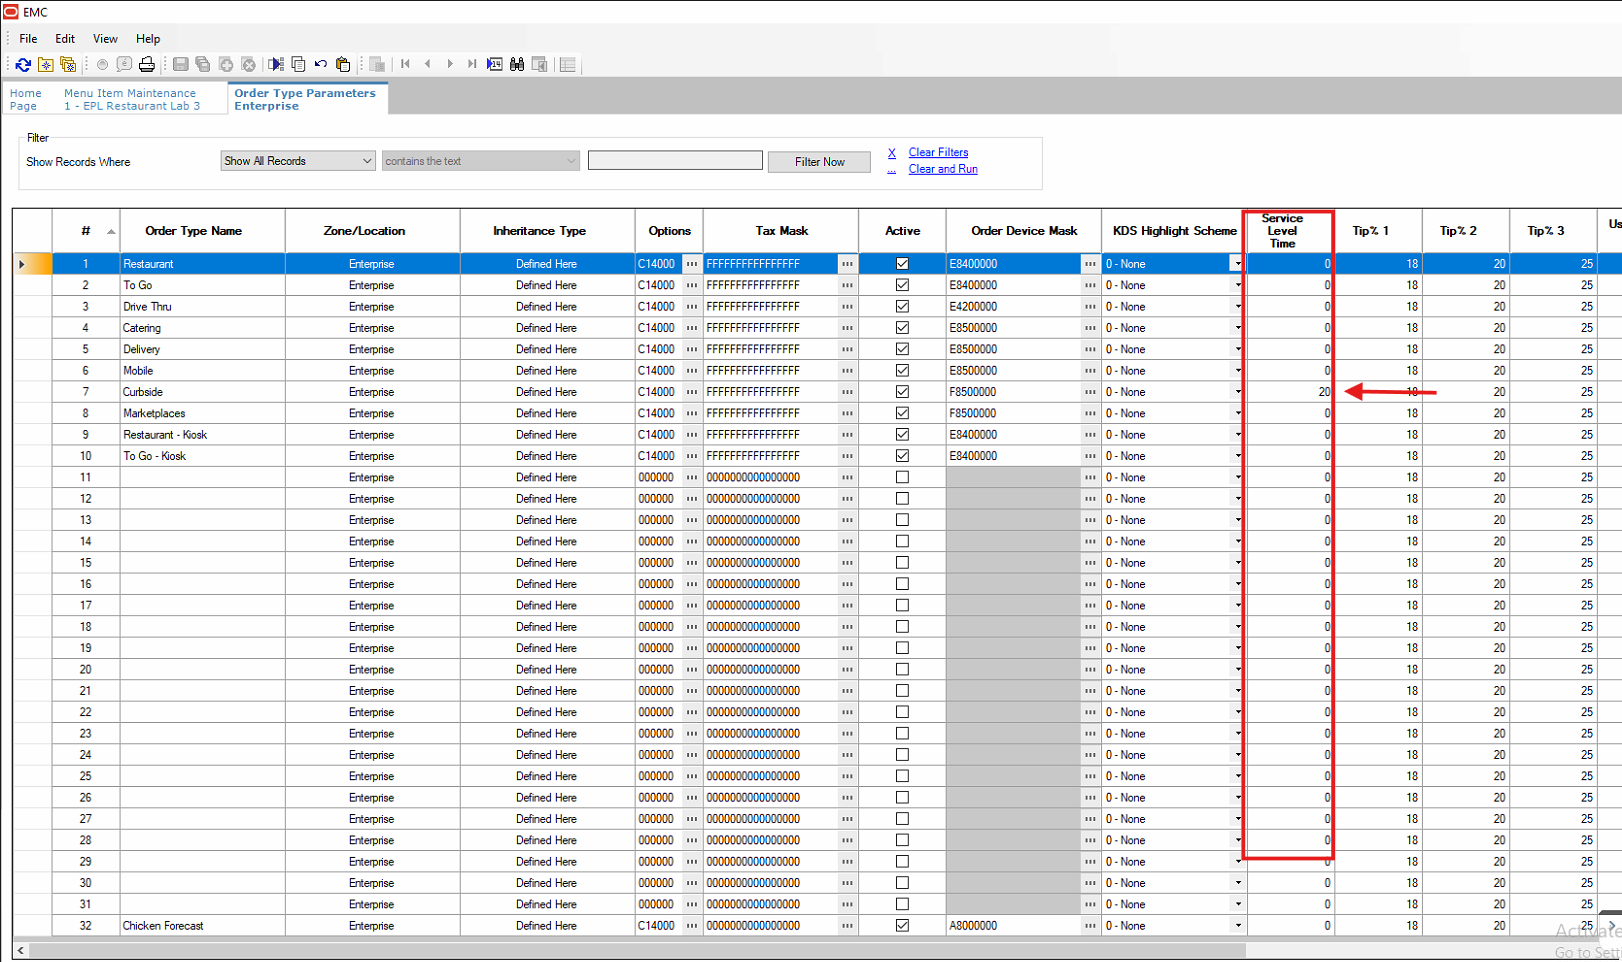
Navigate to Order Type Parameters.
-
Select the Order Type we want to set up Future Order
-
Add the Service Level Time for the Order Type
-
Service level time [Required] → Minimum time required to prepare the order. Value = 1.
-
Future Orders should have pickup_time >= Current Datetime + Service Level Time. Simphony Calculates the Fire Time base on the pickup_time and send the orders to kitchen accordingly.
Troubleshooting and Maintenance
STS API User Password Maintenance in Oracle R&A Portal
The API user password needs to be updated regularly before it expires. Otherwise, you risk system-wide order failures.
Update Password
Please pay special attention to the password reset instructions regarding forced API user password expiration every 45 days.
Reset Expired Password
Reset the API user password.
Oracle forces all STS user passwords to expire after 45 days. At this time, this cannot be changed. An integration can exceed the need to change the password every 45 days by regularly obtaining new tokens under the original authorization session, but when the session terminates for whatever reason, a new API user password will need to be set and the integration configuration will need to be updated with the new password.
When this situation occurs, ALL STS transactions will fail until a new password is reset and the integration uses the new password to obtain a fresh the API token.
To reset an existing API user password:
-
Log out of the Oracle Reporting and Analytics (R&A) portal for the brand.
-
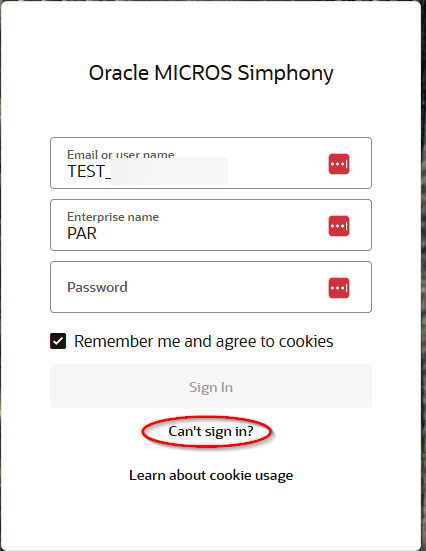
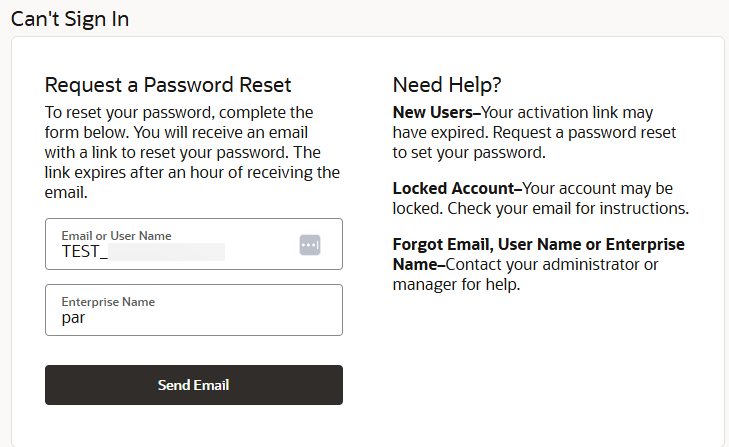
From the R&A login screen, click Can't sign in?
-
Enter the API username and enterprise name
-
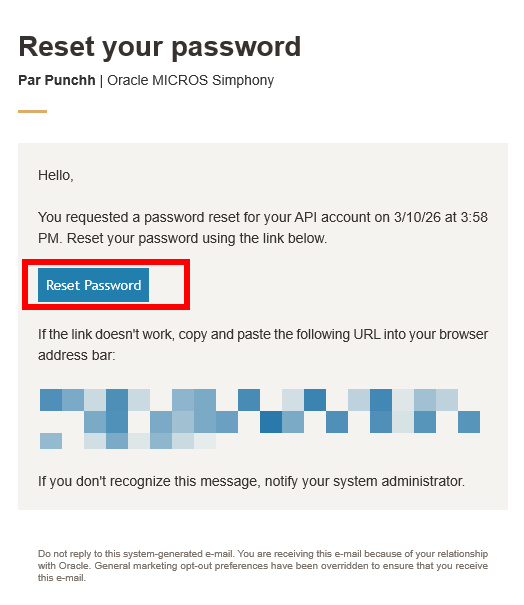
From the assigned email address, complete the password reset.
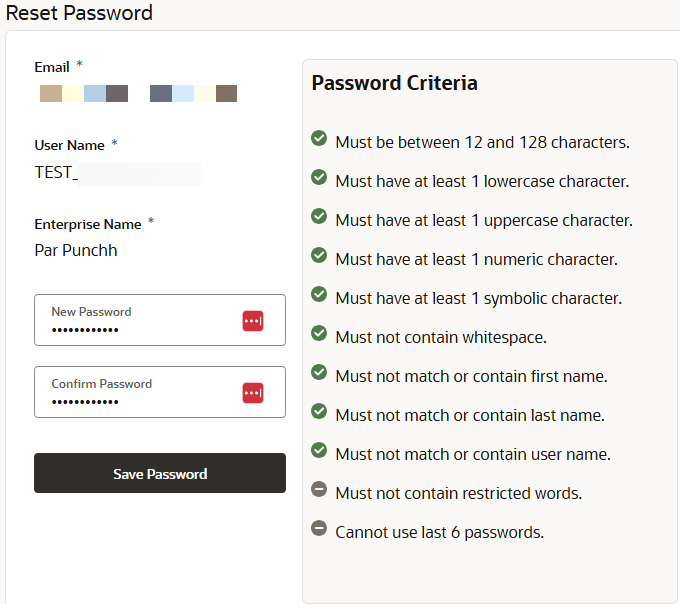
The API User account cannot log into R&A or EMC, so there is no way to confirm the correct password for the account except via STS API calls.
