How to enable/disable Items on PAR Ordering Tablet
| User Role | Chain | Chain Venue |
|---|---|---|
| Brand Manager | ❌ | ✅ |
| Chain Manager | ❌ | ✅ |
| Company Manager | ❌ | ✅ |
| Local Manager | ❌ | ✅ |
The PAR Ordering tablet lets restaurant staff disable menu items directly from the floor — either temporarily for a set period or indefinitely until manually re-enabled. Availability changes made on the tablet can also sync to the POS register in real time, keeping item status consistent across the tablet, POS, and online ordering channels.
This eliminates the need to log into the CMS during rush hours and helps prevent items from being accidentally left disabled.
Key Concepts
- Temporary disabling of menu items for specific periods (1 hour, 4 hours, or until end of day)
- Automatic re-enablement after the selected time period expires
- Indefinite disabling of menu items directly from the tablet (requires a one-time CMS configuration)
- Bidirectional syncing with the POS so that item availability changes made on the tablet are reflected on the POS register in real time, and vice versa
POS availability sync is currently supported for Brink POS integrations only. The item must also have a POS mapping configured for the venue's integration store group.
Temporarily Disable an Item
Items can be temporarily disabled for the following time periods:
- 1 hour
- 4 hours
- Until end of day (based on the venue's local time zone)
When the selected time period expires, the item is automatically re-enabled.
To temporarily disable an item:
-
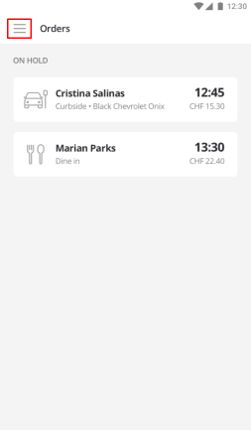
Click on the left navigation menu.
-
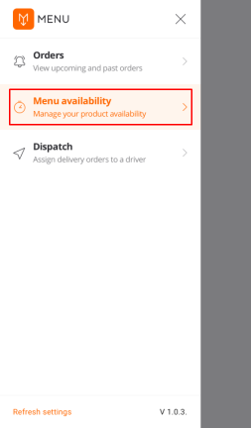
Select Menu Availability.
-
Select Menu in the top navigation bar.
Currently disabled categories, subcategories, and items appear greyed out. The scheduled re-enablement time (in the venue's local time zone) is displayed next to each disabled item. If an item is permanently disabled in the CMS, it displays as Disabled until enabled.
-
Select the item's subcategory.
-
Select the item.
-
Tap TEMPORARY DISABLE.
-
In the Temporary Disable modal, select the period for which you want to disable the item (1h, 4h, or until end of day).
-
Tap Submit.
The item is now temporarily disabled. After the selected time period expires, it is automatically re-enabled.
For this feature to work, the tablet must be running version 1.9.0 or later.
Indefinitely Disable an Item
You can disable an item indefinitely, meaning it stays disabled until you manually re-enable it. This requires a one-time configuration in the CMS before the option appears on the tablet.
Step 1: Enable the Setting in the CMS
-
In the CMS, navigate to your brand.
-
Click Edit Tablet (or Add Tablet if you are configuring a new device).
-
Locate the Allow disabling products indefinitely toggle and set it to Allow.
This toggle is set to Disallow by default for all new tablets. You must set this manually for each device.
Step 2: Disable the Item from the Tablet
Once the CMS setting is enabled, a Disable Indefinitely option becomes available on the tablet.
- Select Venue List in the top navigation bar.
- Select the venue.
- Select Menu in the top navigation bar.
- Select the item's subcategory.
- Select the item.
- Tap DISABLE INDEFINITELY.
The item remains disabled until you manually re-enable it.
How Item Availability Syncs Between the Tablet and POS
Syncing from the Tablet to the POS Register (Tablet → POS)
If your venue uses a Brink POS integration, an Availability on POS switch appears in the Menu Management screen next to each item. Use this switch to mark an item out of stock at the POS register directly from the tablet — no need to walk over to the register.
To mark an item out of stock on the POS:
- On the Menu Management screen, locate the item.
- Flip the Availability on POS switch to off.
The tablet sends the update to the POS and waits for confirmation before showing a result:
- On success: The switch settles to off and a confirmation message reads "POS availability updated." The item is now unavailable on the POS register and on all online ordering channels (app, web, kiosk, and aggregators).
- On failure: The switch reverts to its previous state and a message reads "POS availability could not be updated. Try again or contact support if the problem continues." No change is made on the POS side.
When the item is back in stock, flip the same switch on. The same confirmation flow runs and the POS register can sell the item again once confirmed.
A POS stock-out removes the item from online ordering channels as well, not just the POS register.
Requirements for POS availability sync:
- The venue must use a Brink POS integration with availability sync enabled.
- The item must have a POS mapping configured for the venue's integration store group.
If either requirement is not met, the Availability on POS switch does not appear for that item.
When an Item Is Disabled via the POS (POS → Tablet)
When an item is disabled in the Management Center or on the POS, PAR Ordering reflects that status on the tablet as well. Here is what happens:
- The item is disabled in the Management Center or on the POS.
- A POS sync at the store level occurs (automatically or when triggered manually).
- The PAR Ordering ecosystem picks up that the item is disabled in the POS.
- PAR Ordering updates the item status to reflect that it is disabled by the POS.
- The item now displays as Disabled by POS in the PAR Ordering system.
To re-enable the item:
- Go to the POS and enable the item there.
- Trigger a POS sync.
Once the sync completes, the item returns to an Enabled status in PAR Ordering.
