Reports Setup
Reports Setup is used by the PAR OPS Systems Administrator to organize and maintain reports. Report Organization provides the tools necessary to organize reports for all application users. Report Master is an advanced feature used to rename reports, define filter parameters and customize report data.
This activity is available on the Smart Client ONLY.
Reports Setup has many components and tasks, including:
- Report Master
- Report Organization
- Task Association
- Modify Report Parameters
- Web Enabling a Report
Reports Administration displays several tabs:
- Start: Allows you apply filters for which reports display
- Report Master: Lists all published PAR OPS Reports and allows the Systems Administrator to add reports as well as make modifications to existing reports and report parameters
- Report Organization: Organizes end user reports based on User Login, Sort Order and Smart Groups
- Groups: Provides a flattened view of each report and the Smart Group assigned
- Task Association: Enables an Administrator to associate specific reports with PAR OPS Activities
- Parameter Defaults: Lists parameter settings for reports
Report Master
Click Report Master tab to display all reports available in PAR OPS. This tab allows the Systems Administrator to maintain report configuration settings such as report name, parameter defaults and enabling reports for web viewing.
How Do I Change Settings For The Main Band?
There are many settings you can change for a report in the Main Band.
- Enter or change a report name in the 'DESCRIPTION' column
- Select Report Type to indicate the type of report such as Standard, Pivot, Grid or Tree
- Select the User Type(s) for whom the report is intended
- Unit level reports cannot be run by Multi-Unit or Admin users. Multi-Unit/Admin level reports cannot be run by Unit users. Many reports in the system are copied so there are 2 reports- one for Unit level users, and another for Multi-Unit/Admin users (see Make a Unit Version of an Multi-Unit or Admin Report).
A checkmark displays in the 'CUSTOM' column for all customized reports. This entry defaults based on whether a report is generic or custom.
- No Customization (No check mark)
- Copy Customization: occurs when the customer creates a copy of one of our reports
- Full Customization (Check mark with a yellow background): occurs when the admin creates an empty report registration row and selects the report procedure manually
- If report was created by the PAR OPS development team, the 'CUSTOM' column will not have a checkmark. The checkmark displays once the original report is customized by the Systems Administrator.
- Check Hide in the 'HIDE' column to hide a report
How Do I Add Reports To Report Setup?
Once you have opened Reports Setup, perform the following
- Click Reports Master tab
- Click Add
- Enter Report Name
- Select Report Type
- Select User Type
- Select SP Name
- Click Done
How Do I Make A Unit Version Of A Multi-Unit Or Admin Report?
Often, reports available to Multi-Unit or Admin users would need to be available to unit users. This requires making a unit version of the report.
Once you have opened Reports Setup, perform the following
- Find the MU/Admin version of the report in the list on the Report Master tab
- Filter the SP Name in the 'SP NAME' column to only all reports using the same Stored Procedure
- Ensure you remove any other applied to show all of the reports using that Stored Procedure
- Find a report that has a User Type of Unit from the list of reports using the same Stored Procedure
- Click the row to highlight the Unit version of the report
- Click Actions
- Select Copy
- Rename the copy of the report copy was just made
- Assign the same Report Layout is applied to the MU / Admin version of the report
- Click Done
How Do I Delete Reports From Report Setup?
Once you have opened Reports Setup, perform the following
- Click on the Reports Master tab
- Select the report to delete
- Click Delete
- Click Done
- Deleting a report removes it entirely. Consider using Hide if you only want to deactivate a report.
Report Organization
This activity allows the Systems Administrator to sort, show, hide, and use Smart Groups to organize reports. The folders and sub-folders you set up in the Report Organization tab will show in Filter Reports by Category area of the Reports screen. Report Organization is a tool that allows you to provide structure for the many reports you make available to your users.
How Do I Add A Report To The Report Organization?
To add a report to the Report Organization, perform the following
-
Click Add
-
Select the Report to add the drop down list in the 'REPORT' column
-
Select the User Type for whom the report is intended in the 'USER TYPE' column
-
Select Hide to hide unused reports in the 'HIDE' column
-
Enter the Folder name the report should appear in in the 'FOLDER' column
- You cannot select multiple folders in the 'FOLDER' column. To add a report to multiple folders, create multiple rows, one for each Folder which you want to add the report to (this was done with the Cost and Margin Analysis (MU) report in the example screen).
- If you do not assign a folder, the Filter Reports by Category panel in Reports displays a folder named Empty containing the report.
-
If you want to organize your report into a sub-folder, enter the name in the 'SUB-FOLDER' column
- 'CUSTOM 1', 'CUSTOM 2', and 'CUSTOM 3' columns are available for any additional text comments
-
Click Done
- If the report you need is not listed, verify settings for this report on the Report Master tab.
- After a report is added to Report Organizer, the Report Master will display a check in the 'IN ORGANIZER' column.
How Do I Assign Smart Groups To A Report?
Assigning Smart Groups to a report controls report access to only those with the appropriate permissions. If a Smart Group is not assigned, all users will have access to the report.
- Click the Report Organization tab
- Click "..." to expand the report details to view, add or modify Smart Groups
- This same Smart Group assigned to this report must also be assigned to Logins. Until the Smart Group is assigned in both places, the user will not have access to this report.
- If the Smart Group you need is not listed, create it using the Smart Groups activity.
How Do I Make The Report Button Appear Using Task Association?
An Admin can make specific Reports appear in the Reports button for an activity using Task Association.
To do a Task Association, perform the following
- Click Add
- Select the Activity to associate the report to
- Select the Report to add the Reports button in the Activity
- Click Hide to hide the report from the list under the Reports button
- Click Default to highlight the report in the list under the Reports button in the activity
- Click Send to Printer to automatically send the report to the printer when it is selected from the Reports button in the Activity
- Custom will be checked when you add a report to an activity as this indicates that it was added by an Administrator and not a system default (like the Quick Print option under the Reports button)
- Click Done
How Do I Modify Report Parameter?
Report parameters allows the administrator to default, or even strictly enforce, specific parameter values when a report is run. This is an excellent way to provide very strong guidance to report users and reduce errors for report settings.
Review and Add Parameters
Click "..." to expand the report details to view, add or modify the parameters for this report
Parameter Name is the parameter name recognized by the reporting logic and cannot be changed once it is saved
To add a Parameter name, perform the following
- Click Add
- Enter a unique parameter name starting with the @ character, and containing no spaces or special characters in the 'PARAMETER NAME' column
- Continue modifying the parameters following the steps listed
- Enter a Description in the 'DESCRIPTION' column
- This is the label that displays in list of parameter options after you click the Run Report button)
- Changing the Description for the parameter in the details for this report only changes this report. To make global description changes for a parameter, you would access the Parameter Defaults tab in the Reports Setup activity.
- Select the Parameter Type (this cannot be changed once it is saved) in the 'PARAMETER TYPE' column
- Select the Value Type (this cannot be changed once it is saved) in the 'VALUE TYPE' column
-
Select the Destination(Both, Report, or Server) to determine where the parameter value is sent in the 'DESTINATION' column
Use Both by default until you are certain whether you want to restrict a parameter to only the Server or the Report.
-
- Check the box in the 'SHOW' column to display the parameter settings at the top of reports
- Standard reports only have the Unit, Group, and Date parameters available to display. Other parameters will not show on the report regardless of what is checked in the 'SHOW' column.
Default and Restrict Parameter Values
To set Default and Restrict Parameter Values, perform the following
- Check the box in the ' NULL ALLOWED' column to enable a user to enter no value for a field
- Enter a Min Value in the 'MIN VALUE' column if applicable
- Enter a Max Value in the 'MAX VALUE' column if applicable
- Select options in the 'V ALUE FILTER' column if you want limit the options that would appear in the drop-down list to users when they run the report
- Select the appropriate Apply Default
- Force Default always resets the value for the field to the 'DEFAULT VALUE' or 'DEFAULT TOKEN' columns each time the report is run. It always uses the value entered in the 'DEFAULT VALUE' or 'DEFAULT TOKEN' column no matter what settings were selected the last time the report was run. It does not otherwise restrict any selections.
- Force and Hide hides the selector field when the user runs the report and uses value defined in the 'DEFAULT VALUE' or 'DEFAULT TOKEN' column.
- Integrity Lock has the same function as Force and Hide, but additionally enforces the setting no matter where the report is run from, such as To Dos, from the Reports button in Activities (Task Association), etc.
- This does not limit the user from making selections, but it does default the selection in the field to what is specified in this field.
- Initial Default defaults the value for the field to the 'DEFAULT VALUE' or 'DEFAULT TOKEN' columns until a different value is entered when running the report. When the user changes the value from the initial default, PAR OPS then remembers the most recent setting selected by the user when the report was run.
- Enter a Default Value if appropriate
- The value you enter in this field is applied as a default according to the settings you choose in the 'APPLY DEFAULT' column.
- Enter a Default Token if appropriate
- A Default Token allows you to select a relative value like "Current System Date" or "Previous Period Start" as opposed to an absolute value (07/18/2016). This is commonly used for dates and gives you great flexibility in defaulting reports to values that dynamically change over time.
- The value you enter in this field is applied as a default according to the settings you choose in the 'APPLY DEFAULT' column.
- Enter a Default Token Option if appropriate
- A Default Token Option allows you to adapt the Default Token. A very common example of this is to use the Default Token of Current System Date and to put -1 as the Default Token option to set the default date to yesterday. For the same day last week, you could use Current system date -7.
- Enter a Comment
- This is highly recommended for any default settings you put in reports that you can simply explain in comments versus interpreting settings across several columns (especially when you have a clever Default Token and Default Token Option set up).
- Click Done
Parameter Defaults
The Parameter Defaults tab allows you to select a Parameter Type filter at the top of the form and displays all the reports using that Parameter type and their settings for that report. This is a good tool to see how parameters may be defaulted the same or differently across multiple reports.
How Do I Enable A Report For Web Viewing?
Reports can be enabled for web viewing. This provides the user access to reports from any PC. Using Smart Groups, the systems administrator can define which users have access to web reports.
- Click the checkbox in the 'ENABLED' column to approve the report for publishing to the internet
- Select the Scope from the 'SCOPE' column
- All: the report is available from the PAR OPS Smart Client and the Web
- Client: the report is available from the PAR OPS Smart Client
- Web: available from the Web
The Web Reporting Smart Group must be assigned to the Advanced Permissions named Allow Web-based Reports, plus Logins with permission to view the report via the internet. Depending on which Scope you decided, perform one of the following.
- Attach the Web Reporting Smart Group to the Advanced Permission named Allow Web-based Reports.
- Attach the same Web Reporting Smart Group to the User Login with permission to view web reports.
Combined Reports
Reports can be combined so that one report can reflect the data from two separate built-in reports. Follow the steps below to create a standard combined report.
- Setup the Base Layout
- Save the zipped standard layout to your hard drive
- Extract the layout file and note the location to which it is saved
- Setup the Base Reports
- Select the Report Master tab from Reports Setup
- Identify the reports that will be used in the combined
- Create a copy of each of these reports
- Name them in a manner that identifies them as part of the new report.
- Set the defaults for all parameters in each of the reports
- Set force defaults for as many of the parameters as possible
- Create the Combined Report
- Click Add
- Type the name of your new report in the Description field of the new row
- Confirm Report Type is set to the proper type for the final report layout
- Select the preferred User Type for the report
- Multi-Unit/Admin is recommended initially for ease of running the report for configuration purposes
- Select the Module Type Combined
- Click Done
- Highlight the new report
- Click Actions
- Select Send Custom Layout To the Server
- Navigate to the layout you have saved on your drive
- Remember the file extension must be repx
- Click Done
- Expand details for the new report
- Click in the blank row to generate a drop down list of reports in order to select the first report
- Fill in the parameter label
- Move to the next row
- Select the next report
- Set its parameter name
- Repeat steps 1 through 17 for each report that is to be combined into this report
- You can use the Parameter Sync tab to sync parameters that are the same in each report such as Groups, Units, Date From or Date Thru. (The parameters must be the exact same to sync. Date from and Thru are not the same as From and Through Date.)
- To Test Report
- Click the new report
- Select Test Report in the toolbar
- If the report is set to be a standard report it will open in a blank gray window because a layout is not yet associated with it. At this time you can select Create New Standard Report in the options menu.
- If the report is set to be an excel report, it will open in an excel workbook with the several pages containing data. You can begin to build your custom excel layout on the next blank sheet. Do not use any sheet that already contains data, even if it is just a period. When complete, you will hide the data sheets before publishing.
- Upon closing the new report, you'll be prompted to specify a name for the report layout, which will be stored on the server if a standard report or your local drive if excel and can be used to load as a predefined base layout for reusable, easier configuration.
- Use this blank standard layout as a base for all your reports. It will offer consistency and speed up the process of creating a new report. Download Layout (just go to the Report Layouts section and find the layout that best suits your need).
- An important note in creating and copying from existing reports is understanding which fields can be changed and which cannot. Report Type can be changed, but User Type cannot. User Type cannot be changed because of the parameters associated with the report; Multi-Unit/Admin reports typically require parameters that Unit level reports do not section and find the layout that best suits your need).
How Do I Load Predefined Layouts?
Reports layouts can be loaded from your hard-drive in just a few clicks. This allows you to standardize the base layout and provides a faster method for creating standard reports.
- Save the layout to your drive (be sure to extract the contents of zipped files)
- Open Reports Setup
- Click Report Master tab
- Select the built in report from which you intend to build your custom report
- Click Actions
- Select Copy Report
- Rename the new report
- Click Done
- Highlight the new report
- Click Actions
- Select Send Custom Layout To the Server
- Navigate to the layout you have saved on your drive (reminder: the file extension must be repx)
- Click Done
- Test the report and begin making adjustments
Now you may begin inserting fields and designing the report.
- Don't forget to save the report layout before exiting the designer
- Reports Setup Administration may not be available in all subscription levels.
How do I modify a report layout?
PAR OPS provides the Systems Administrator with the tools necessary to modify a report. The quickest modifications are made using Pivot reports. If advanced customization is needed, our Report Designer feature offers advanced designer tool options.
How do I launch a modified report layout?
Below are the steps on how to launch Modify Report Layout Design
- Select Report Designer from the Menu Folder
- Select Modify Report Layout Design activity
How Do I Manipulate Pivot Reports?
Pivot reports provide the flexibility to quickly regroup or manipulate report data based on your needs. Reporting data is collected/stored offsite and is protected from accidental changes while modifying the layout or design of a report.
- Scroll down and select Reports Setup from the Activity Selector
- Click the Pivot report to modify
For Example: Here we look at the Profit and Loss Multi Unit Flash Report. In this example, we look at the Profit and Loss Multi Unit Flash Report.
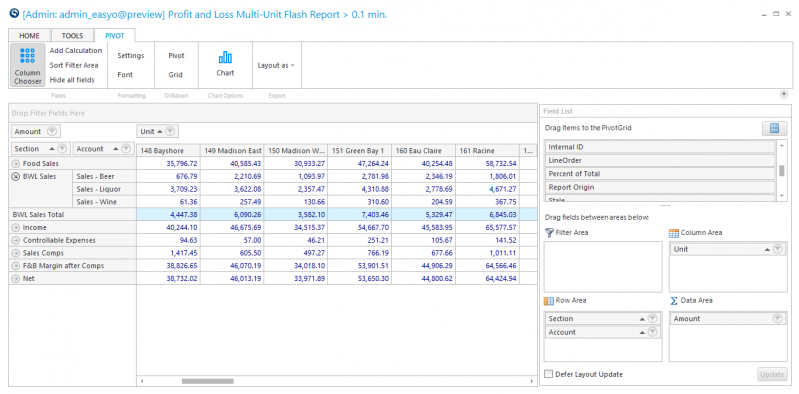
P&L Accounts list on the left and are grouped by Section. Each Account total displays in the report and columns are grouped by Unit.
-
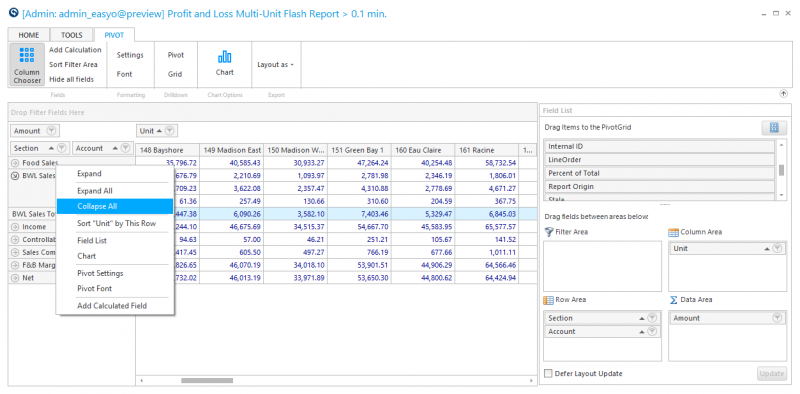
Right click on the left panel
-
Select Collapse All to collapse all Accounts and roll up into sections so the report displays Section totals for each row rather than individual account totals.
-
To add fields to the report, drag a field from the field list to the Data Area, the Column Area, or the Row Area
If the field list is not displayed on your screen, click Column Chooser under the Pivot tab.
For Example: If you dragged the Percent of Total field from the Field list to the Row Area, it would add the Percent of Total after the Amount for each unit
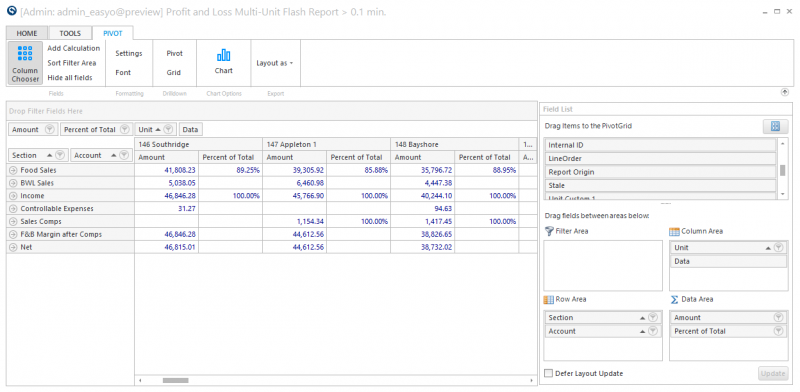
To remove a field from the pivot table, drag it back into the field list.
-
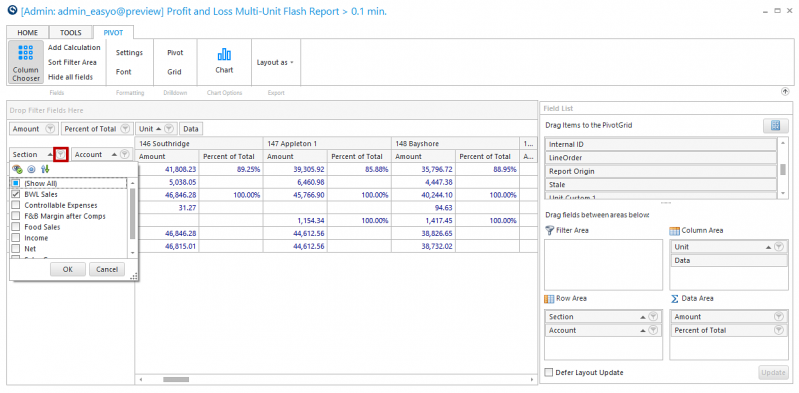
You can filter and sort items in columns just as you would in other PAR OPS activities
- Click the filter icon on the right of a column header to select filters to apply (highlighted in the image)
- Check the items you want to display in the report and uncheck any items you want to filter out of the report
If you have a filter applied to a column, but you drag the column back into the field list, the filter will still apply to the report.
- Click the column header to sort ascending or descending (and arrow displays to indicate sorting)
If you have made changes to the layout of the pivot, standard, or tree report that you do not want to keep, you can restore default layout from the server by clicking Restore under the Tools tab.
Clear Filters removes any column filters that are used on the Grid or Pivot report. Click Clear under the Home tab
How do I save a custom layout on the server?
This feature allows the PAR OPS System Administrator to save a report layout and apply it to a new report.
Once you have opened your report, perform the following.
- Run the report
- Make the necessary modifications
- Click Save under the Tools tab
- Enter the File Name for this report on the server
- Select OK
The file is saved and can be applied to a new report